Application Details
This is the page where you will view all the details of the application.
Sections |
|---|
Details |
Keys |
User Sources |
Application Ip Restriction |
User Ip Restriction |
Browser Restriction |
Groups |
Links |
Logos |
permissions |
Agreements |
Point of Contacts |
Access Restrictions |
The application details section consists of the sections in the table.
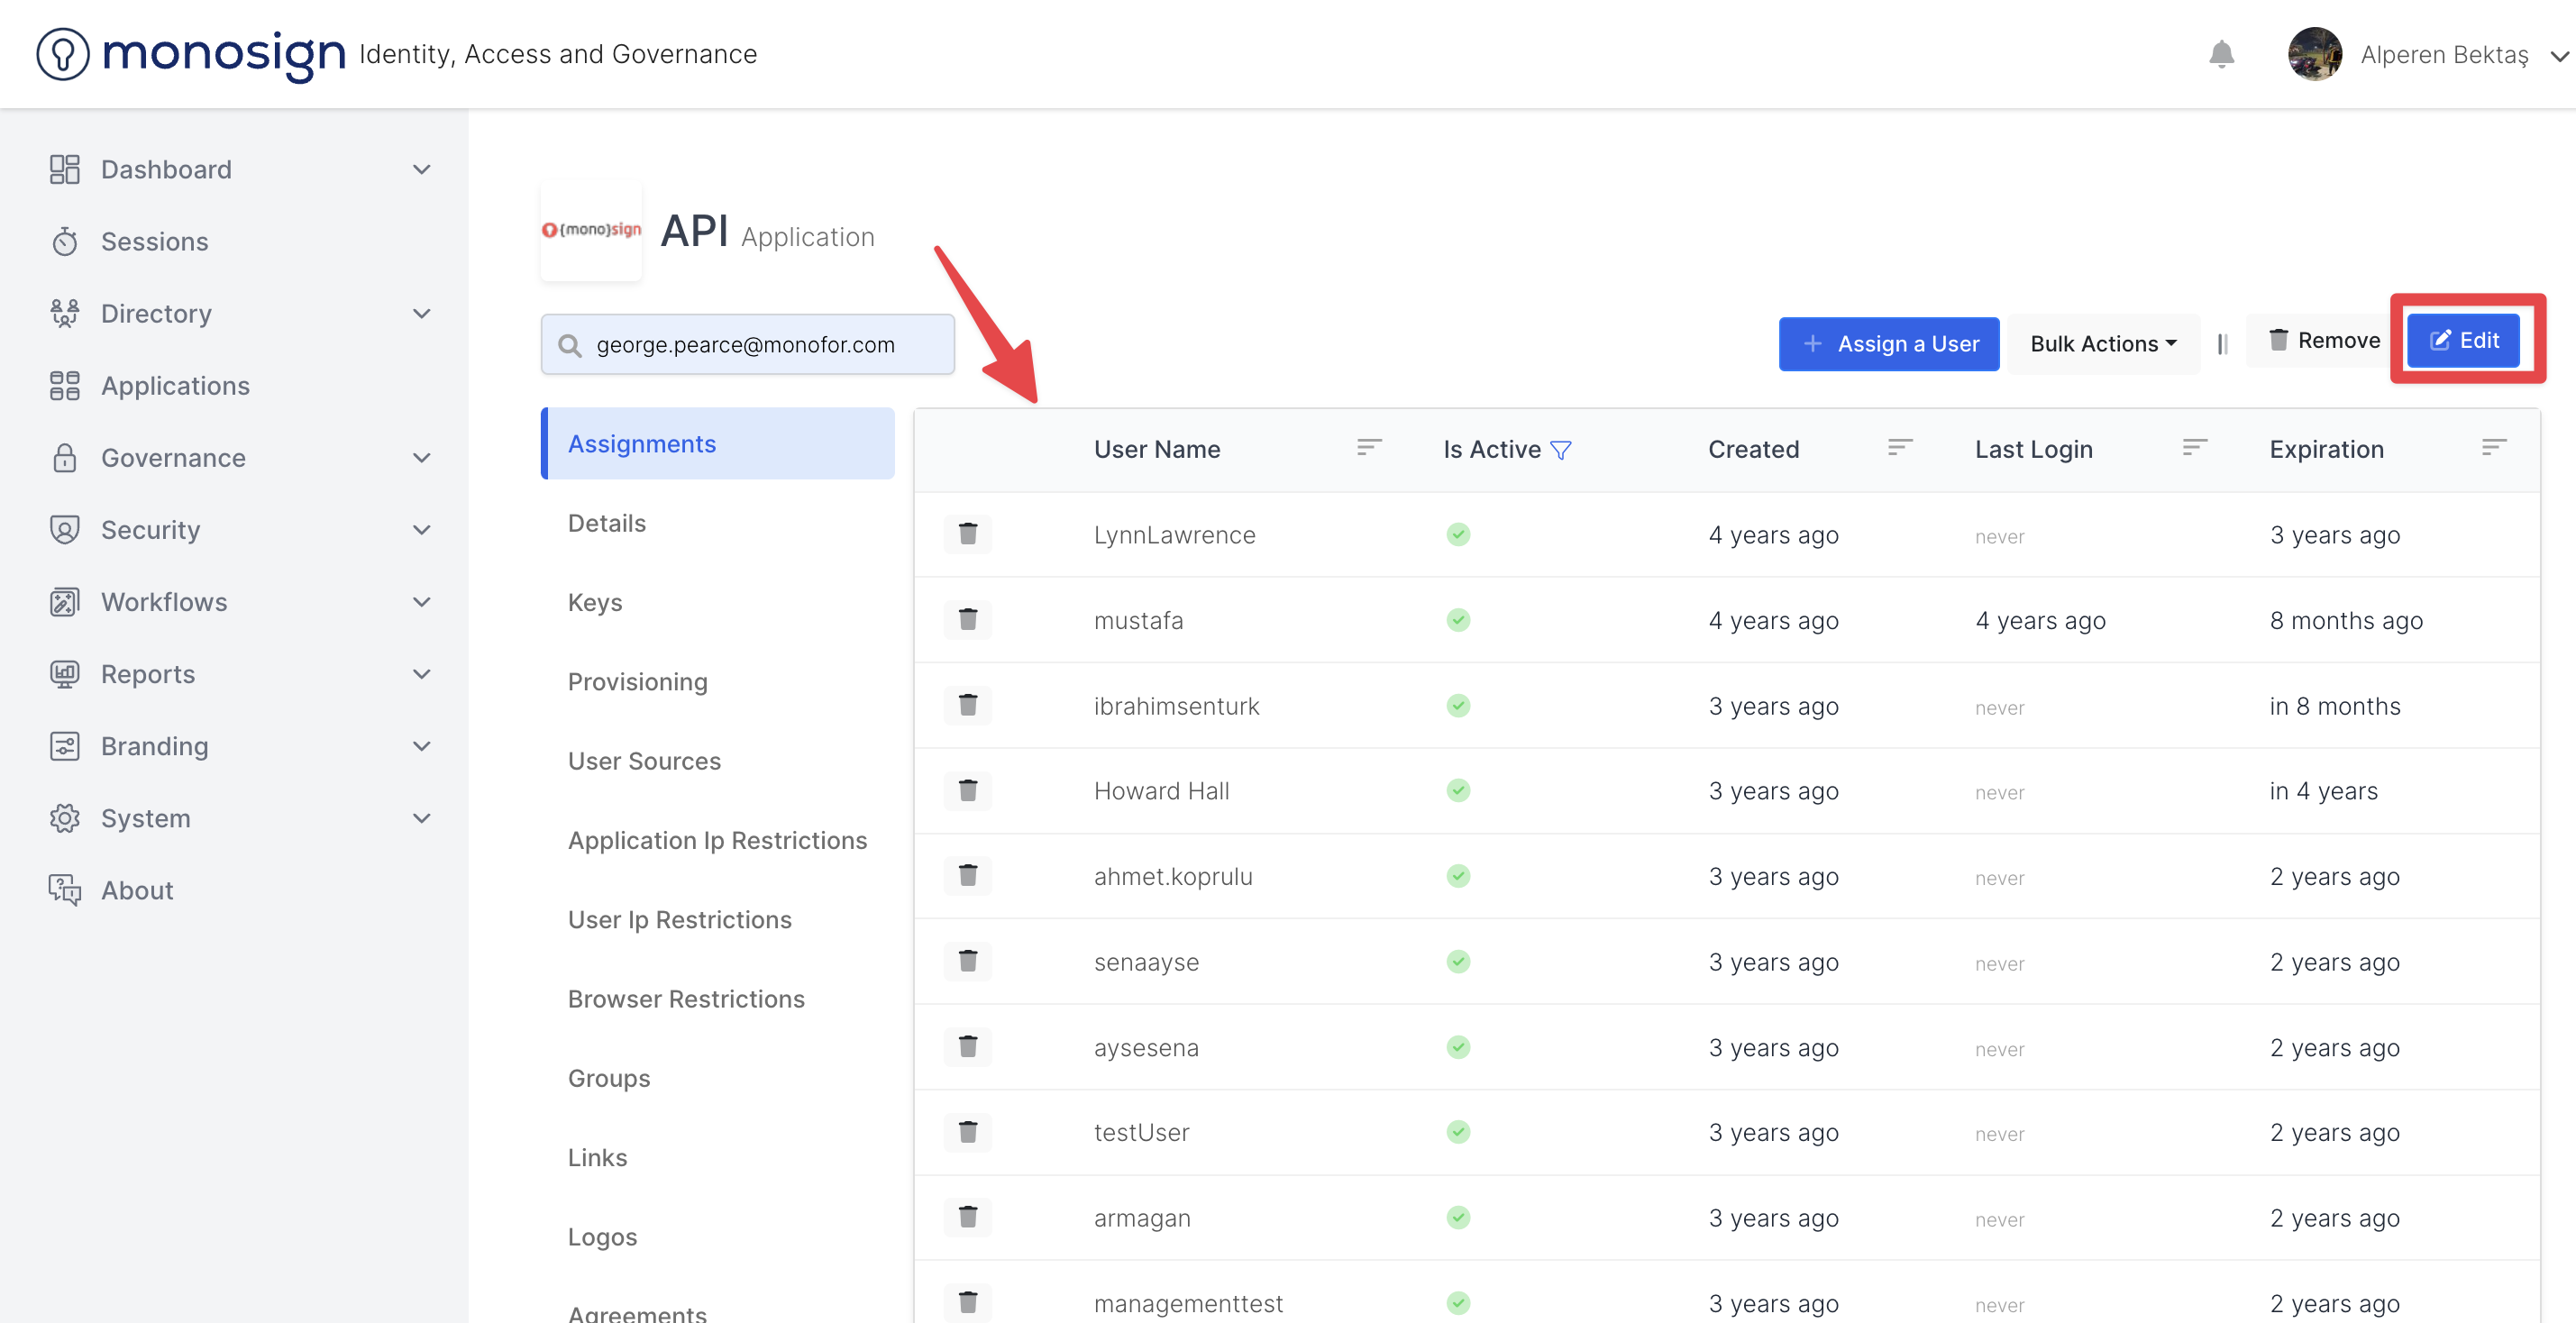
Edit Application
The edit app button takes you directly to a detailed page where you can edit the app. You can access detailed information about the page you want to edit the application, from the edit-application section, which has the same process as the edit operation in the quick actions menu.
Details
It is the page of the application where you can view the application details.
Propertys |
|---|
ApplicationId |
Description |
Name |
Settings |
State |
Title |
Url |
Application IP Restriction Type |
Application Type |
Authenticator Type |
Browser Restriction Type |
Created Date |
Creation Type |
Is Displayable |
Is Master |
Login Callback Url |
Login Form Type |
Login Method |
Login Policy |
Max Creation |
Profile Access Type |
Sort |
Source Using Type |
Timeout |
Two Factor Type |
Type |
User Access Type |
User Group Access Type |
User Ip Restriction Type |
ApplicationId
This is the area of the application where the credential is displayed.
Descriptipn
It is the area where the application's description information is displayed.
Name
It is the area where the name information of the application is displayed.
Setting
It is the area where the settings information of the application is displayed.
State
It is the area where the application's status information is displayed.
Title
This is the area where the application's header information is displayed.
Url - Uniform Source Loader
This is the area of the application where uniform resource locator information is displayed.
Application IP Restriction Type
It is the area where the application's application IP restriction type information is displayed.
ApplicationType
It is the area where the application type / type information is displayed.
AuthenticatorType
This is the area where the validator type / type information of the application is displayed.
Browser Restriction Type
This is the area where the browser restriction type / type information is displayed.
Created Date
This is the area where the application's creation date information is displayed.
CreationType
It is the area where the creation type / type information of the application is displayed.
Is Displayable
It is the area where the application's viewable or not viewable information is displayed. If the green tick icon is visible, you can understand that the application is viewable. If there is a gray space, you can understand that the application cannot be viewed.
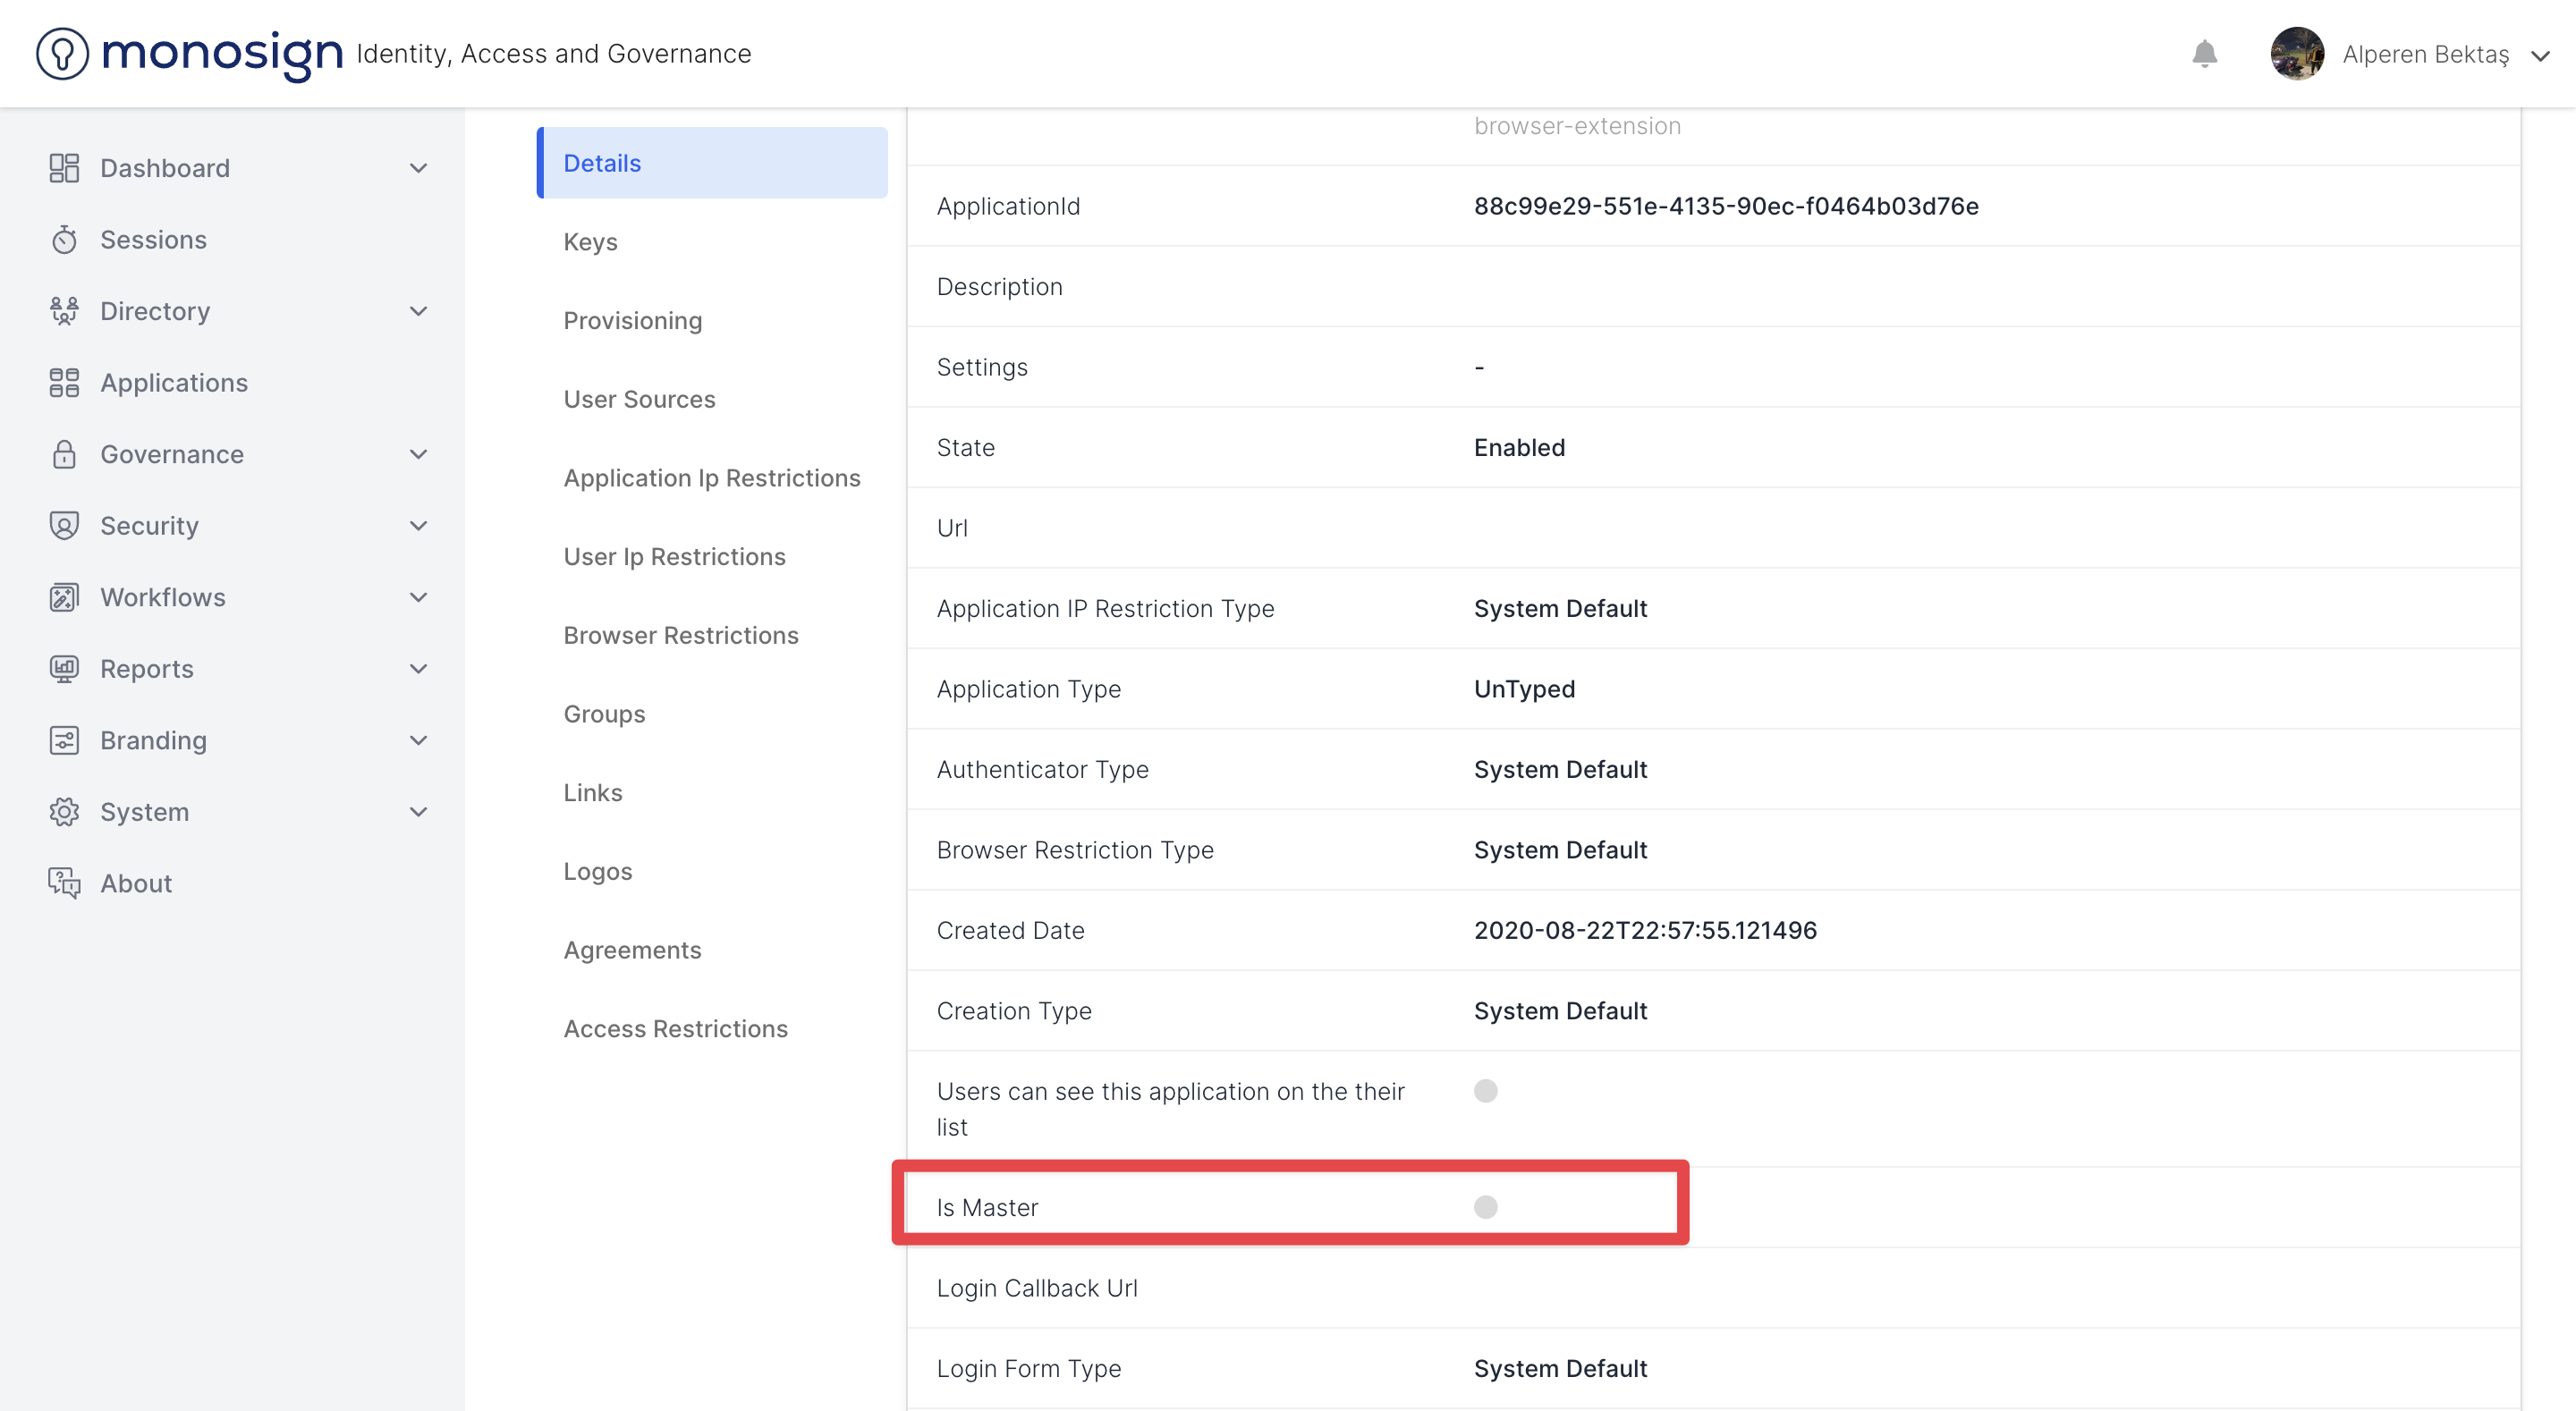
Is Master
This is the area where the application's main application or not main application information is displayed. If the green tick icon is visible, you can understand that the application is the main application. If there is a gray space, you can understand that the application is not the main application.
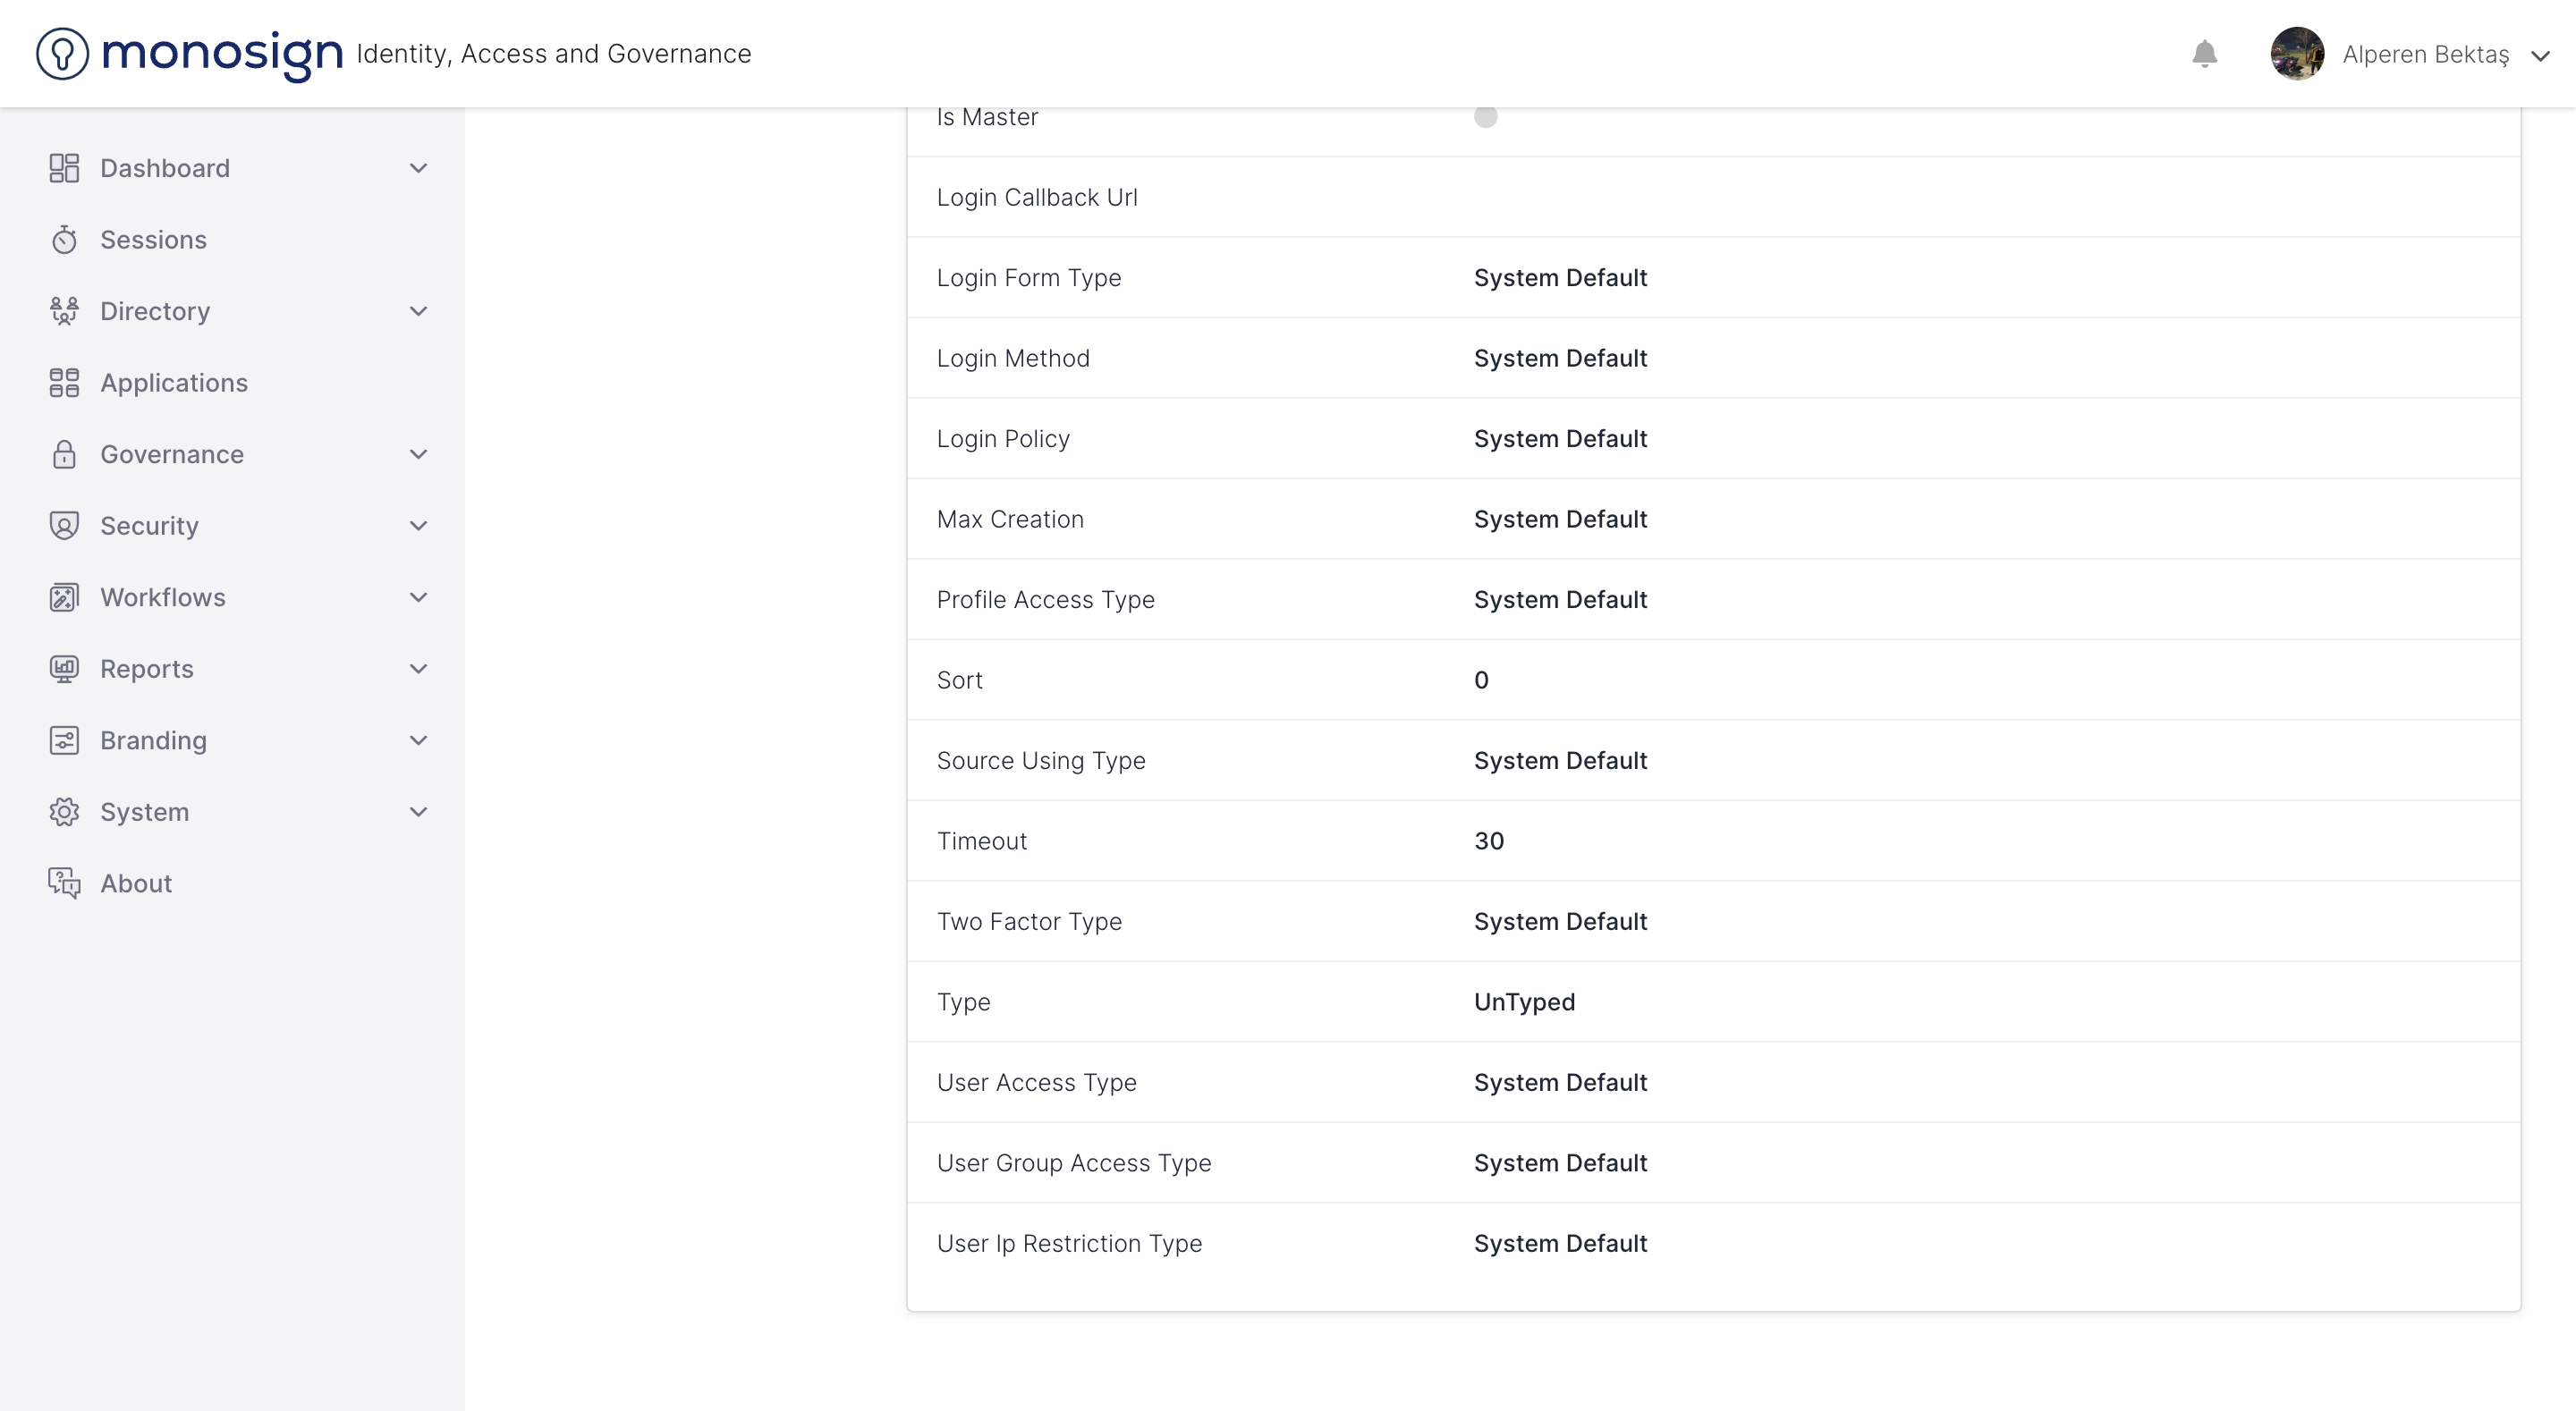
Login Callback Url
This is the area of the application where the application login callback uniform resource locator information is displayed.
Login Callback Url
This is the area of the application where the application login callback uniform resource locator information is displayed.
Login Form Type
It is the area where the application's input form type information is displayed.
Login Method
It is the area where the application's input method information is displayed.
Login Policy
This is the area where the application's login policy information is displayed.
Max Creation
This is the area where the application's maximum session creation information is displayed.
Profile Access Type
It is the area where the profile access type / type information of the application is displayed.
Shorts
It is the area where the application's queue information is displayed.
Source Using Type
This is the area where the application's resource usage type / type information is displayed.
Timeout
This is the area where the application's timeout information is displayed in minutes.
Two-Factor Type
This is the area where the two-factor type / type information of the application is displayed.
Type
It is the area where the application type / type information is displayed.
User Access Type
It is the area where the user access type / type information of the application is displayed.
User Group Access Type
This is the area where the user group access type / type information of the application is displayed.
User IP Restriction Type
It is the area where the user IP restriction type / type information is displayed.
Keys
This is the page of the application where you can view the keys information.
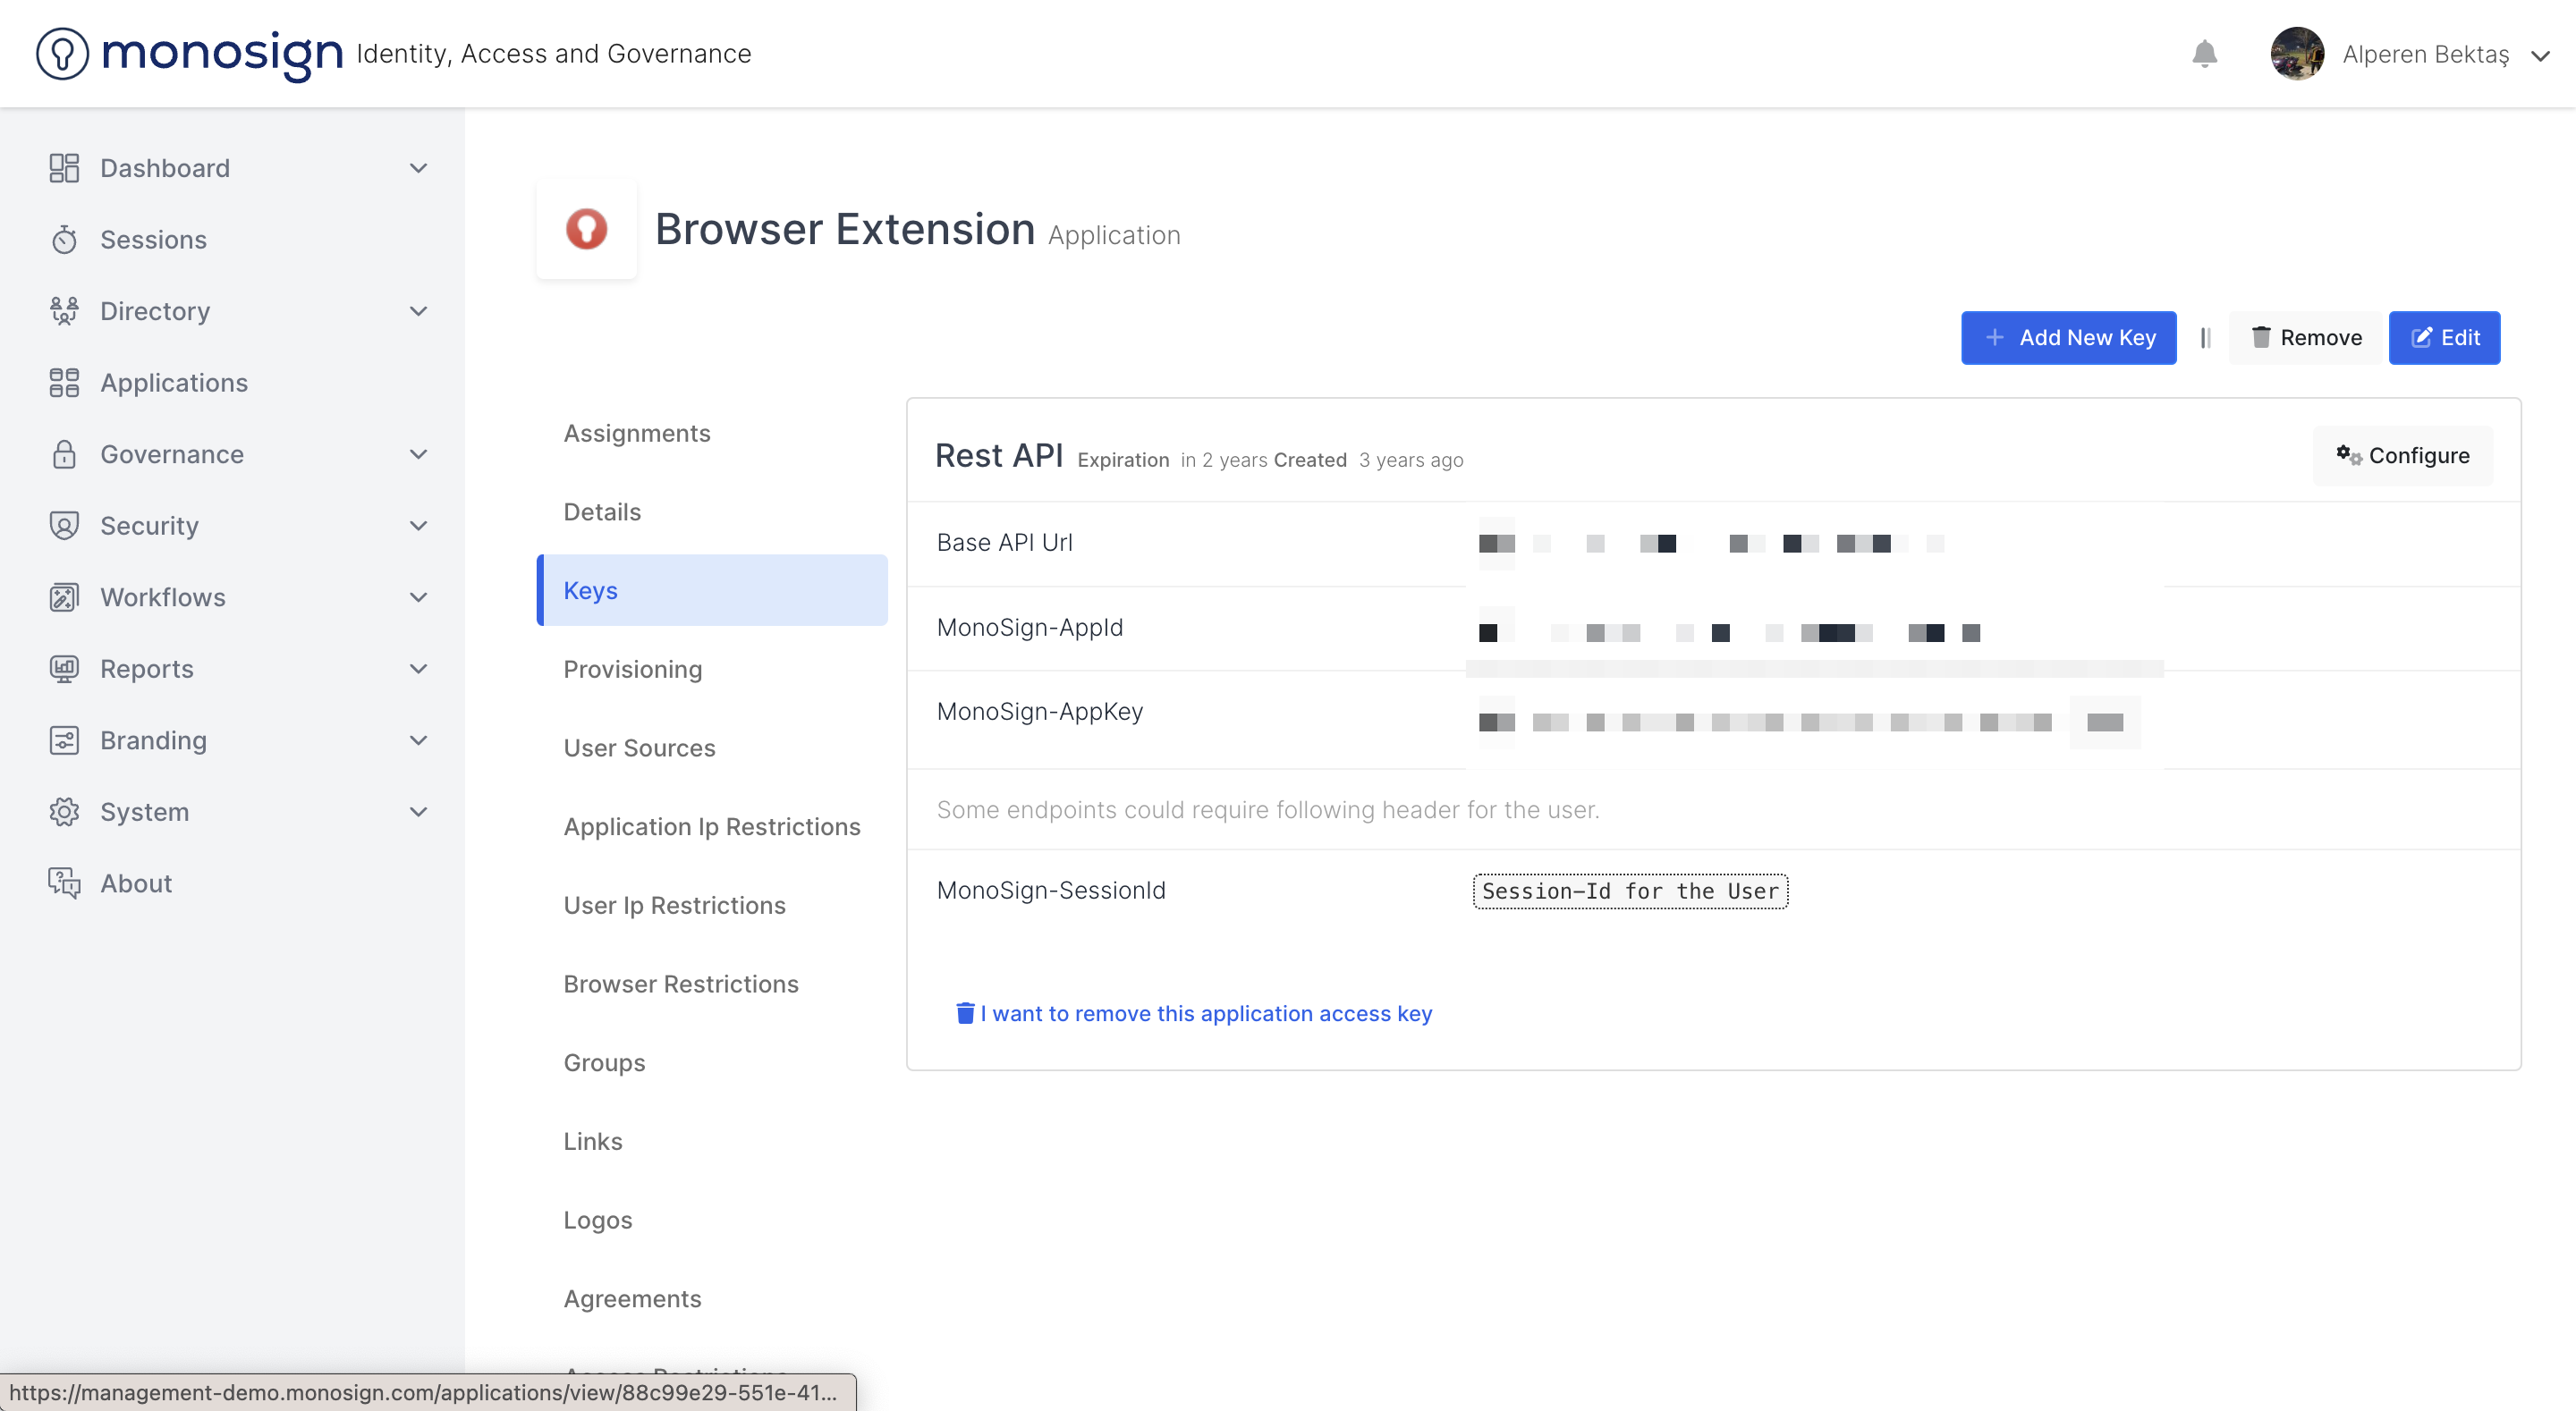
In the Keys area, you can view the keys defined on the application. Key options may vary depending on the location and activities the system is running.
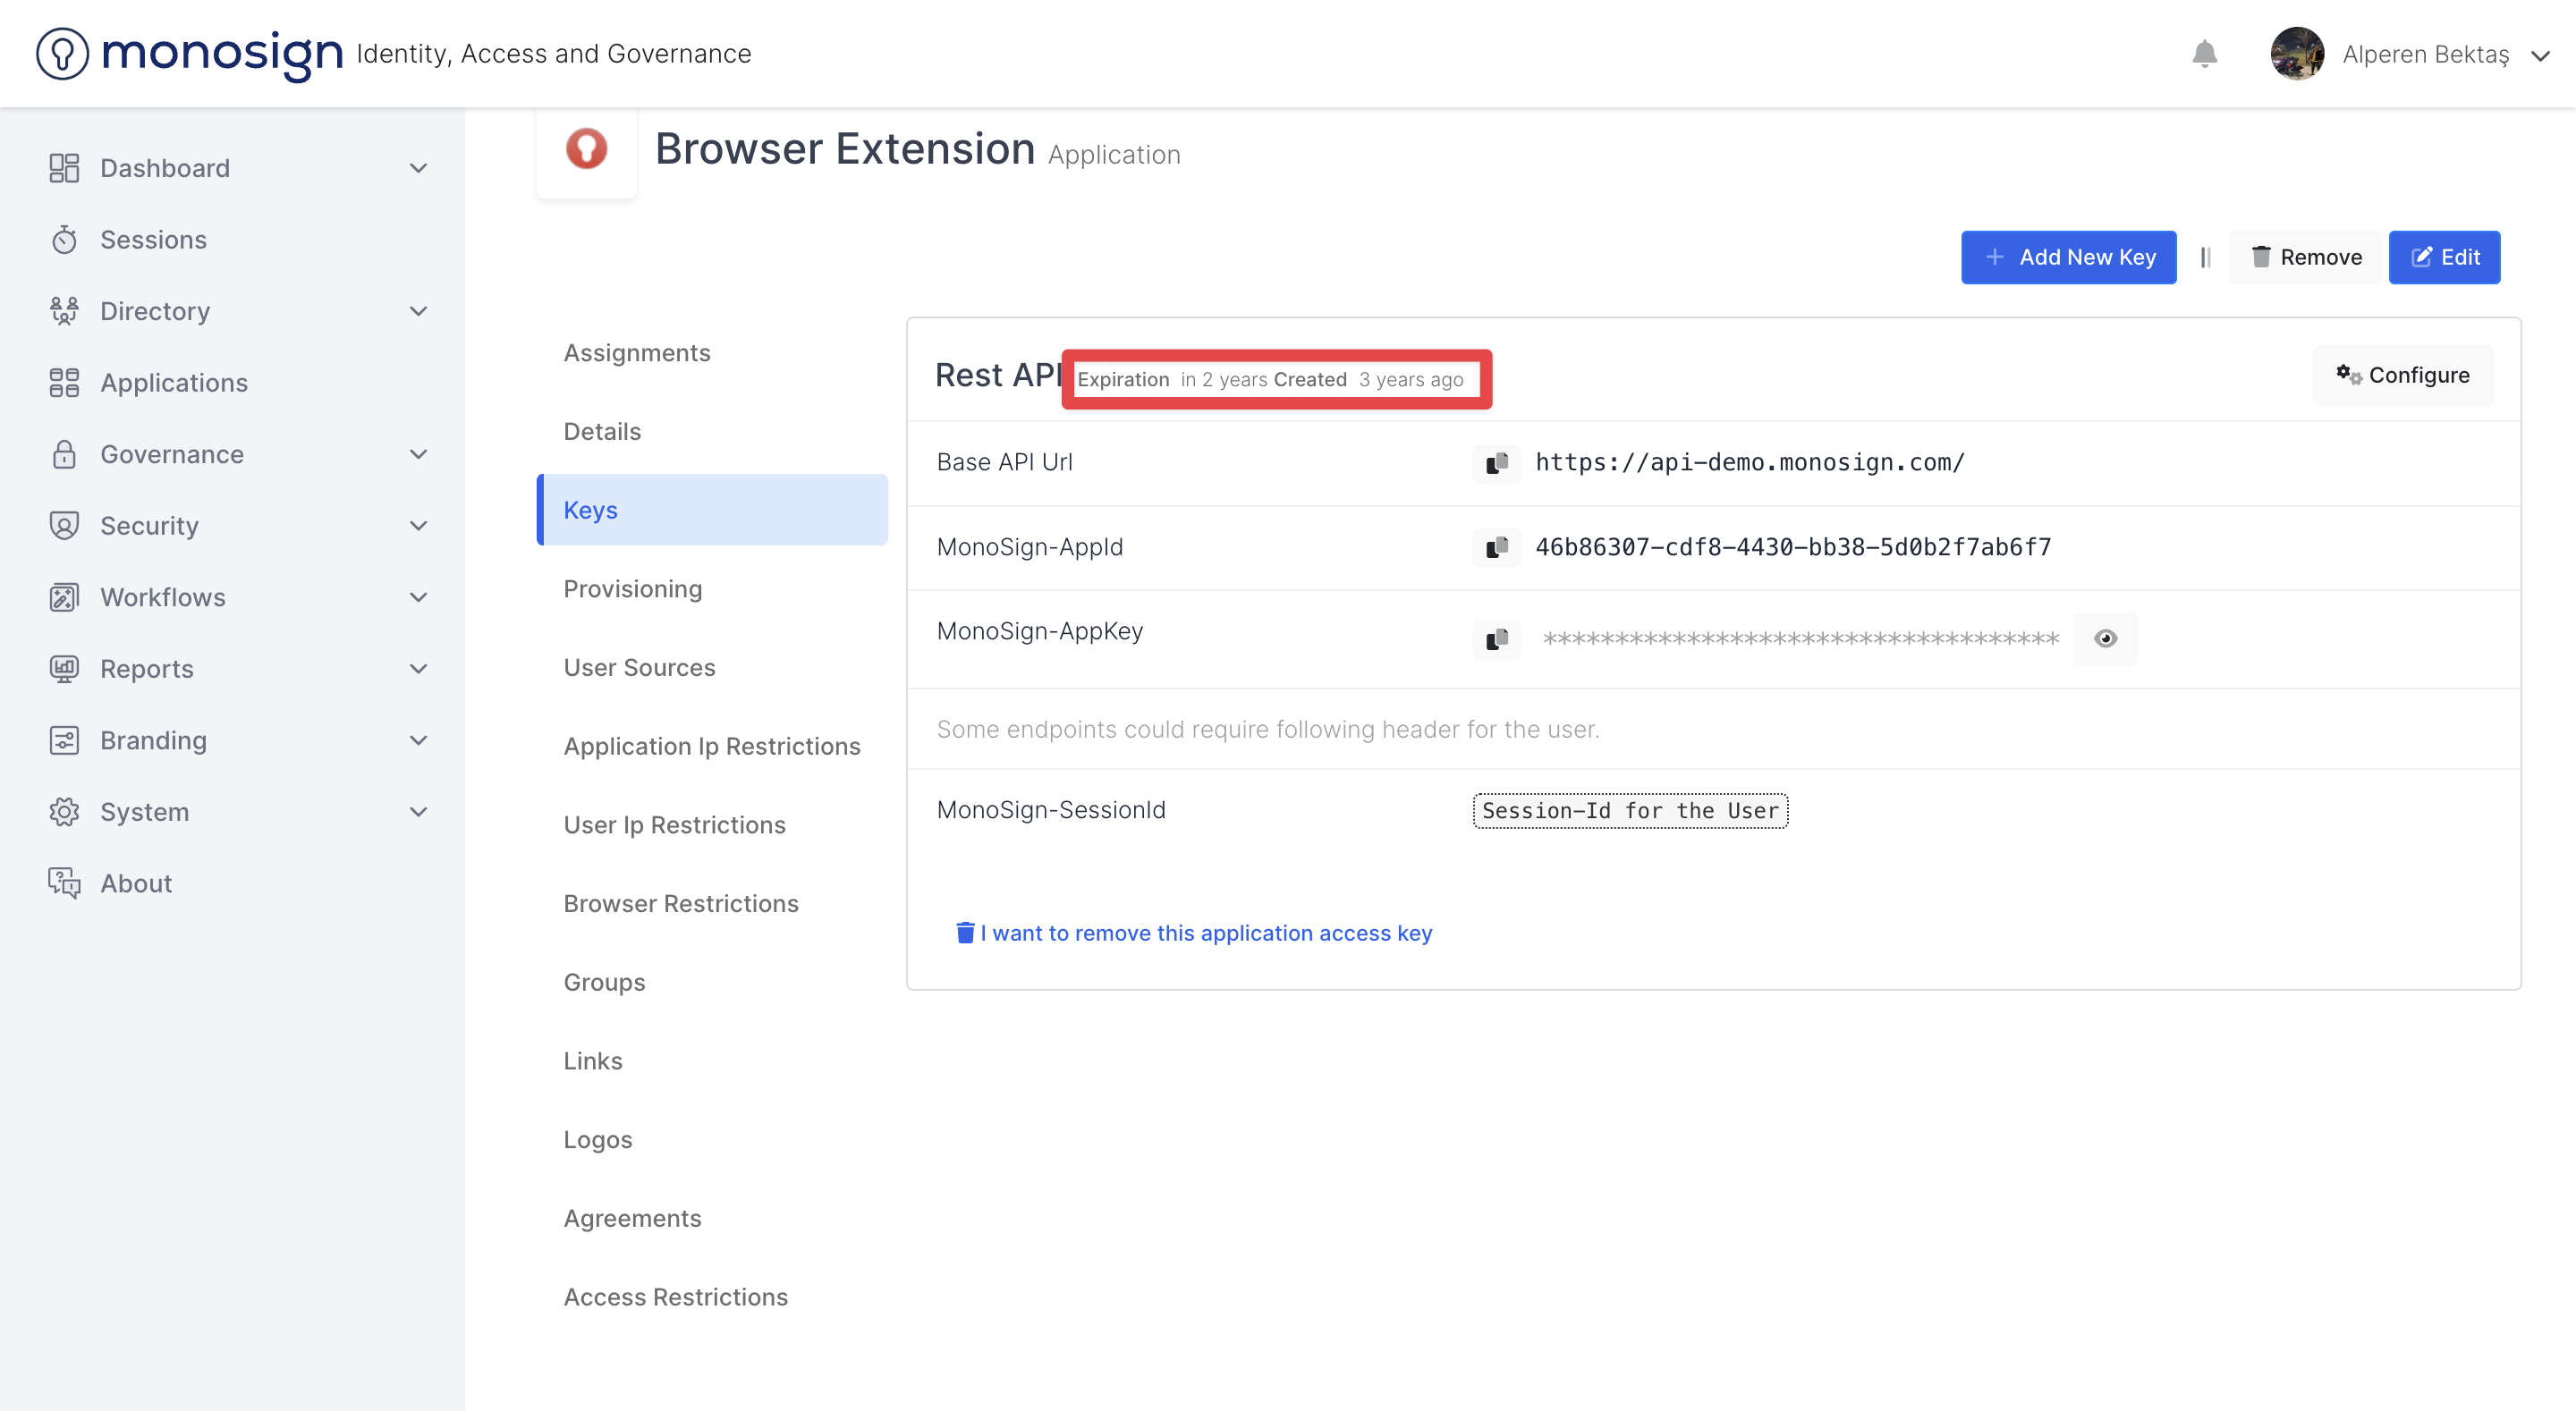
Rest API
It is a structure that contains the information you want to read, with various endpoints from which the system is connected and from which you will read the information. In the Rest Api field, under Request Header,
AppId (App ID)
AppKey
information is included.
For example, you wanted to read information through the API to which an application you are using is connected. Authentication is required when you want to connect to this API and read information. The verification process is realized thanks to the AppId and AppKey specified in the key you have defined. Information reading operations are performed by validating the AppId and AppKey appearing on the page by the Api.

In the keys area, at the bottom of the page, there is expiration (expiry date) and create (created date) information.
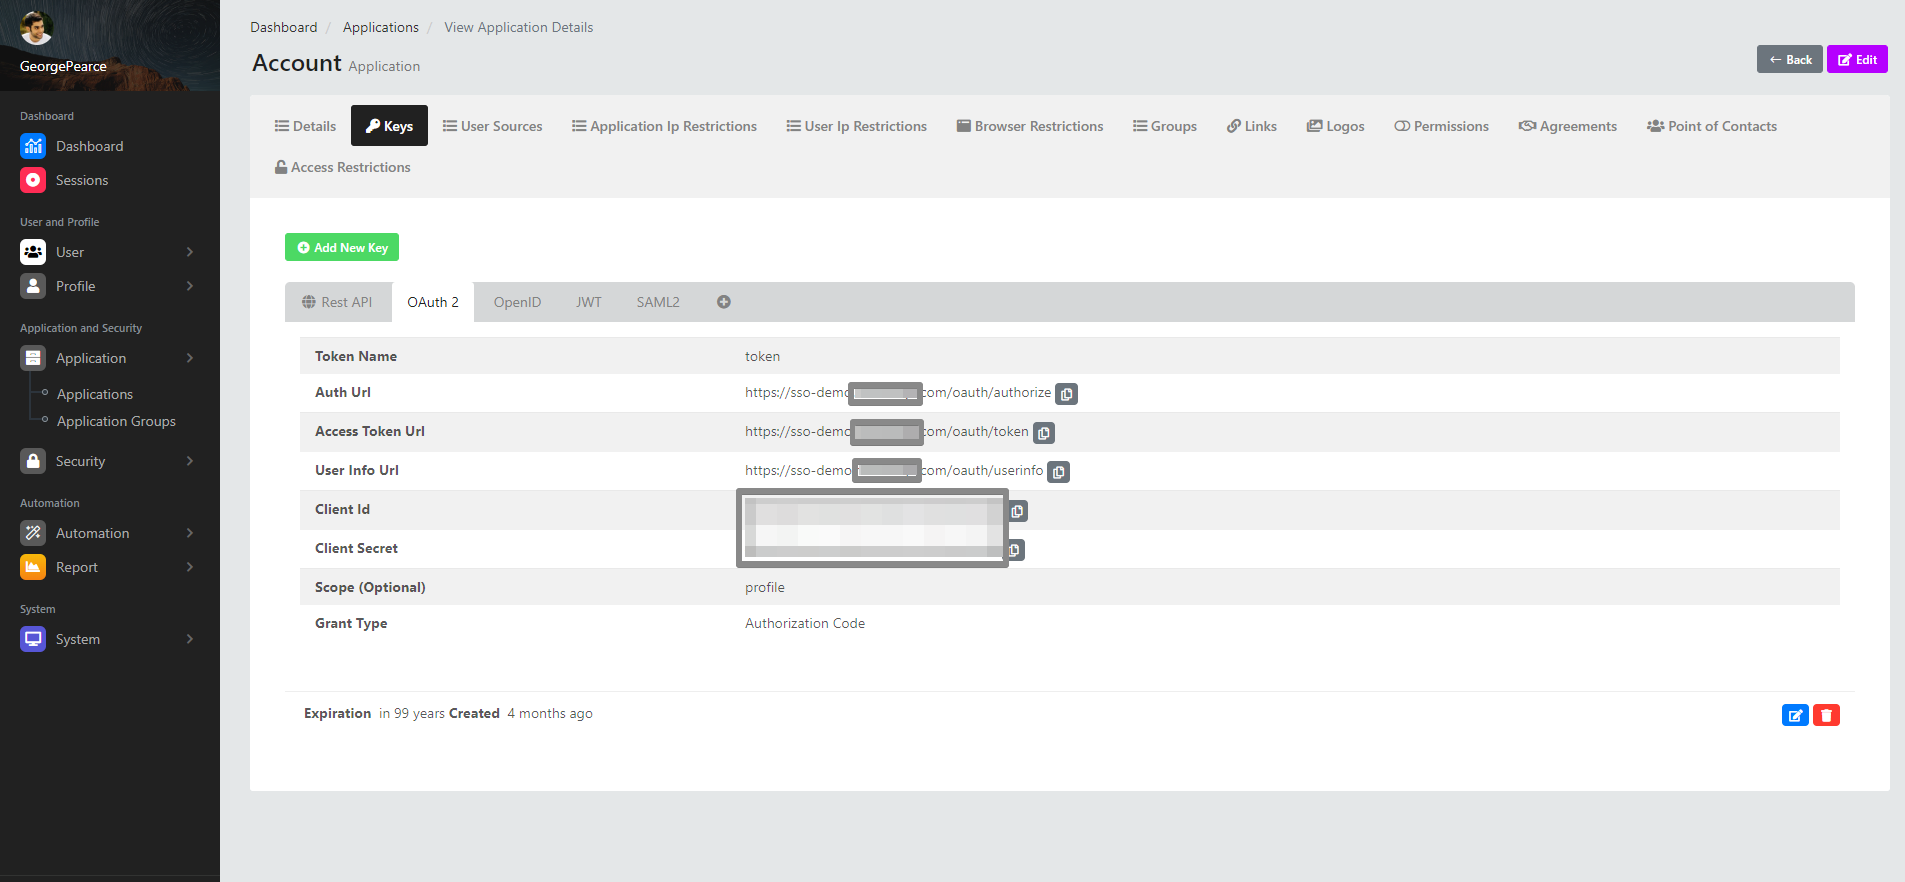
OAuth 2
In the OAuth 2 info,
Token Name - Token Name
Auth Url - Auth Uniform Resource Locator
Access Token Url - Access Token Uniform Resource Locator
User Info Url - User Info Uniform Resource Locator
Client id - Client id
Client Secret
Scope (Optional) - Scope
Grand Type - Concession Type
you can view the footer information.
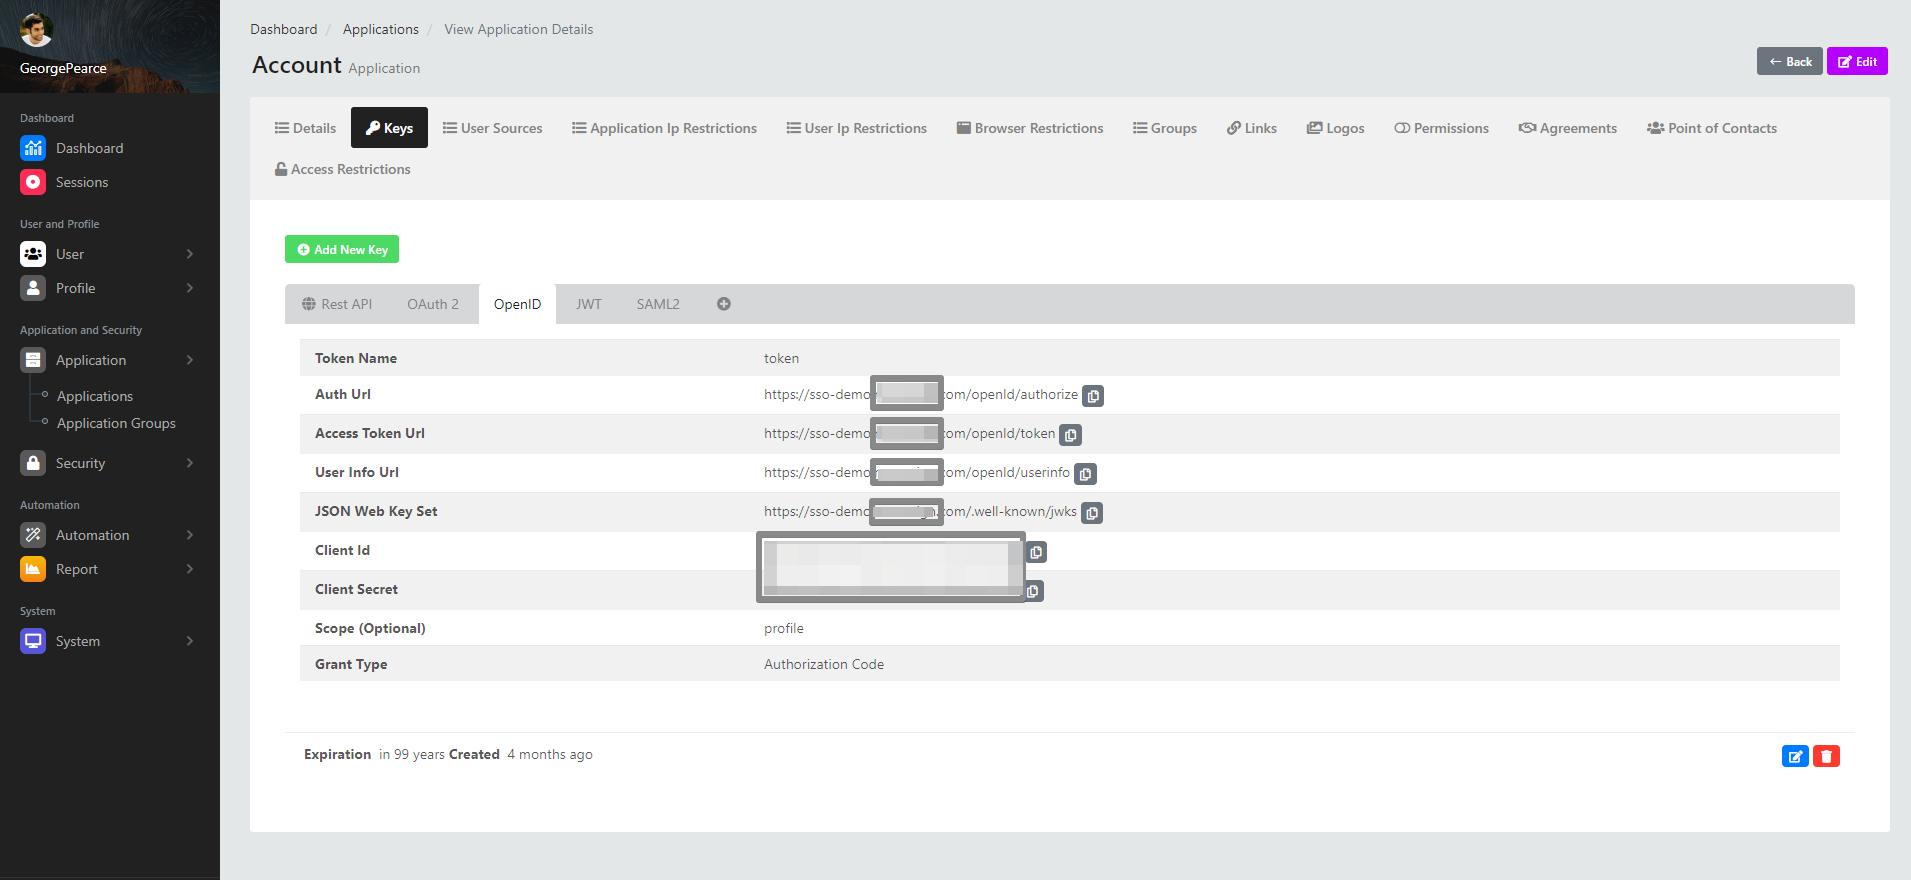
OpenID
In the OpenID info,
Token Name - Token Name
Auth Url - Auth Uniform Resource Locator
Access Token Url - Access Token Uniform Resource Locator
User Info Url - User Info Uniform Resource Locator
JSON Web Key Set - JSON (Javascript Object Notation) Web Key Set
Client id - Client id
Client Secret
Scope (Optional) - Scope
Grand Type - Concession Type
you can view the footer information.
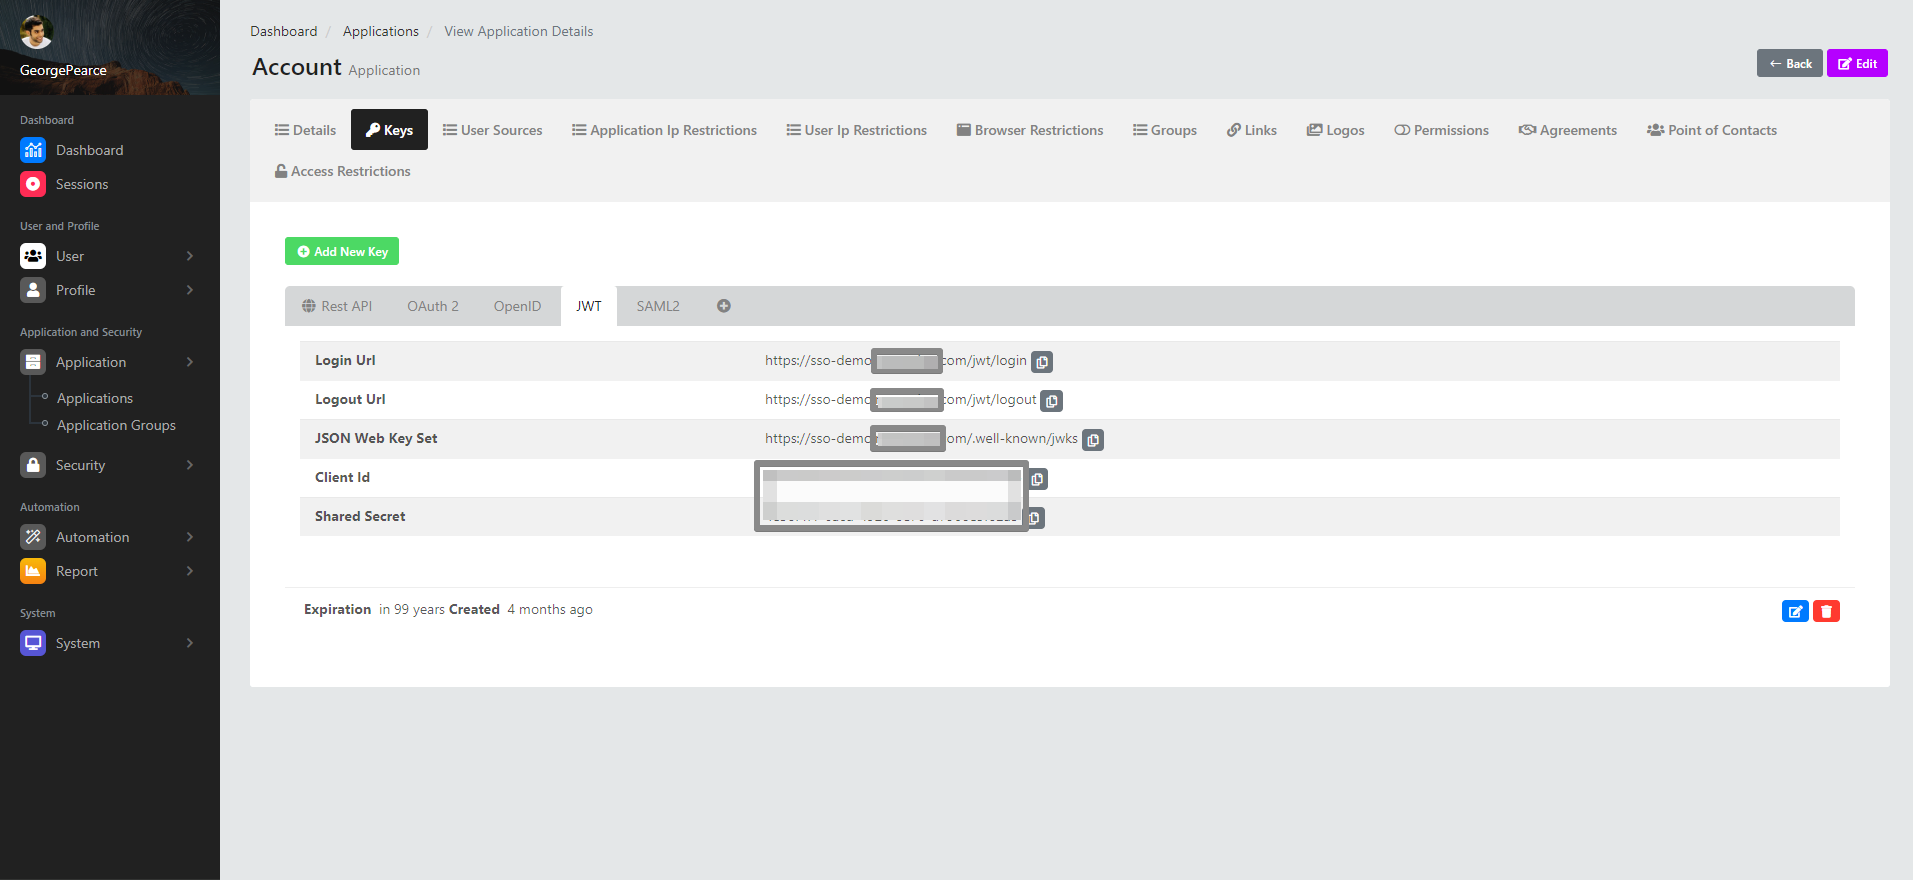
JWT
In JWT info,
Login Url - Login Uniform Resource Locator
Logout Url - Output Uniform Resource Locator
JSON Web Key Set - JSON (Javascript Object Notation) Web Key Set
Client Id - Client ID
Shared Secret
you can view the footer information.
SAML2
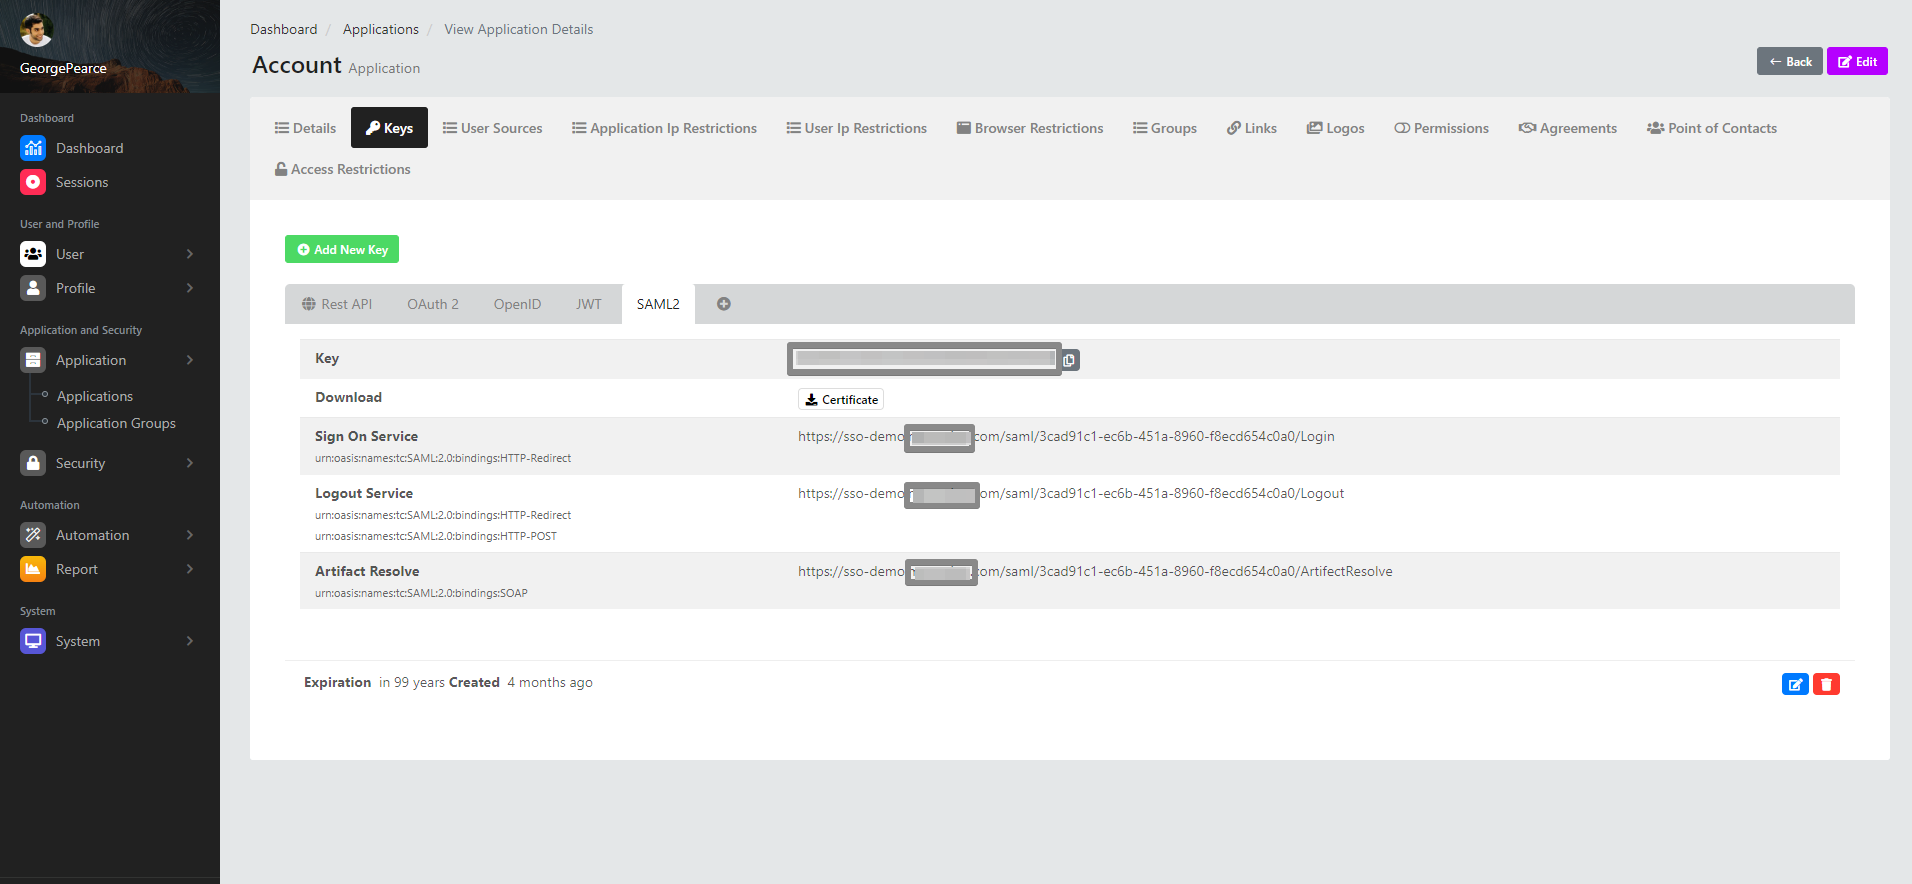
In SAML2 information,
Key - Key
Download - Download (You can download certificate information)
Sign On Service - Login Service
Logout Service - Logout Service
Artifact Resolve - Artifact Resolve
you can view the footer information.
Add New Key
Add new key button opens a window where you can add a new key. Add new key window consists of the following sections.
Sections |
|---|
General |
Keys |
SAML2 Settings |
General
Sections |
|---|
Session Type |
State |
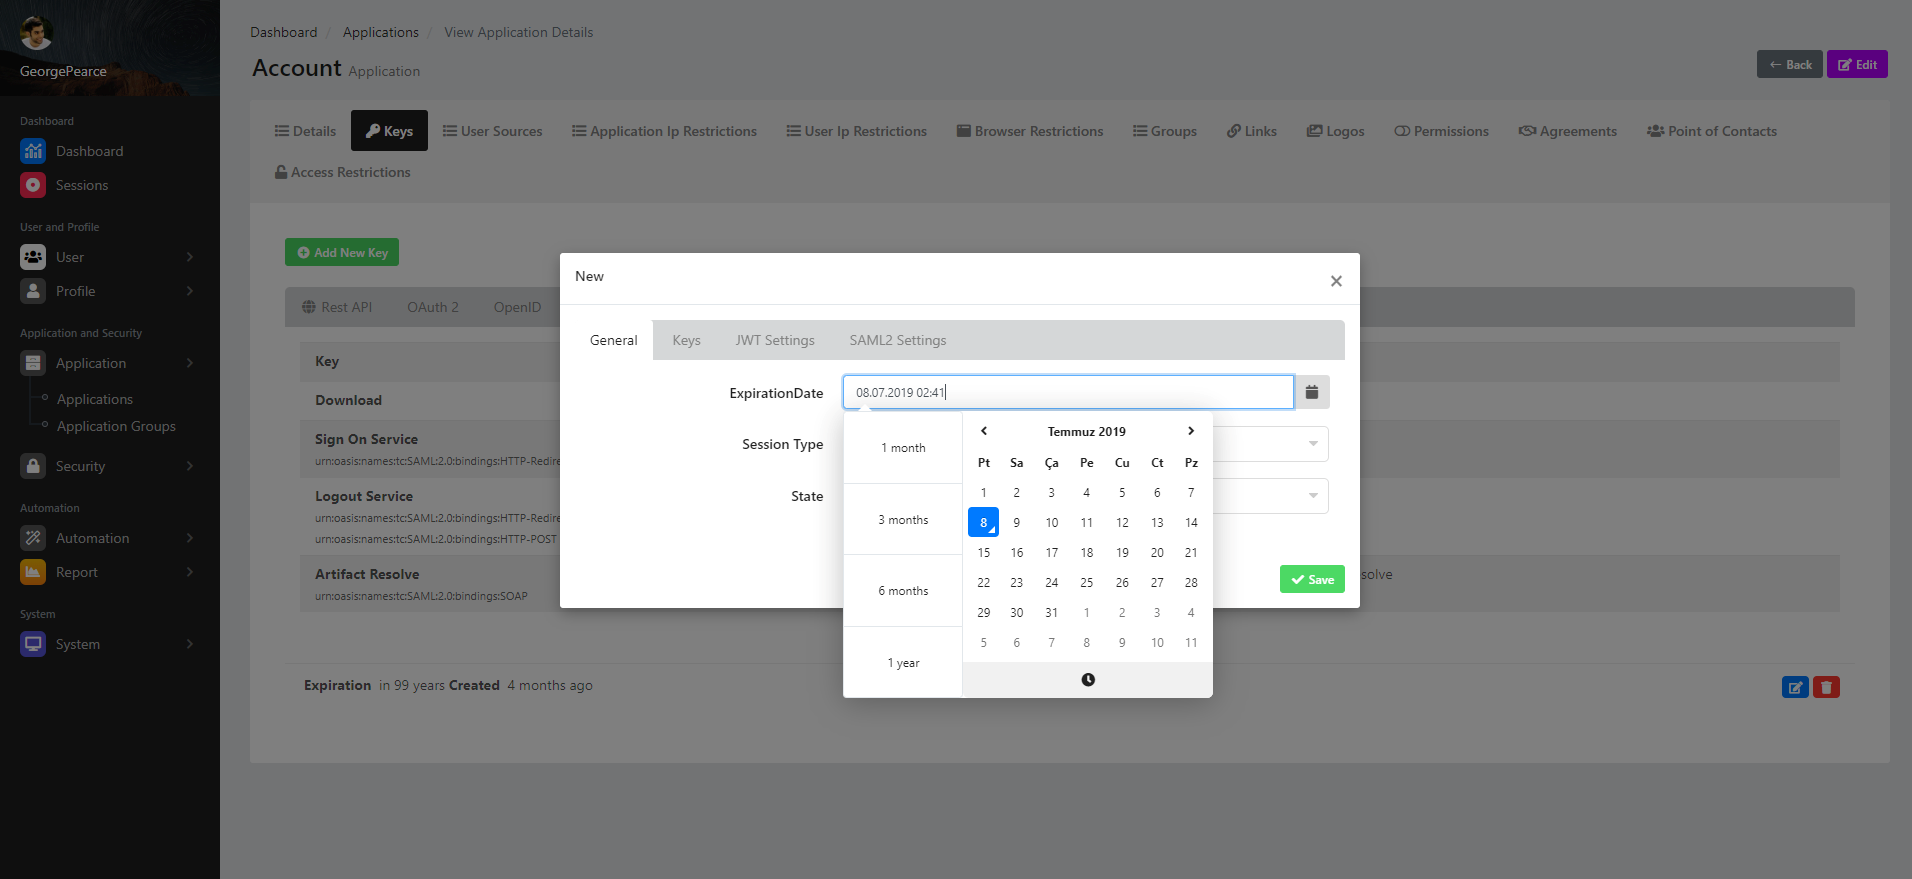
ExpirationDate
This is the field where you can specify the expiry date of the newly created key.
Session Type
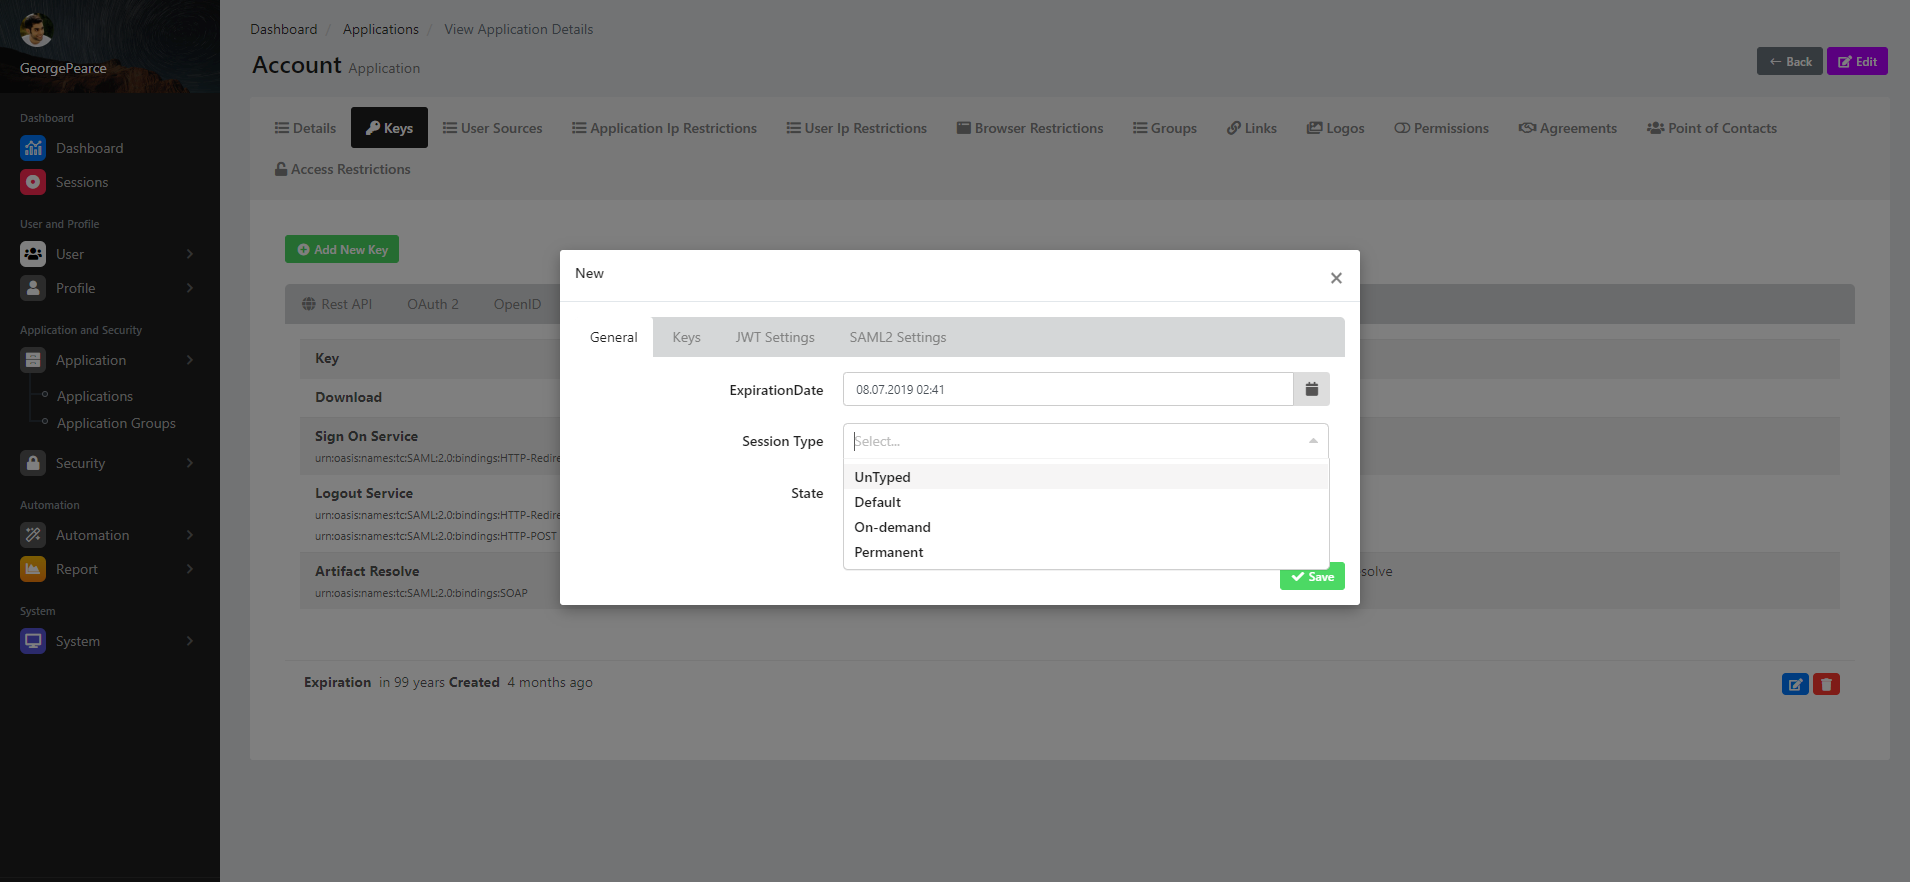
This is the area where you can specify the session type of the newly created key and there are 4 session types.
Untyped - Allows the session type to be determined as untyped / untyped using the Untyped / Untyped property.
Default - Allows the session type to be set as the system's default using the default feature.
On-demand - Allows the session type to be set as on-demand using the On-Demand feature.
Permanent - Allows the session type to be determined permanently by using the permanent feature.
State
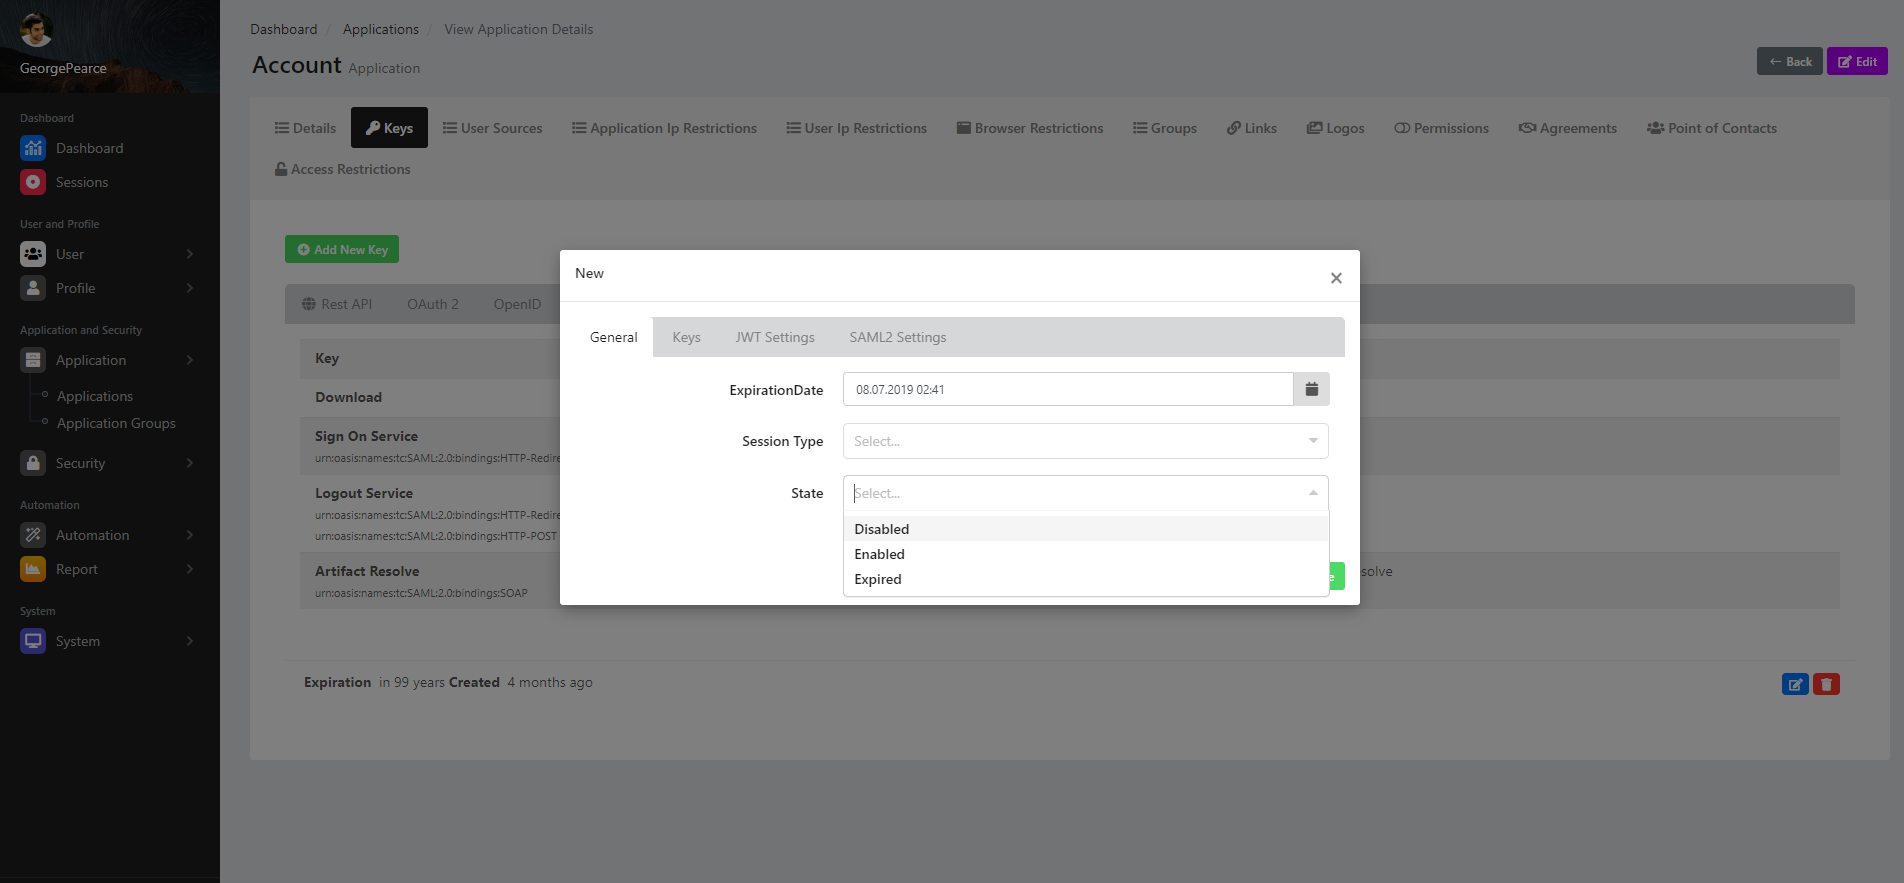
This is the field where you can specify the status information of the newly created key.
Disabled - Inactive, using the property of the session state, sets it as inactive.
Enabled - the session state using the Enabled property, enables it to be determined effectively.
Expired - Allows session status to be set as Expired using the Not expired feature.
Keys
This is the area where you can view the keys information of the newly created key.
Sections |
|---|
ApplicationKey |
ExternalAuthKey |
SamlKey |
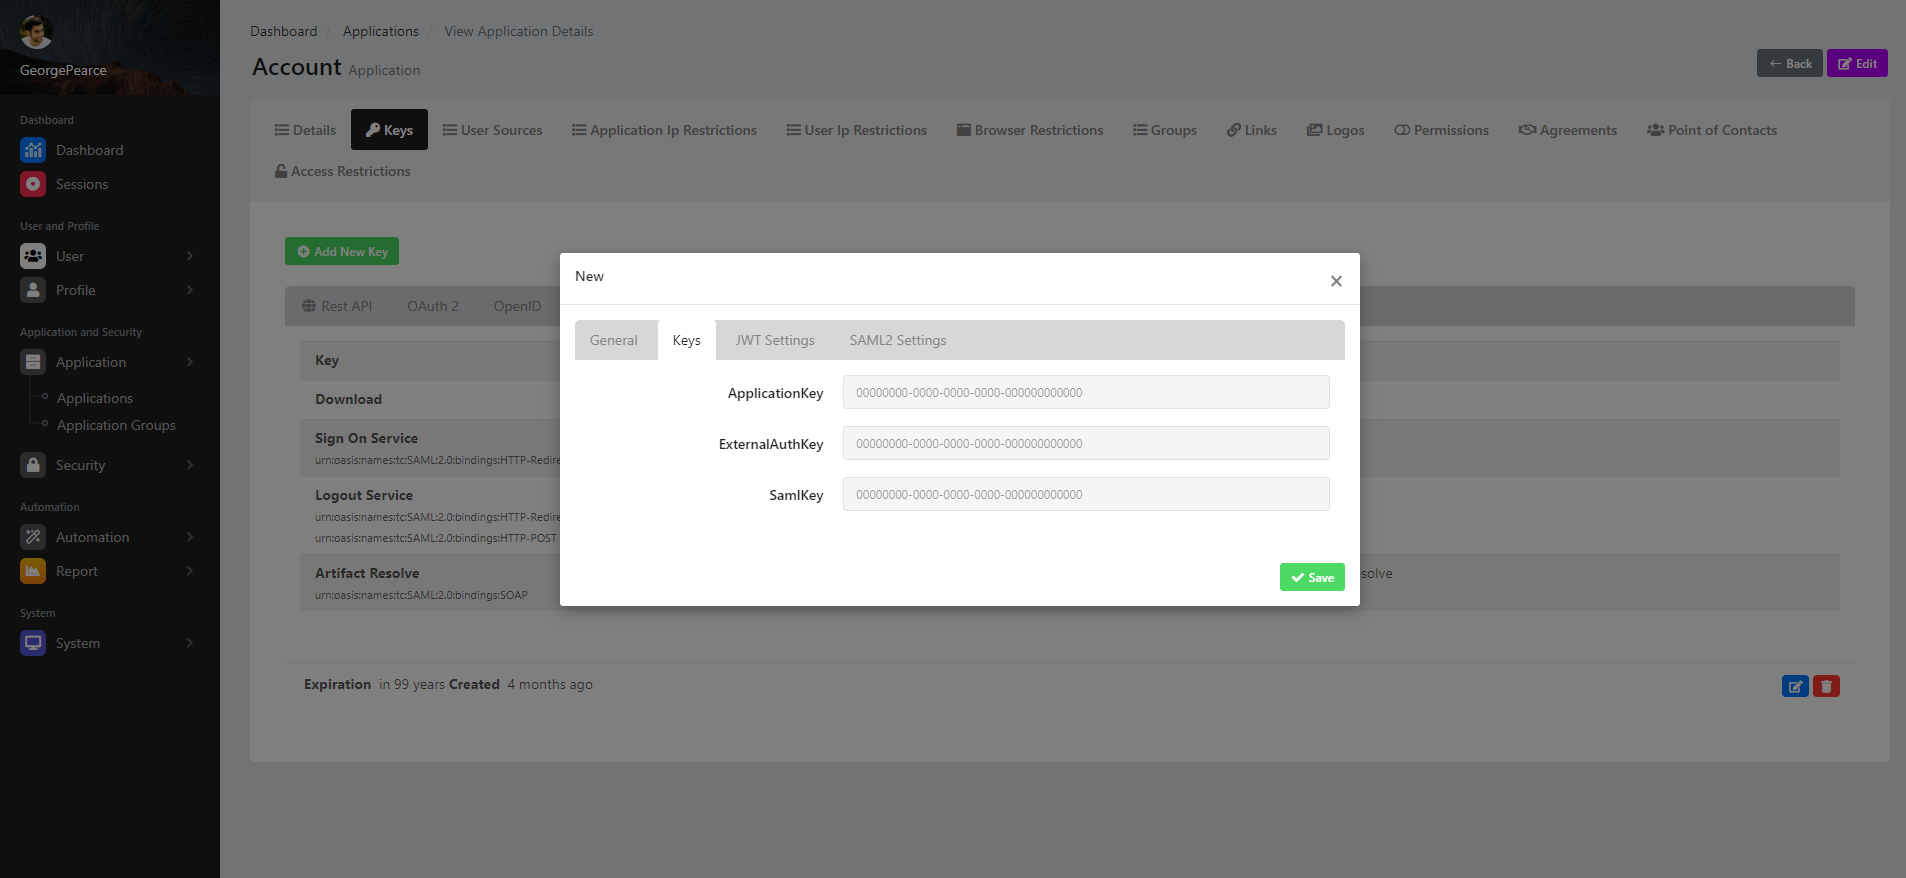
ApplicationKey
This is the area where you can view the application key information of the newly created key.
ExternalAutHKey
This is the area where you can view the external authorization key information of the newly created key.
Saml
This is the area where you can view the Saml key information of the newly created key.
JWT Settings
This is the area where you can view the JWT settings of the newly created key.
Sections |
|---|
JWT Signature Algorithm |
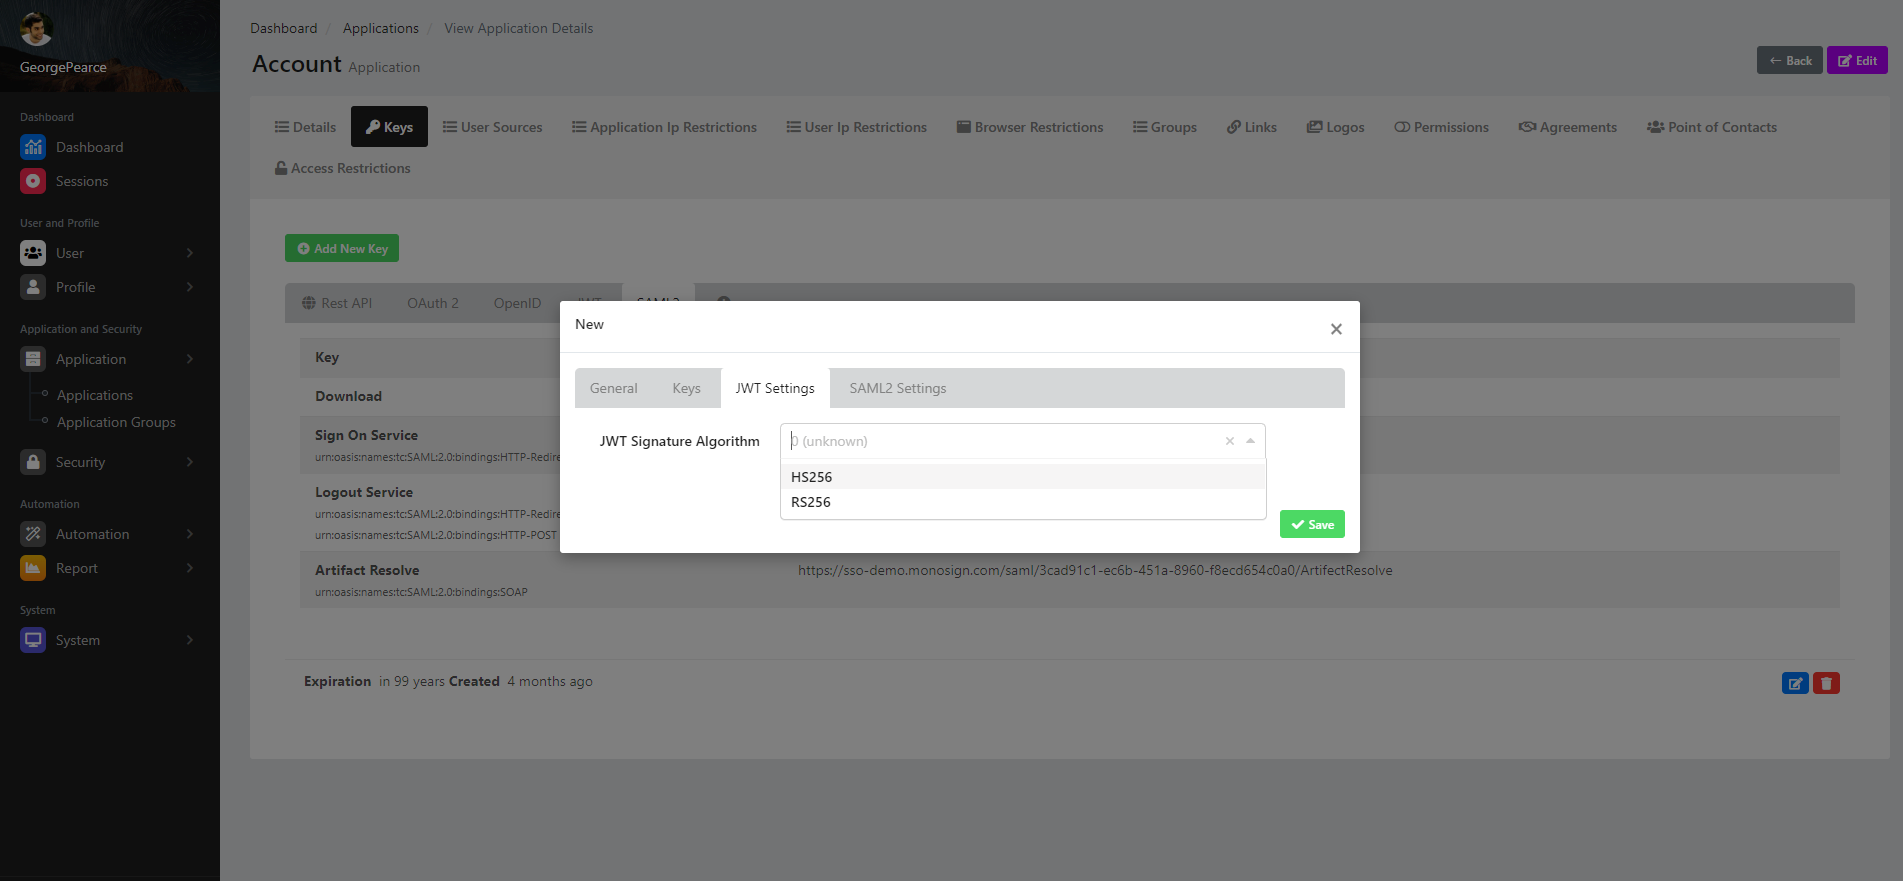
JWT Signature Algorithm
This is the field where you can specify the JWT signature algorithm information of the newly created key.
HS256 - Allows the JWT signature algorithm to be determined as HS256 by using the HS256 feature.
RS256 - Allows the JWT signature algorithm to be determined as HS256 by using the RS256 feature.
SAML2 Settings
This is the area where you can view the SAML2 settings of the newly created key.
Sections |
|---|
Assertion Consumer Url |
Audience |
Entity Id |
Name Id |
Idp Description |
Exclude Key Info |
Hide Details |
Don't Encrypt Entire Message |
Don't Encrypt Assertion |
Exclude NotBefore |
Exclude Not On Or After |
Extra Attributes |
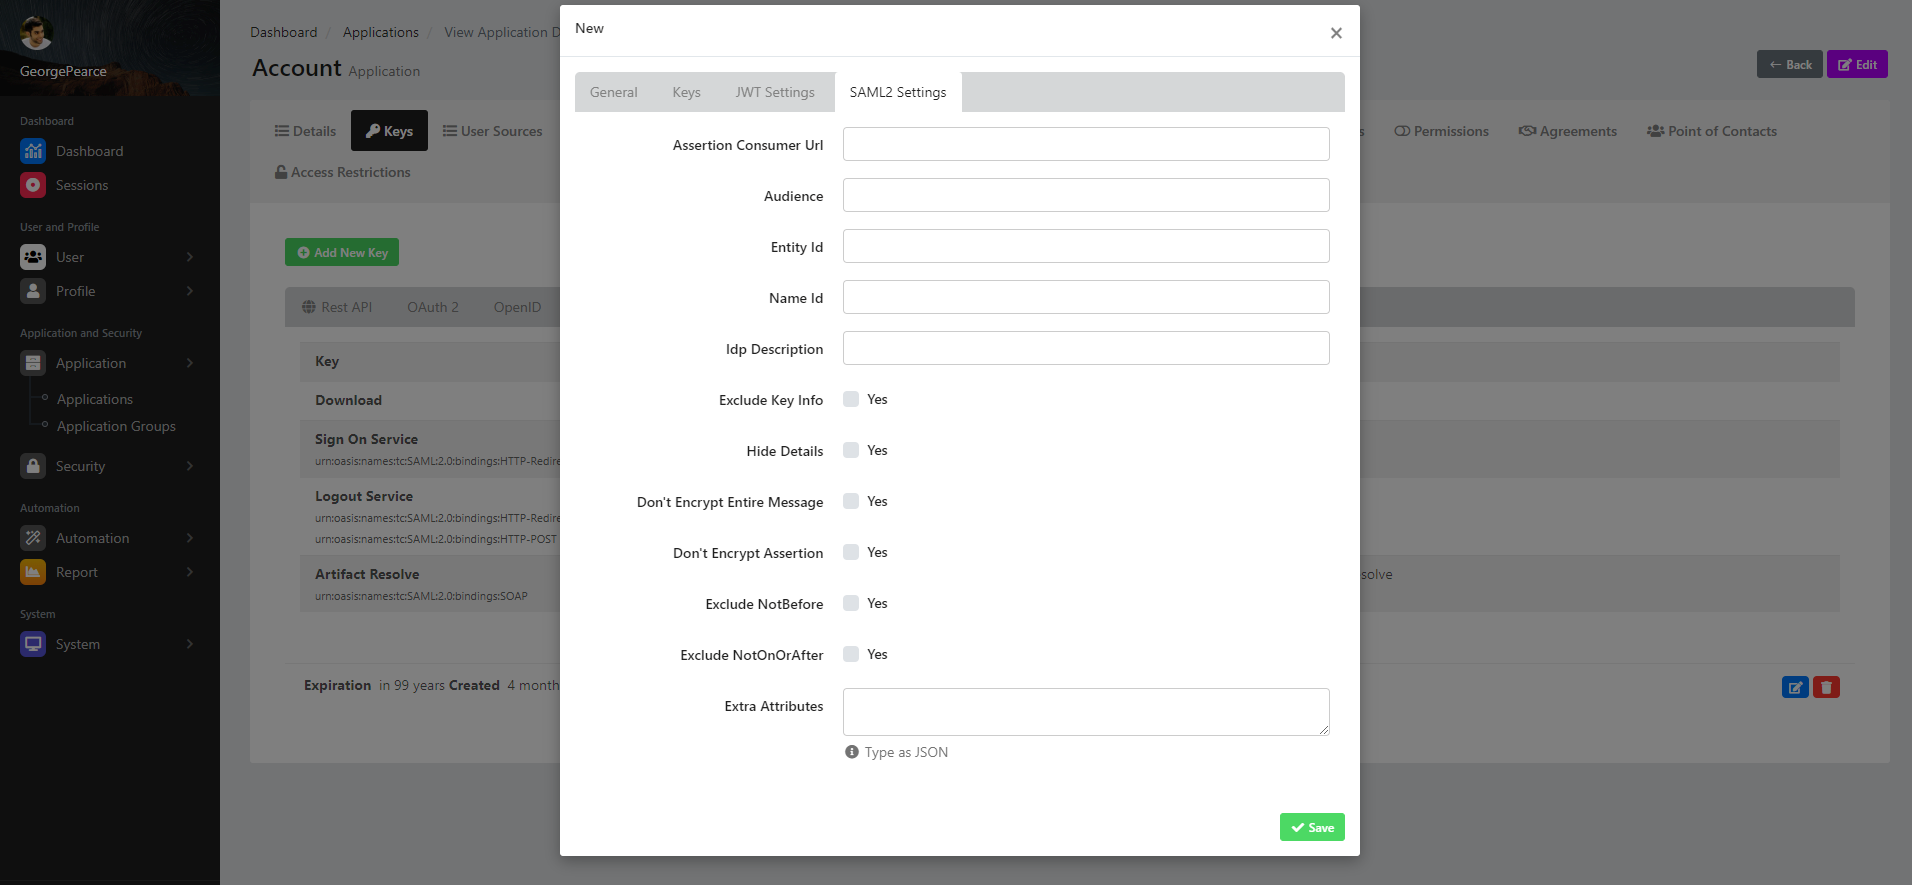
Assertion Consumer Url
This is the field where you can specify the Assertion Consumer Url property of the SAML2 setting.
Audience
This is the field where you can specify the audience property of the SAML2 setting.
Entity Id
This is the field where you can specify the Entity Id property of the SAML2 setting.
Name Id
This is the field where you can specify the Name Id property of the SAML2 setting.
Description of IDP
This is where you specify the Idp Description view of the SAML2 settings.
Exclude Key Information
This field is where you will select the Key Information to Exclude from the SAML2 setting. Thanks to the checkbox You can enable or disable this feature.
Hide Details (Hide Details)
You will set the Hide Details (hide details) goal of your SAML2 settings. Thanks to the checkbox You can enable or disable this feature.
Encrypt Entire Message
This is how SAML2 settings will set Encrypt Entire Message. Thanks to the checkbox You can enable or disable this feature.
Encrypt Confirmation
SAML2 settings are how to make Don't Encrypt Assertion. Thanks to the checkbox You can enable or disable this feature.#### Exclude NotBefore
This is the field where you can specify the Exclude NotBefore property of the SAML2 setting. Thanks to the checkbox You can enable or disable this feature.
Exclude Not On Or After
This is the field where you can specify the Exclude Not On Or After property of the SAML2 setting. Thanks to the checkbox You can enable or disable this feature.
Extra Attributes
This is the field where you can specify the Extra Attributes property of the SAML2 setting. Extra attributes in this field, JSON(Javascript Object Notation) You must set as . You can see the warning about this in the warning text in the Extra Attributes field.
When all selection and value addition processes are completed, you will save a new key by clicking the "Save" button and if it is successfully saved, a confirmation notification will appear that the key addition has been successful.
Save
After all the fields are filled and the properties are determined, a new key is added for the application by clicking the green "save" button in the lower right part of the window. It will issue a confirmation notification to your stake when the transaction is successful.
Edit Application Key
On the app details keys page there is a small blue button at the bottom right where you can edit the app key. When you click the button, you will see a window where you can edit the application key. Since the application key editing process includes the same processes as the application key creation process, you can view and edit the information about this window from the add new key section.
Delete Application Key
On the app details keys page there is a small red button at the bottom right where you can remove the app key. When you click the button, you will see a window where you can remove the application key. "Are you sure? (Are you sure?)" "This application key will be removed! When action is done, your application can't access with this Application Key. It can't be undone. Are you really sure to do This? (This app key will be removed! Once the operation is done, your app will not be able to access this app key. It is irreversible. Are you sure to delete the key?)" is displayed. Clicking the "Yes, delete it" option will delete the application key, and if it is successfully removed, it will issue a confirmation notification that the key removal was successful.
User Sources
This is the page where you can view the user resources information of the application.
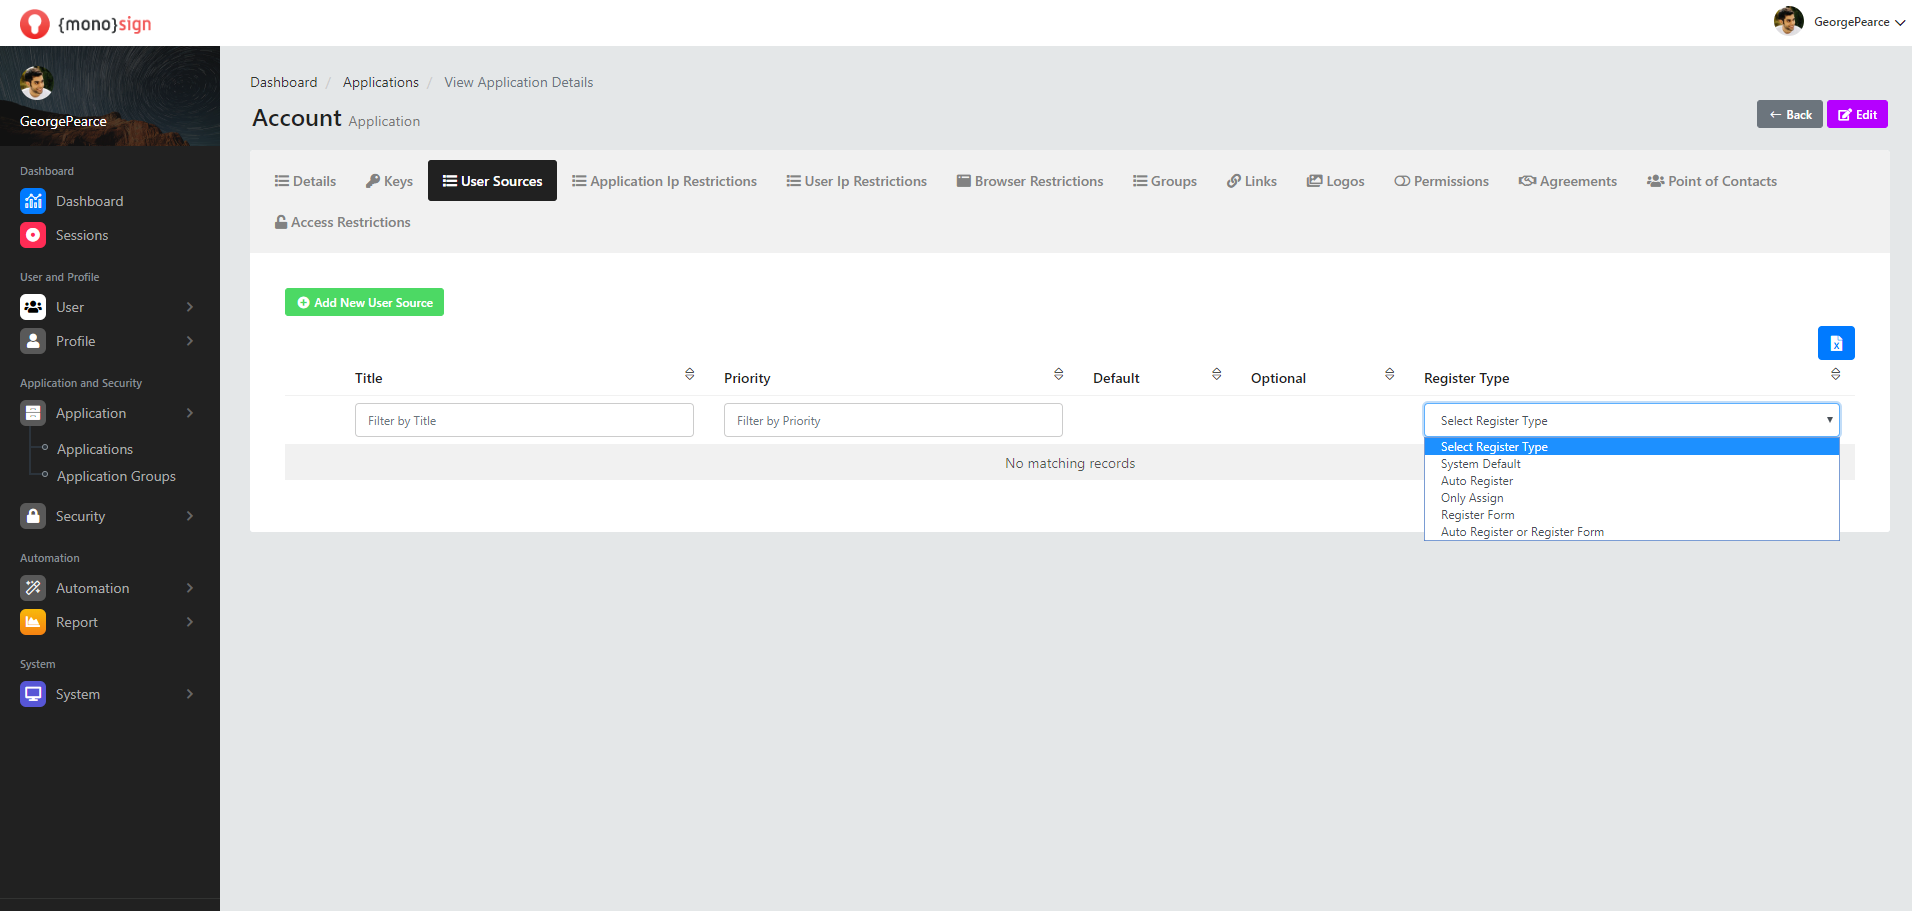
You can sort and filter the application resources according to the following fields.
Sections |
|---|
Title |
Priority |
Default |
Optional |
Register Type |
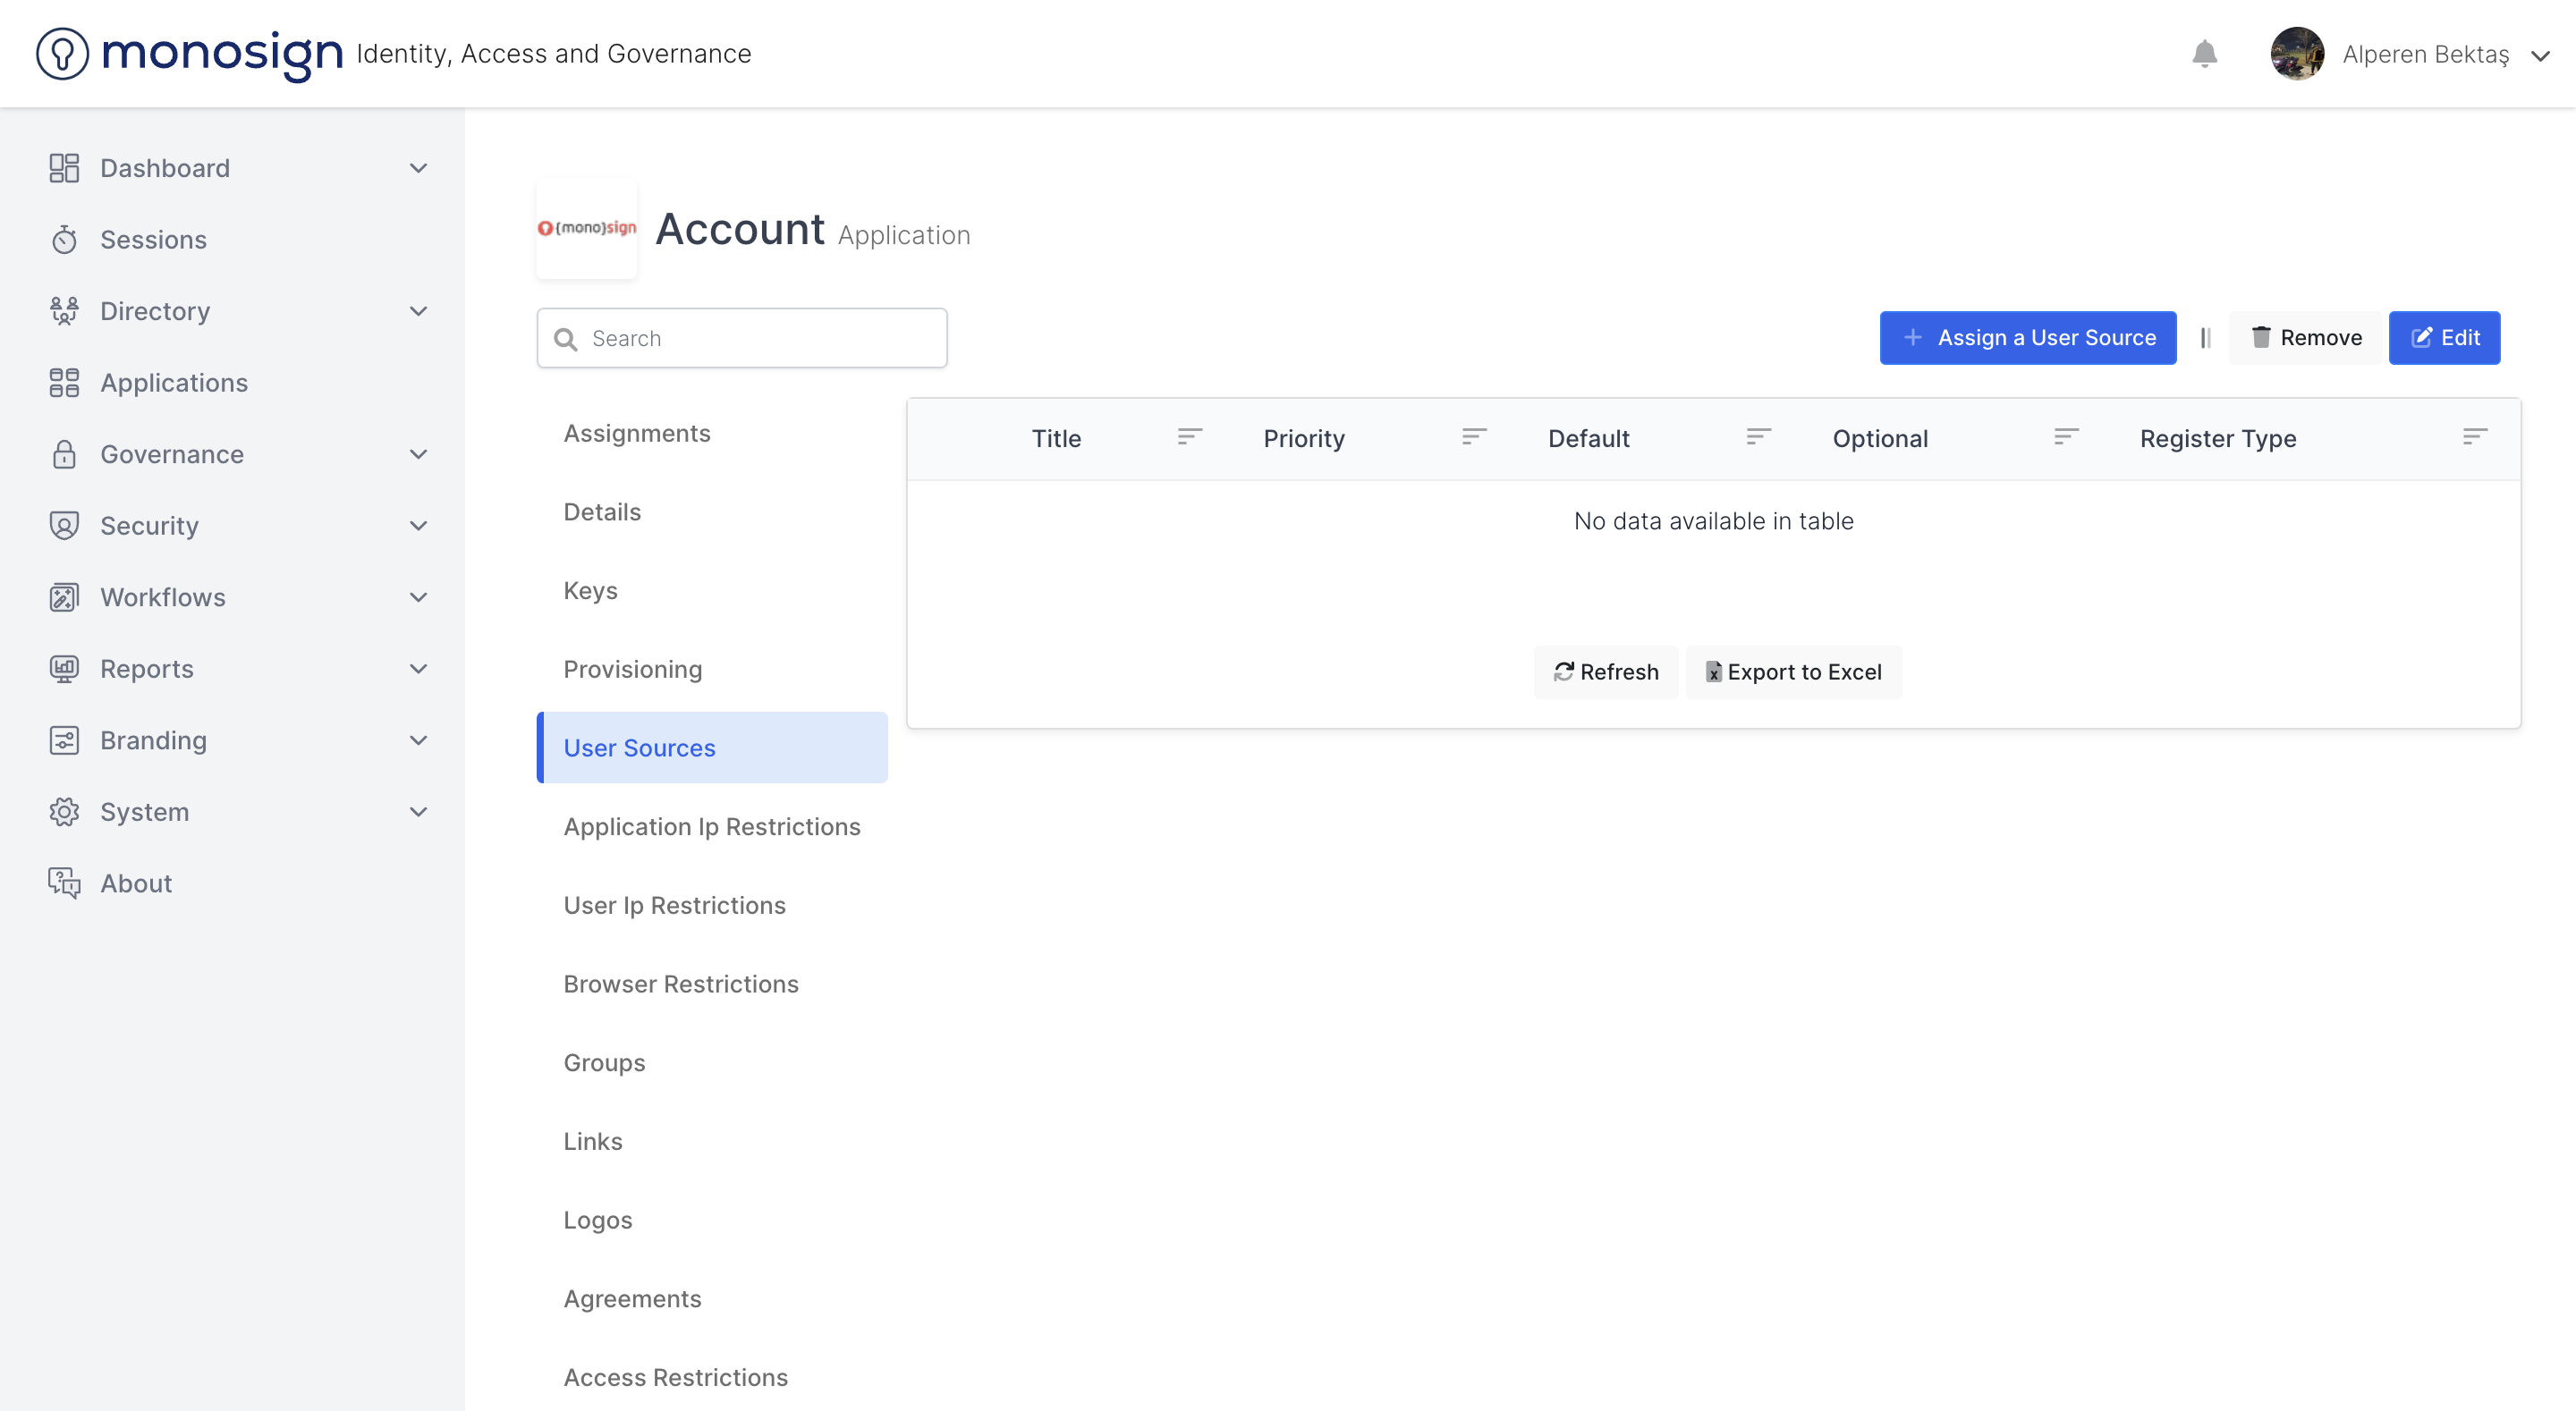
Title
This is the area where you can view and filter the header information of application user resources.
priority
This is the area where you can view and filter the priority information of application user resources.
default
This is the area where you can view and filter the default information of application user resources.
optional
This is the area where you can view and filter optional information of application user resources.
Register Type
Displaying the record type information of application user resources,
System Default
Auto Register
Only Assign
Register Form
Auto Register or Register Form
you can filter by options.
Add New User Source
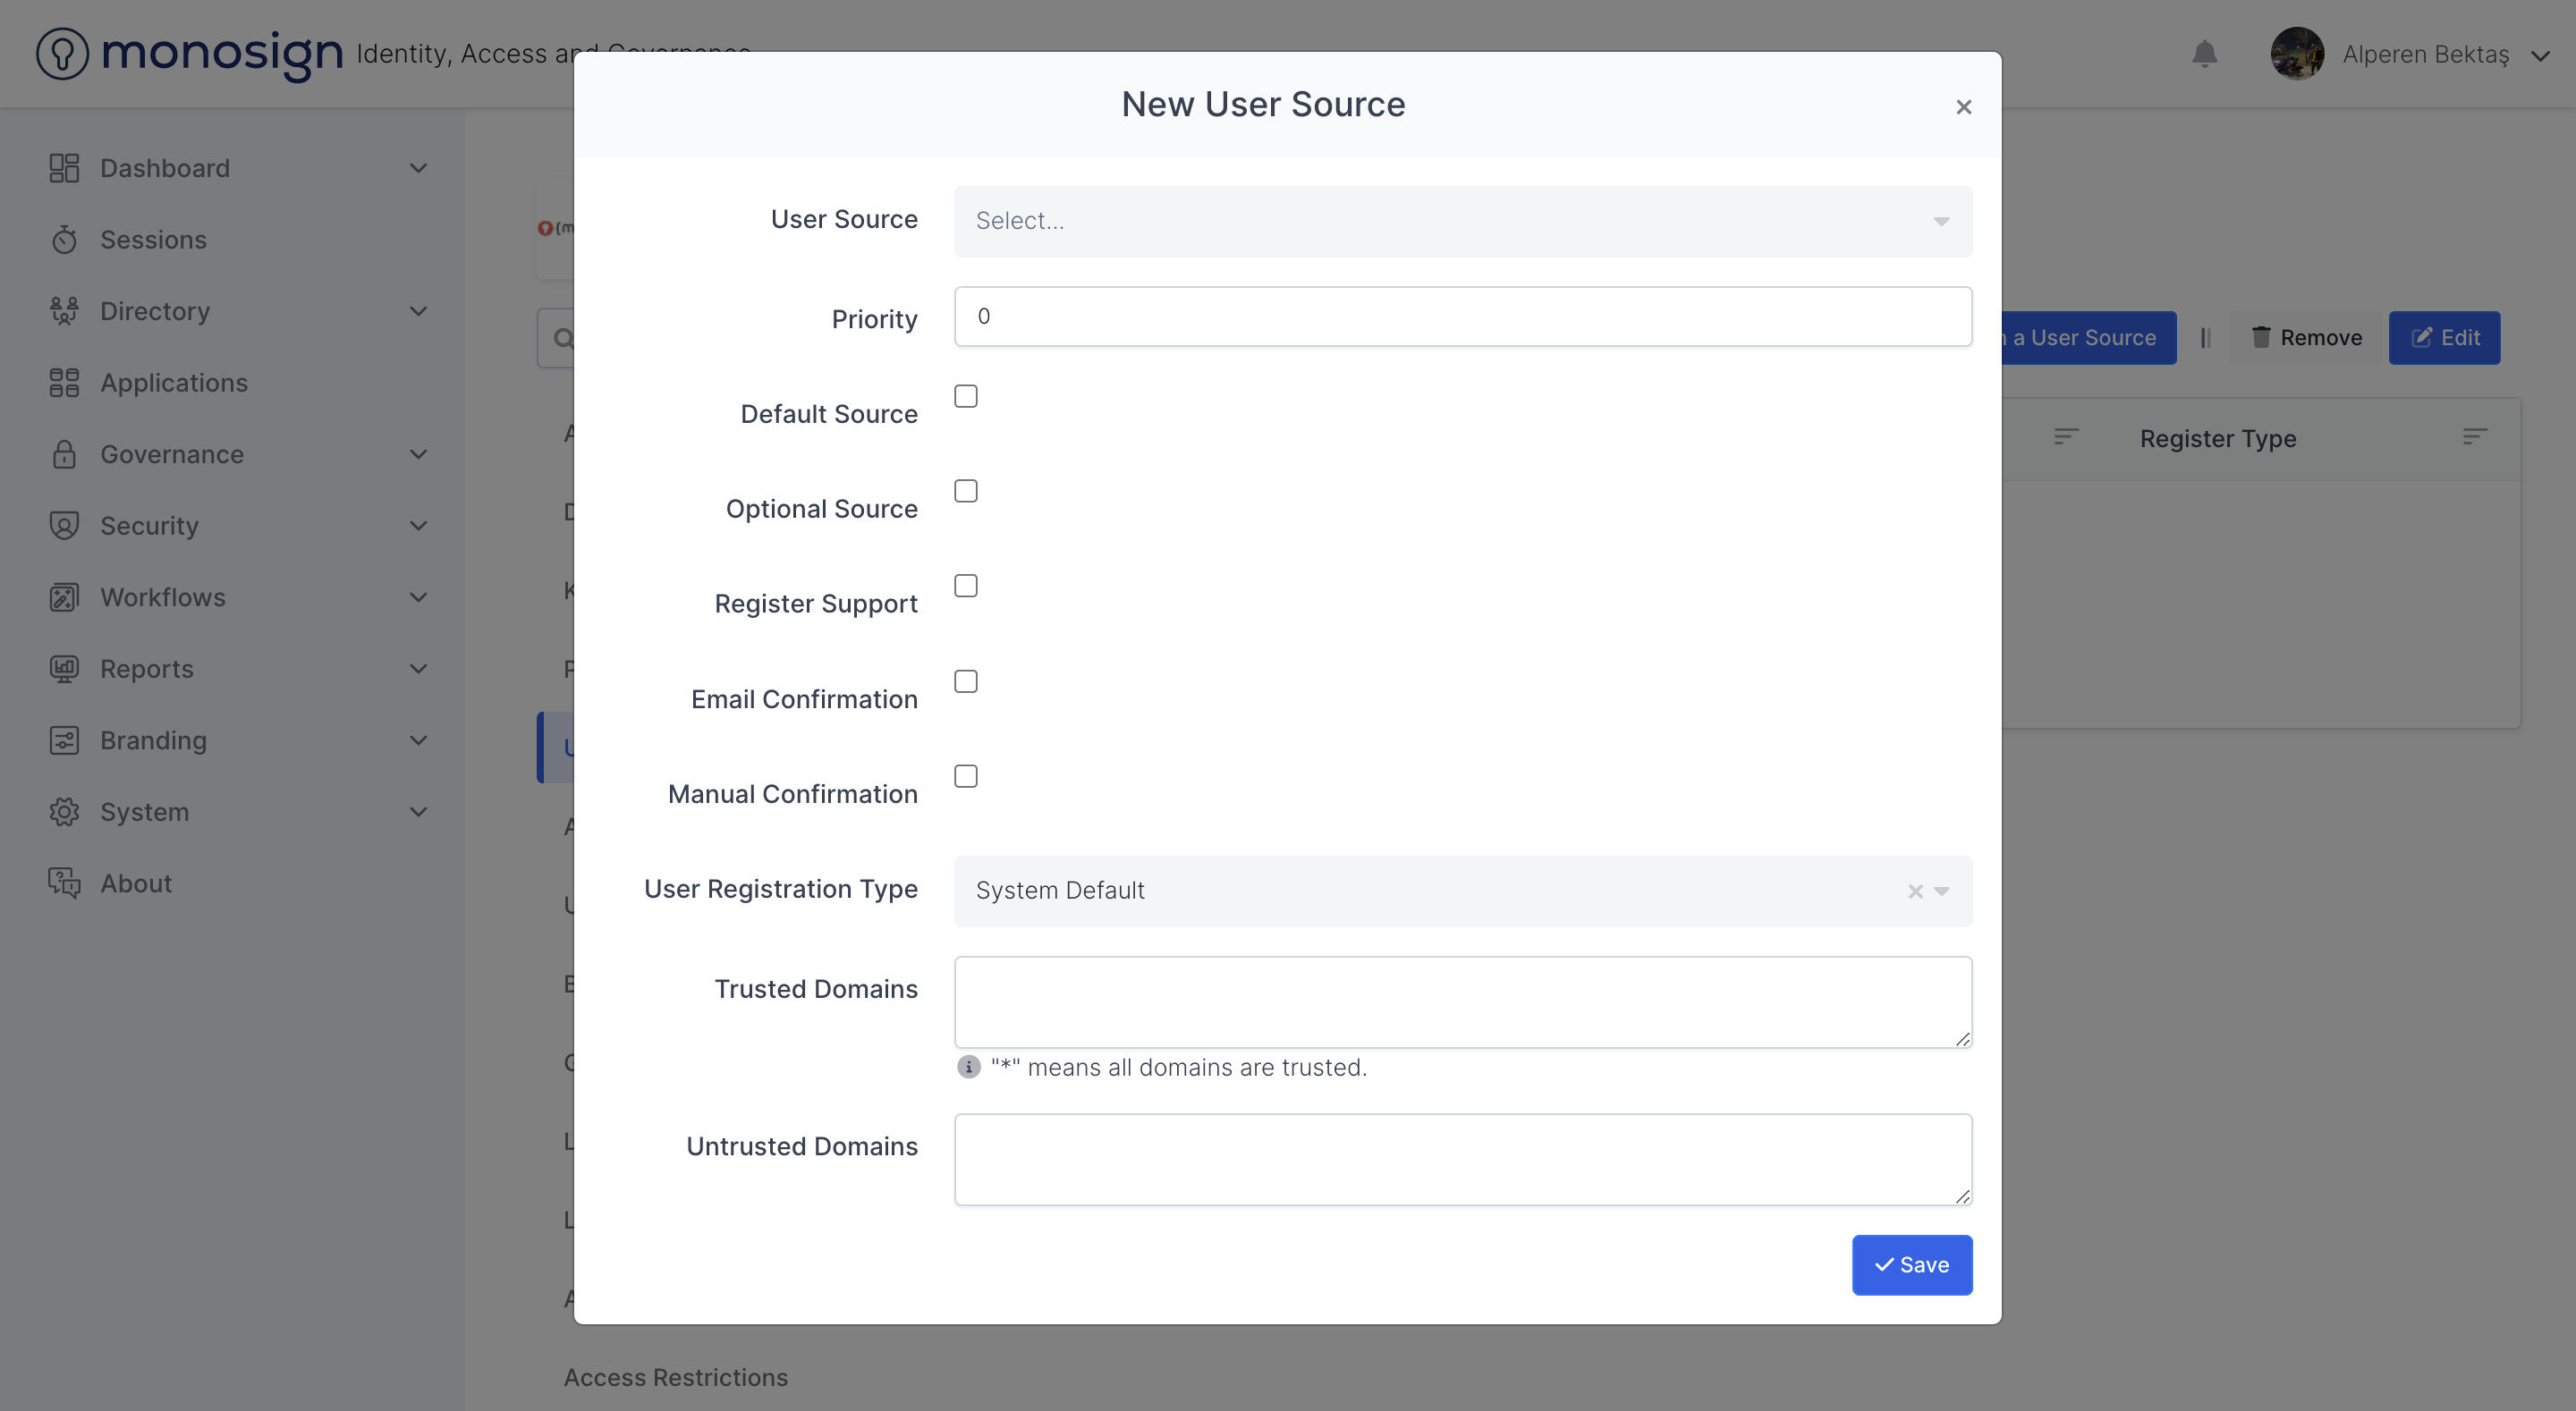
Add new application user resource button opens a window where you can add a new application user resource. The Add new application user resource window consists of sections.
Sections |
|---|
User Source |
Priority |
Default Source |
Optional Source |
Register Support |
Email Confirmation |
Manual Confirmation |
User Registration Type |
Trusted Domains |
Trusted Emails |
User Source
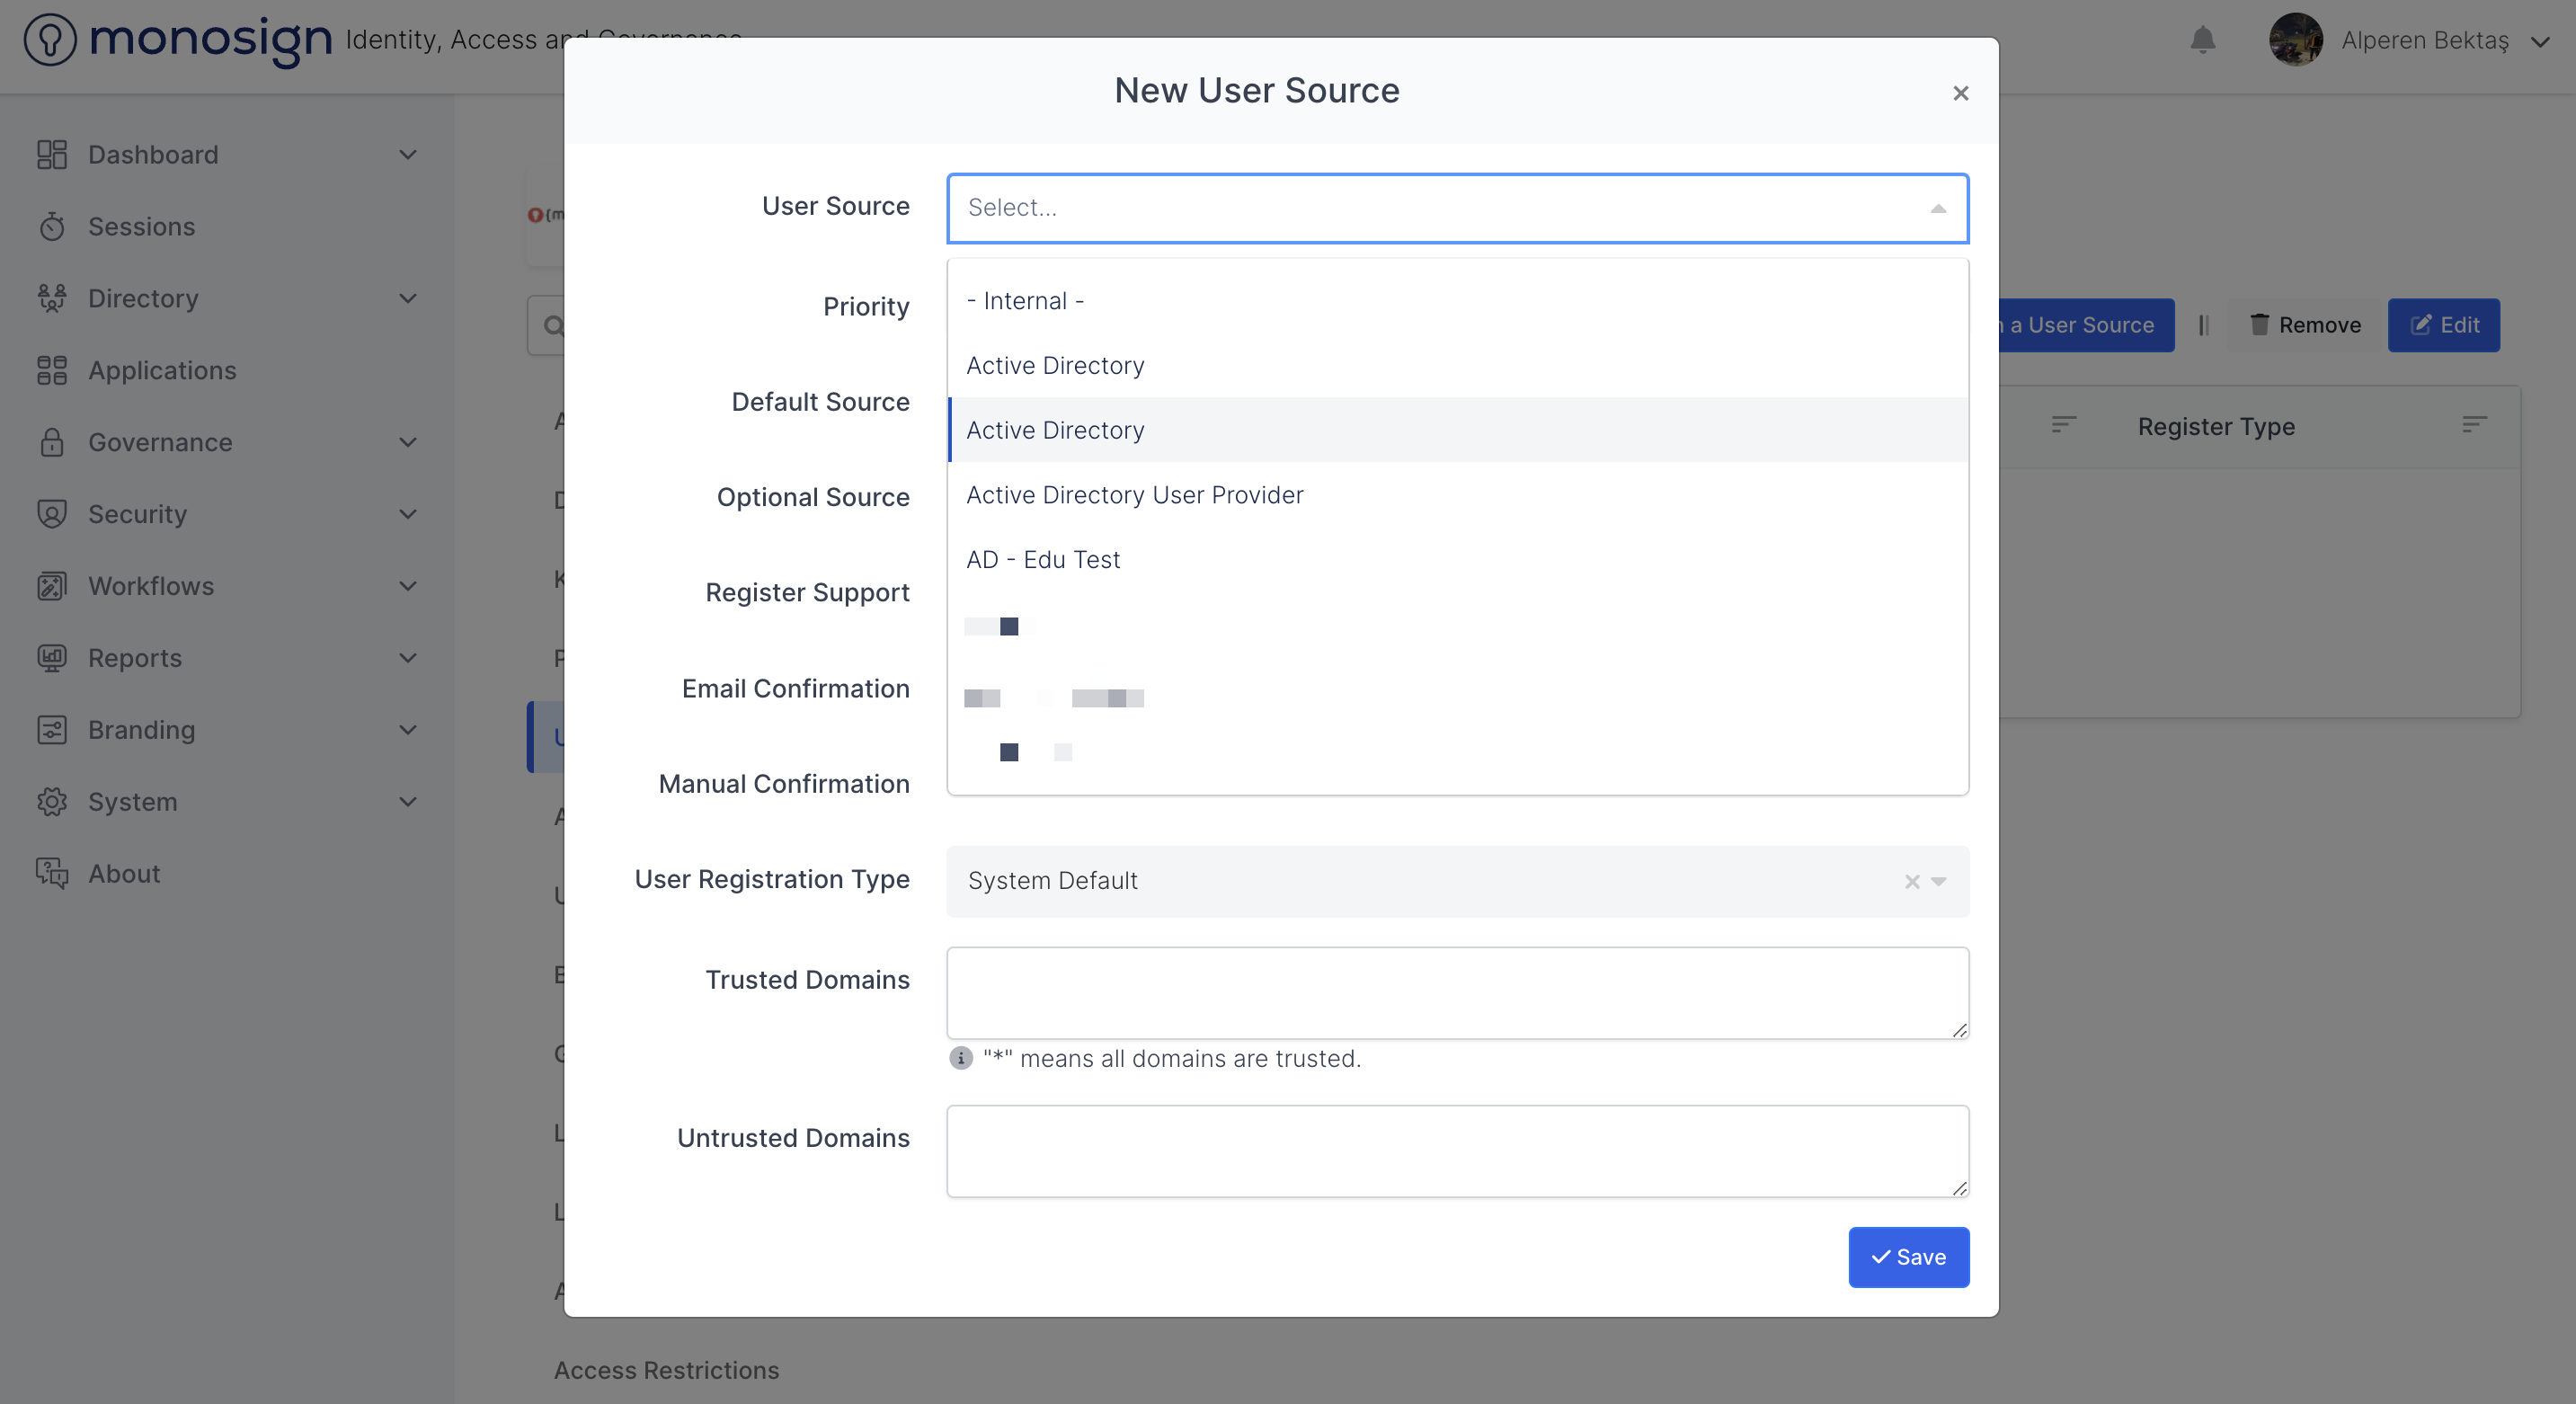
This is the field where you can specify the user resource information when adding a new user resource to the application.
Allows you to specify the user resource internally using the Internal feature.
Active Directory allows you to specify the user source as active directory using its feature.
System Directory allows you to specify the user resource as the system directory using the feature.
Web Service allows you to specify the user resource as web service using its feature.
priority
This is the field where you can specify the priority information when adding a new user resource to the application.
Default Source
This is the field where you can specify whether the resource is the default resource when adding a new user resource to the application. Clicking the checkbox to specify You can activate or deactivate it.
Optional Source
This is the field where you can specify whether the resource is an on-demand resource when adding a new user resource to the application. Clicking the checkbox to specify You can activate or deactivate it.
Register Support
This is the field where you can specify whether the resource supports registration when adding a new user resource to the application. Clicking the checkbox to specify You can activate or deactivate it.
Email Confirmation
When adding a new user resource to the application, you can specify whether the resource is email-approved or not. Clicking the checkbox to specify You can activate or deactivate it.
Manual Confirmation
This is the field where you can specify whether the resource is manually approved when adding a new user resource to the application. Clicking the checkbox to specify You can activate or deactivate it.
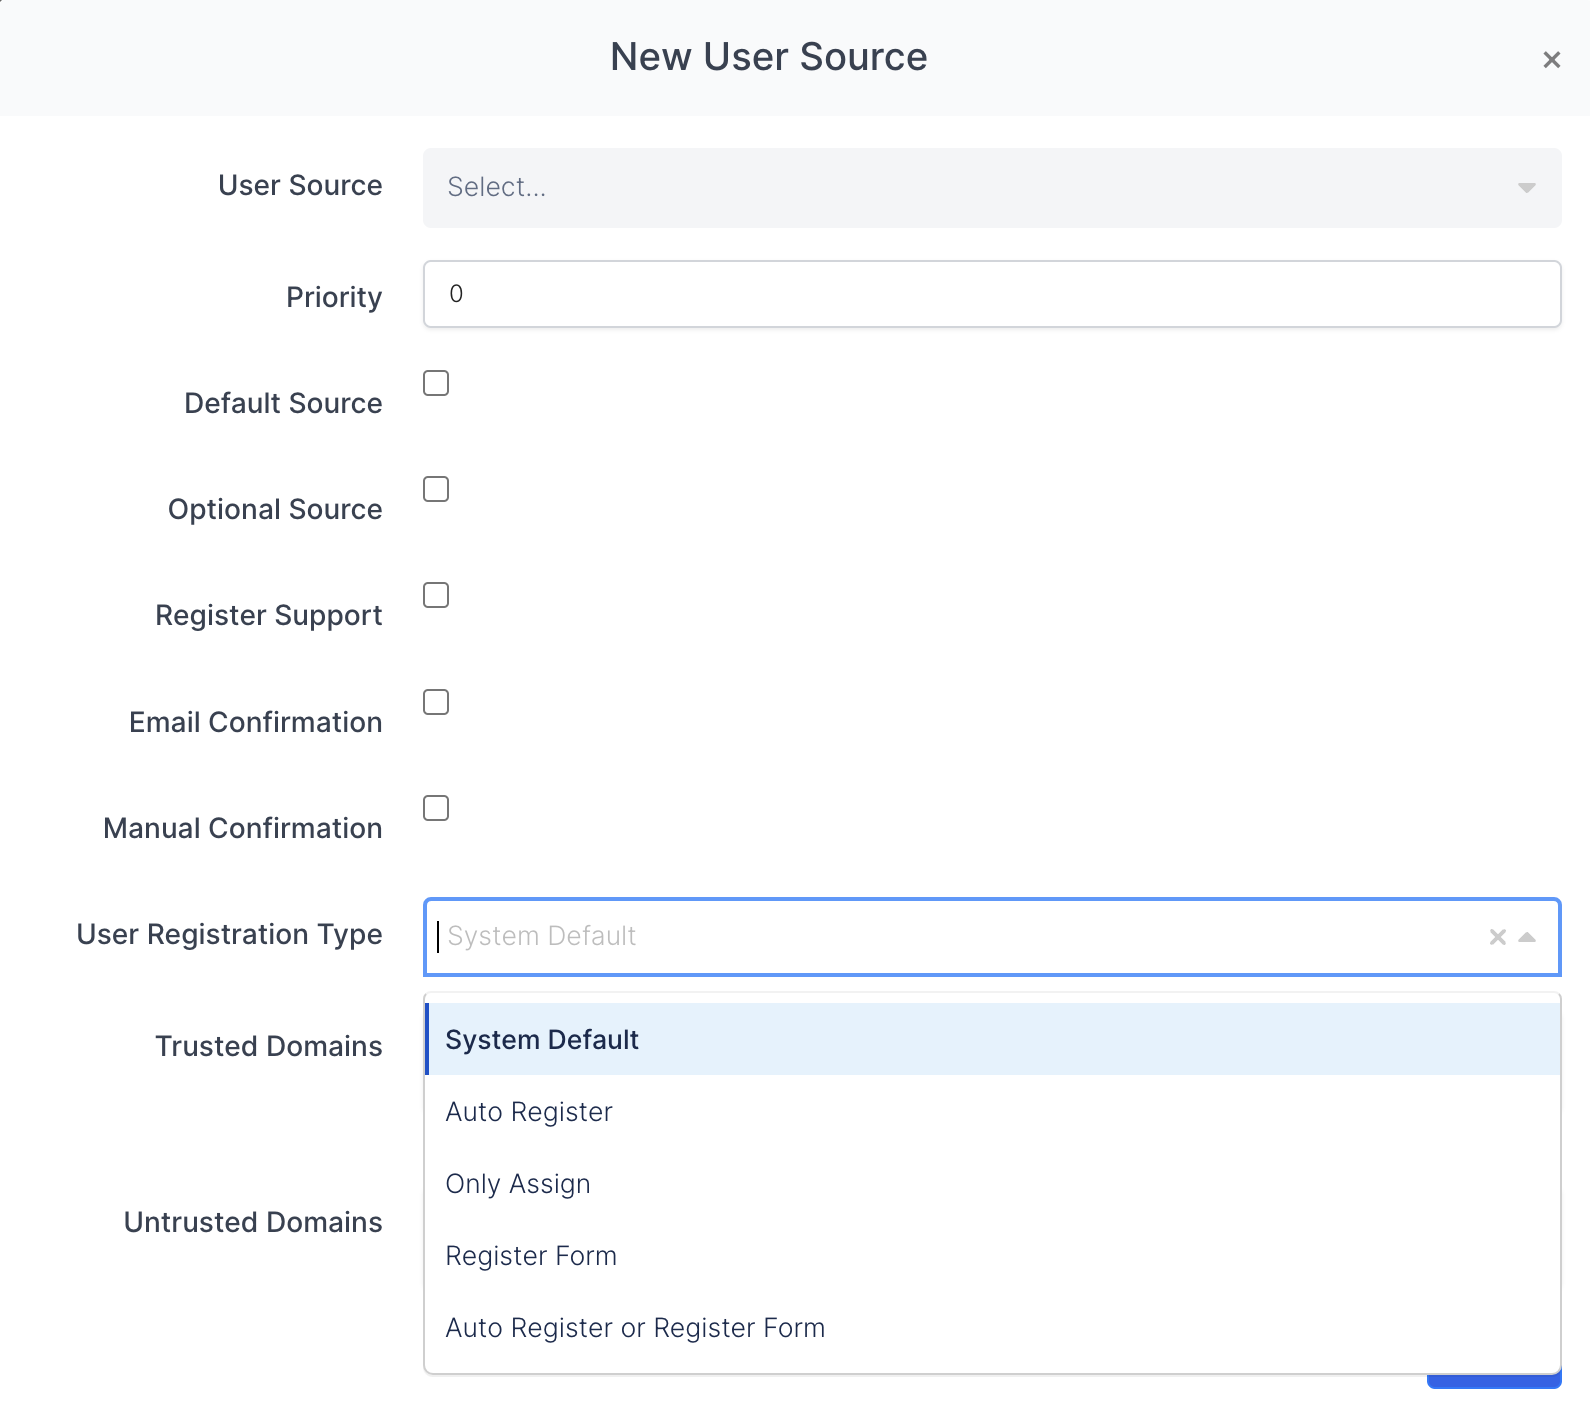
User Registration Type
This is the field where you can specify the user record type / type of the resource when adding a new user resource to the application.
System Default allows the user registration type / type to be set as the system default when adding a new resource.
Auto Register provides automatic registration of user registration type / type when adding a new resource.
Only Assign ensures that the user record type / type is determined as assignment only when adding a new resource.
Register Form allows the user registration type / type to be set as the registration form when adding a new resource.
Auto Register or Register Form allows the user registration type / type to be determined as automatic registration or registration form when adding a new resource.
Trusted Domains
When adding a new user resource to the application, it is the field where you can specify the resource's trusted domains information. Just below the Trusted Domain You can view the information "("*" means all domains are trusted)". The asterisk means "all domains are trusted".
Untrusted Domains
When adding a new user resource to the application, you can specify the resource's untrusted domains information.
Save
After all the fields are filled and the properties are determined, a new application user resource is added by clicking the green "save" button at the bottom right of the window. It will issue a confirmation notification to your stake when the transaction is successful.
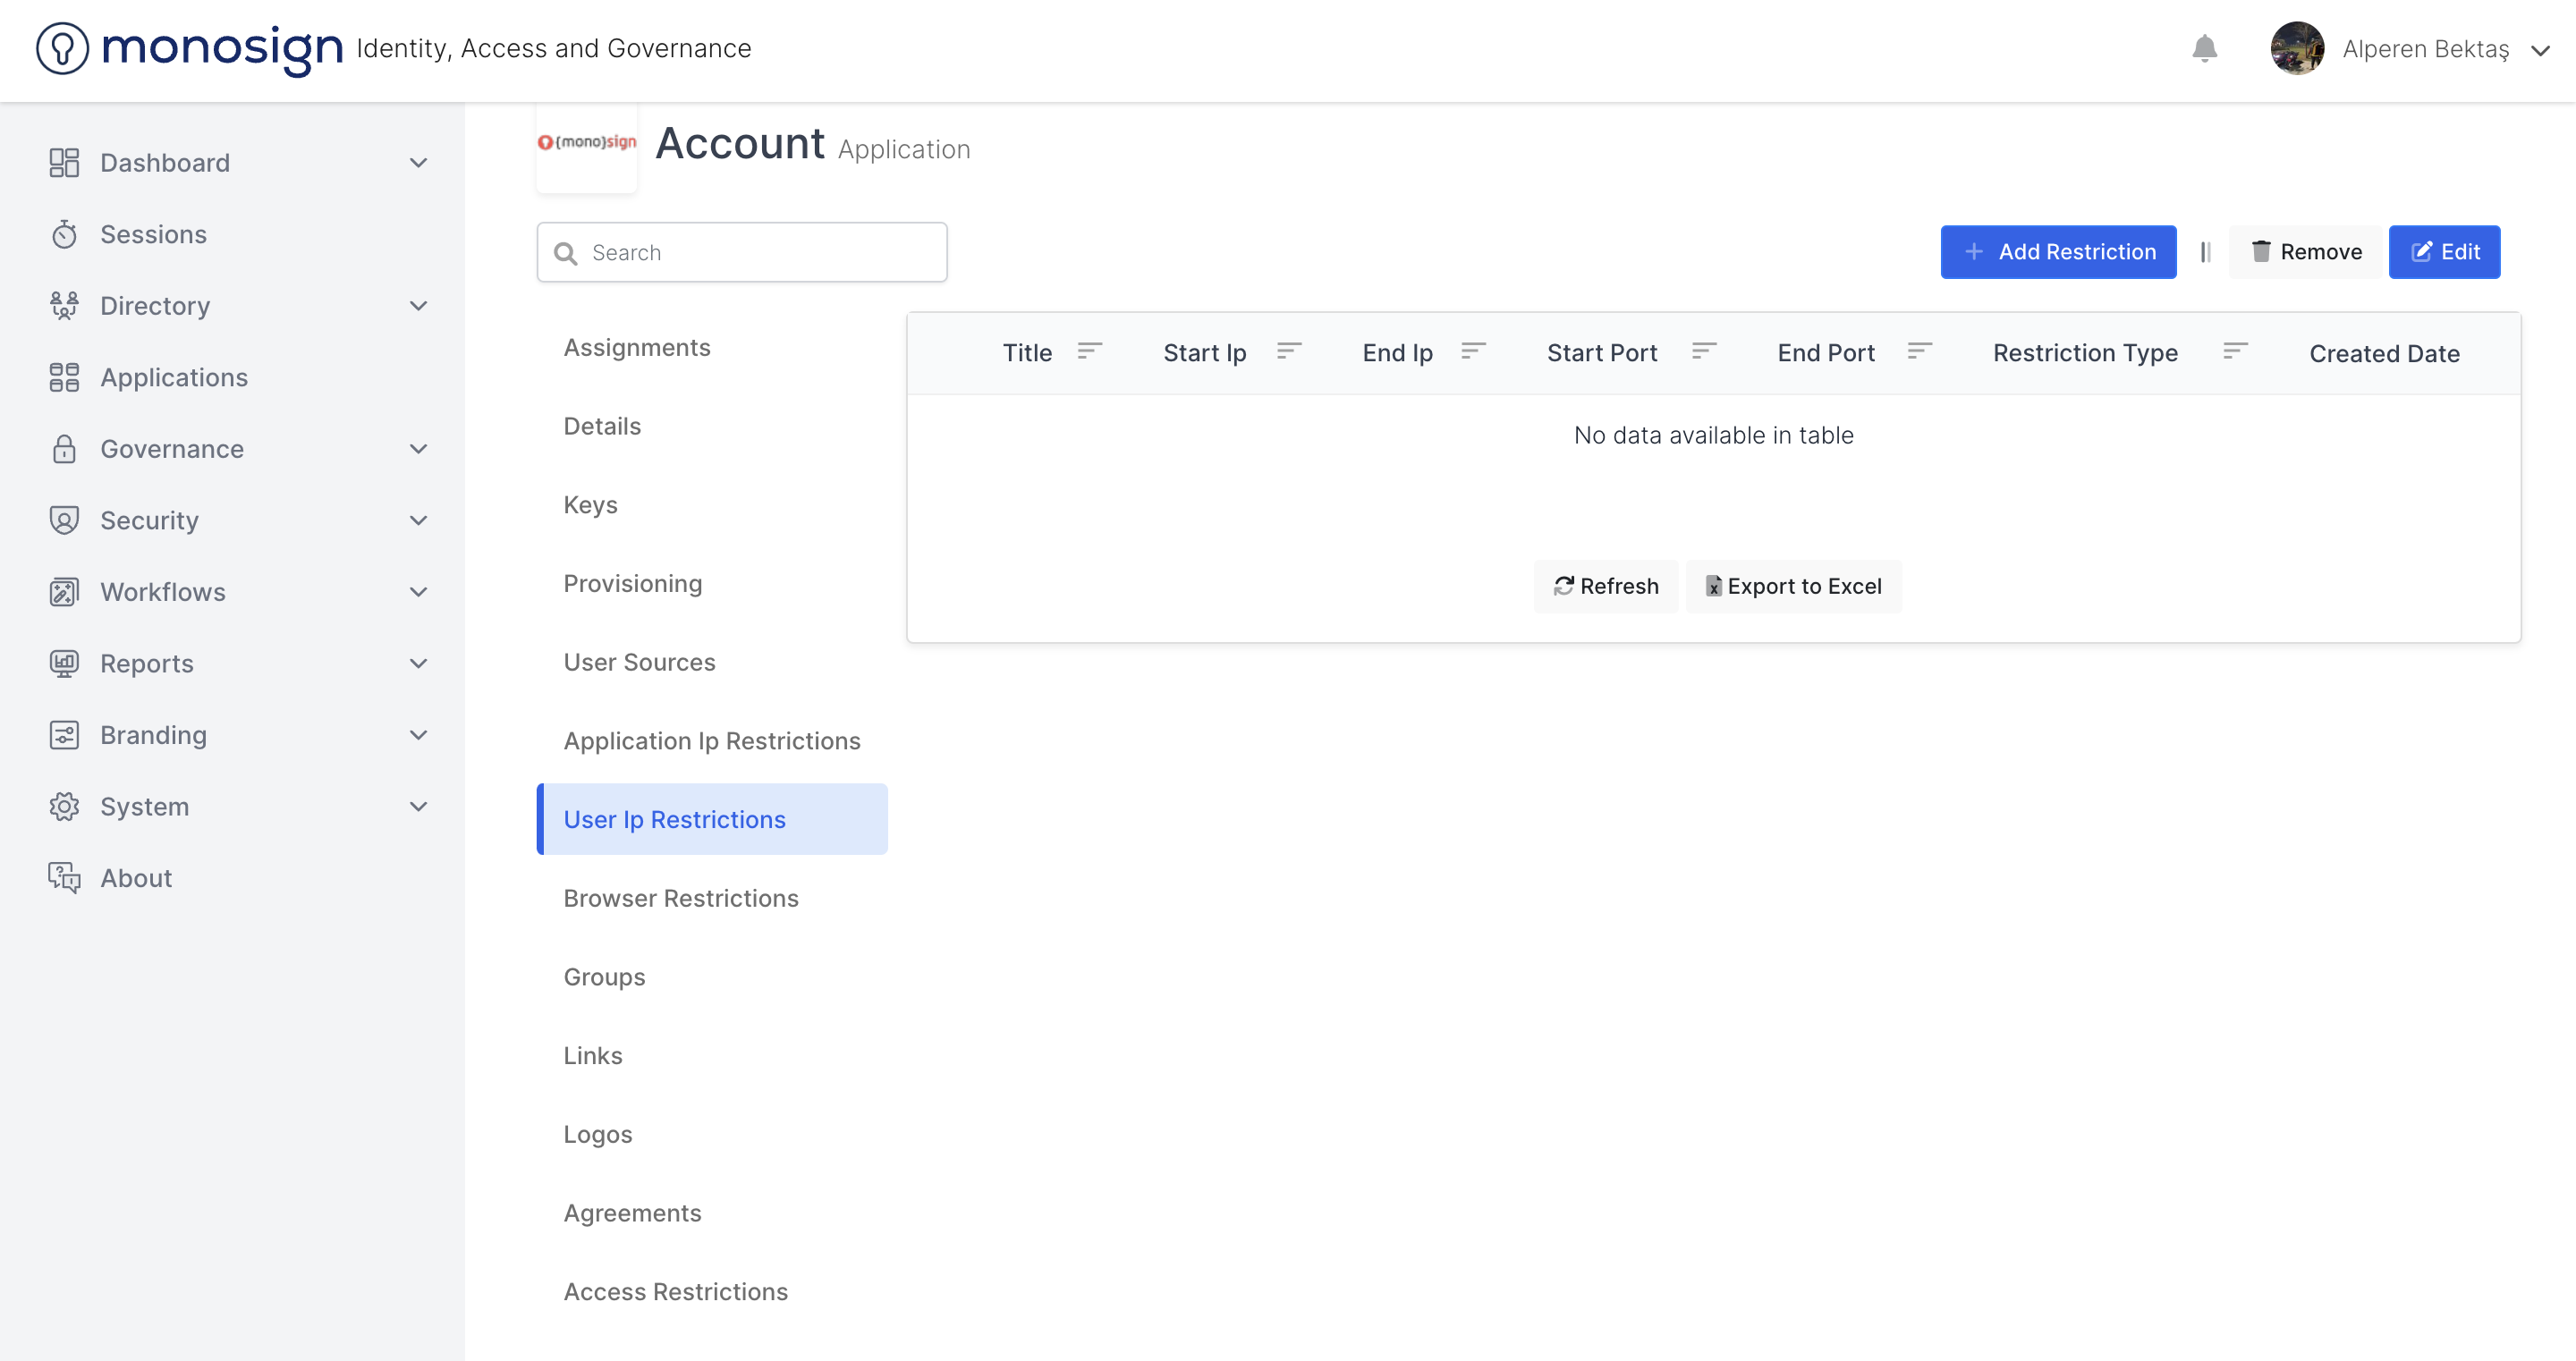
Application Ip Restrictions
This is the page where you can view the IP restrictions of the application.
You can sort and filter the application IP restrictions according to the fields below.
Sections |
|---|
Title |
Start Ip |
End Ip |
Start Port |
End Port |
Restriction Type |
Created Date |
Title
Application Ip restrictions is the area where you can view and filter header information.
Start Ip
Application Ip restrictions is the area where you can view and filter the initial IP information.
End Ip
Application Ip restrictions is the area where you can view and filter the end IP information.
Start Port
Application Ip restrictions is the area where you can view and filter the starting port information.
End Port
This is the area where you can view and filter the application IP restrictions end port information.
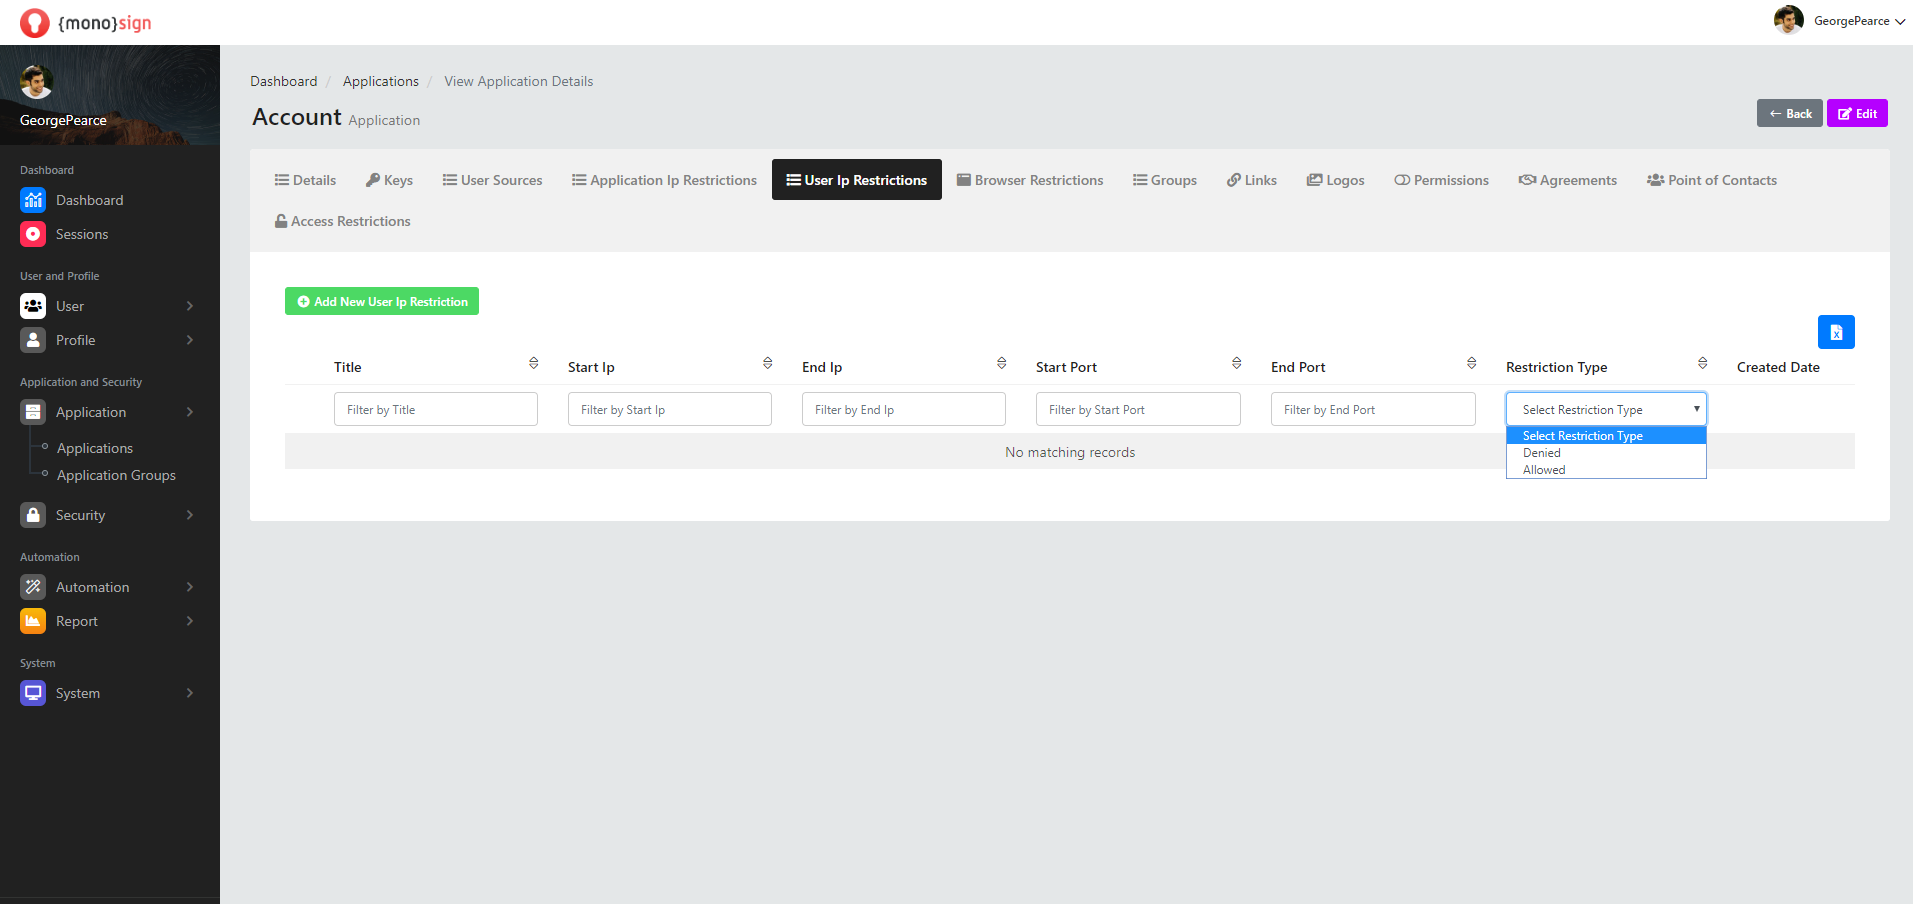
Restriction Type
View the application IP restrictions restriction type information,
Denied - Denied
Allowed - Allowed
this is the area where you can filter by options.
Created Date
This is the area where you can view the application IP restrictions creation date information.
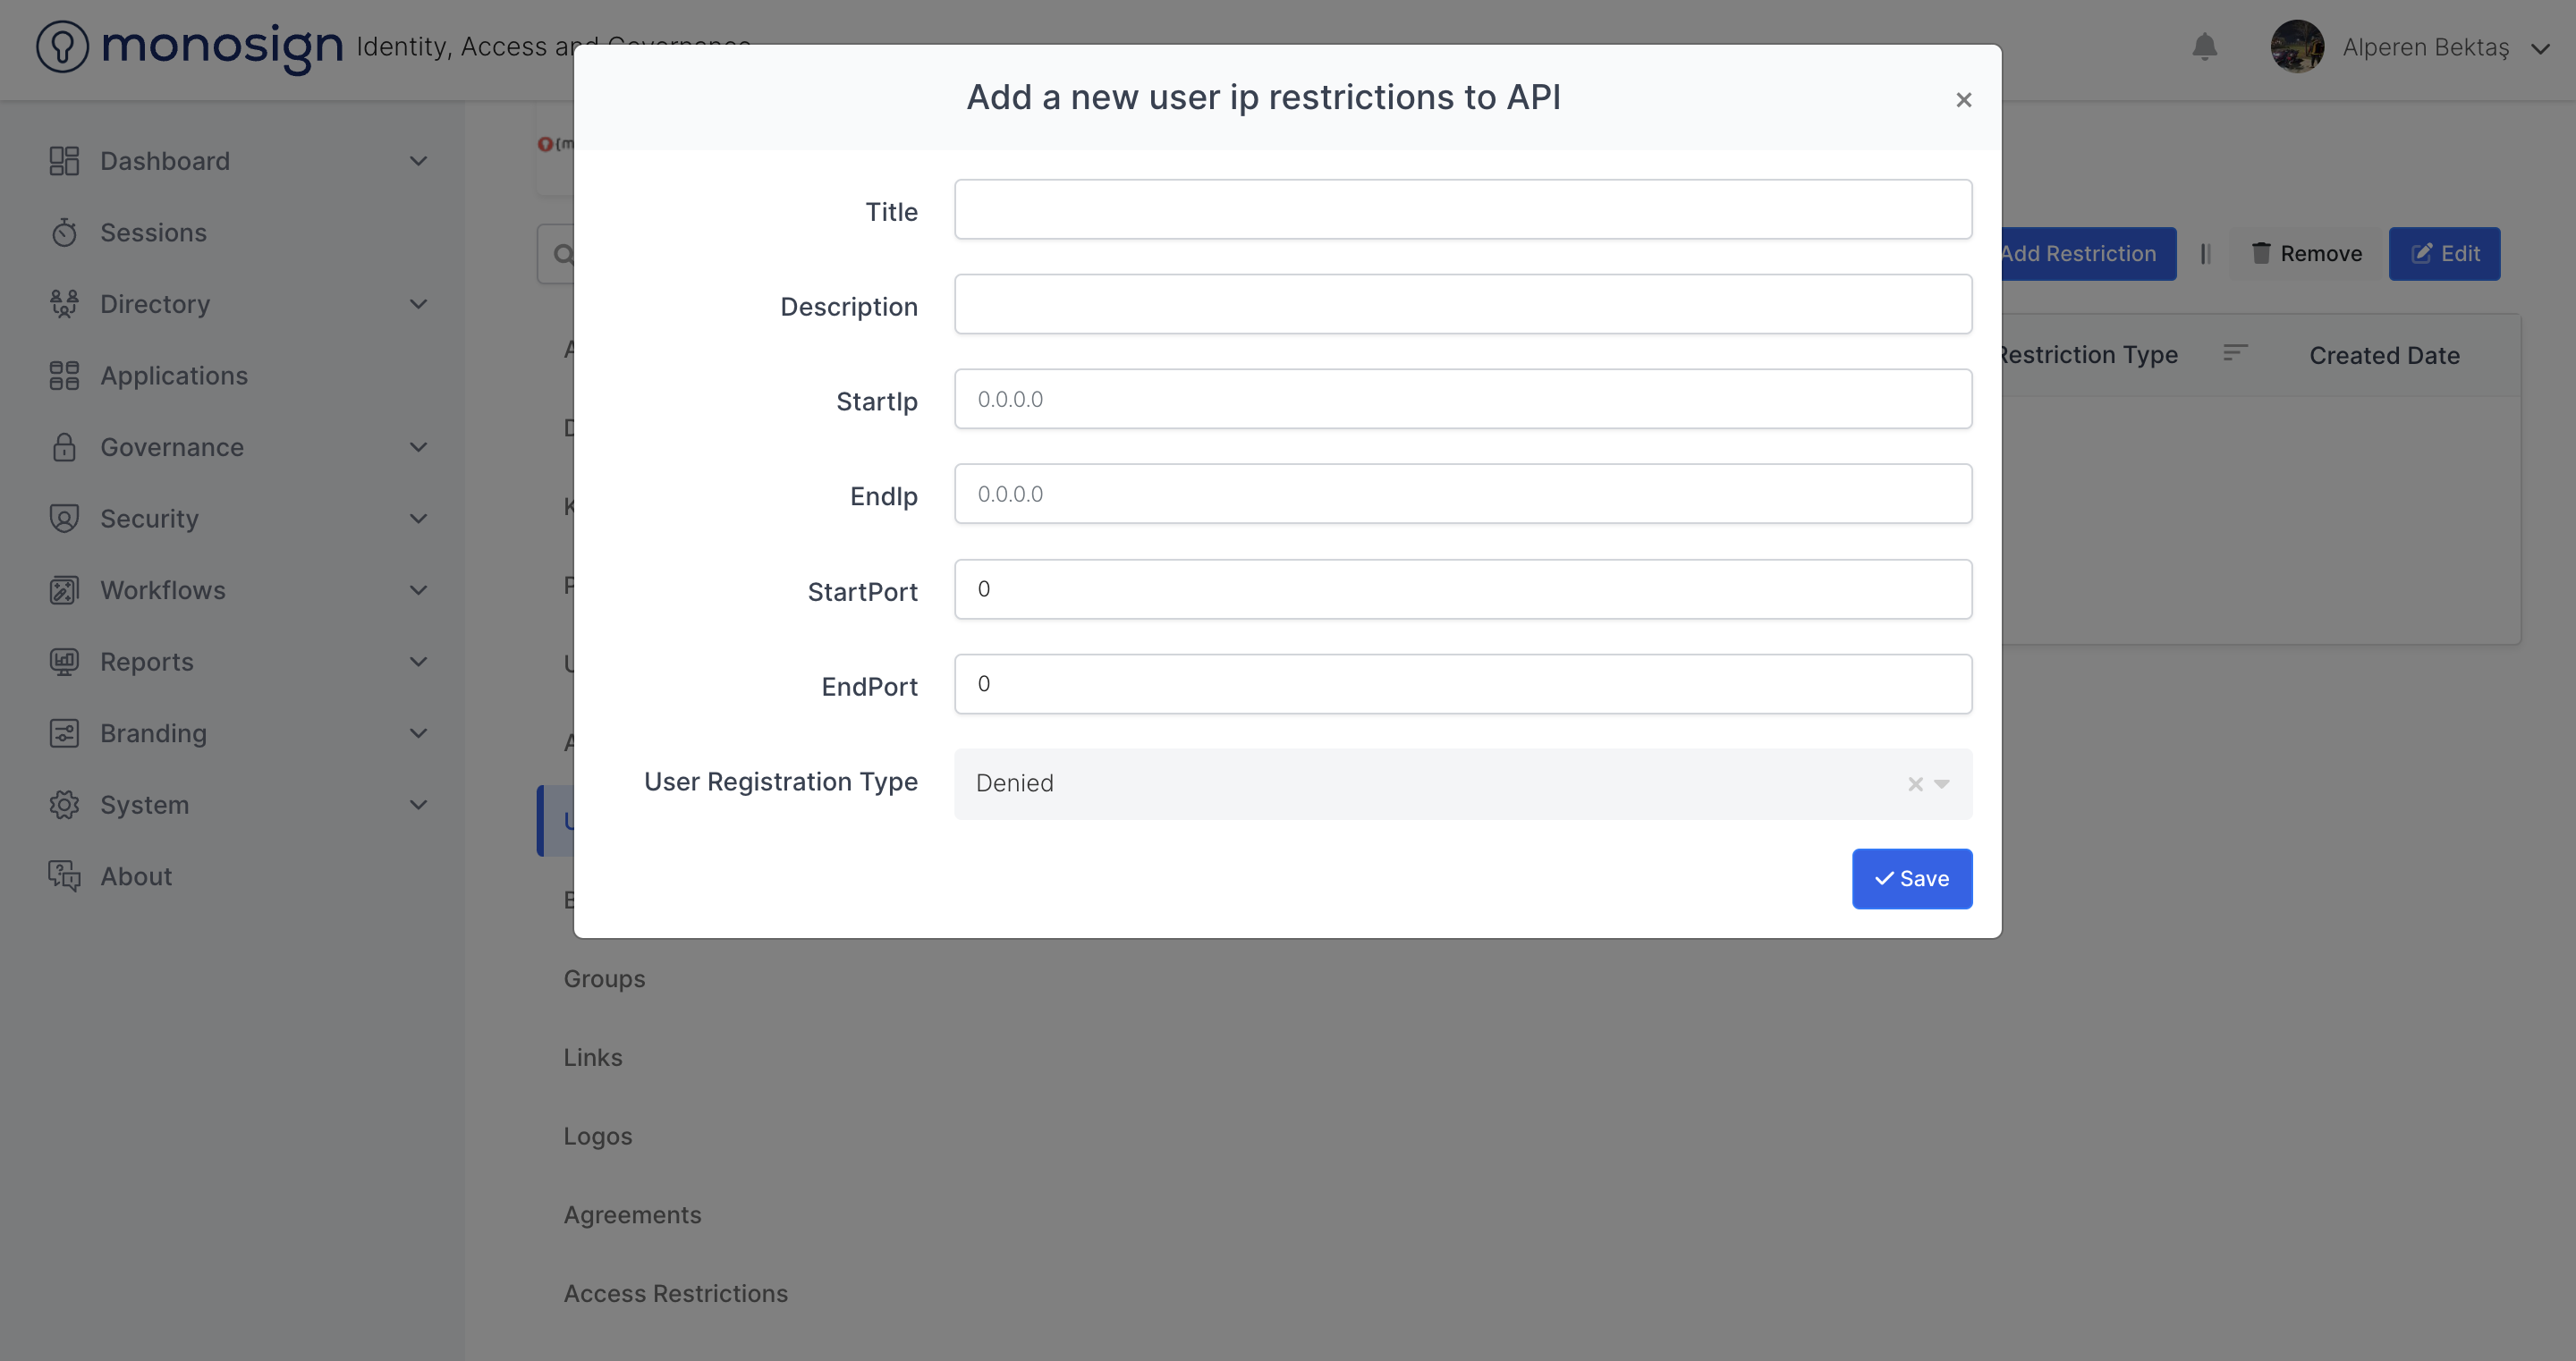
Add New Ip Restriction
Add a new Ip restriction button opens a new Ip restriction window. A new IP restriction window consists of the following sections.
Sections |
|---|
Title |
Description |
StartIp |
EndIp |
StartPort |
EndPort |
User Registration Type |
Title
This is the field where you can specify the header information when adding a new IP restriction to the application.
Description
This is the field where you can specify the description information when adding a new IP restriction to the application.
StartIp
This is the field where you can specify the initial IP information when adding a new IP restriction to the application.
EndIp
This is the area where you can specify the ending IP information when adding a new IP restriction to the application.
StartPort
This is the field where you can specify the starting port information when adding a new IP restriction to the application.
EndPort
This is the area where you can specify the end port information when adding a new IP restriction to the application.
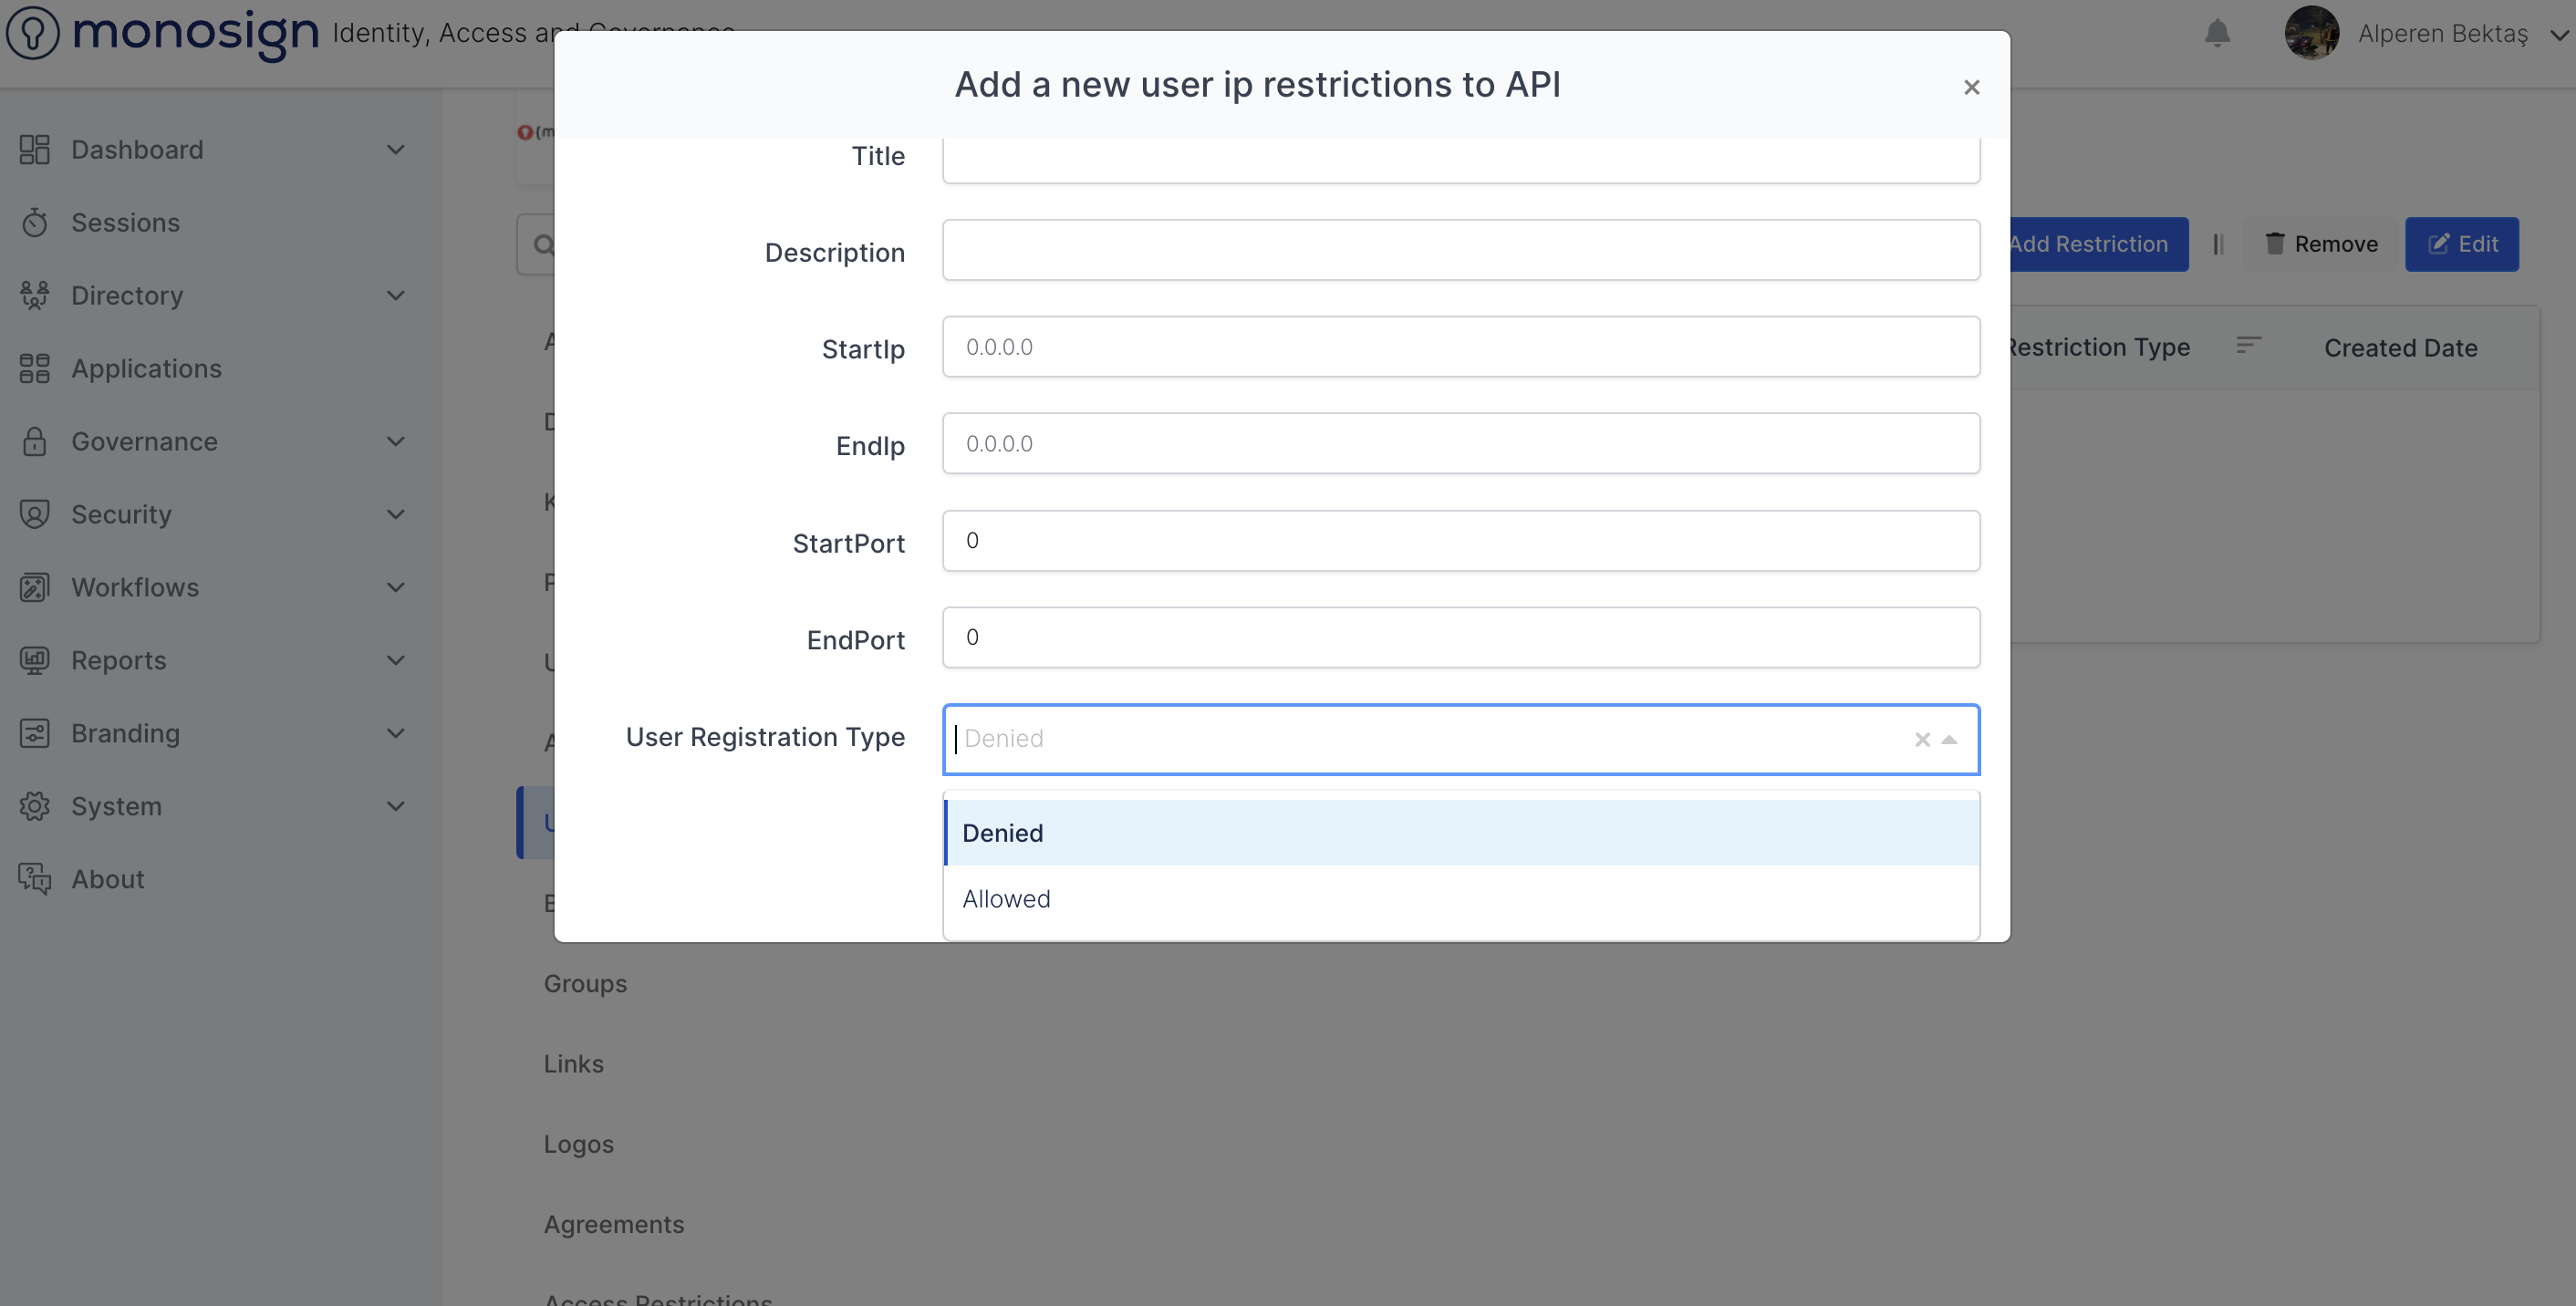
User Registration Type
When adding a new IP restriction to the application, the user restriction type information
Denied - Allows it to be set as Denied.
Allowed - Allows to be set as Allowed.
Save
After all the fields are filled and the properties are determined, a new application IP restriction is added by clicking the green "save" button at the bottom right of the window. It will issue a confirmation notification to your stake when the transaction is successful.
User Ip Restrictions
It is the page where you can view the user IP restrictions of the application.
You can sort and filter the application's user IP restrictions by fields.
Sections |
|---|
Title |
Start Ip |
End Ip |
Start Port |
End Port |
Restriction Type |
Created Date |
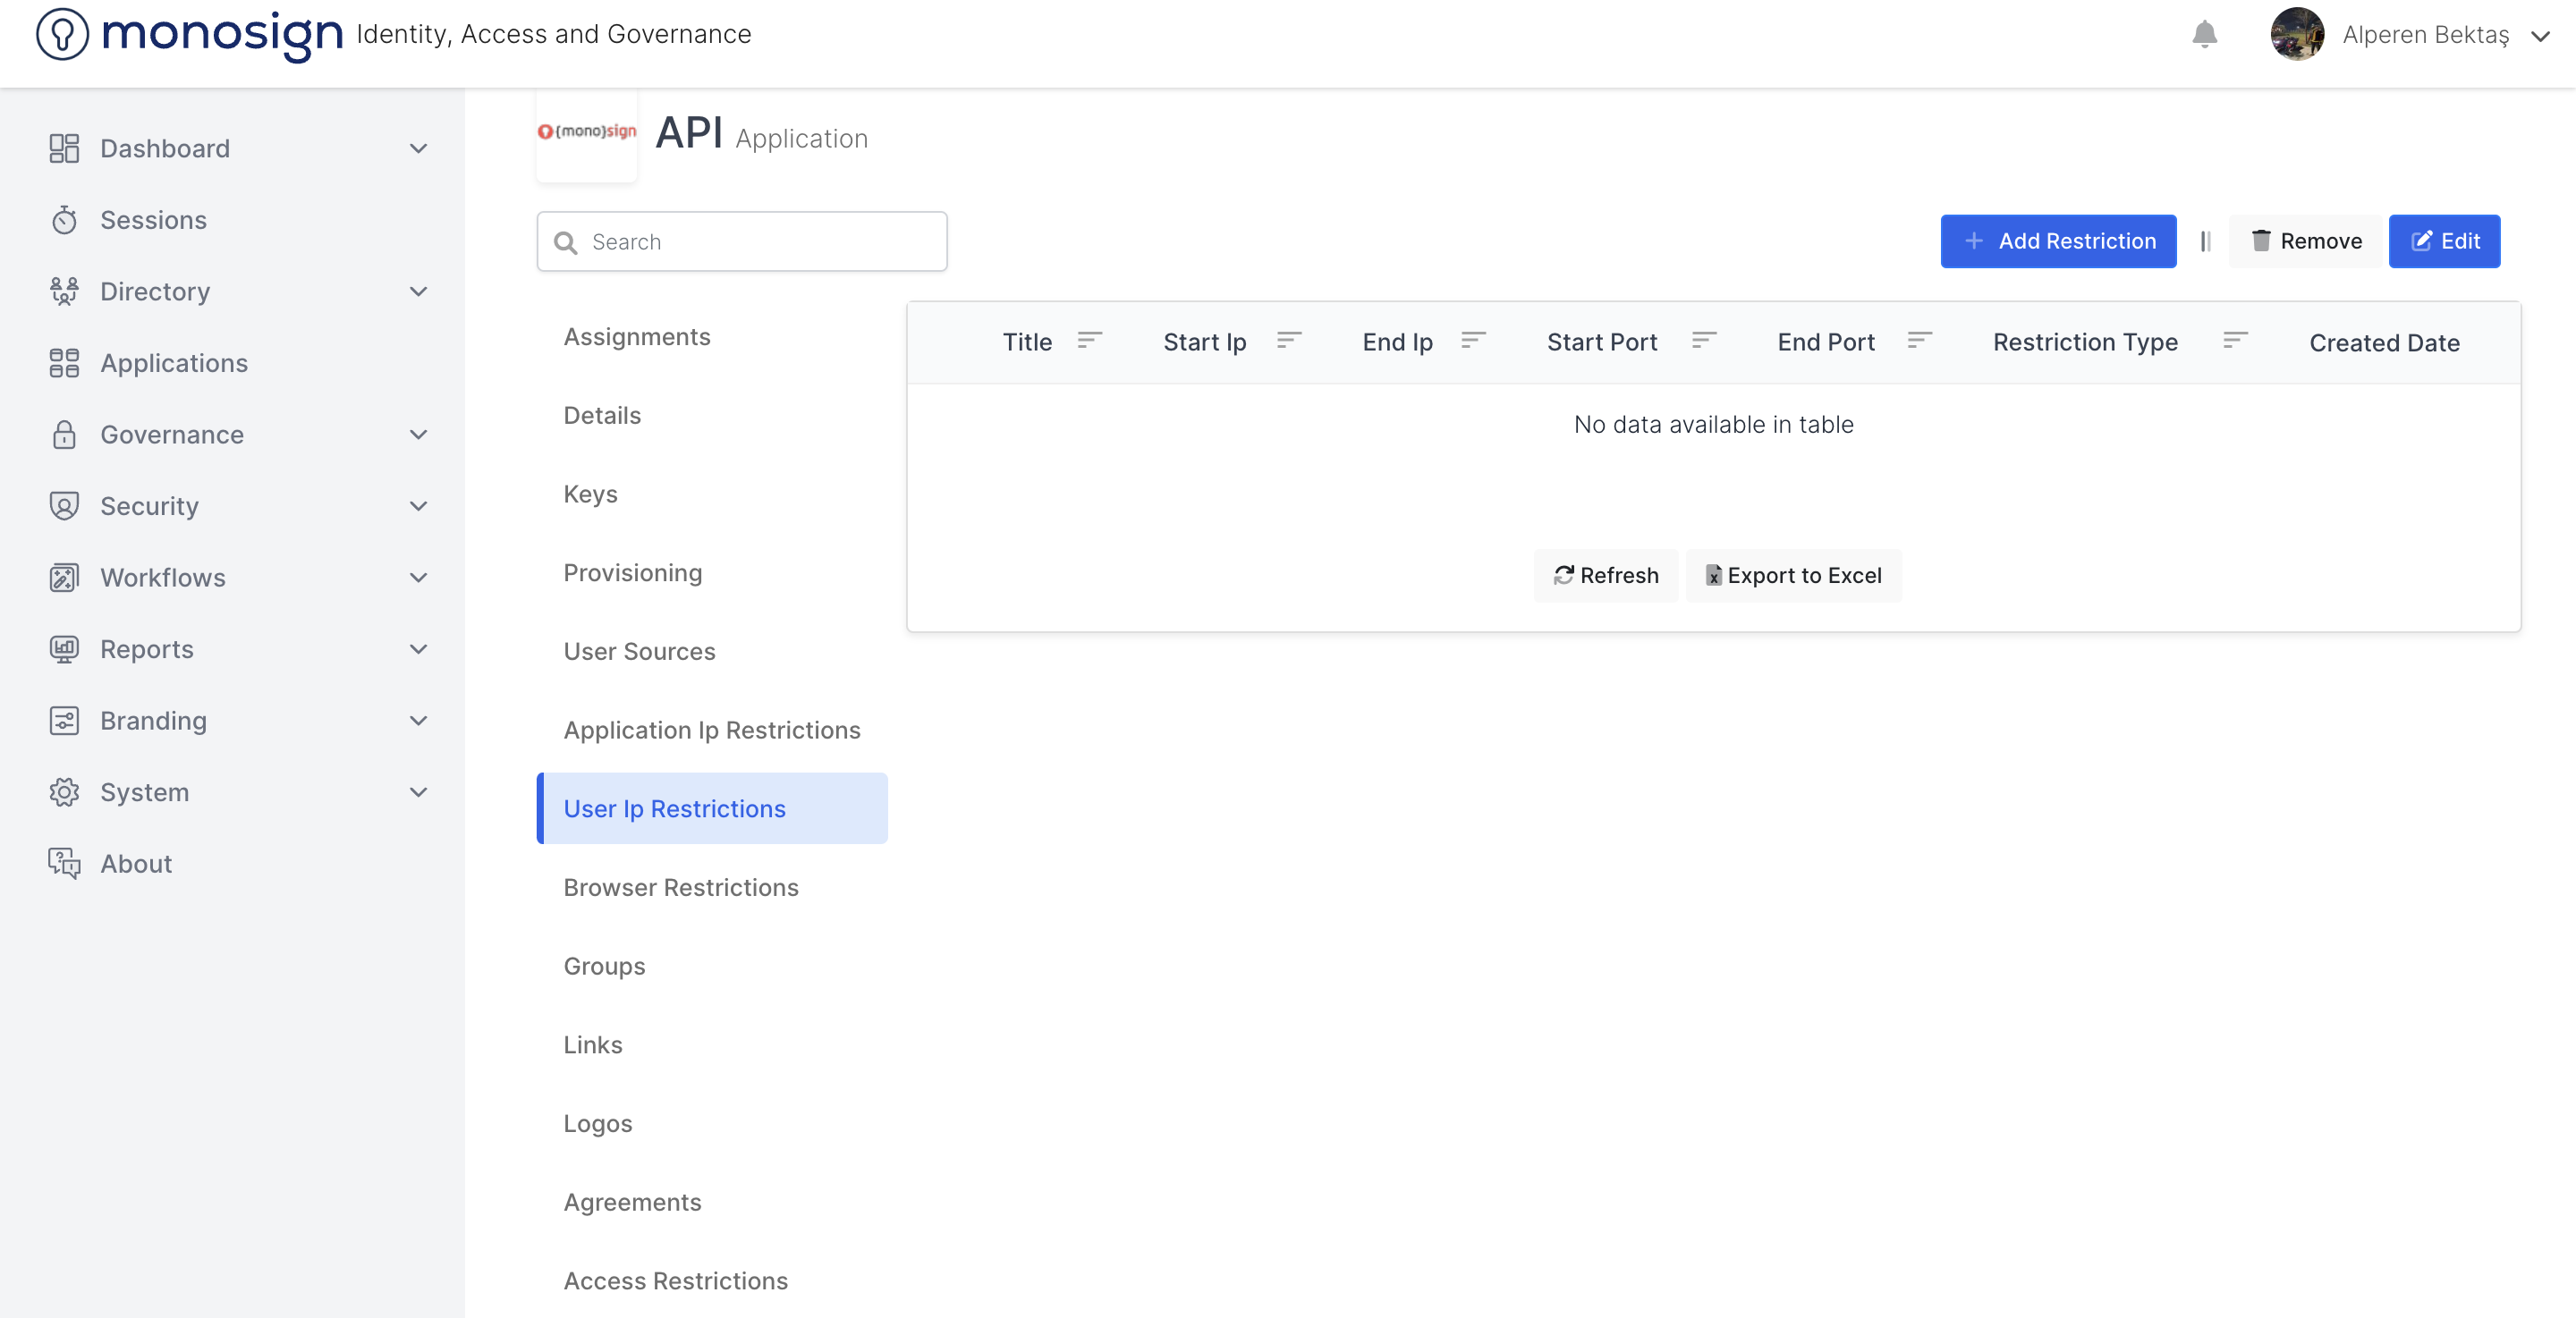
Title
It is the area of the application where you can view and filter the user IP restrictions header information.
Start Ip
It is the area where you can view and filter the user IP restrictions and initial IP information of the application.
End Ip
It is the area of the application where you can view and filter the user Ip restrictions ending Ip information.
Start Port
It is the area where you can view and filter the user IP restrictions start port information of the application.
End Port
It is the area where you can view and filter the user IP restrictions end port information of the application.
Restriction Type
It is the area where you can view the user IP restrictions restriction type / type information and filter according to the options of the application.
Denied
Allowed
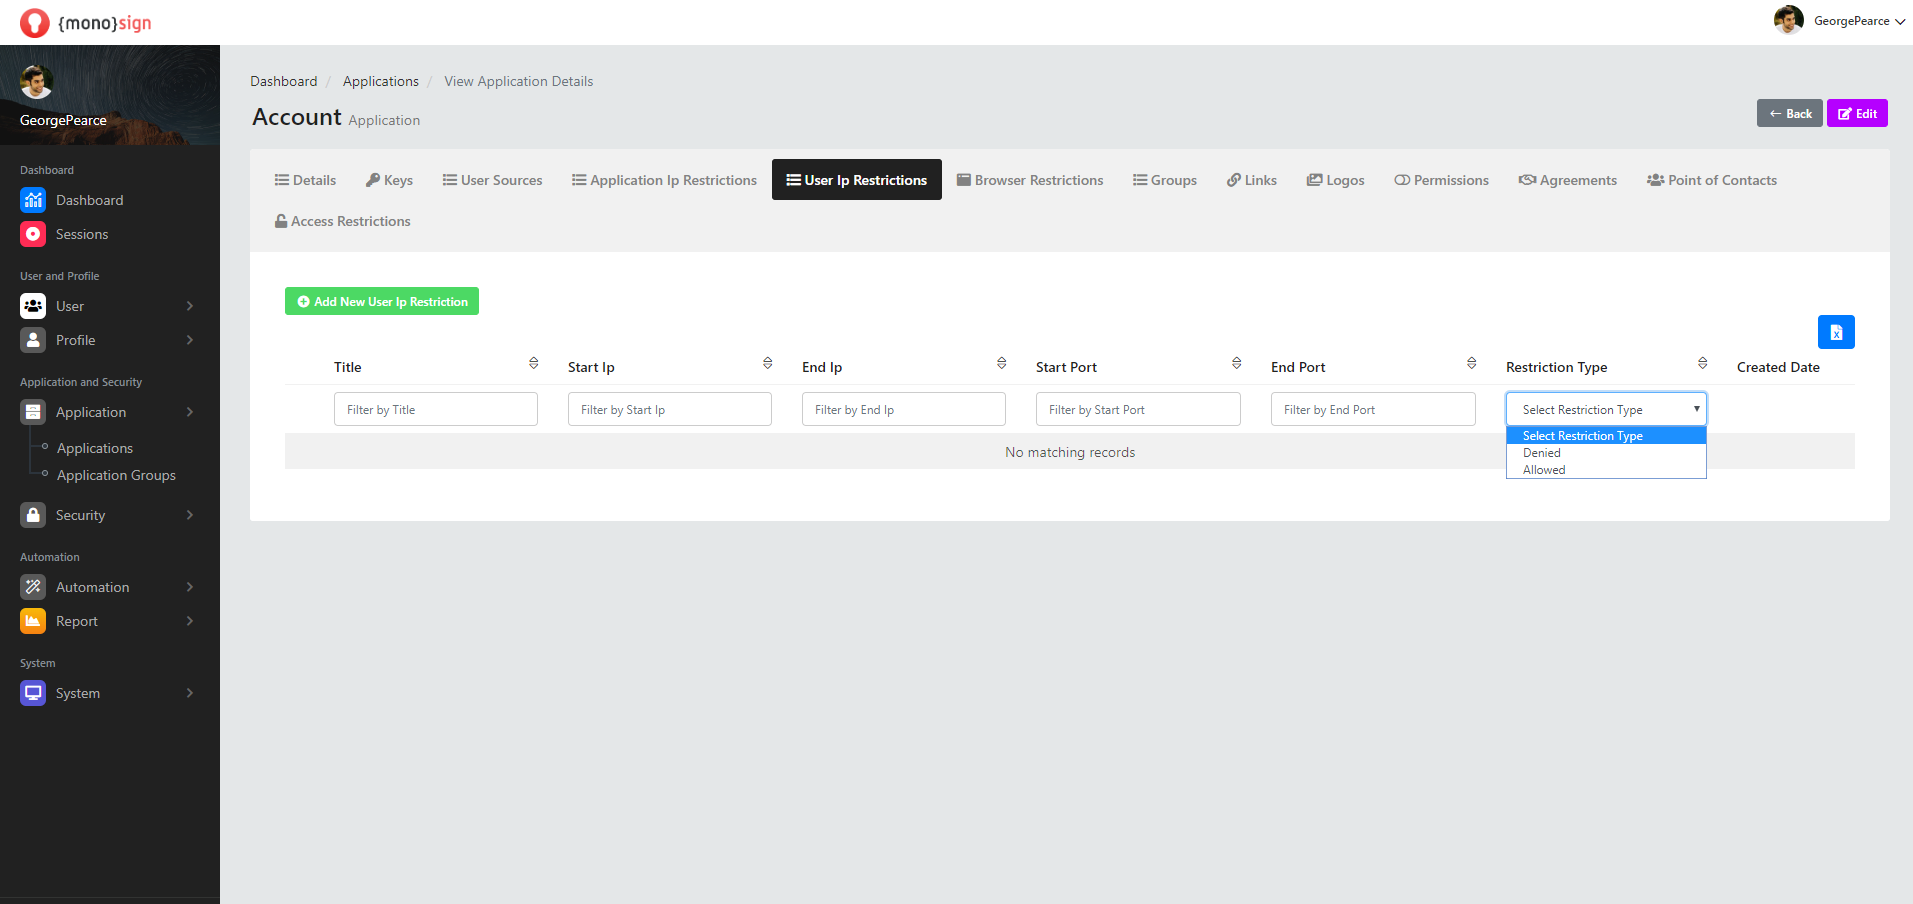
Created Date
This is the area where you can view the Ip restrictions creation date information of the application.
Save
After all the fields are filled and the properties are determined, a new user IP restriction is added for the application by clicking the green "save" button at the bottom right of the window. It will issue a confirmation notification to your stake when the transaction is successful.
Browser Restrictions
This is the page where you can view the application's browser restrictions.
You can sort and filter the application's browser restrictions by fields.
Sections |
|---|
Title |
MinVersion |
MaxVersion |
Restriction Type |
Created Date |
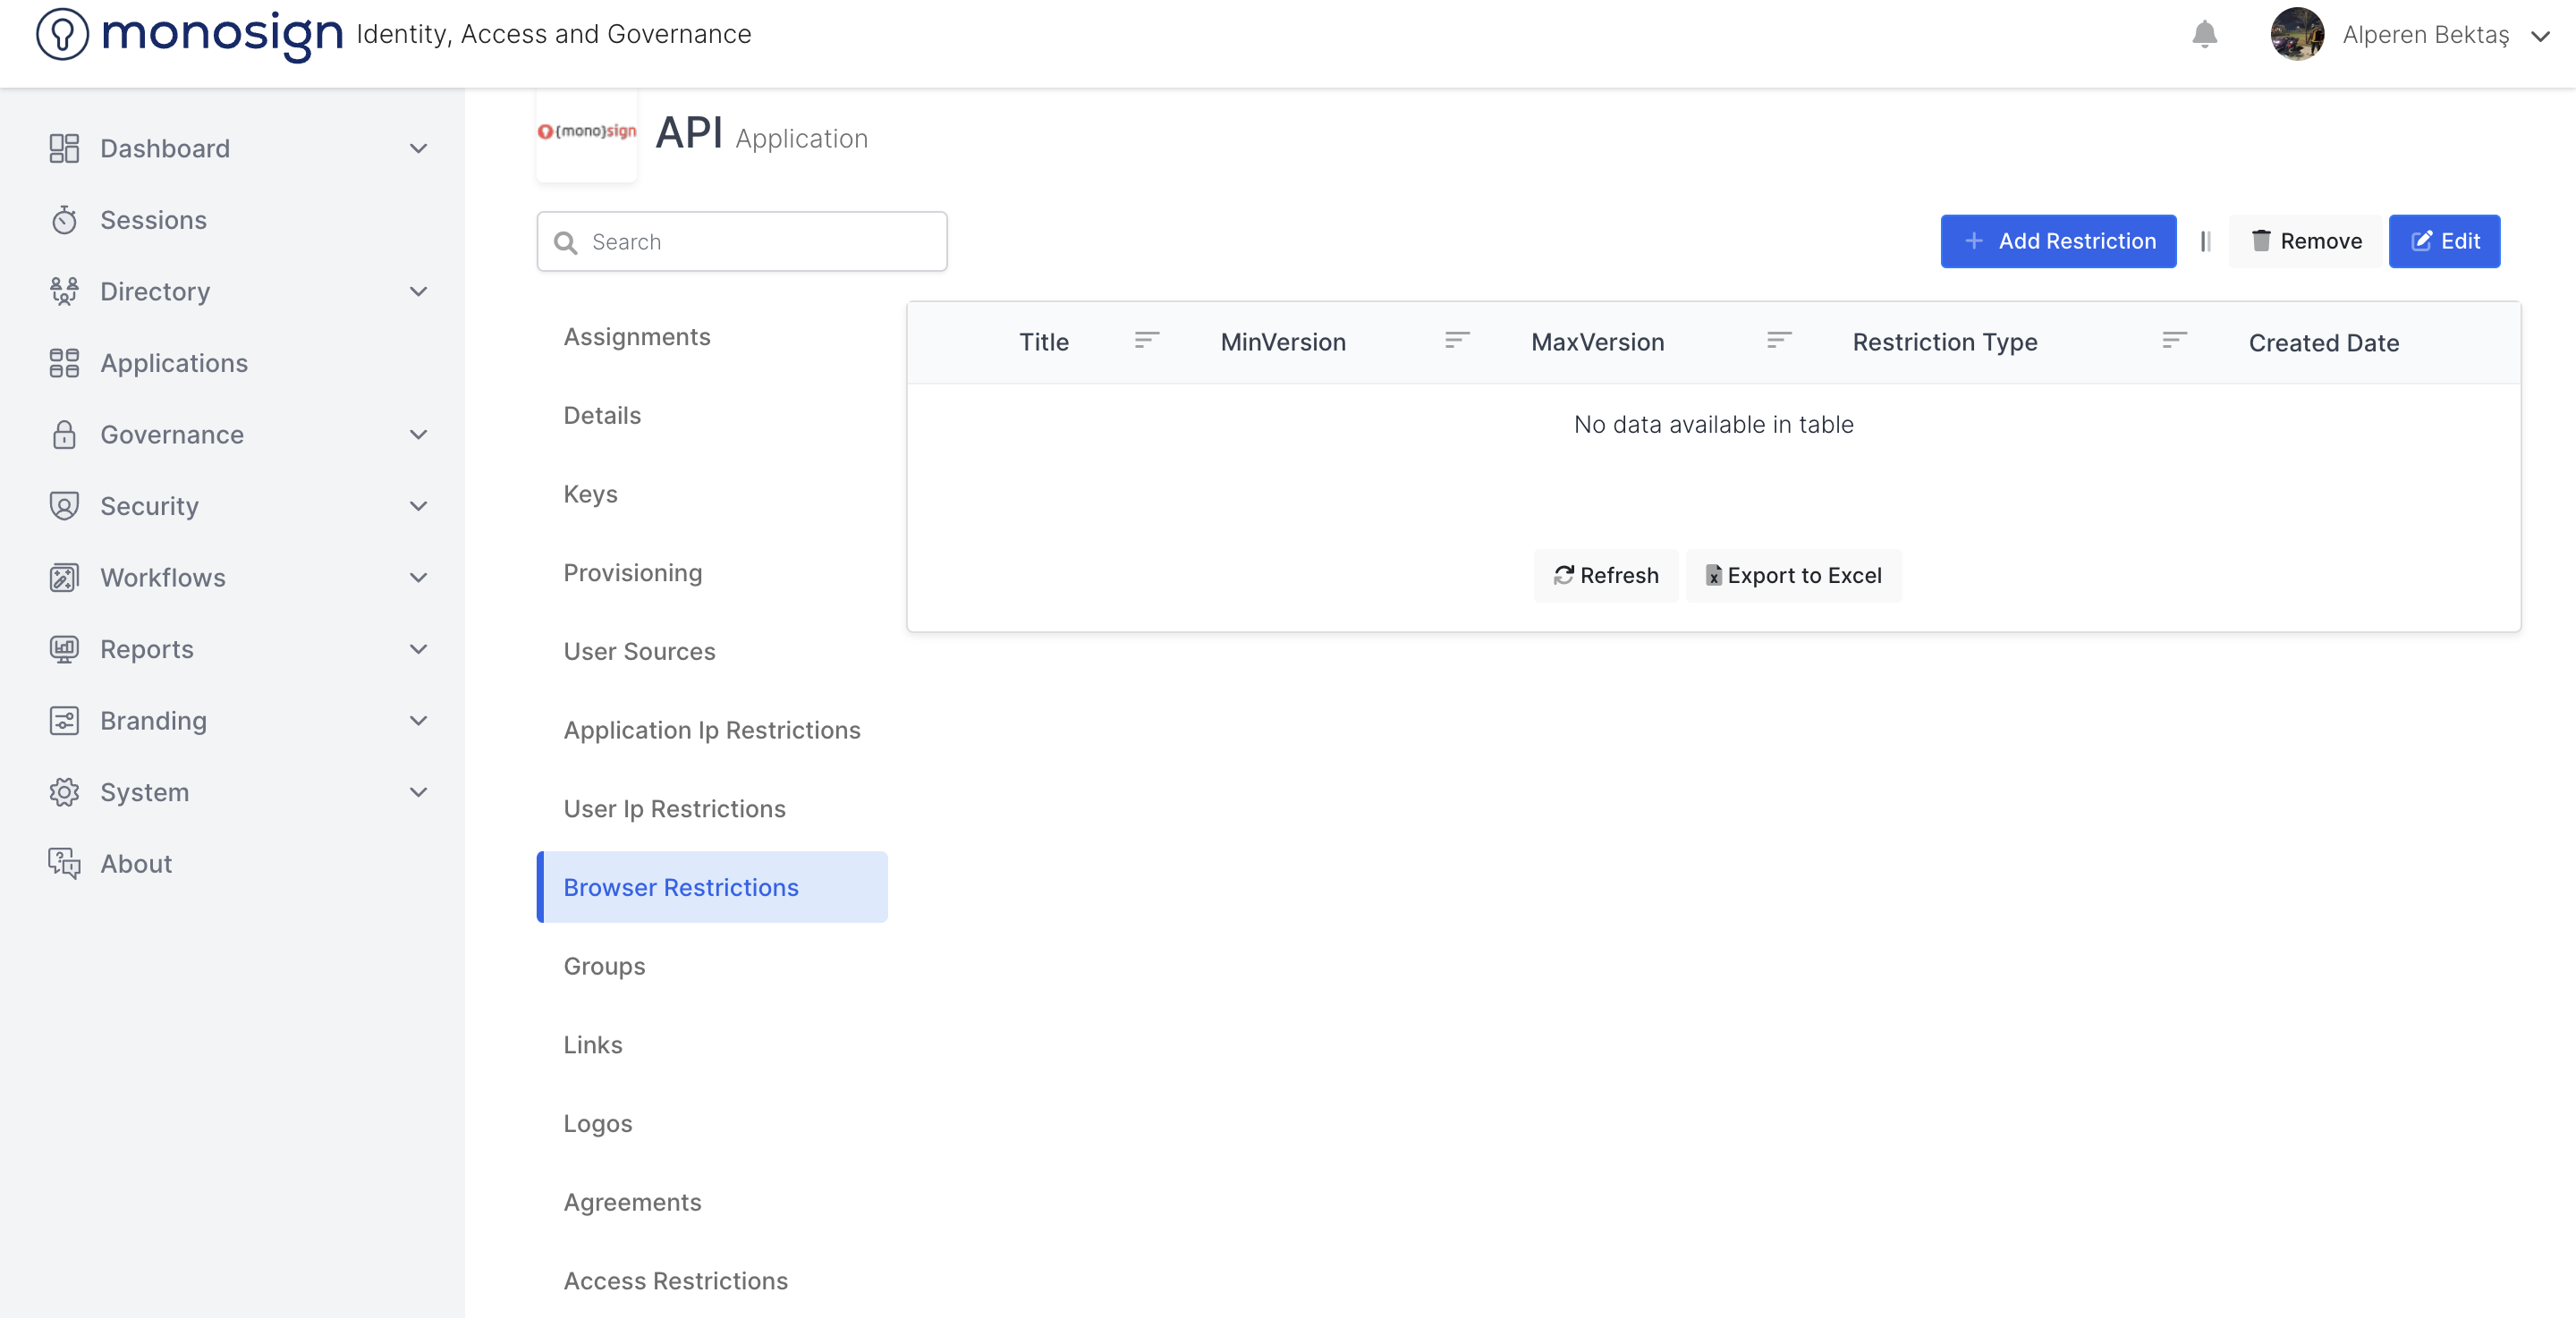
Title
This is the area where you can view and filter the browser restrictions header information of the application.
MinVersion
This is the area where you can view and filter information about the application, browser restrictions, minimum version.
MaxVersion
This is the area where you can view and filter the application, browser restrictions, maximum version information.
Restriction Type
The application displays the browser restrictions type / type information,
Denied
Allowed
this is the area where you can filter by options.
Created Date
This is the area where you can view the browser restrictions creation date information of the application.
Add New Browser Restriction
Add a new browser restriction button opens a window where you can add a new browser restriction. A new browser restriction window consists of sections.
Sections |
|---|
Browser Title |
Min Version |
Max Version |
Restriction Type |
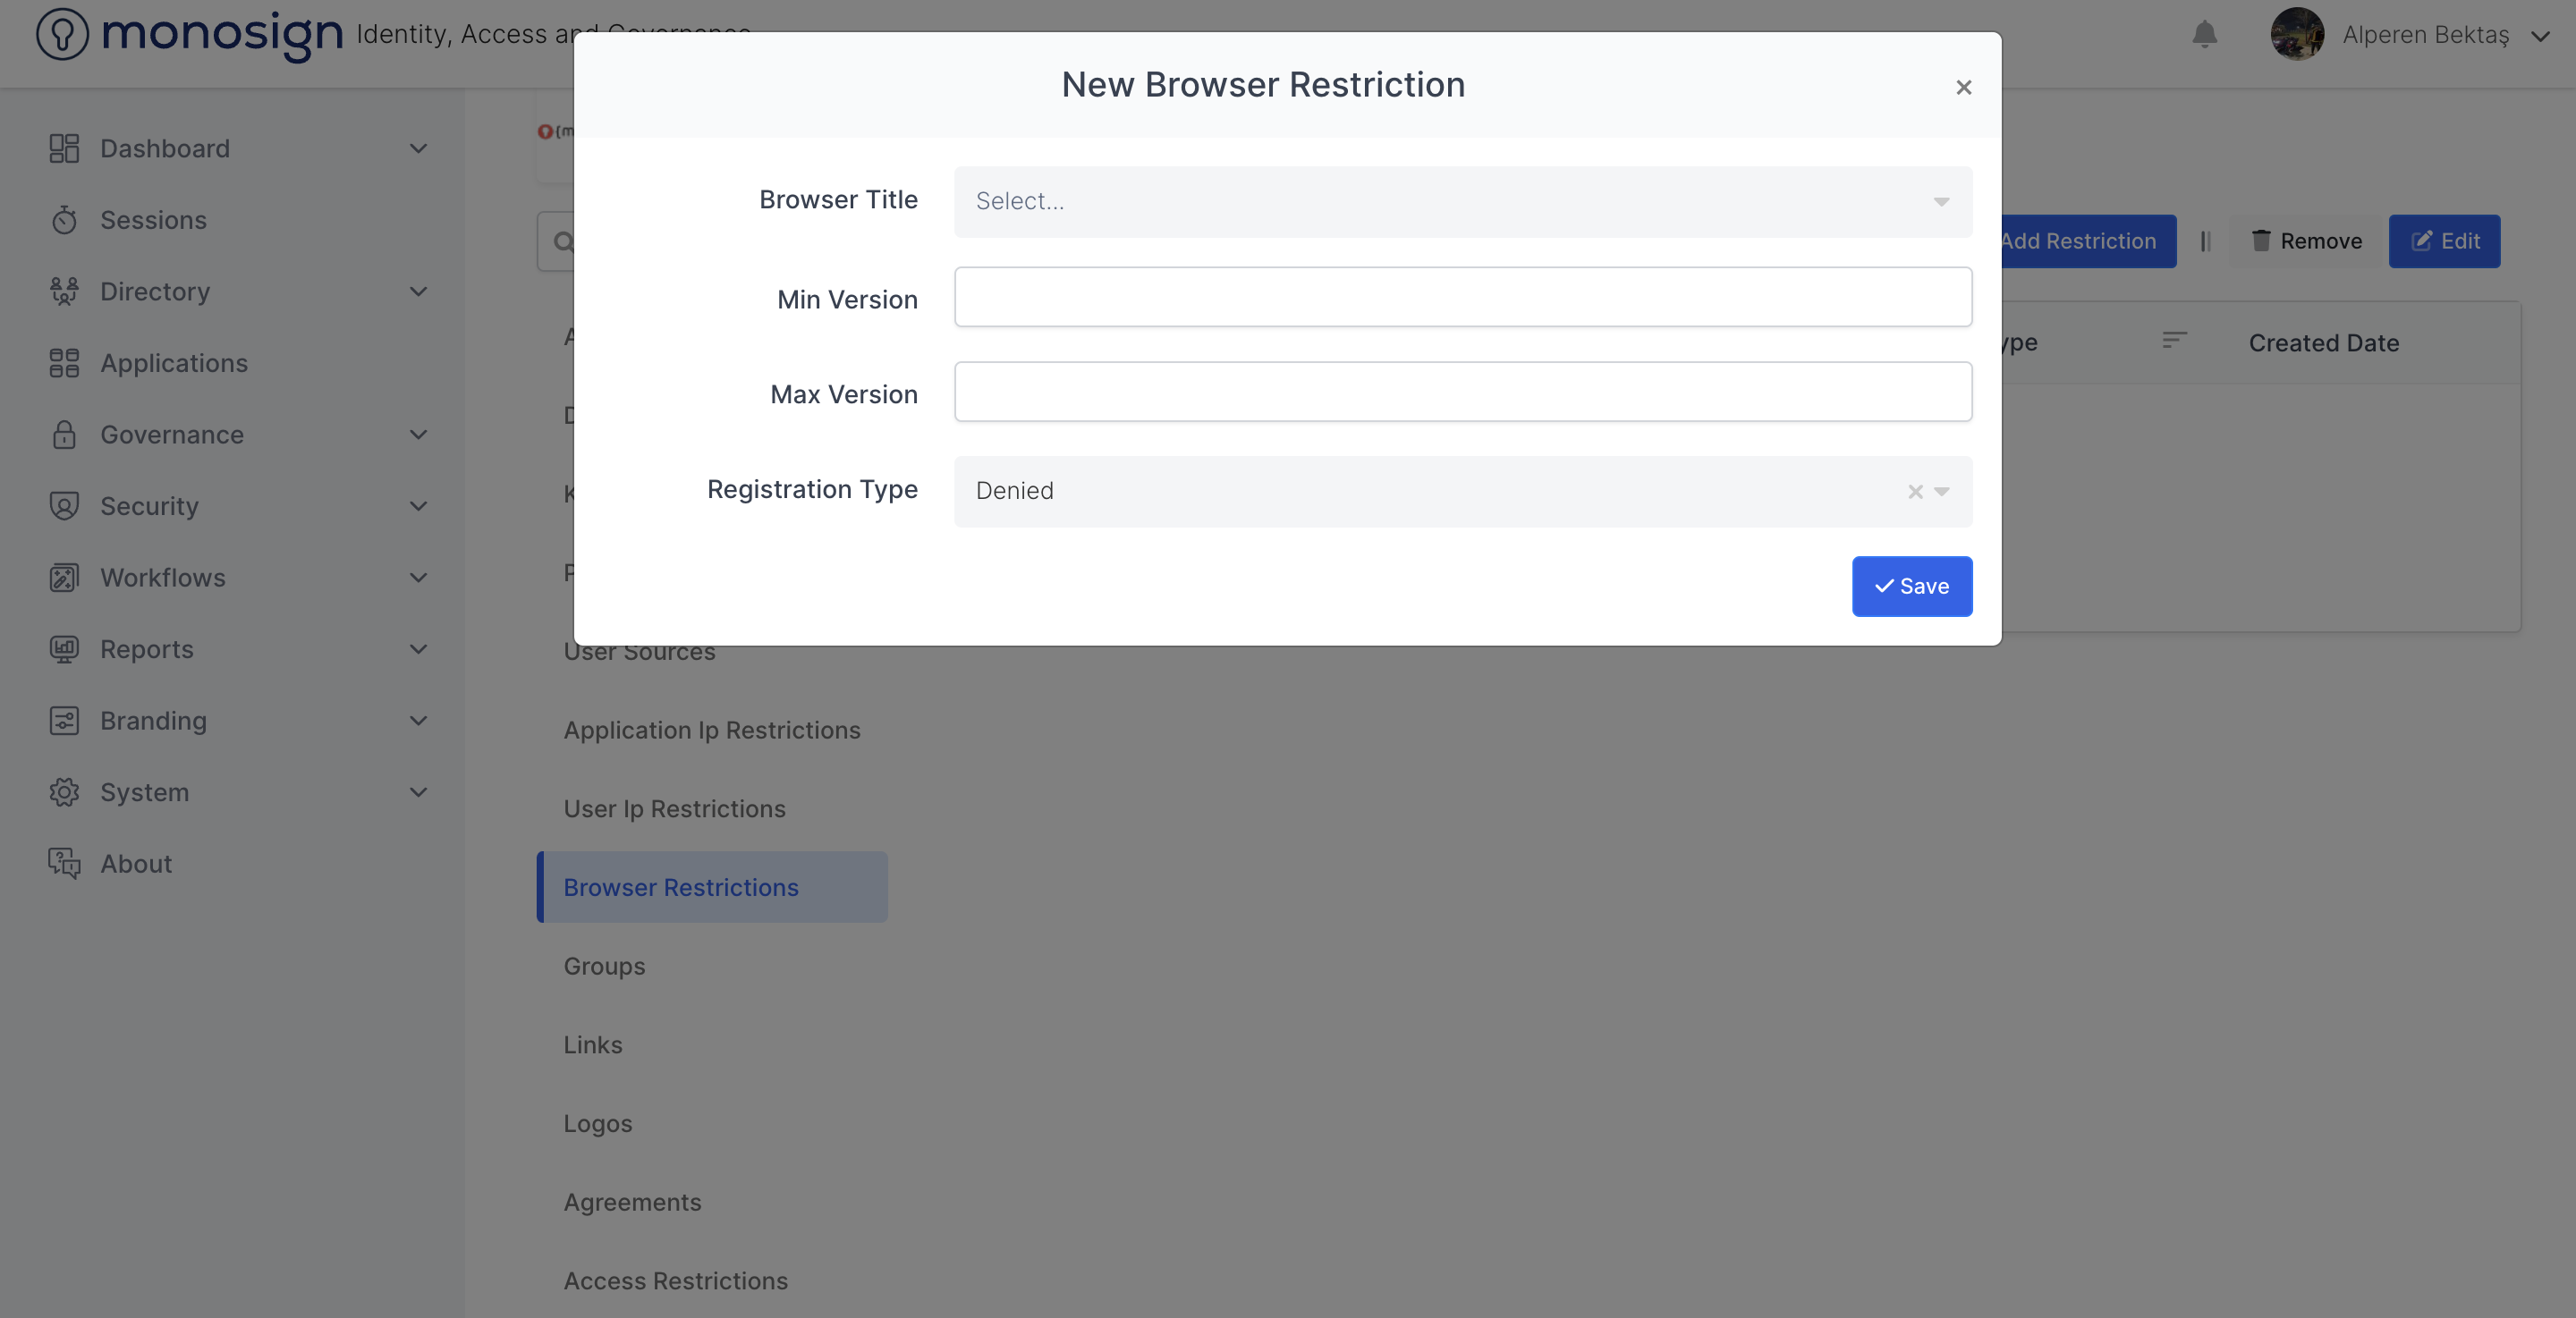
Browser Title
This is the field where you can specify the browser's header information when adding a new browser restriction to the application.
Min Version
This is the area where you can specify the minimum version information of the browser when adding a new browser restriction to the application.
Max Version
This is the area where you can specify the maximum version information of the browser when adding a new browser restriction to the application.
Restriction Type
This is the field where you can specify the browser's restriction type / type information when adding a new browser restriction to the application.
Denied
Allowed
Save
After all the fields are filled and the properties are determined, a new browser restriction is added for the application by clicking the green "save" button in the lower right part of the window. It will issue a confirmation notification to your stake when the transaction is successful.
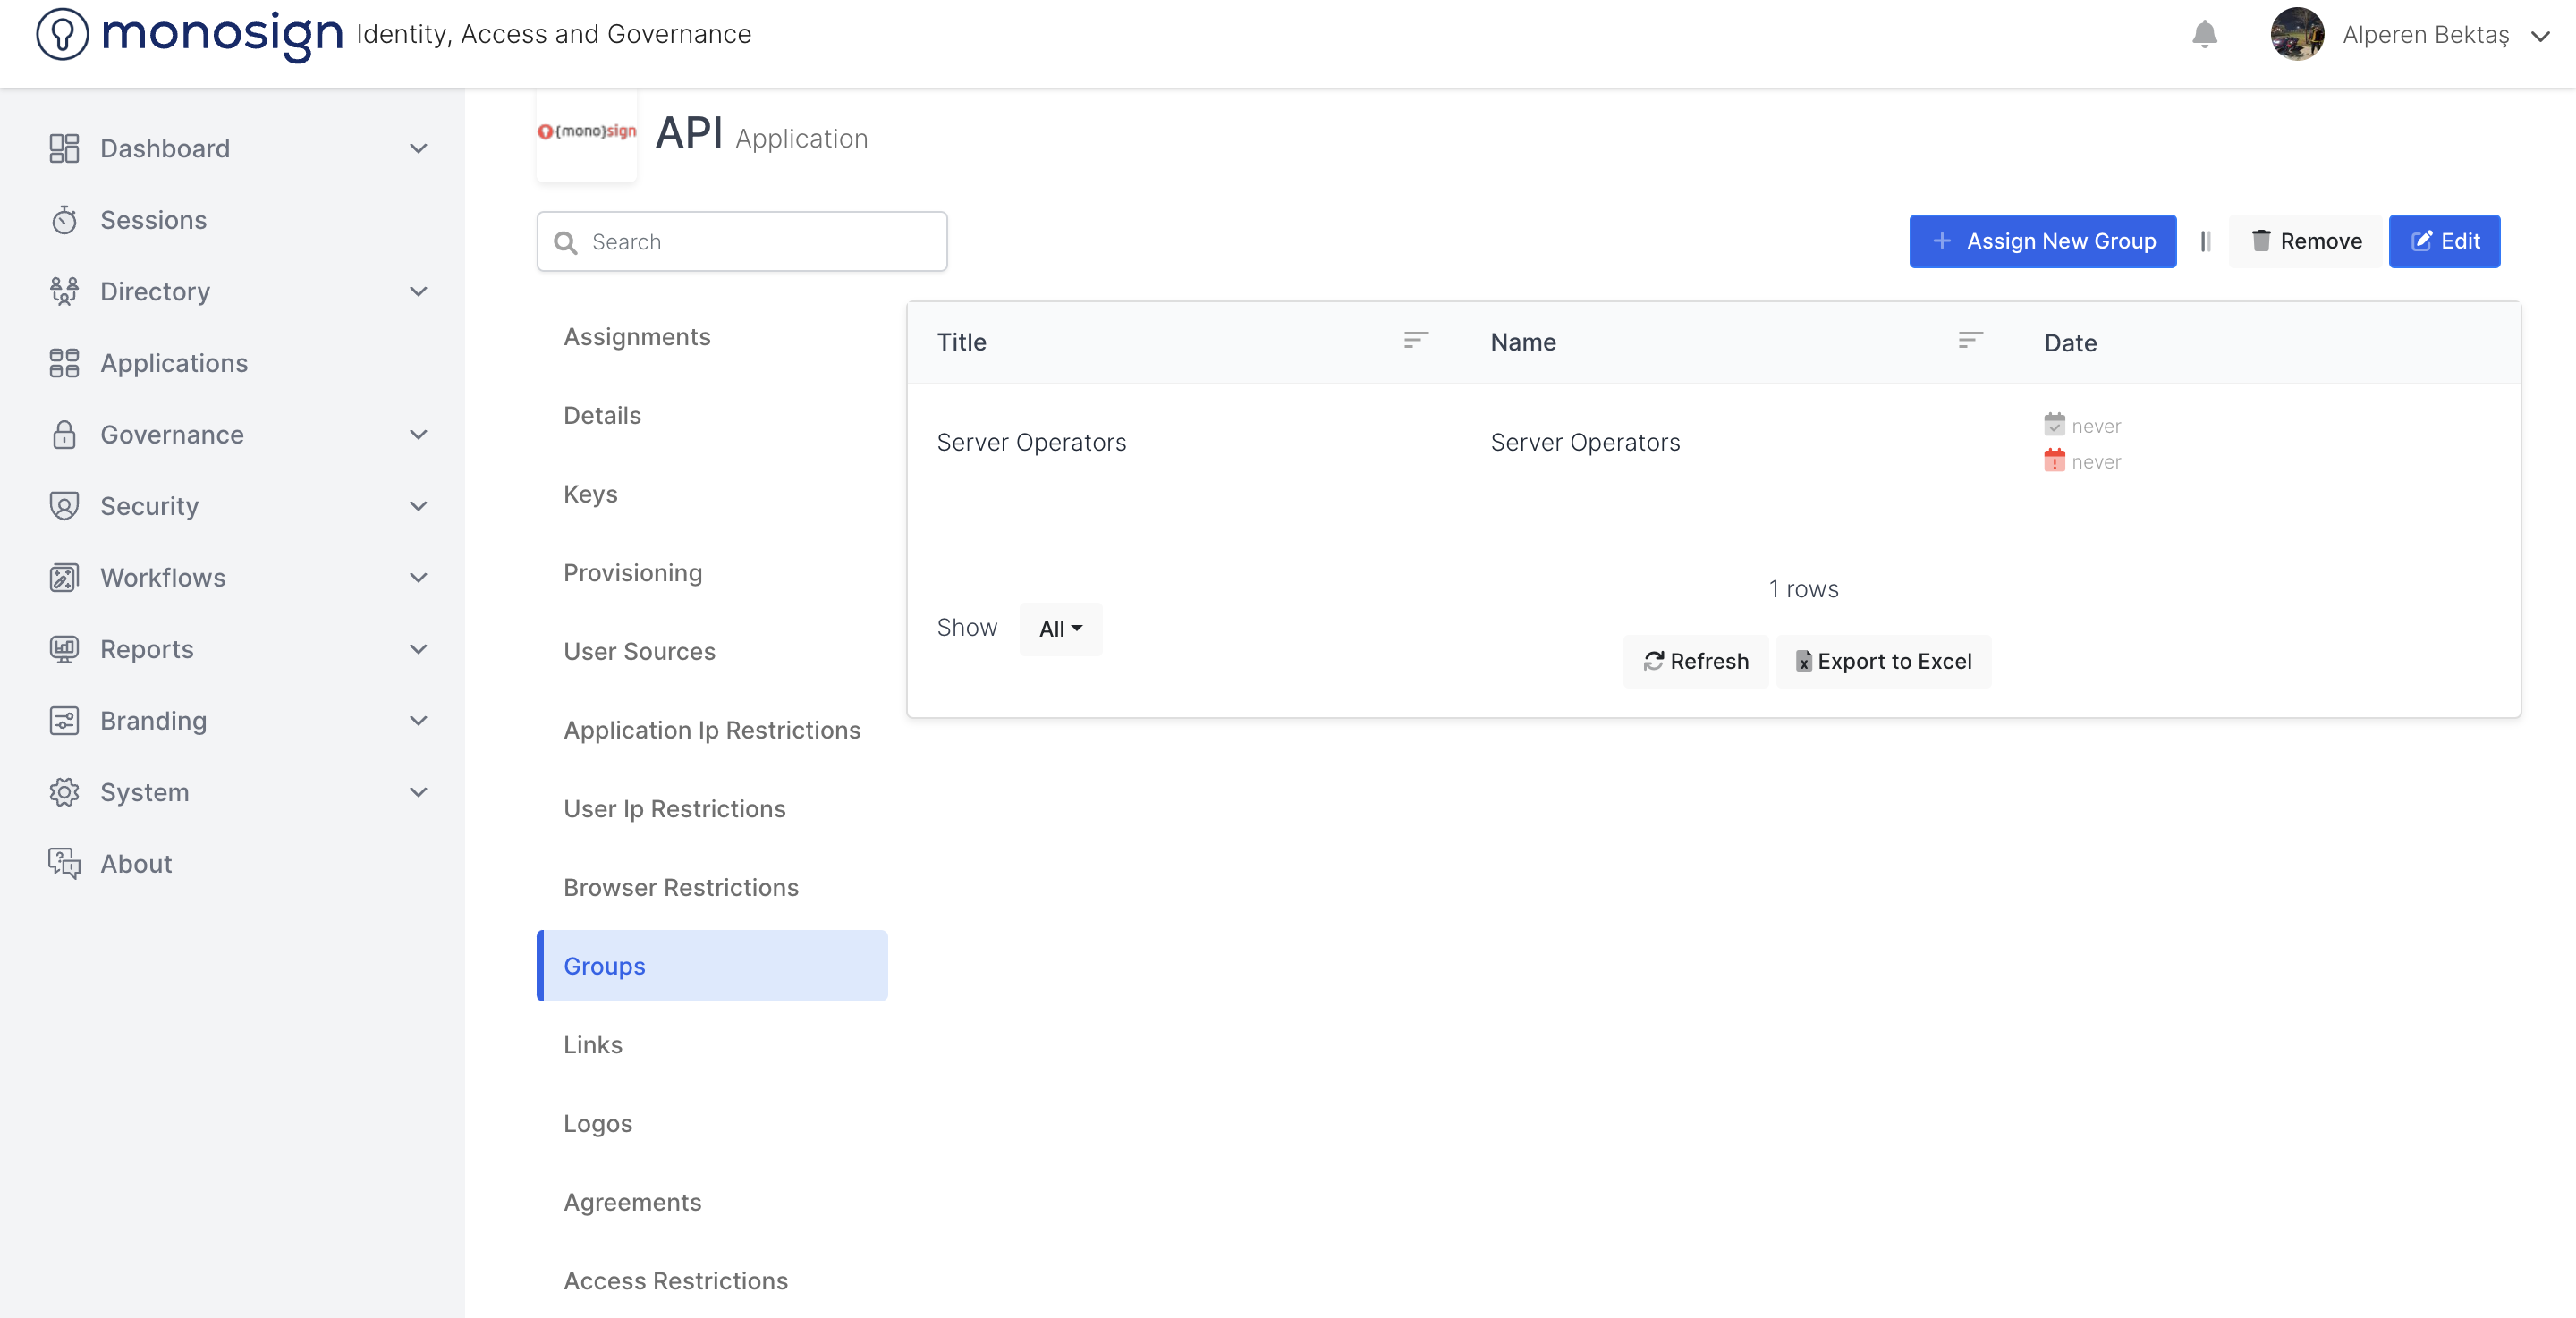
Groups
This is the page where you can view the groups of the application.
You can sort and filter the app's groups by fields.
Sections |
|---|
Title |
Name |
Created Date |
Title
It is the area of the application where you can view and filter the group header information.
Name
It is the area where you can view and filter the group name information of the application.
Created Date
This is the area where you can view and filter the group's creation date information.
oup
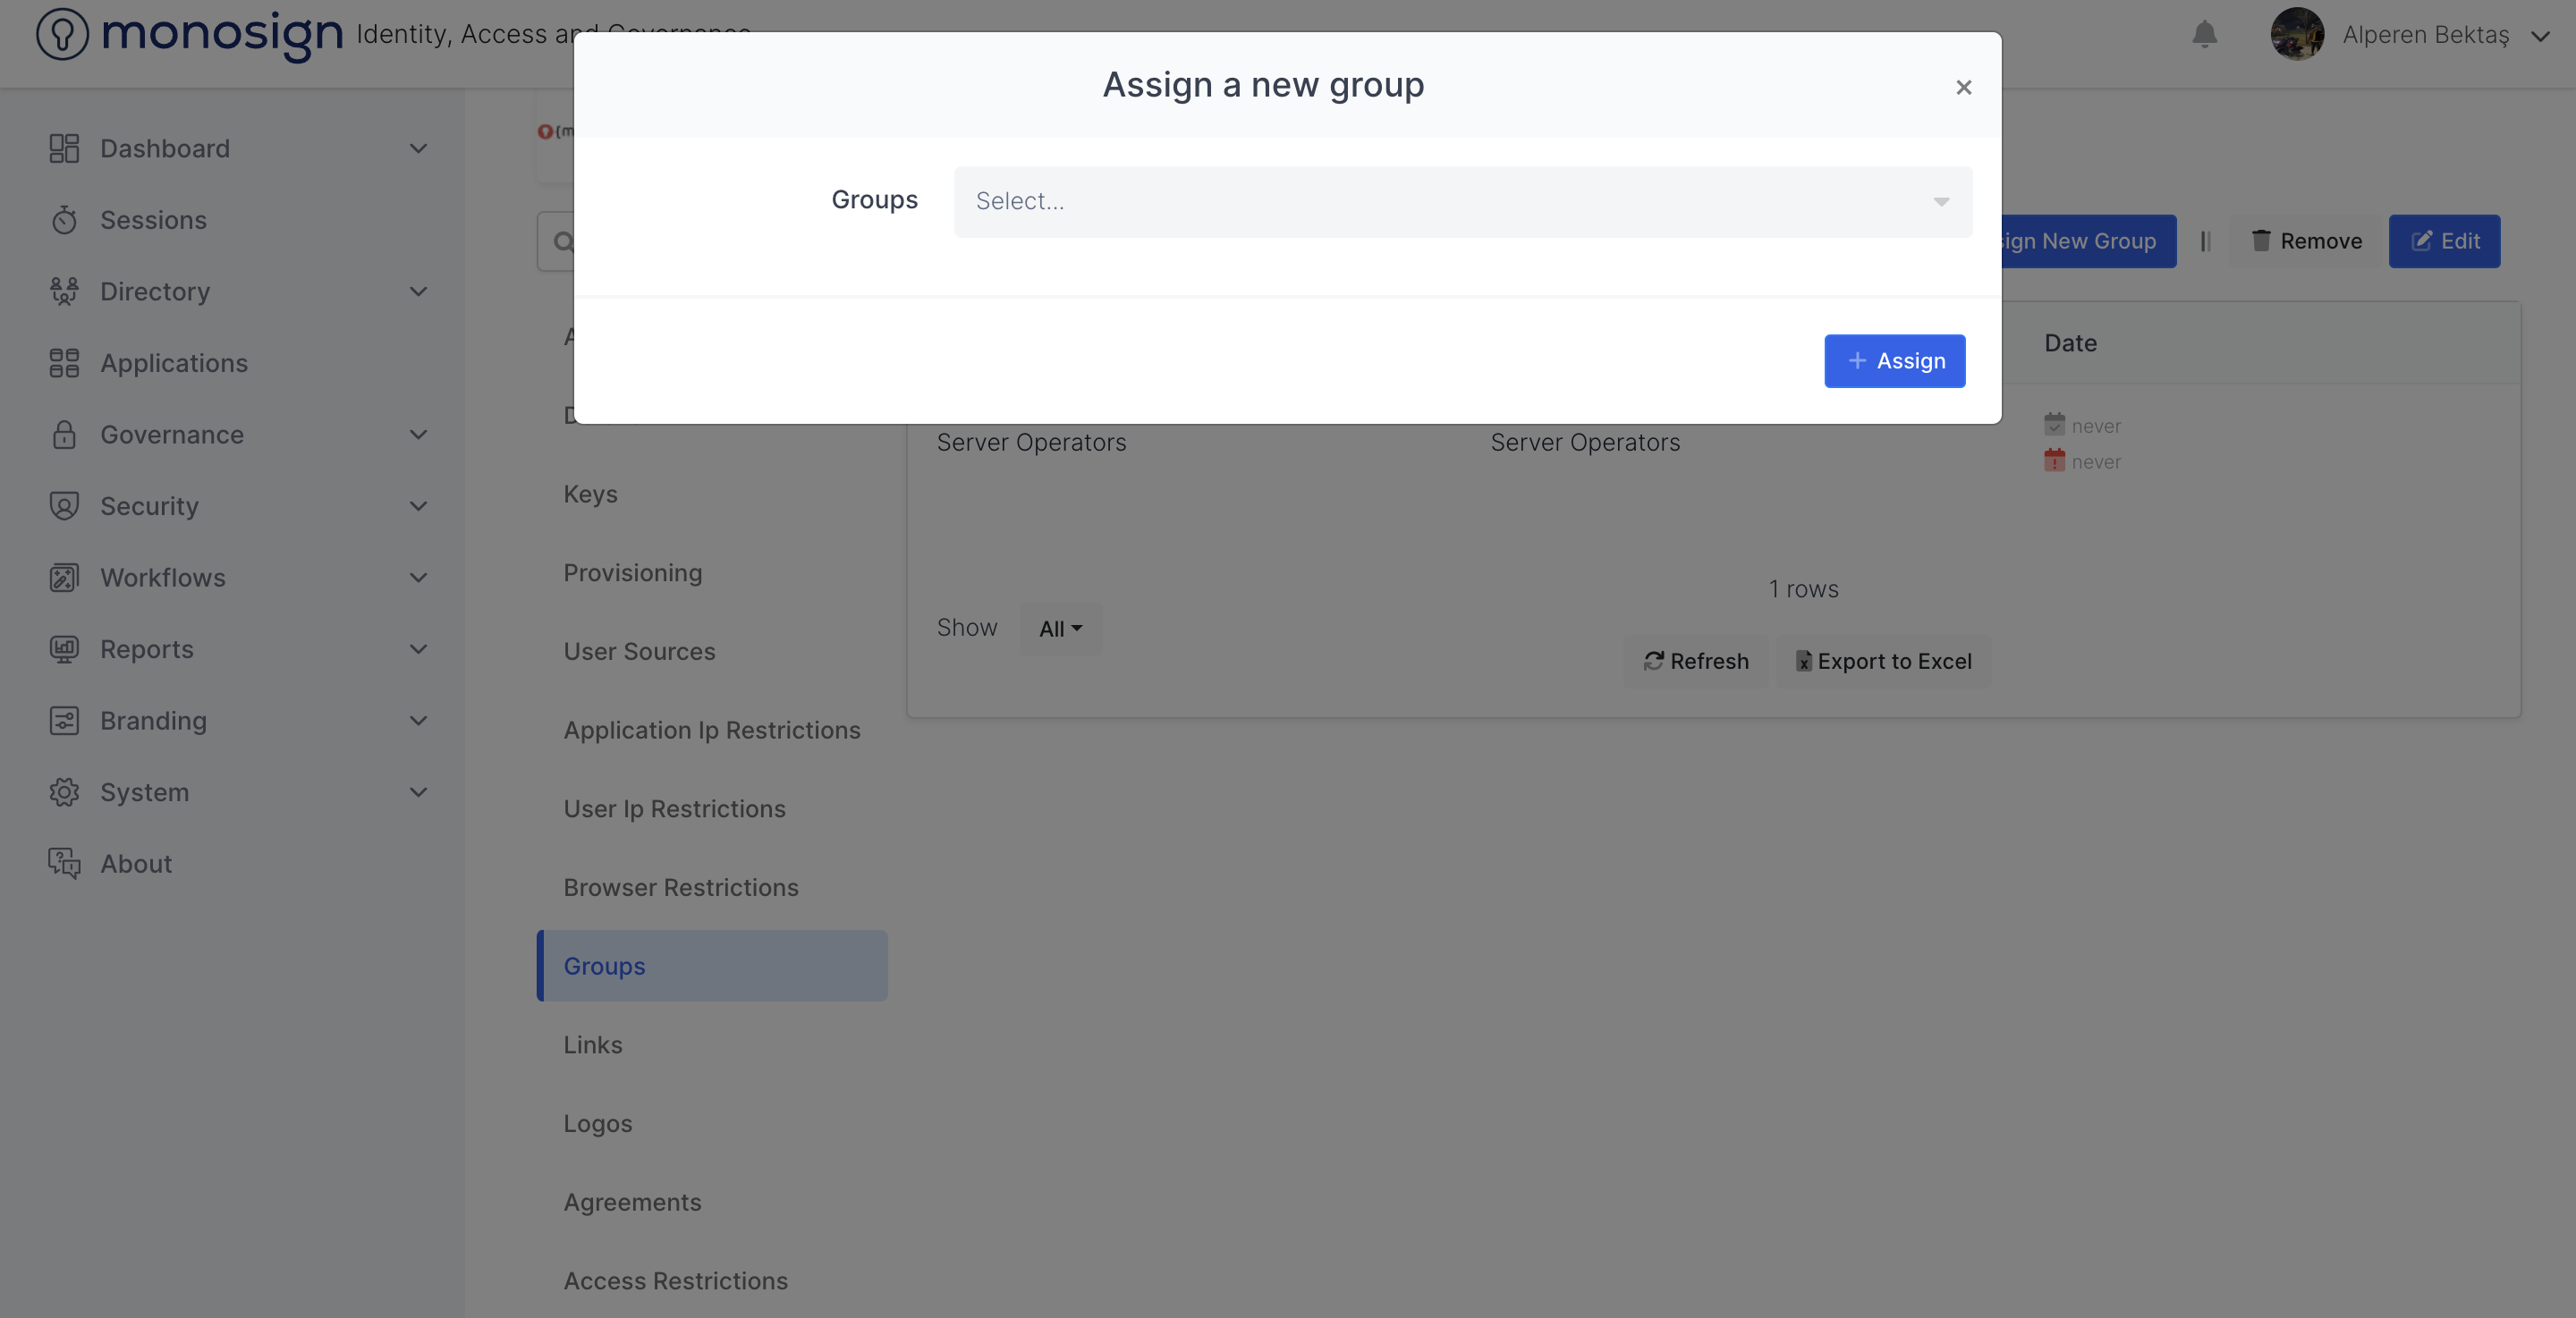
Add new group button brings up a window where you can add a new group to the new application. The Add a new group window consists of the section.
Section |
|---|
Group |
Groups
This is the field where you can specify the group information while adding a new group to the application. Group information may vary according to the location and activities of the system.
Save
After all the fields are filled and the properties are determined, a new group for the application is added by clicking the green "save" button in the lower right part of the window. It will issue a confirmation notification to your stake when the transaction is successful.
Links
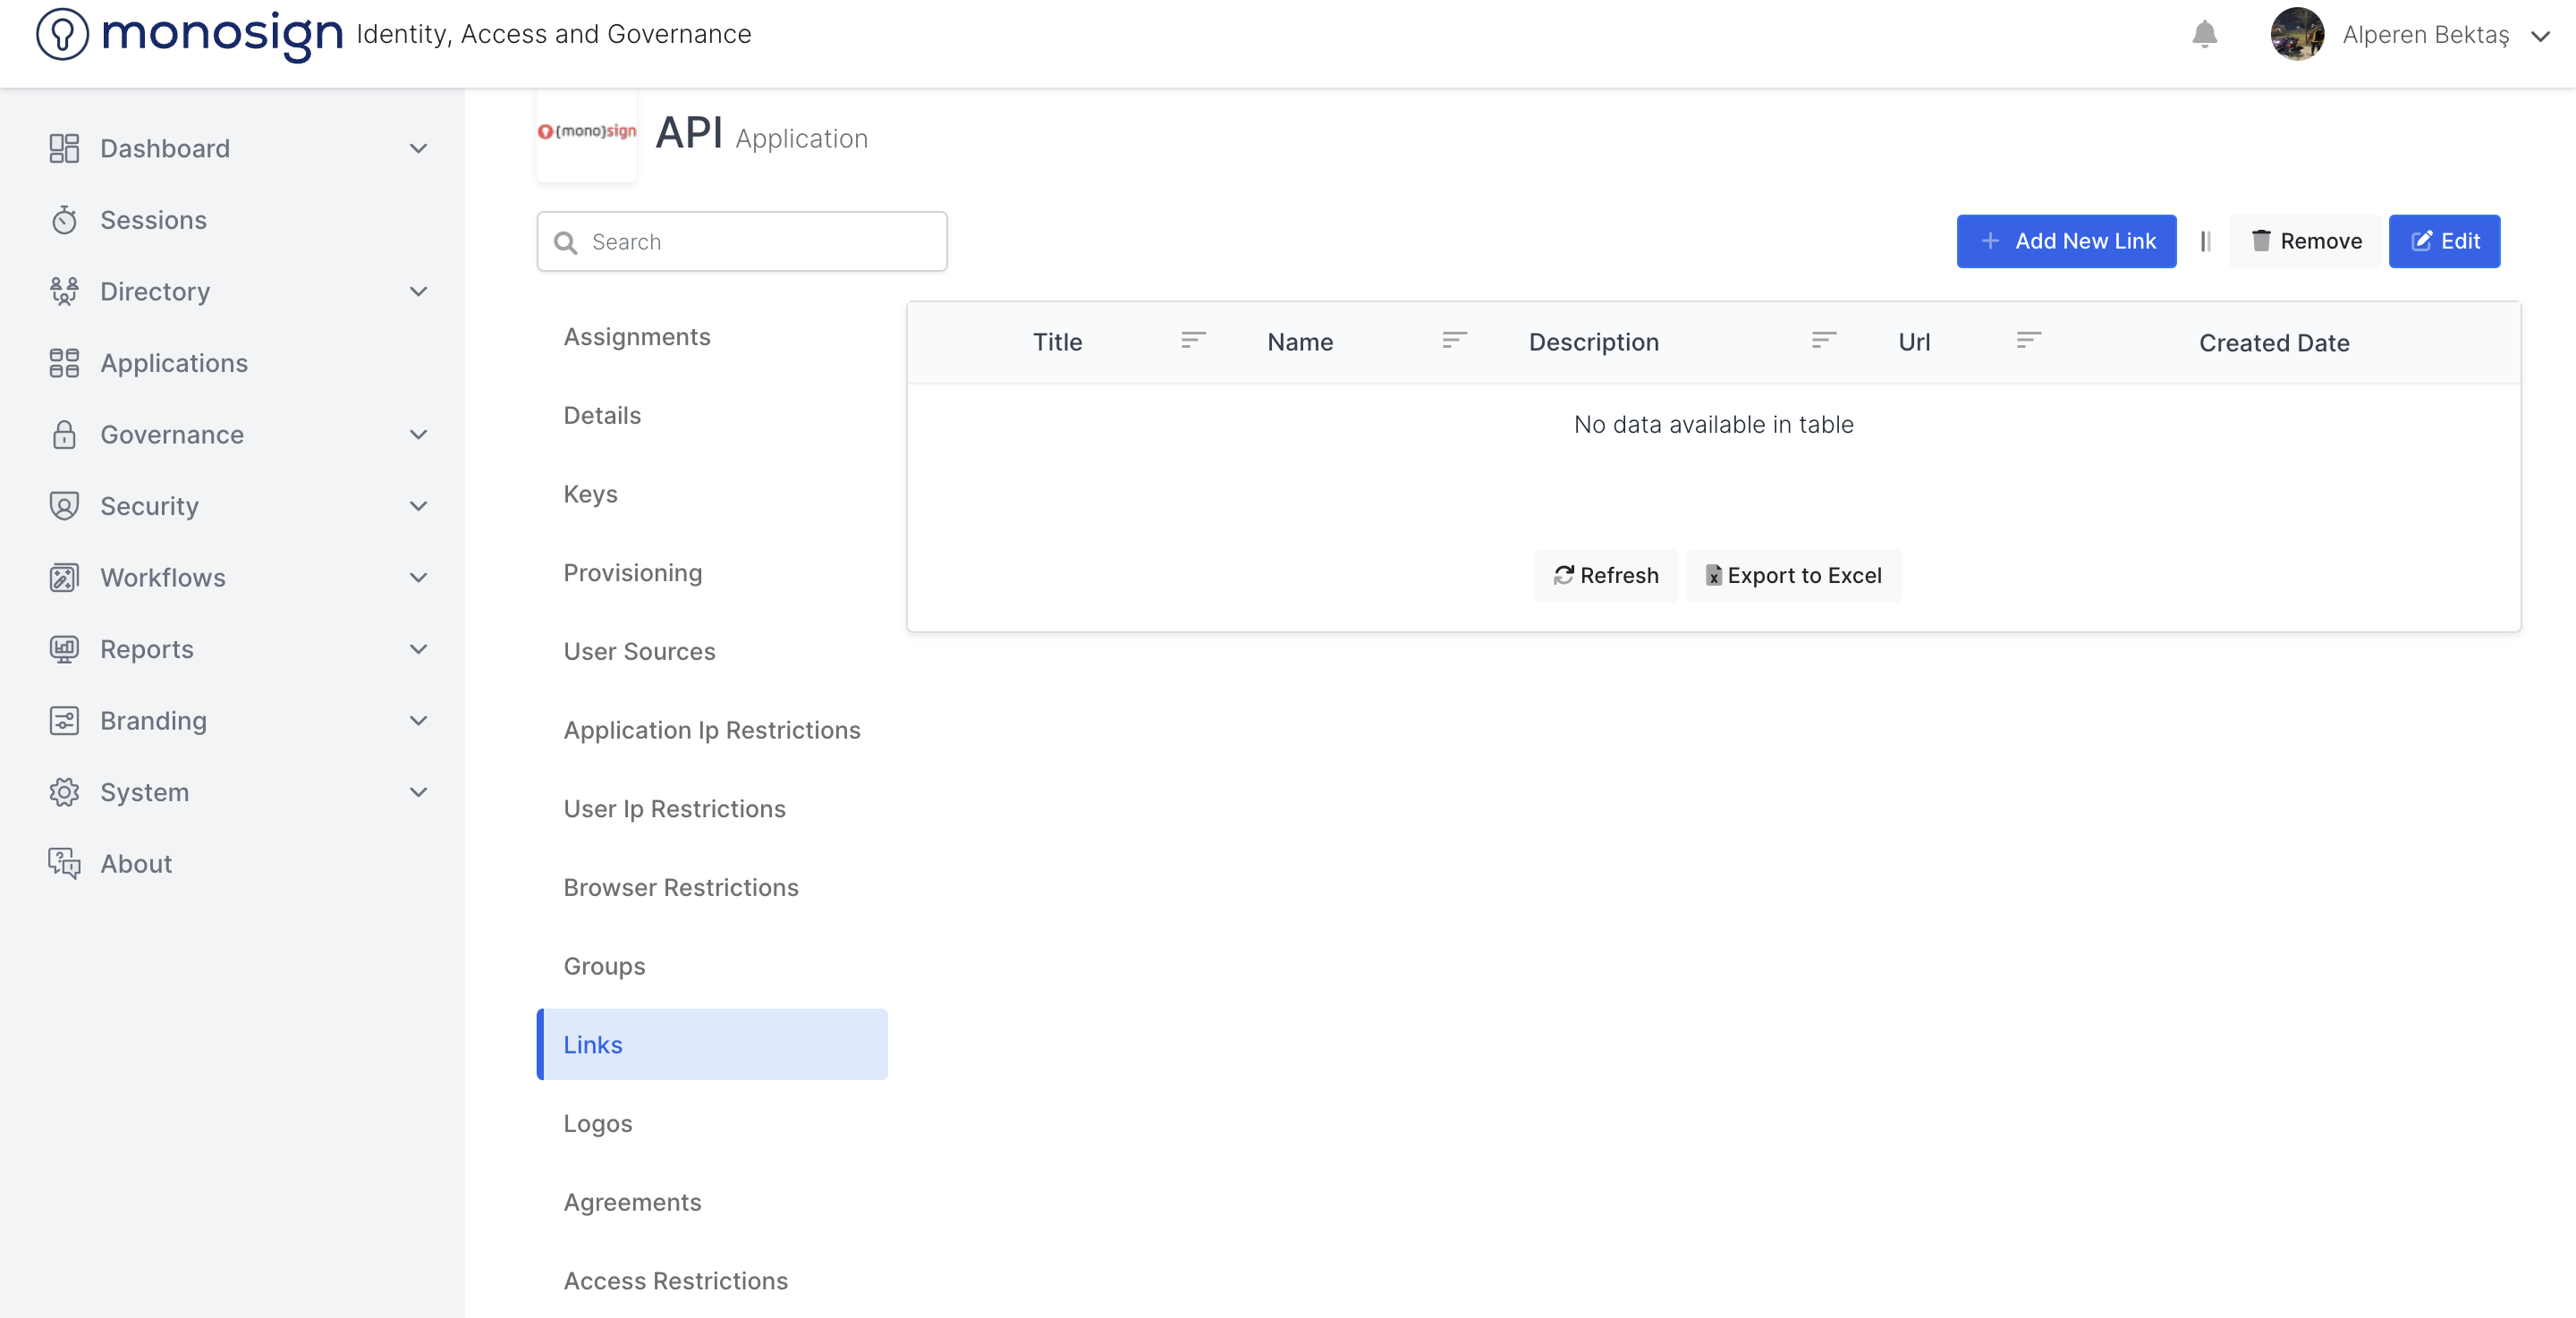
This is the page where you can view the application's links.
You can sort and filter the application's connections according to their fields.
Sections |
|---|
Title |
Name |
Description |
Url (Uniform Resource Loader) |
Created Date |
Title
This is the area of the application where you can view and filter the connection header information.
Name
It is the area where you can view and filter the connection name information of the application.
Description
This is the area of the application where you can view and filter the connection description information.
url
This is the area where you can view and filter the uniform resource locator information of the application link.
Created Date
This is the area where you can view and filter the creation date of the application link.
Add New Link
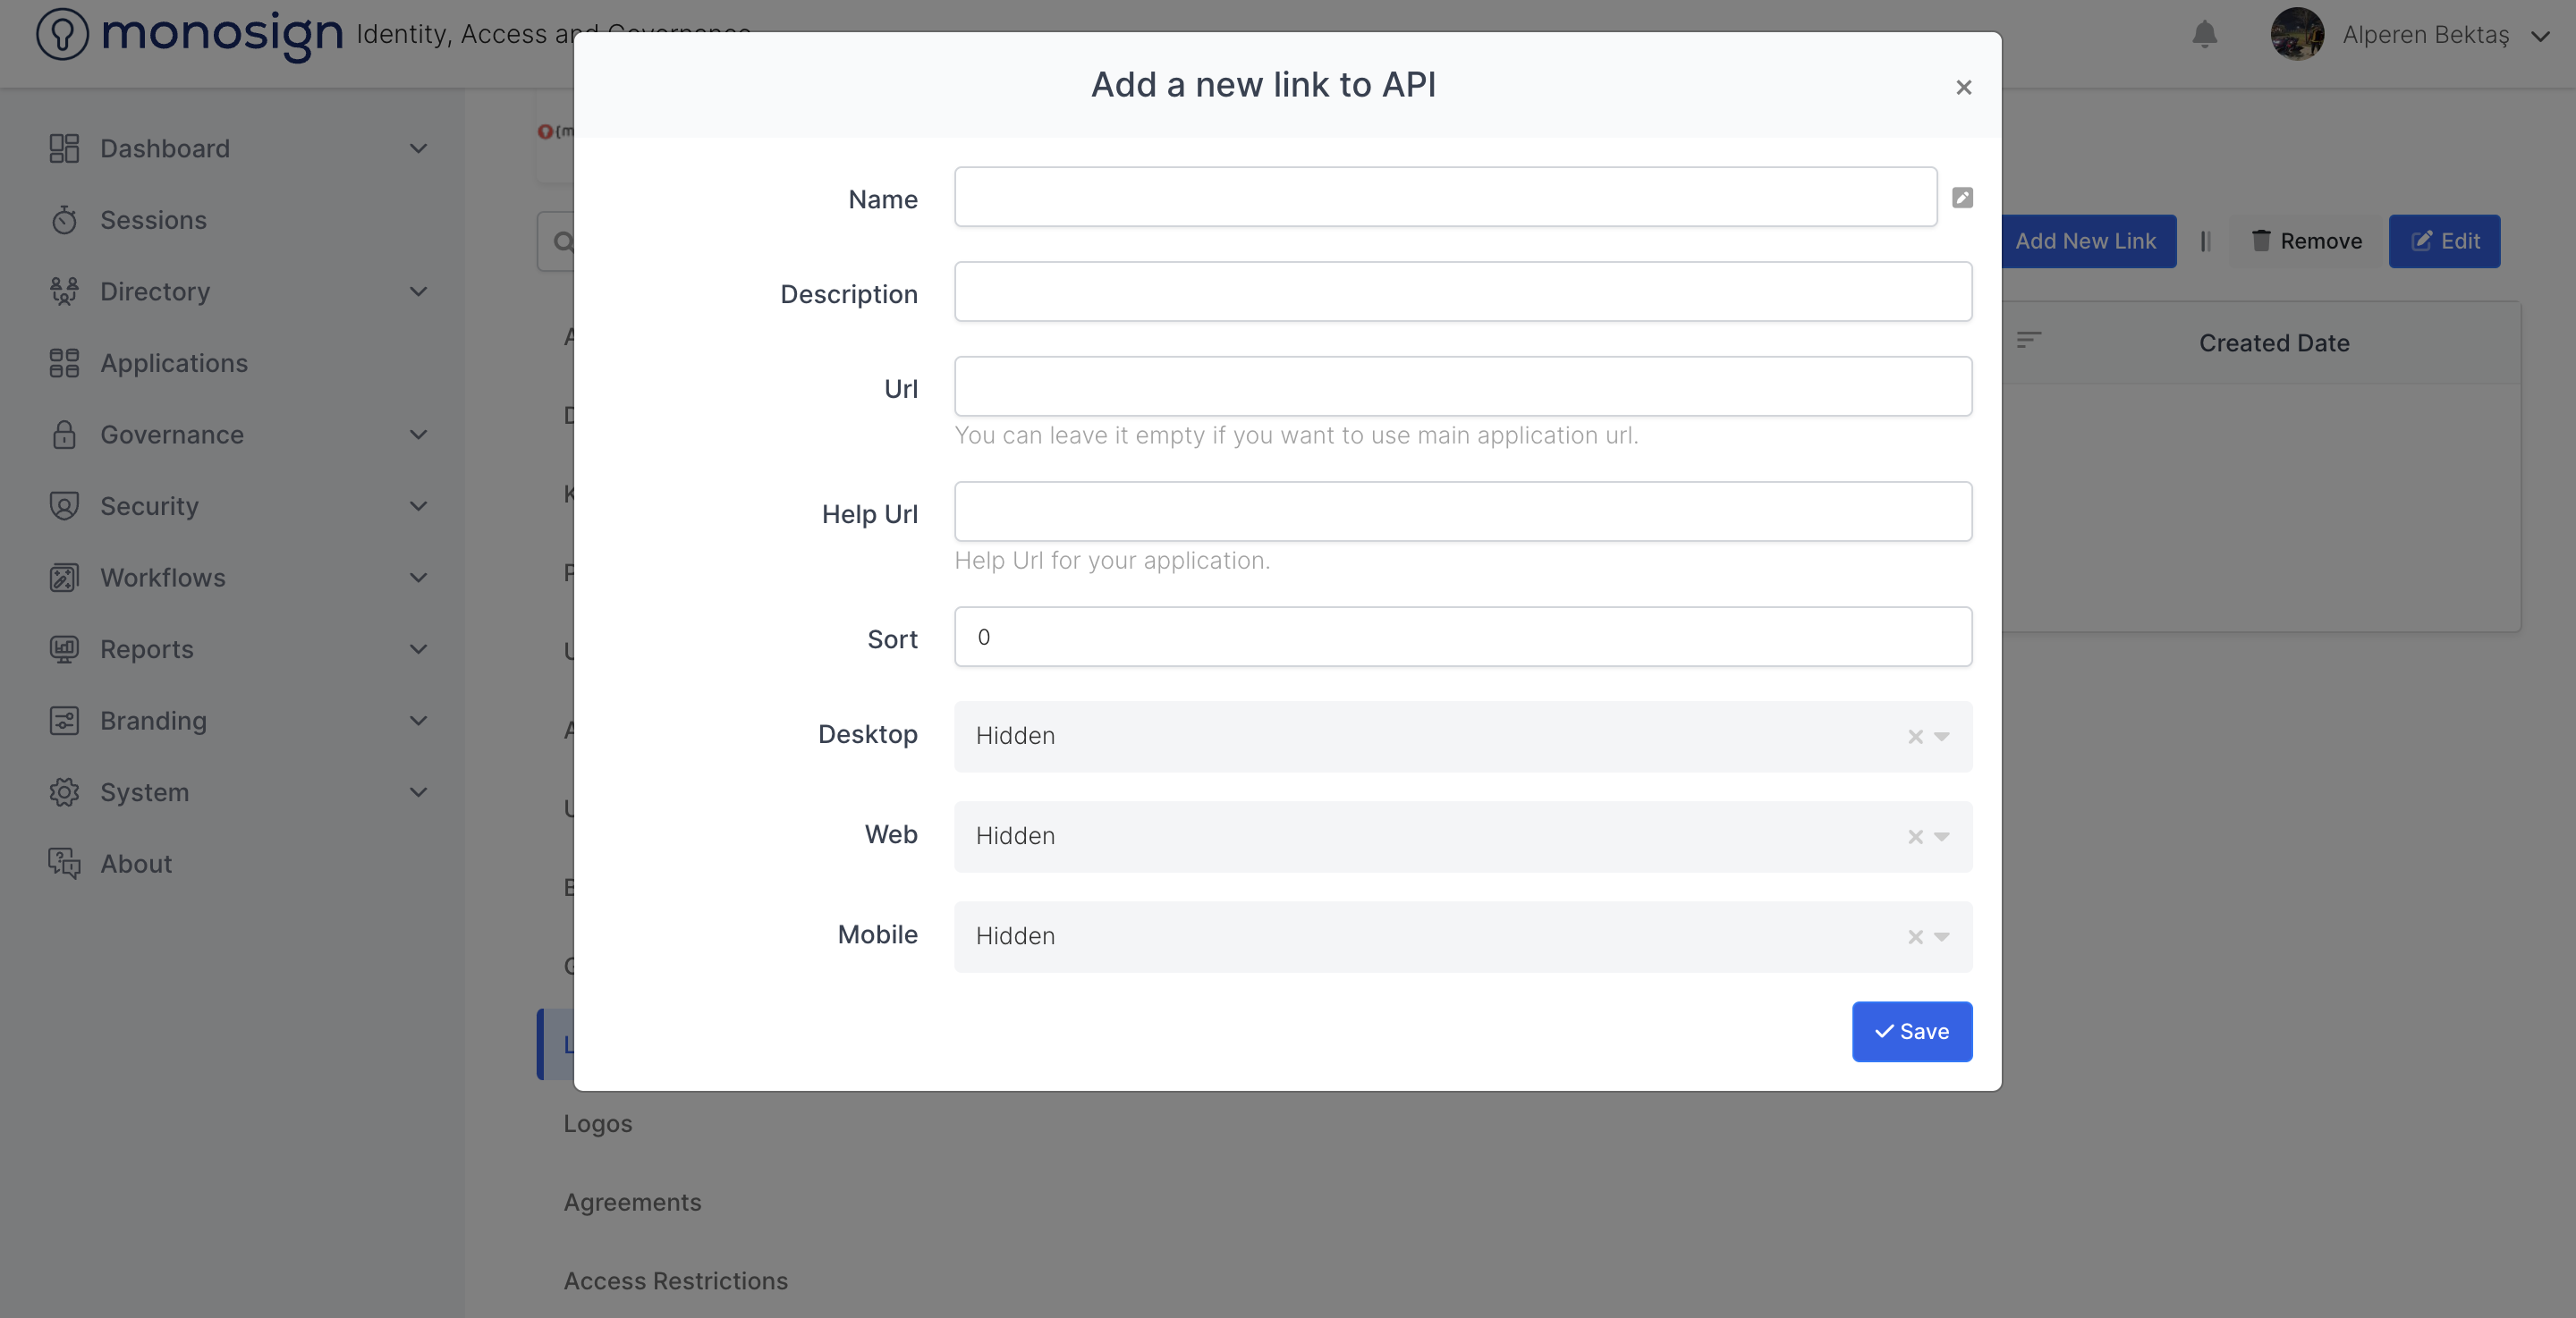
Add new link button brings up a window where you can add a new link to the application. Adding a new group window consists of the following sections.
Sections |
|---|
Title |
Name |
Description |
Url (Uniform Resource Loader) |
AltUrl |
Sort |
Dekstop |
Web |
Mobile |

Title
This is the area where you can specify the header information of the link when adding a new link to the application.
Name
This is the area where you can specify the name of the connection when adding a new connection to the application.
Description
This is the area where you can specify the header information of the link when adding a new link to the application.
url
This is the area where you can specify the uniform resource locator information of the link when adding a new link to the application.
AltUrl
This is the field where you can specify the AltUrl information of the link when adding a new link to the application.
Shorts
This is the area where you can specify the order information of the connection when adding a new connection to the application.
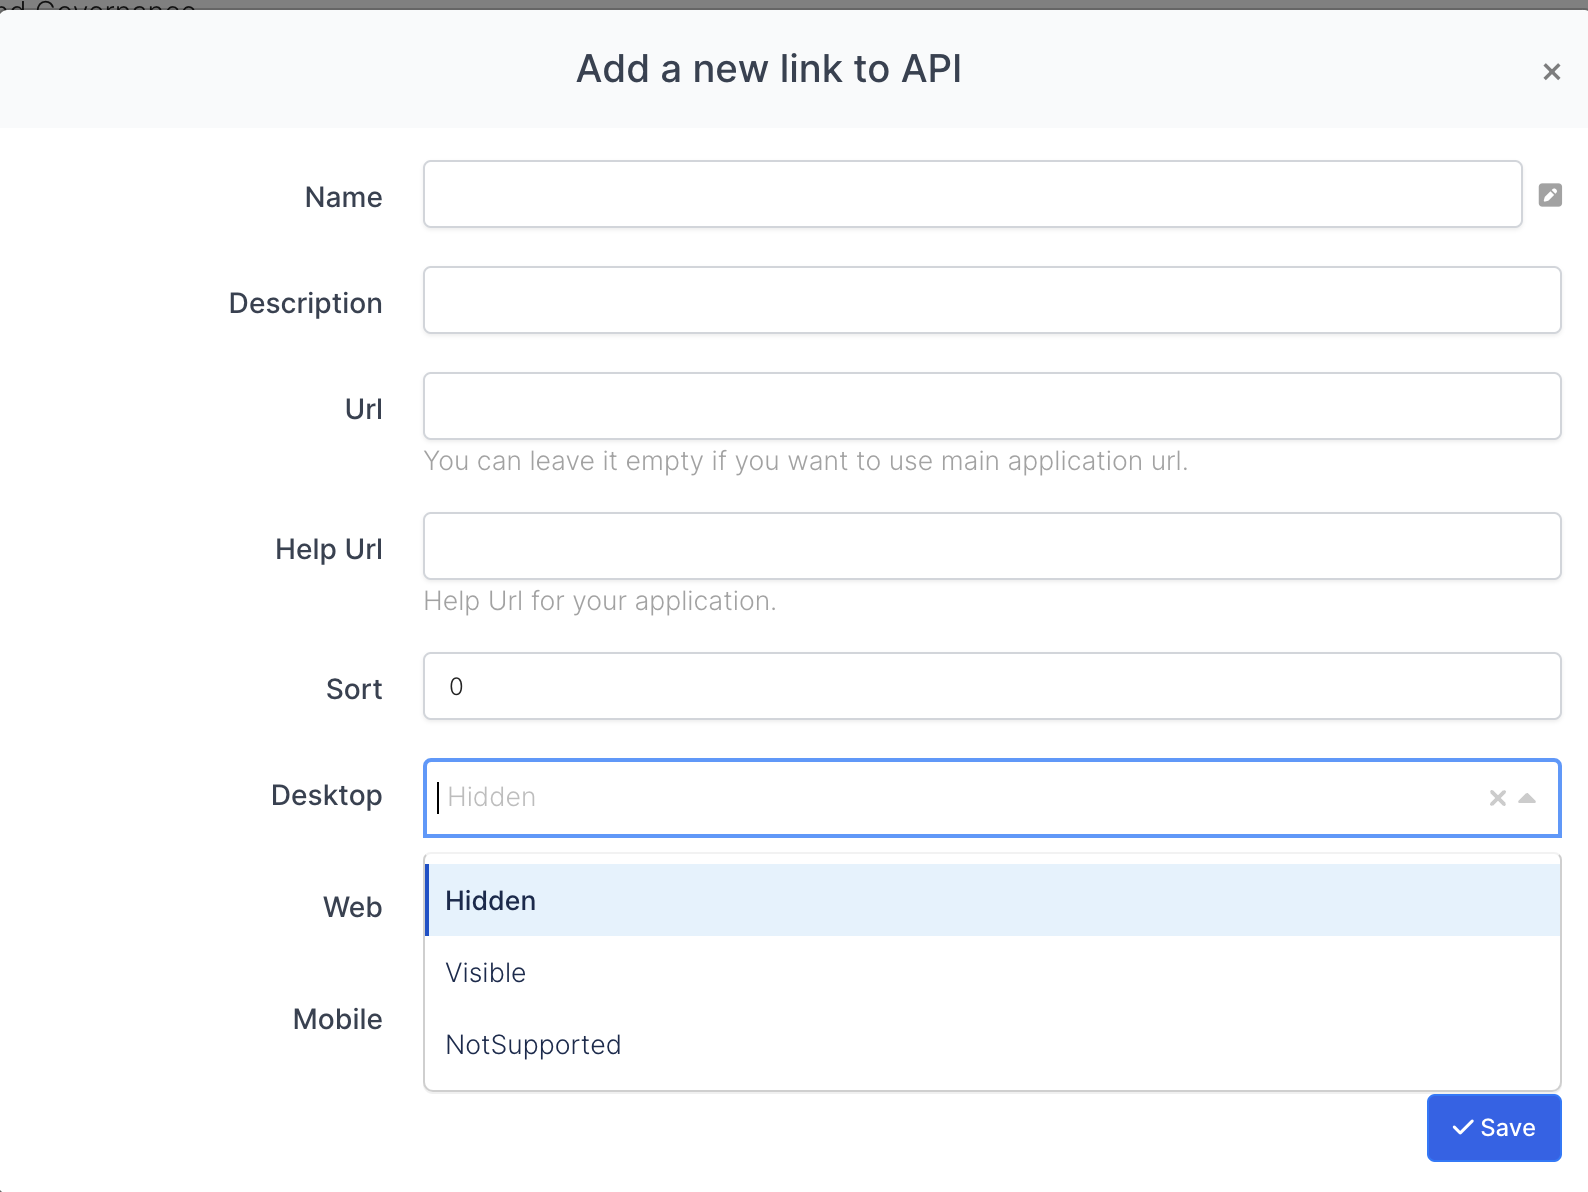
Dekstop
When adding a new link to the application, it is the area where we can specify the link as in the desktop application.
Hidden
Visible
Not Supported
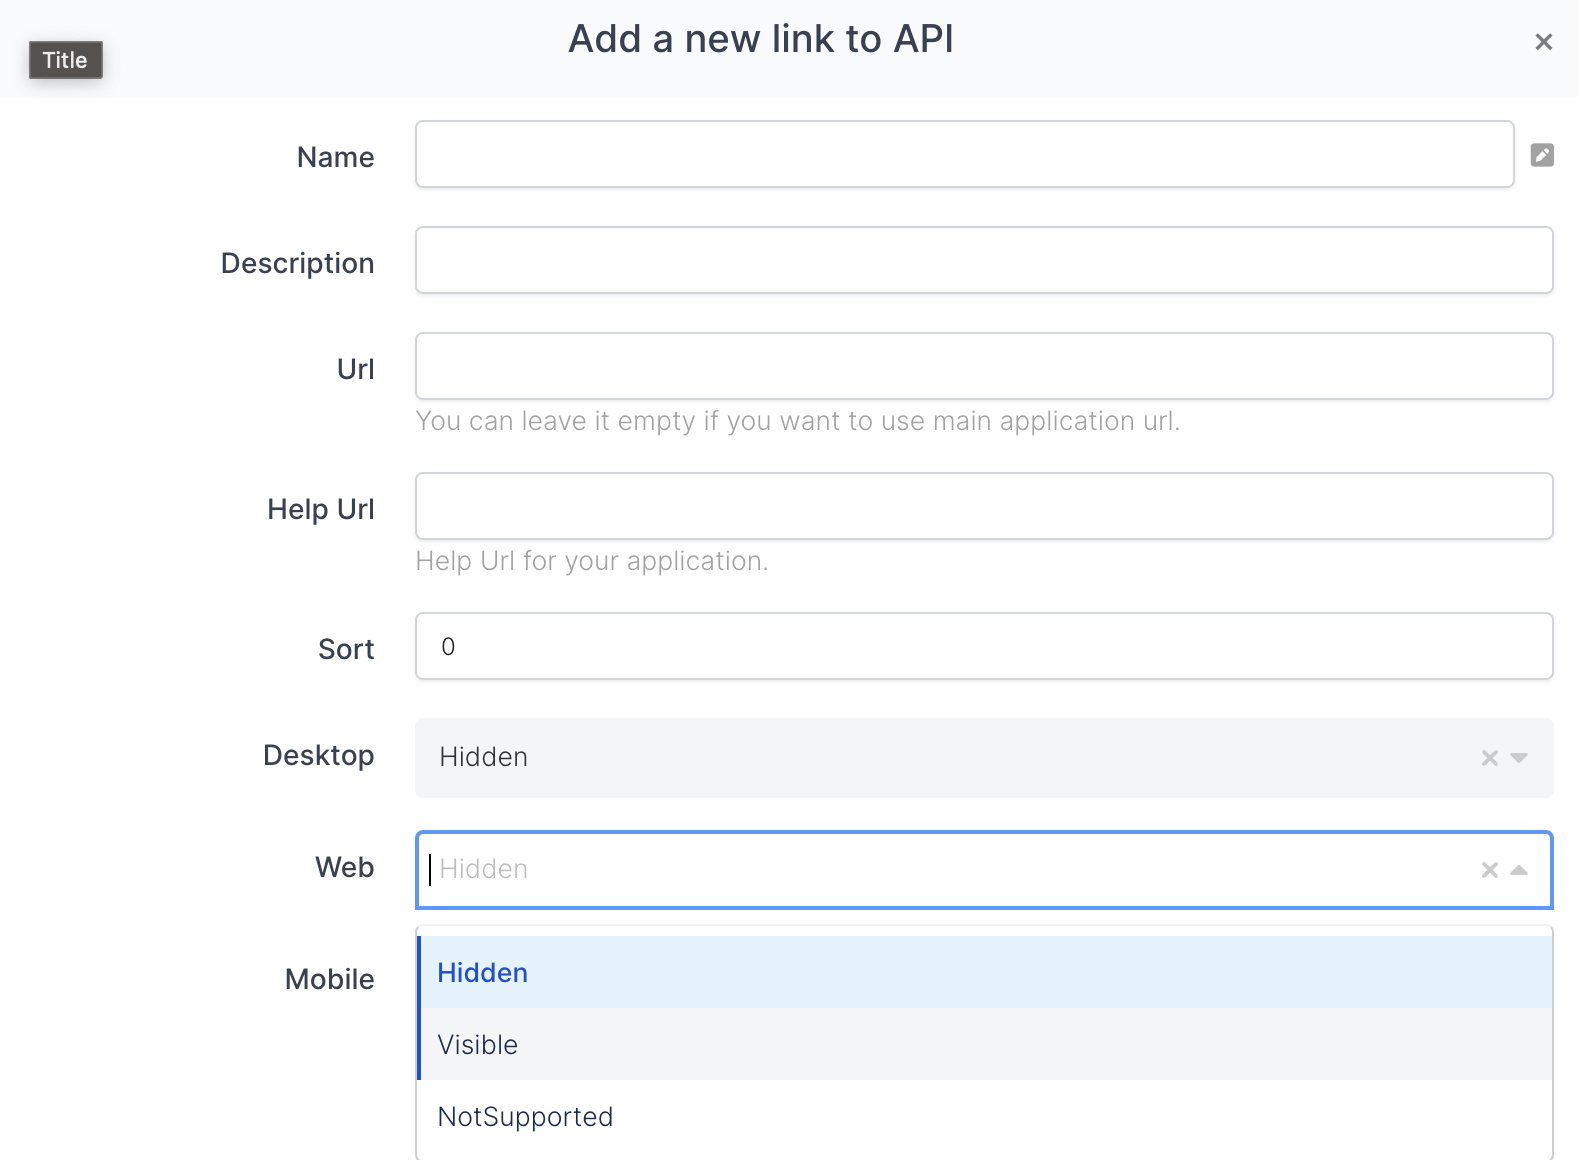
Web
When adding a new link to the application, the web is the area where we can specify the link as in the application.
Hidden
Visible
Not Supported
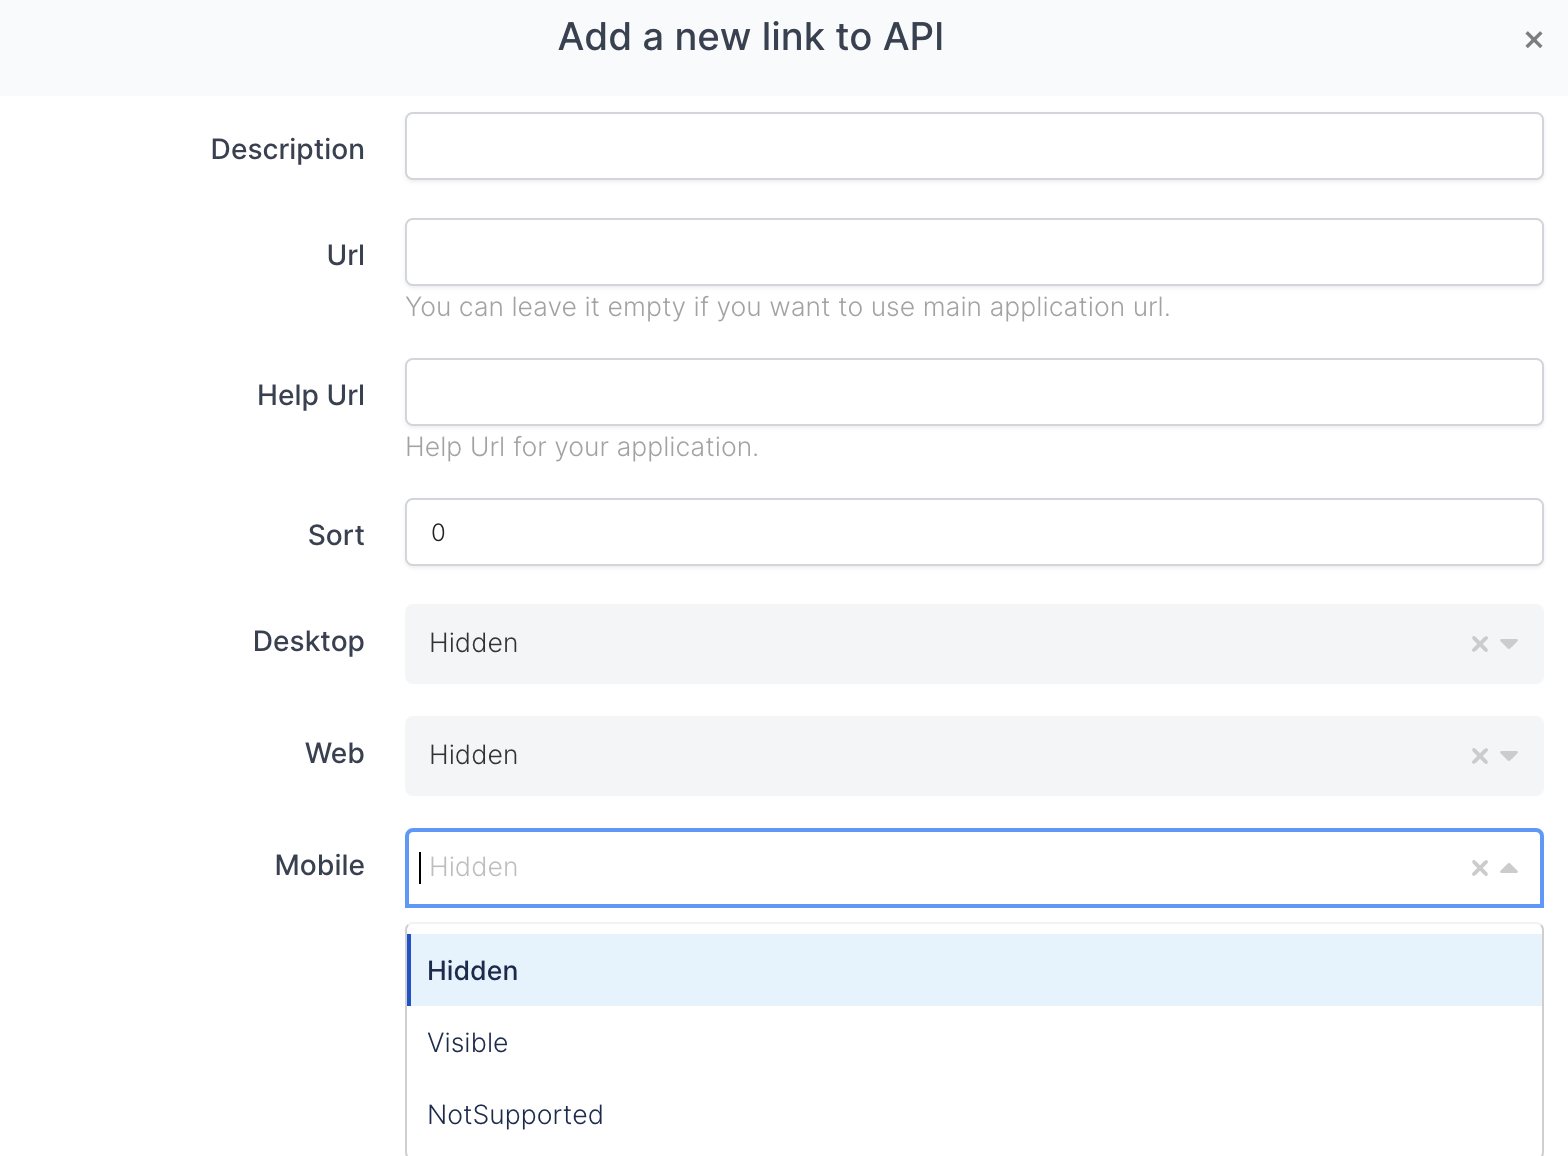
Mobile
When adding a new link to the application, it is the area where we can specify the link as in the mobile application.
Hidden
Visible
Not Supported
Save
After all the fields are filled and the properties are determined, a new link for the application is added by clicking the green "save" button in the lower right part of the window. It will issue a confirmation notification to your stake when the transaction is successful.
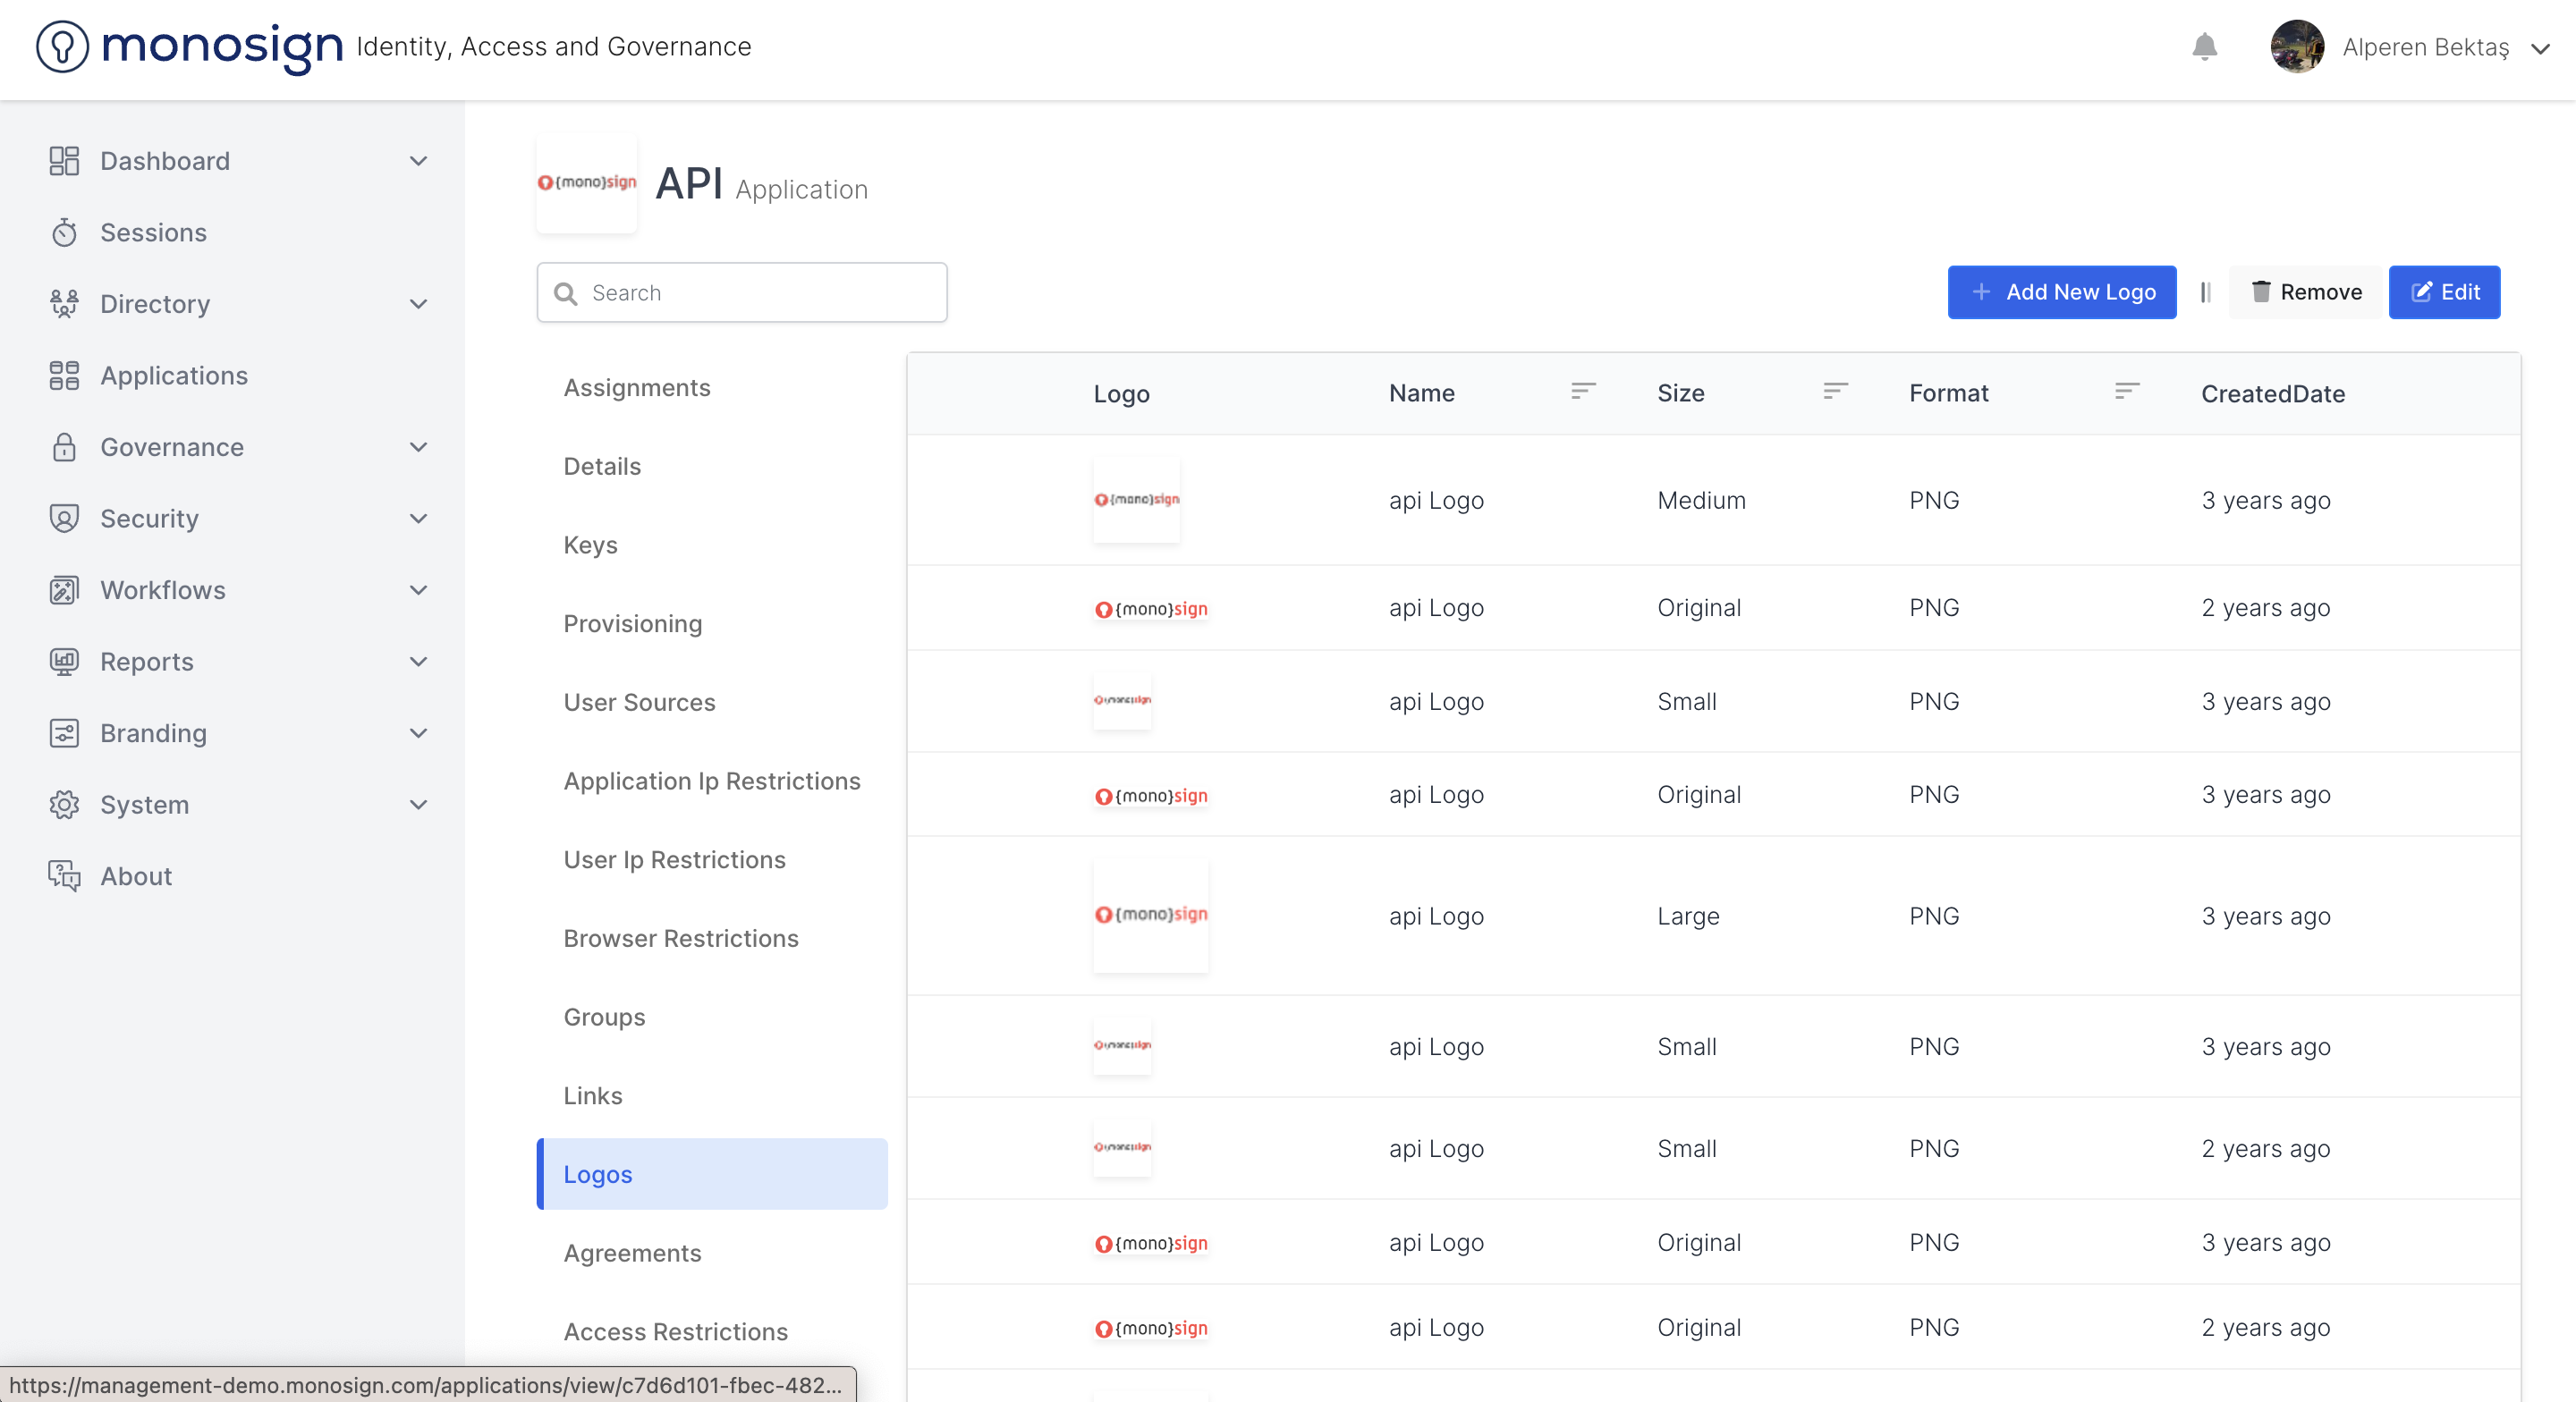
Logo
This is the page where you can view the logos (emblems) of the application.
You can sort and filter the application's logos (emblems) according to their fields.
Sections |
|---|
Logo |
Name |
Size |
Format |
Created Date |
Logo
It is the area where you can view the logo information of the application.
Name
This is the area where you can view and filter the logo name information of the application.
To you
It allows the application logo to be displayed and filtered according to the size information.
Format
It allows the application logo to be displayed and filtered according to the format information.
Created Date
It is the area where you can view and filter the logo creation date information of the application.
Add New Logo
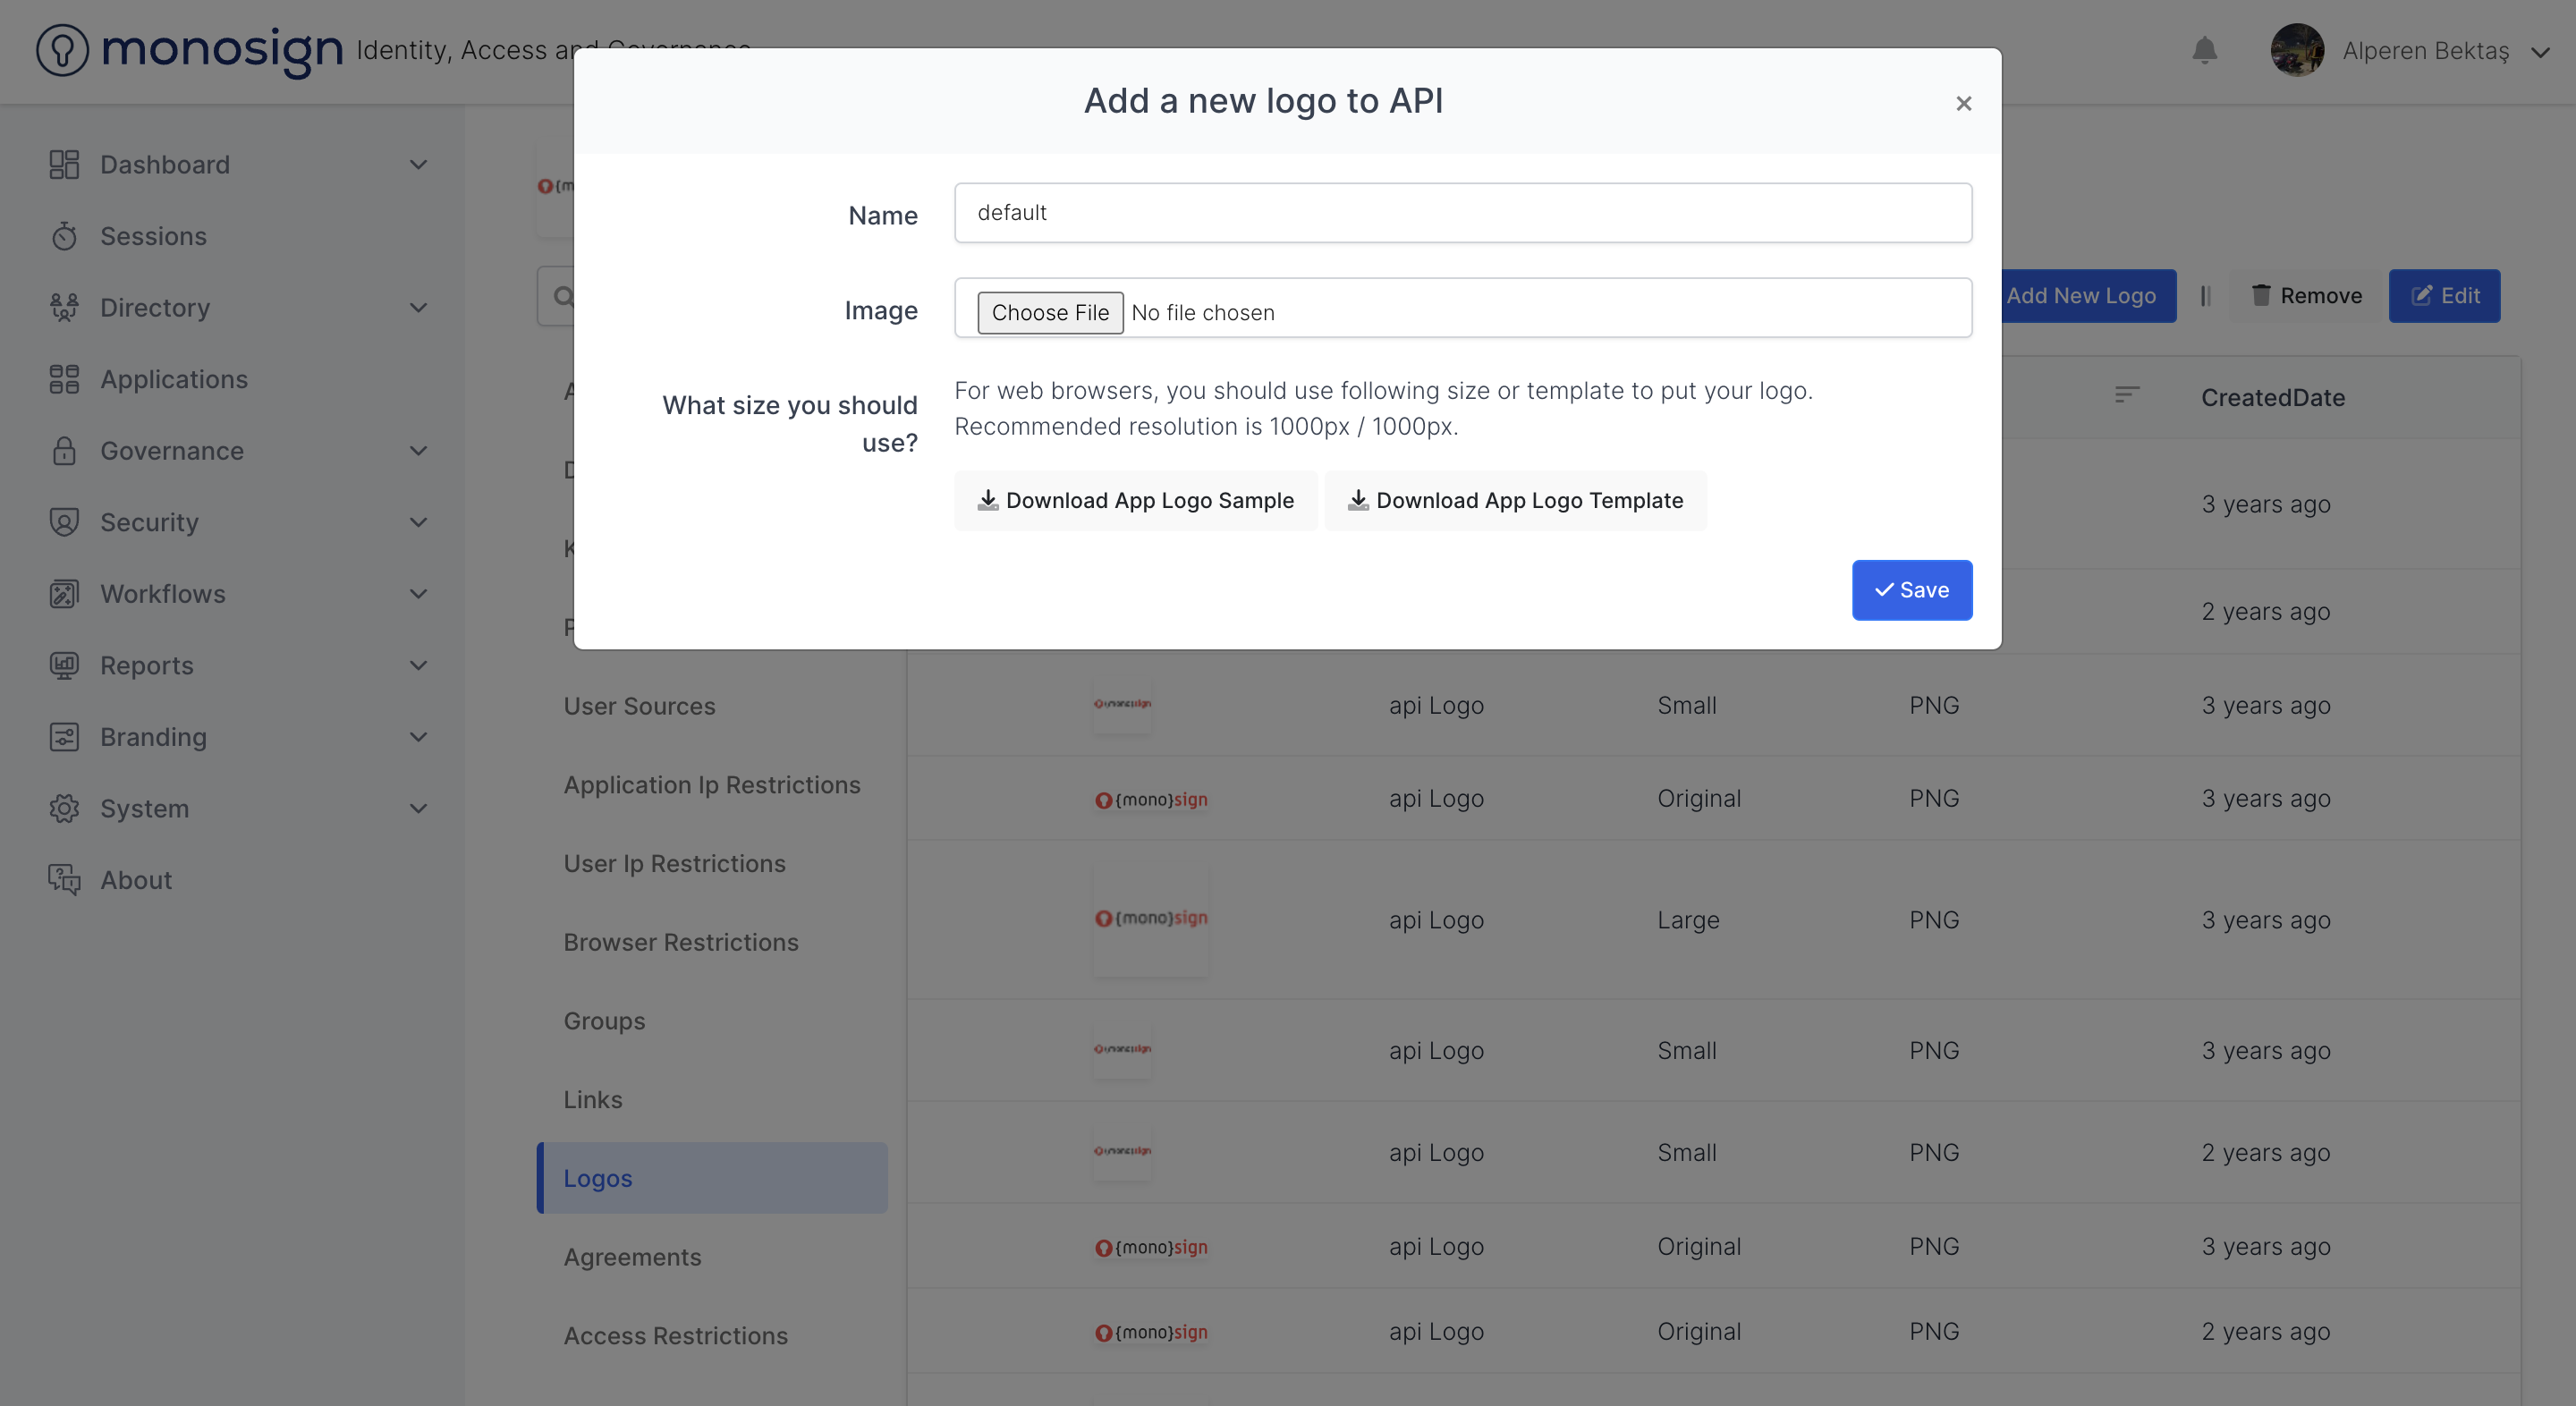
The Add new emblem button opens a window where you can add a new emblem to the application. The window for adding a new emblem consists of sections.
Sections |
|---|
Name |
Image |
Name
This is the area where you can specify the name of the emblem while adding a new emblem to the application.
Image
This is the area where you can specify the image information of the emblem while adding a new emblem to the application. When you want to add a new image to the application, after clicking the gray "select file" button, a window will appear where you can add a picture - emblem. From this window, you can add a picture - emblem from the files of the device you are using.
Save
After all the fields are filled and the properties are determined, a new emblem for the application is added by clicking the green "save" button in the lower right part of the window. It will issue a confirmation notification to your stake when the transaction is successful.
Permissions
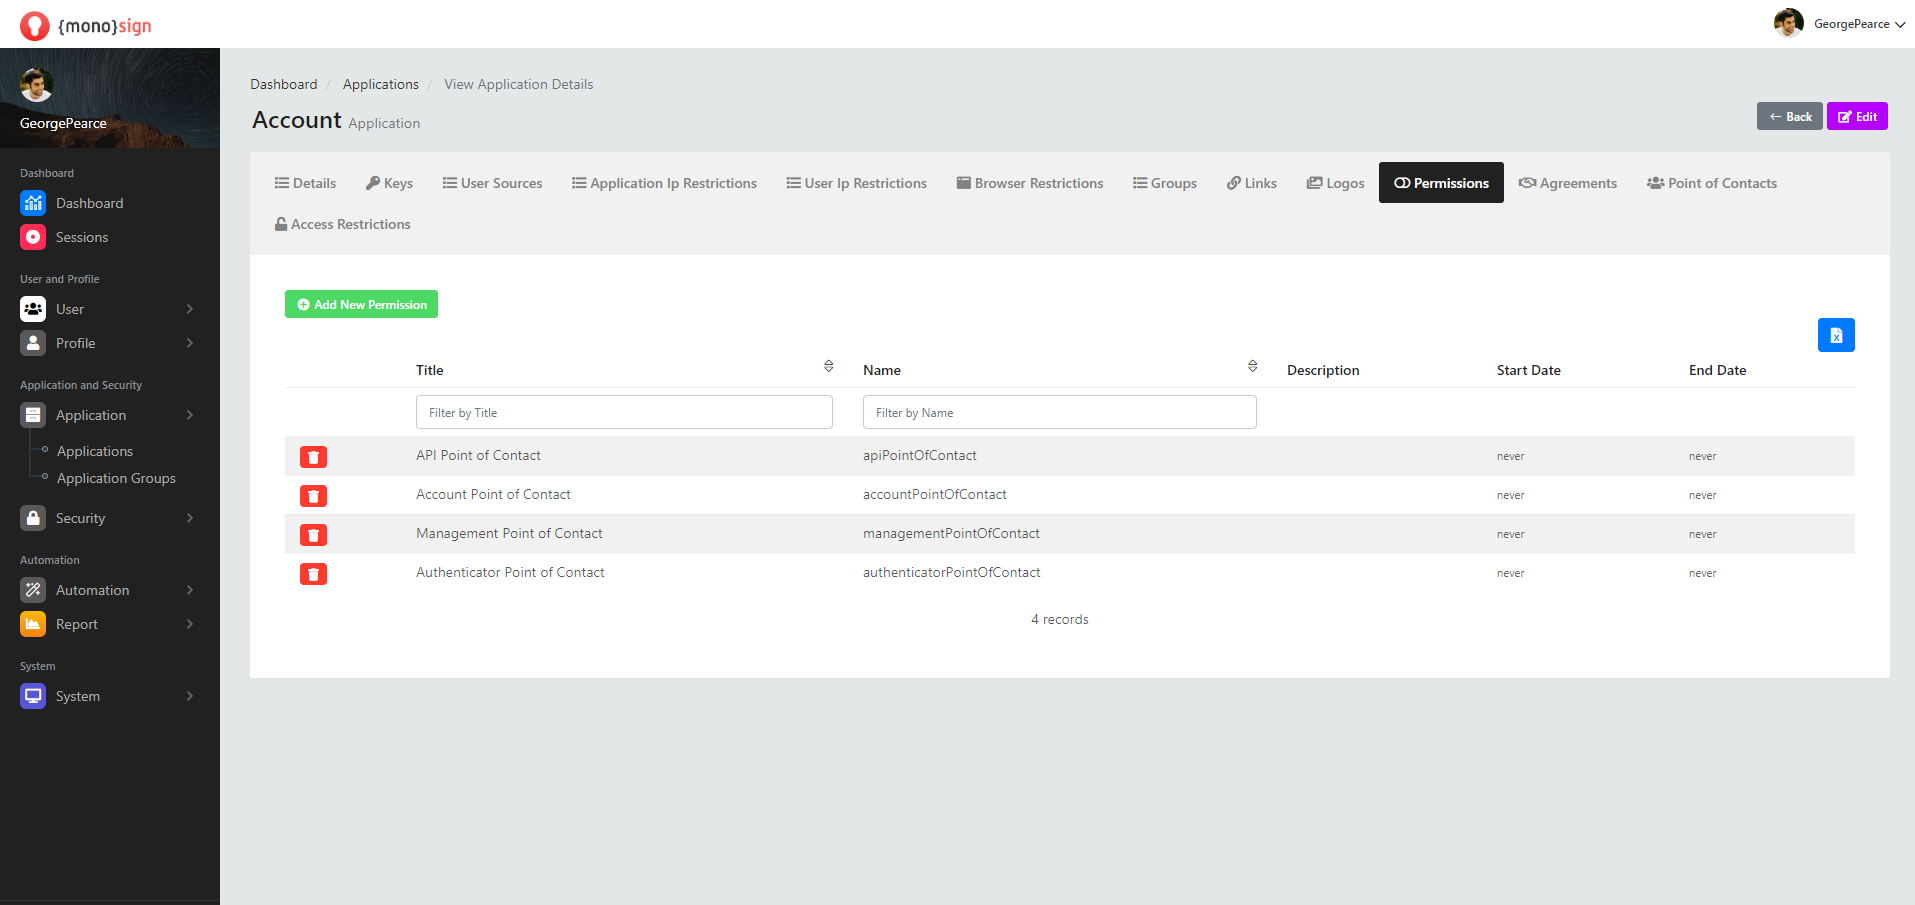
This is the page where you can view the application's authorizations.
You can sort and filter the authorizations of the application according to their fields.
Sections |
|---|
Title |
Name |
Description |
Start Date |
End Date |
Title
This is the area where you can view the title information of the authorization or authorizations defined on the application.
Name
This is the area where you can view the name information of the authorization or authorizations defined on the application.
Description
This is the area where you can view the description information of the authorization or authorizations defined on the application.
Start Date
This is the area where you can view the start date information of the authorization or authorizations defined on the application.
End Date
This is the area where you can view the start date information of the authorization or authorizations defined on the application.
Add New Permission
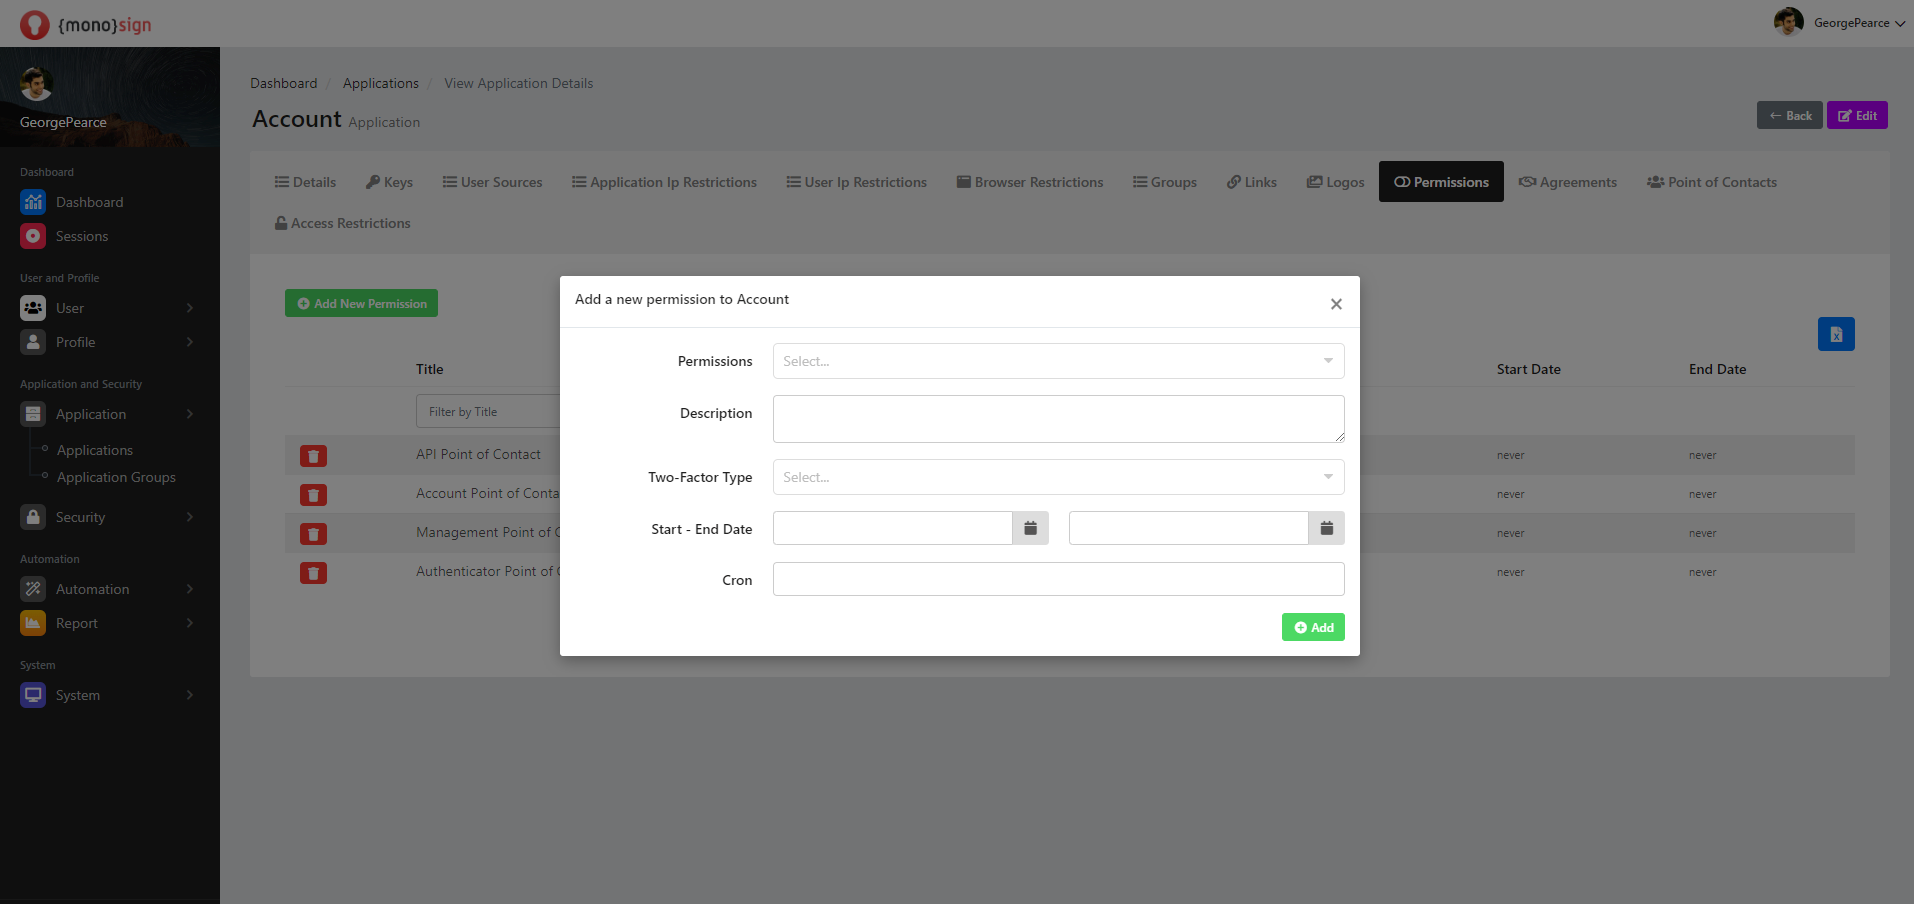
Add new authorization button opens a window where you can add a new authorization to the application. Adding a new authorization window consists of sections.
Sections |
|---|
Perm |
Name |
Description |
Start Date |
End Date |
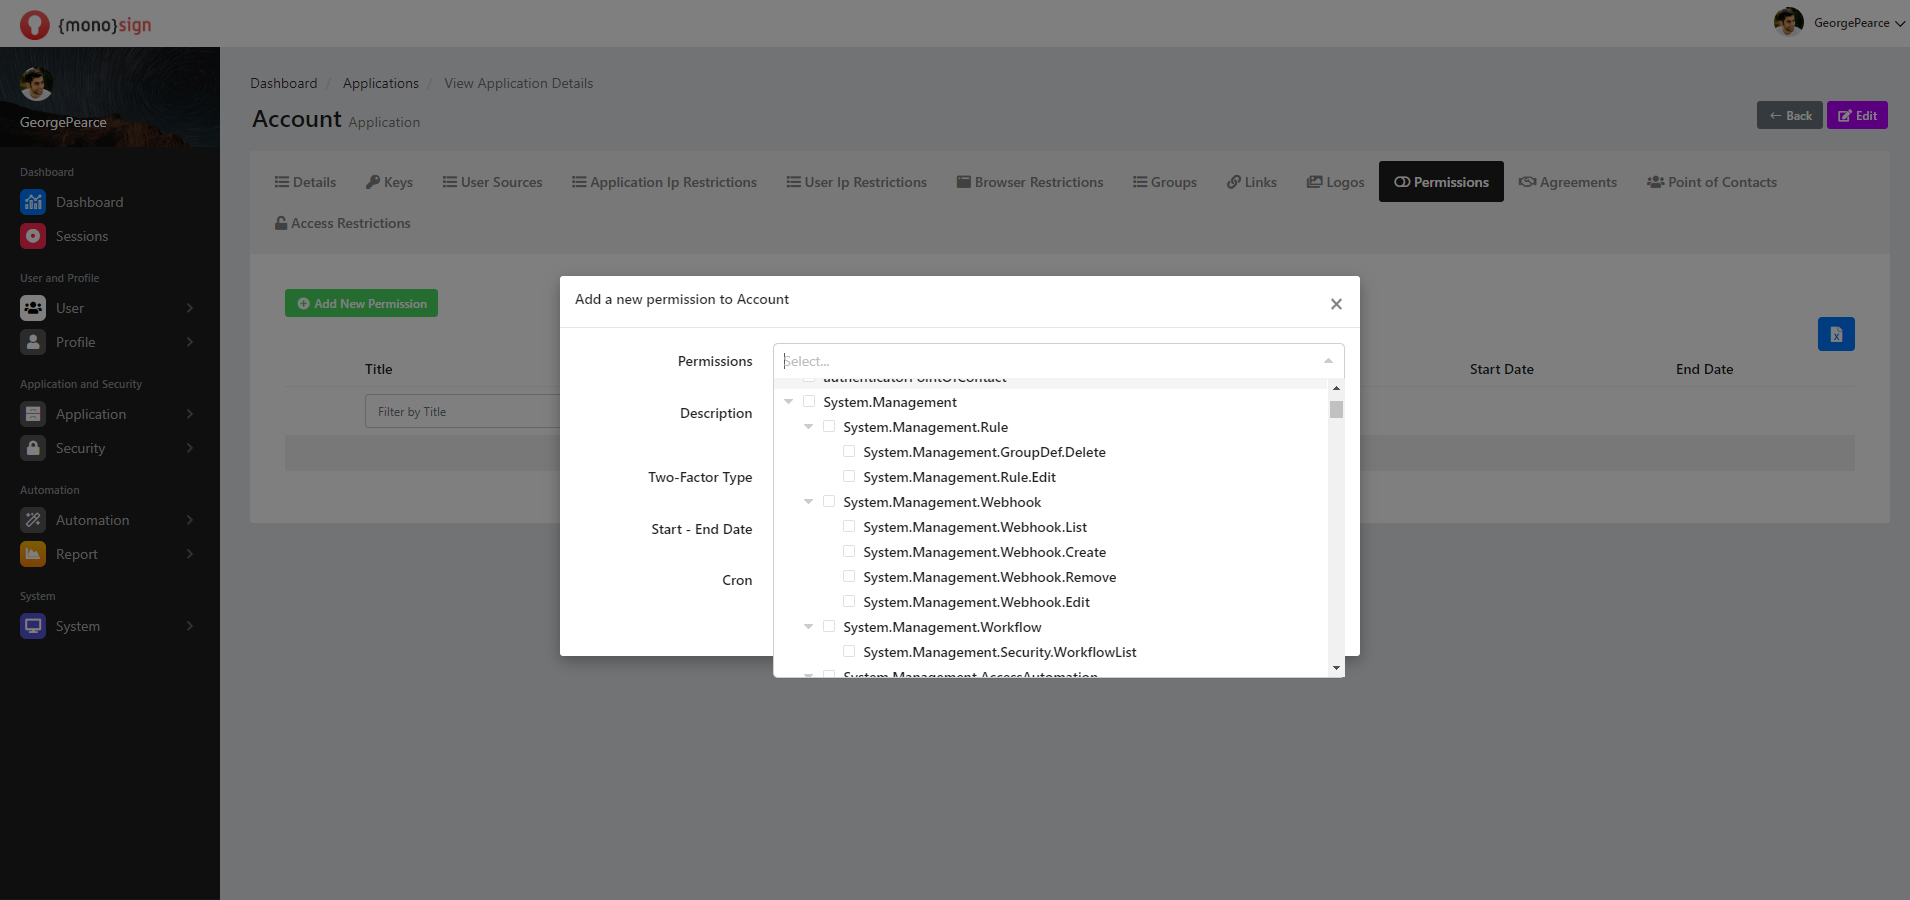
Permission
This is the area where you can specify the authorization or authorizations when adding a new authorization or authorizations to the application.
Description
This is the area where you can specify the authorization or authorizations while adding a new authorization or authorizations to the application.
Two-Factor Type
This is the field where you can specify the two-factor type / type of authorization or authorizations when adding a new authorization or authorizations to the application.
System Default allows you to select the system default option of the two-factor type/type of authorization or authorizations to be added new.
Ask once per environment allows you to select the option to add new authorization or authorizations, two-factor type / type, ask once per environment.
Ask every login allows you to select the new authorization or authorizations, two-factor type / type, ask every login option.
Not required allows you to select the two-factor type / type of the new authorization or authorizations to be added, not required.
Disabled allows you to select the disabled option, the two-factor type / type of authorization or authorizations to be added.
Start - End Date
This is the area where you can specify the start and end dates of the authorization or authorizations when adding a new authorization or authorizations to the application.
You can set the start and end dates of the authorization or authorizations from the date selection window that appears.
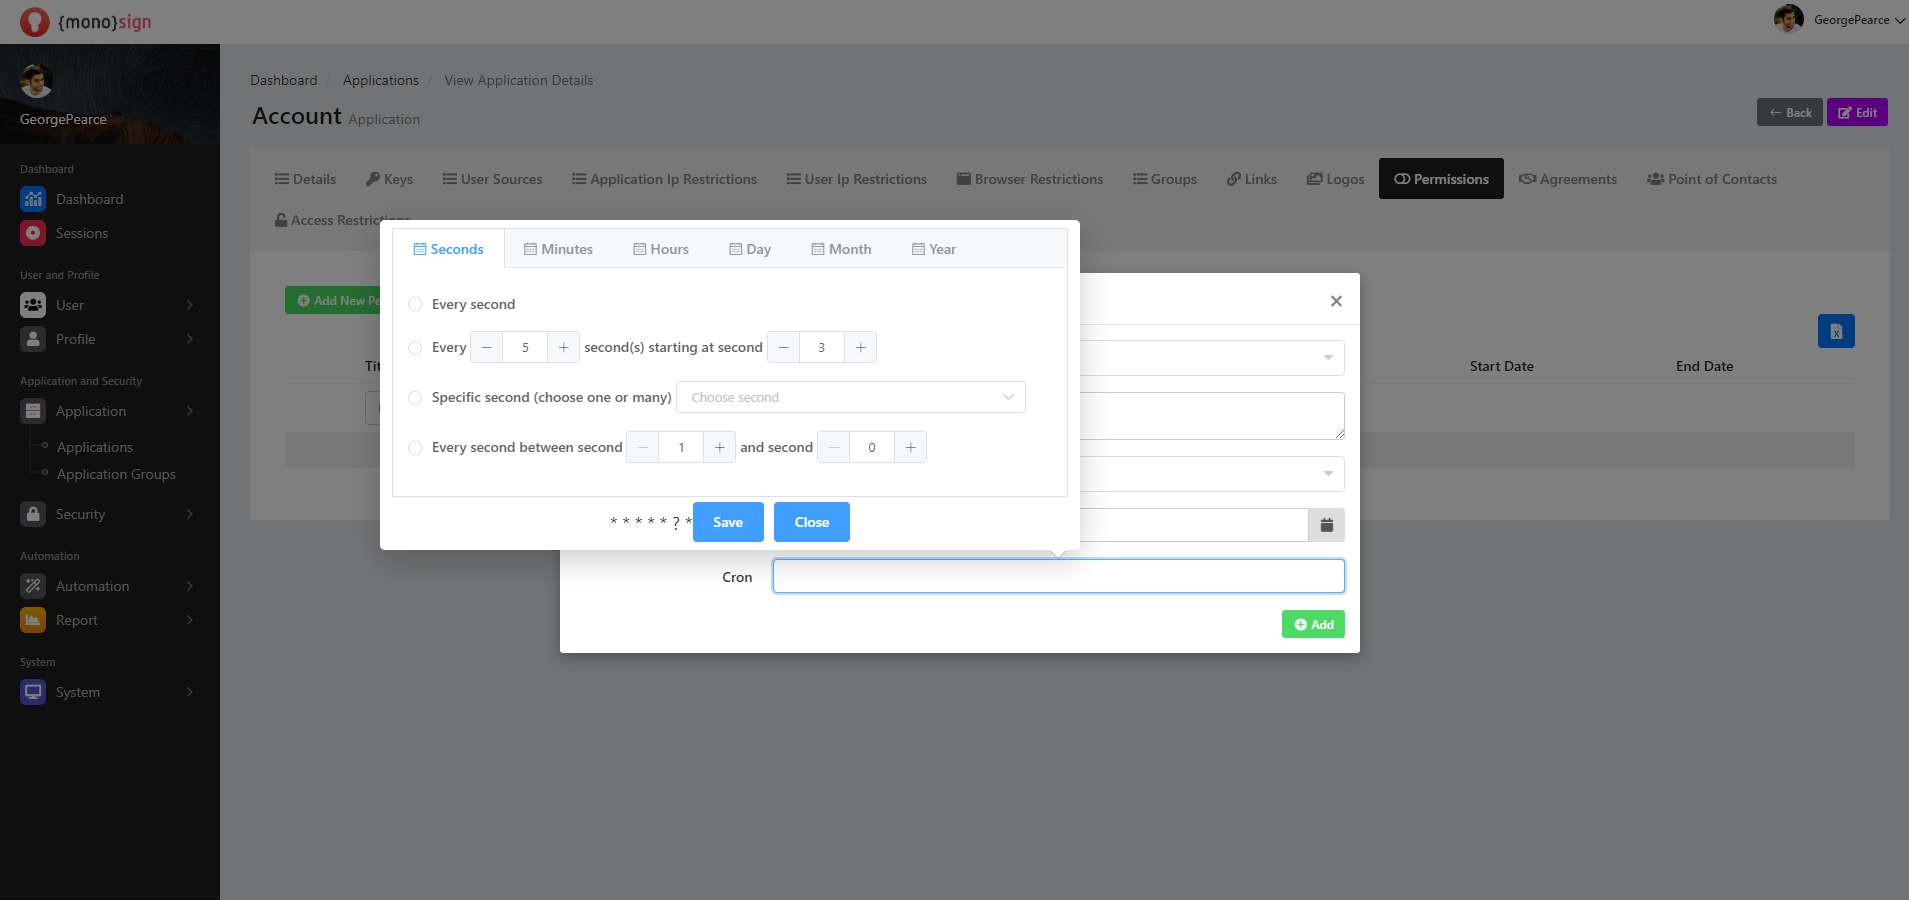
Cron
It is a unix command that allows permissions to be scheduled at a later date. When you click on the cron field from the Add new authorization window, another window will appear that allows you to schedule the authorizations according to a later date. In the window that appears, you can make a comprehensive plan for the future from its sections.
Seconds
Minutes
Hours
Day
Month
Year
Save
After all the fields are filled and the properties are determined, a new authorization or authorizations are added for the application by clicking the green "save" button in the lower right part of the window. It will issue a confirmation notification to your stake when the transaction is successful.
Agreements
This is the page where you can view the agreements of the application.
Agreements of the application,you can sort and filter by fields.
Sections |
|---|
Name |
Created Date |
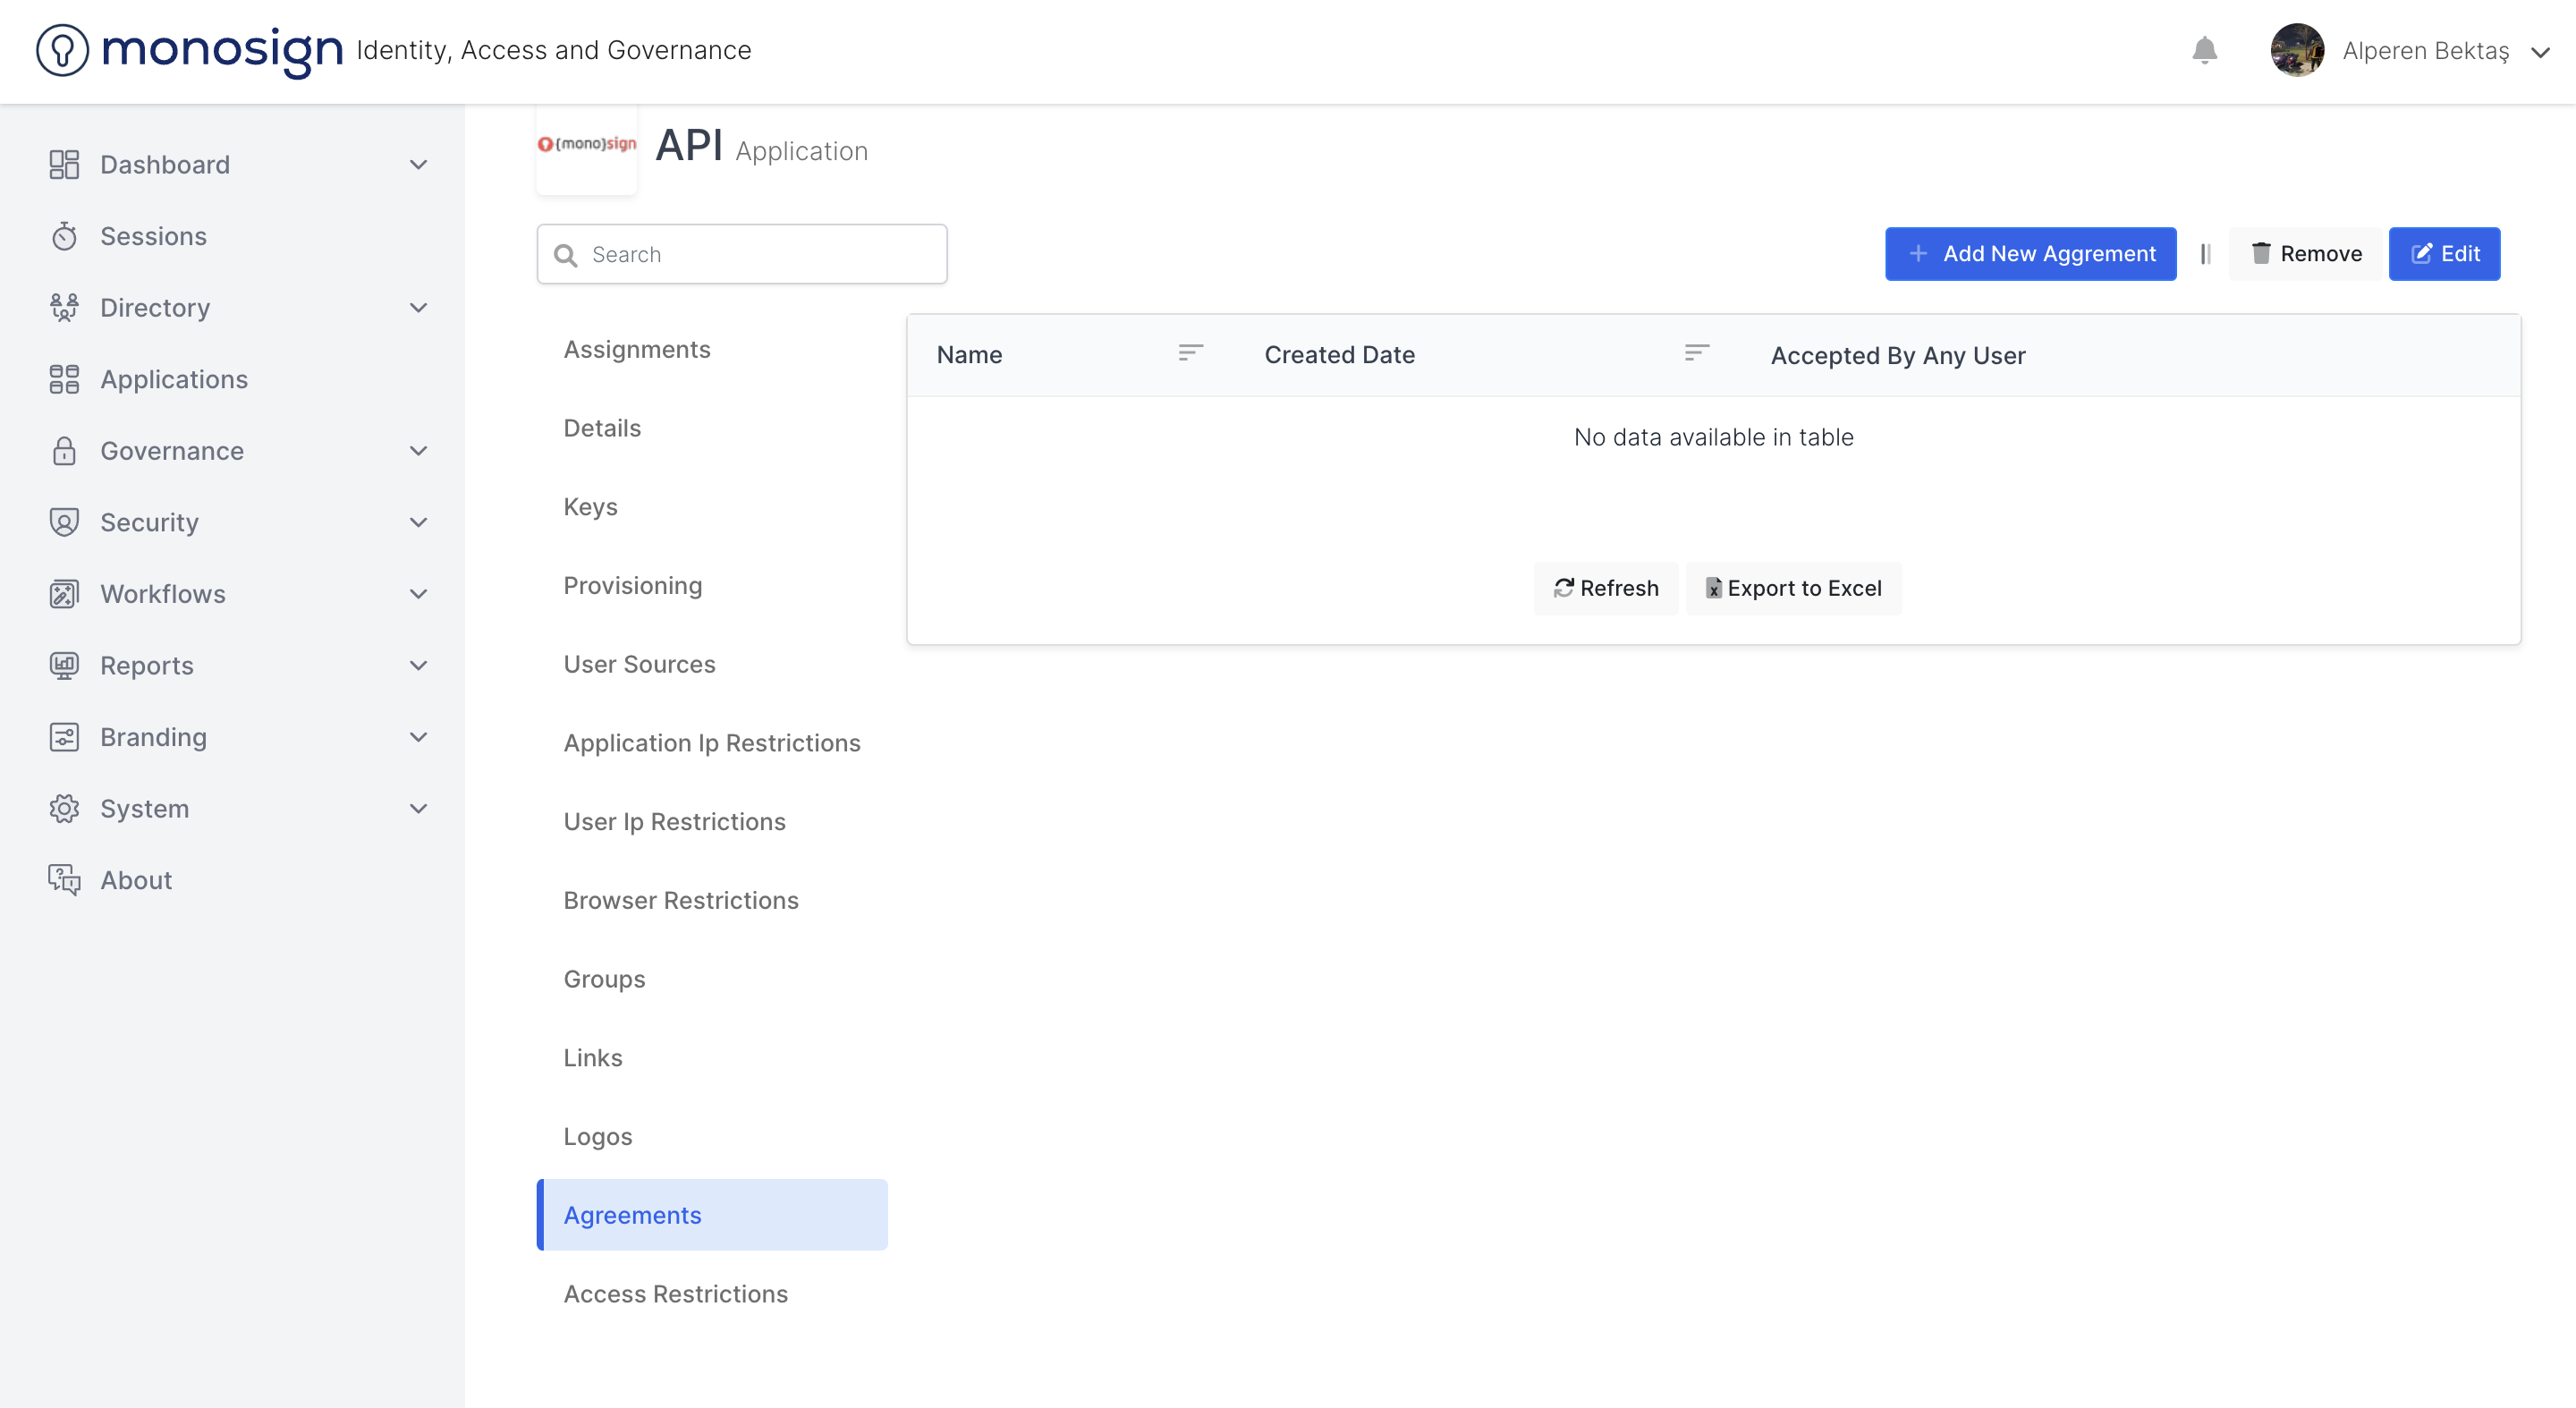
Name
You can name the agreements or associations on the application.
Checkout Date
You can evaluate the date of creation of agreements or agreements on the application.
Clone Application Agreement
Harmonies deal, the blue button inside any deal lets you agree. Cloning button tighten association is about adding one more cloned relation. In terms of operation it is cloned well in terms of use in editing a shape.
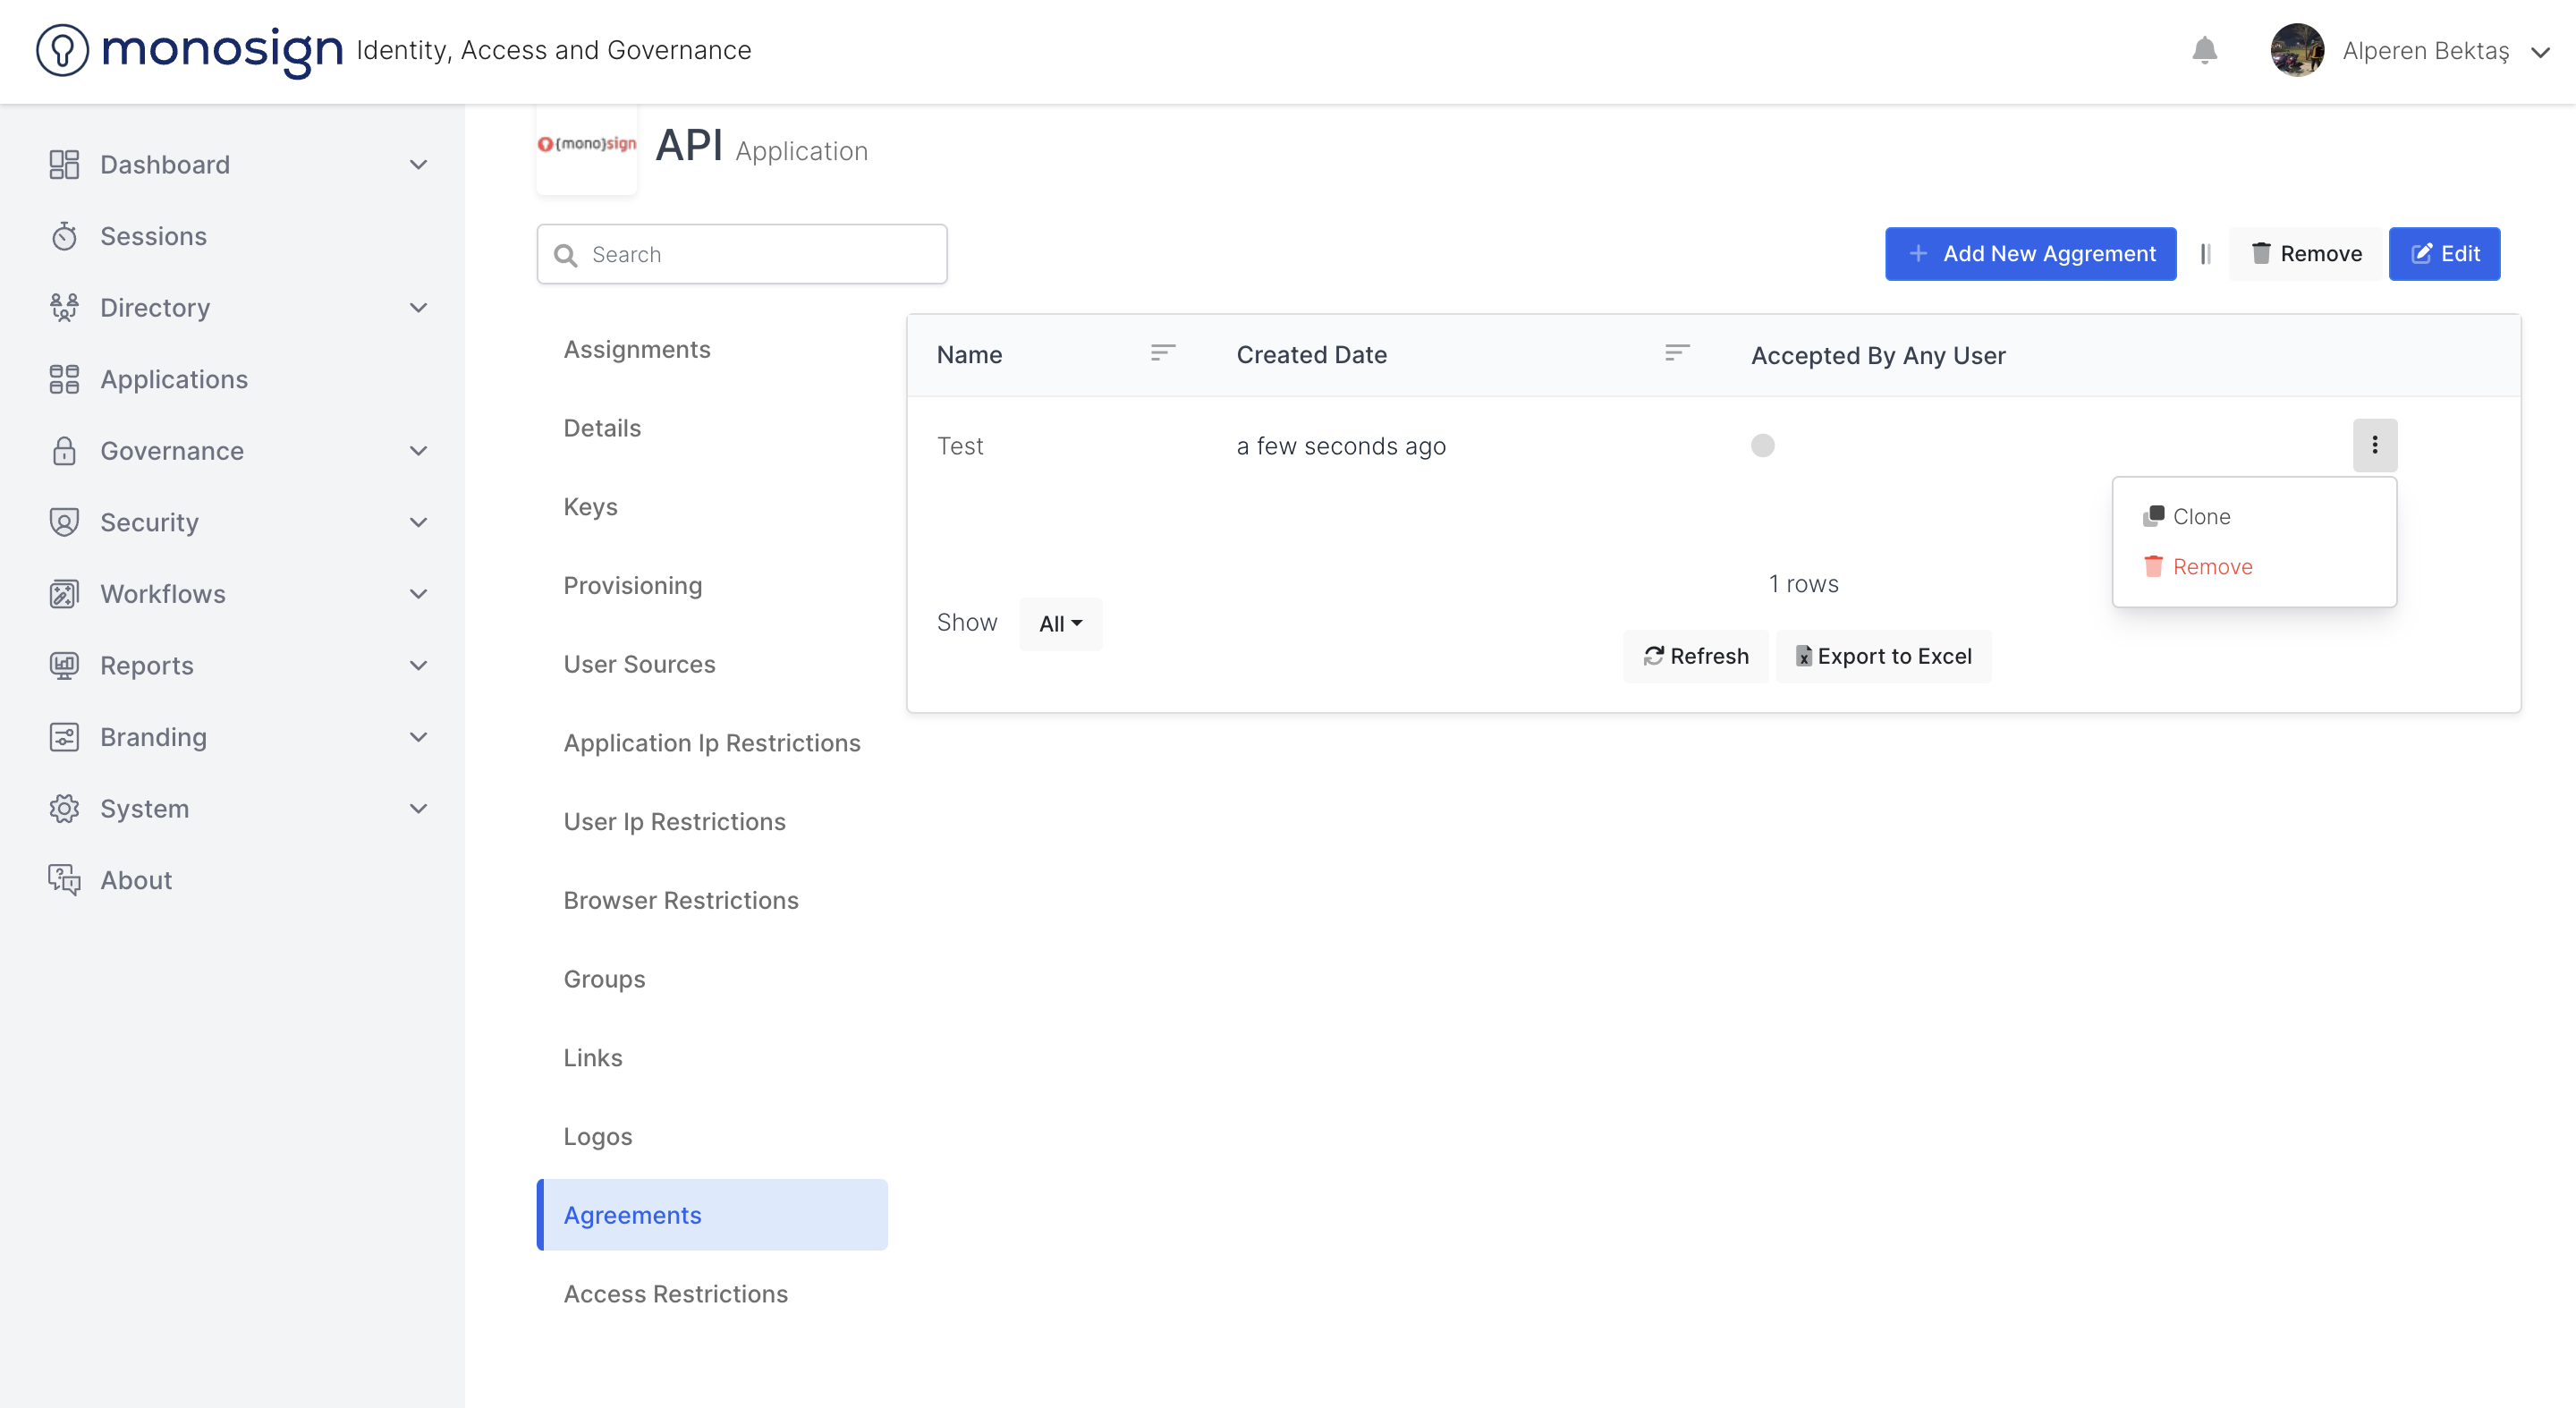
Delete Application Agreement
The shopping bottle, the red button inside any deal allows you to delete the deal. A window appears with an emphasis on "Are you sure? (Sure wrong)" "This app deal will be removed". Removed and completes successfully so that it can be applied while completing the "Yes, delete" operation.

Edit Application Agreement
Alignments can imagine suitable solutions to plan what they might be suitable for. For tools for the application, you can find information about the products in the "Add New Deal (Add New)" section.
Add New Agreement
Add new authorization button opens a window where you can add a new authorization to the application.
Adding a new authorization window consists of sections.
Sections |
|---|
Agreement Name |
Sort |
Name |
Content |
Agreement Name
This is the area where you can specify the agreement name while adding a new agreement to the application.
Shorts
This is the area where you can specify the deal order when adding a new deal to the application.
Name
This is the area where you can specify the content title in the section where the content is written when adding a new agreement to the application.
Content
This is the area where you can specify the content when adding a new deal to the application.
The agreement you want to create can be in English or Turkish. Content and content names can be written in English and Turkish.
Point of Contacts
The application is the page where you can view the person or people to consult and consult.
You can sort and filter the application according to the person or people to be consulted and consulted.
Section |
|---|
Name |
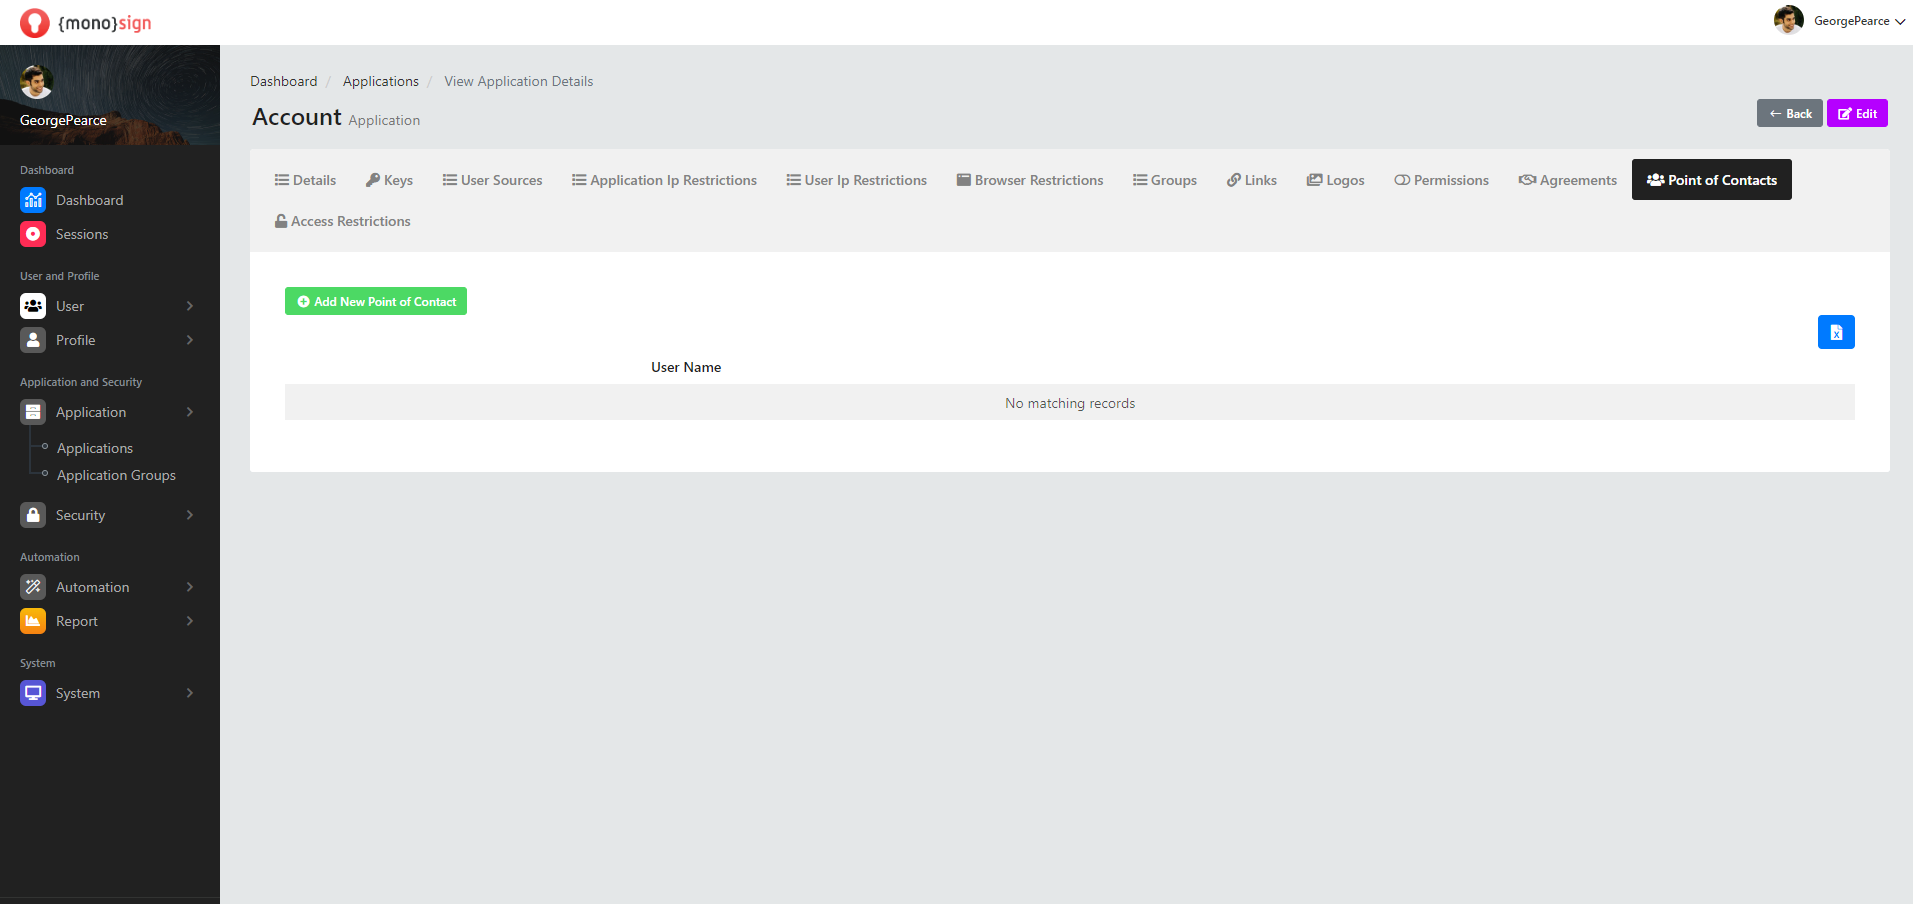
Name
It is the area where you can view the name information of the person or persons to be consulted defined on the application.
Add New Point of Contact
Add new contact, contact person button brings up a window where you can add a new contact, contact person to the application.
The window for adding a new contact, contact person, consists of section.
Section |
|---|
Users |
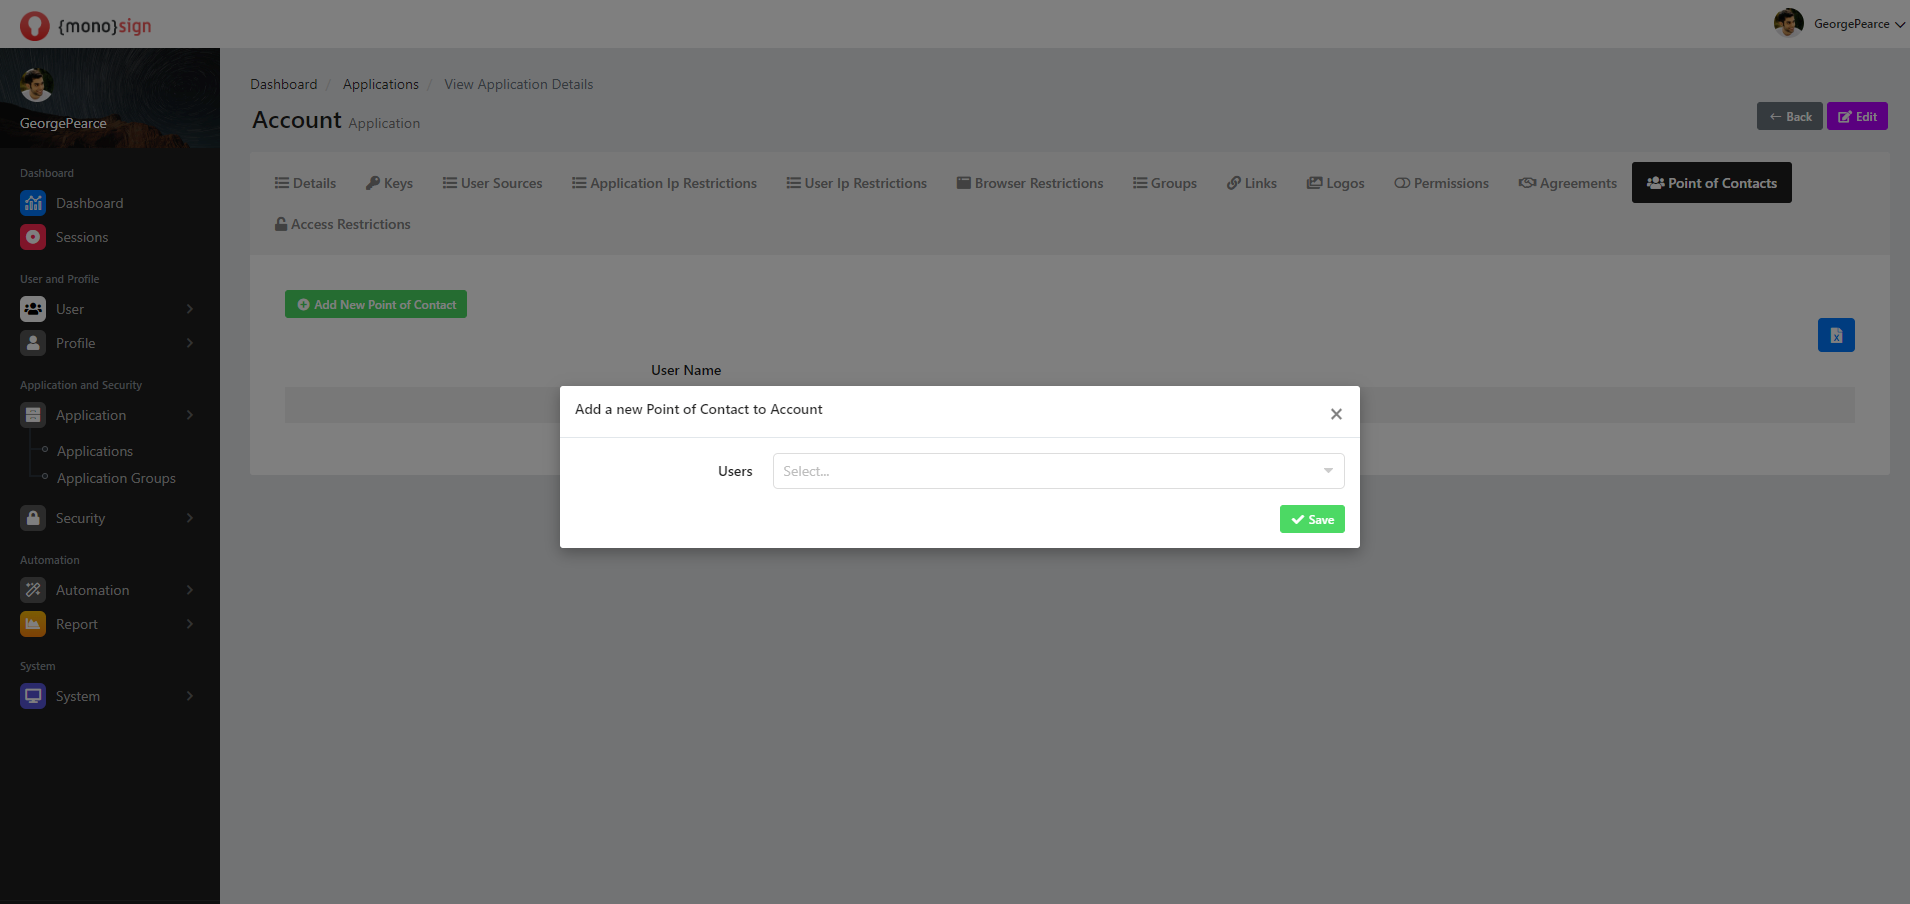
Users
This is the area where you can specify any of the users defined in the system while adding a new contact, contact person to the application. The person you added in the Users field will now be selected as the person to be consulted and consulted in the application.
Save
After filling the person selection field, clicking the green "save" button in the lower right part of the window will add a new contact and contact person for the application. It will issue a confirmation notification to your stake when the transaction is successful.
Access Restrictions
This is the page where you can view the application's access restrictions.
You can sort and filter the application's access restrictions by area.
Sections |
|---|
Restriction Type |
Start Date |
End Date |
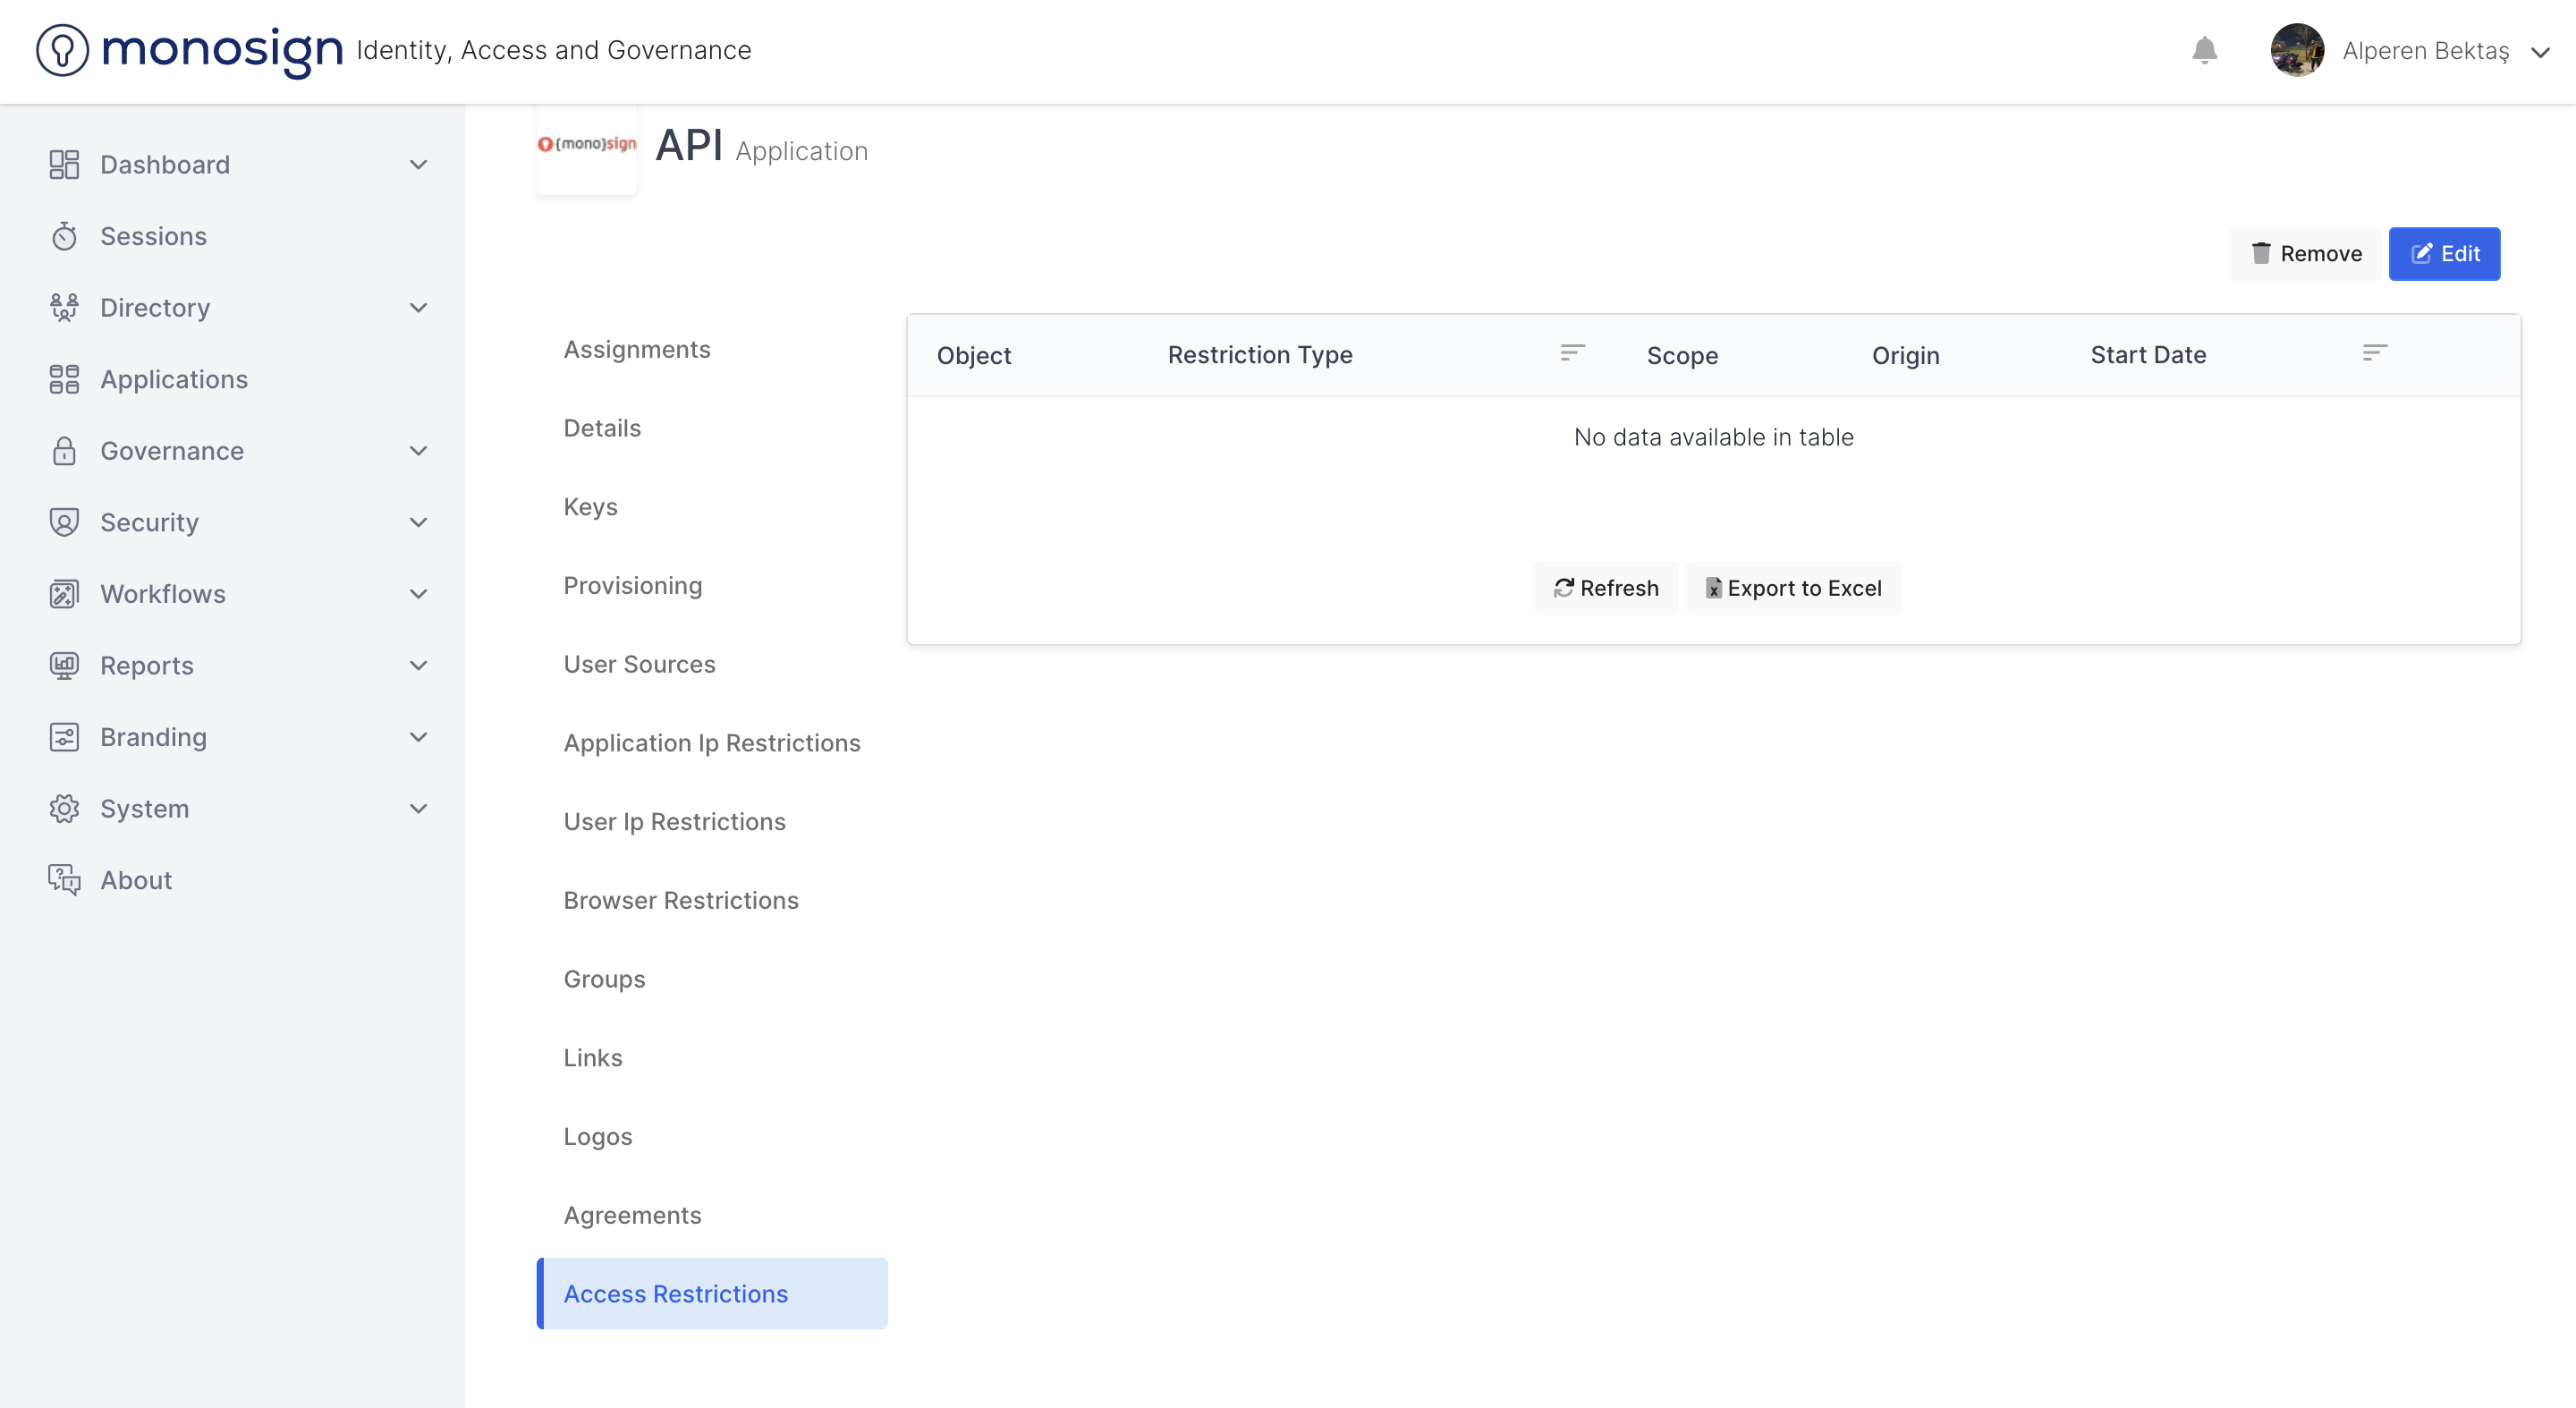
Restriction Type
It is the area where you can view the restriction type / type information of the access restrictions defined on the application.
This is the area where you can view the application restriction type / type information and filter it according to the options below.
Allow
Deny
Start Date
This is the area where you can view the start date information of the access restrictions defined on the application.
End Date
This is the area where you can view the end date information of the access restrictions defined on the application.
Delete Access Restriction
On the access restrictions page, the red button on any access restriction side allows you to delete the access restriction. "Are you sure? (Are you sure?)" "This access restriction will be removed! (This access restriction will be removed!)" "If you remove this access restriction it will be deleted permanently. If you remove the restriction, it will be deleted permanently.)" a warning window appears. When the "Yes, delete it" button is clicked, the application agreement will be removed, and when the operation is successful, a confirmation notification will appear that the application agreement has been successfully removed.
Add New Access Restriction
Add new access restriction button opens a window where you can add a new access restriction to the application.
Adding a new access restriction window consists of the following sections.
Sections |
|---|
Object Type |
Object |
Access Types |
Access Restriction Type |
Start Date |
End Date |
Cron |
Add New Access Restriction
Add new access restriction button opens a window where you can add a new access restriction to the application.
Adding a new access restriction window consists of the following sections.
Sections |
|---|
Object Type |
object |
Access Types |
Access Restriction Type |
Start Date |
End Date |
Cron |
ObjectType
It is the area where you can view the type / type of the object as determined by the system when adding a new access restriction to the application.
Object
This is the area where you can view the object as determined by the system when adding a new access restriction to the application.
Access Types
This is the area where you can specify the access type(s) while adding a new access restriction to the application.
Allow allows you to select allow option when adding new access restriction, set access type(s).
Deny allows you to select deny option when adding new access restriction, e-specifying access type(s).
Access Restriction Type
This is the field where you can specify the type / type of access restriction when adding a new access restriction to the application.
Usability allows you to select the availability option when adding new access restriction, specifying access restriction type(s).
Accessibility allows you to select the accessibility option while adding new access restriction, specifying the access type(s).
Start Date
This is the field where you can specify the start date information when adding a new access restriction to the application.
End Date
This is the field where you can specify the start date information when adding a new access restriction to the application.
Cron
It is the unix command that allows the newly added access restrictions to be scheduled to a later date. When you click on the cron field from the Add new access restriction window, another window will appear that allows you to schedule the access restrictions according to a later date. In the window that appears, You can make a comprehensive plan for the future from the sections.
Seconds
Minutes
Hours
day
Month
Year
Save
After all the fields are filled and the properties are determined, a new access restriction is added for the application by clicking the green "save" button at the bottom right of the window. It will issue a confirmation notification to your stake when the transaction is successful.
