This document explains how to create workflows on Monosign. It covers workflow process. Before you continue, it is better to start with understanding how workflows are needed and why workflows are important.
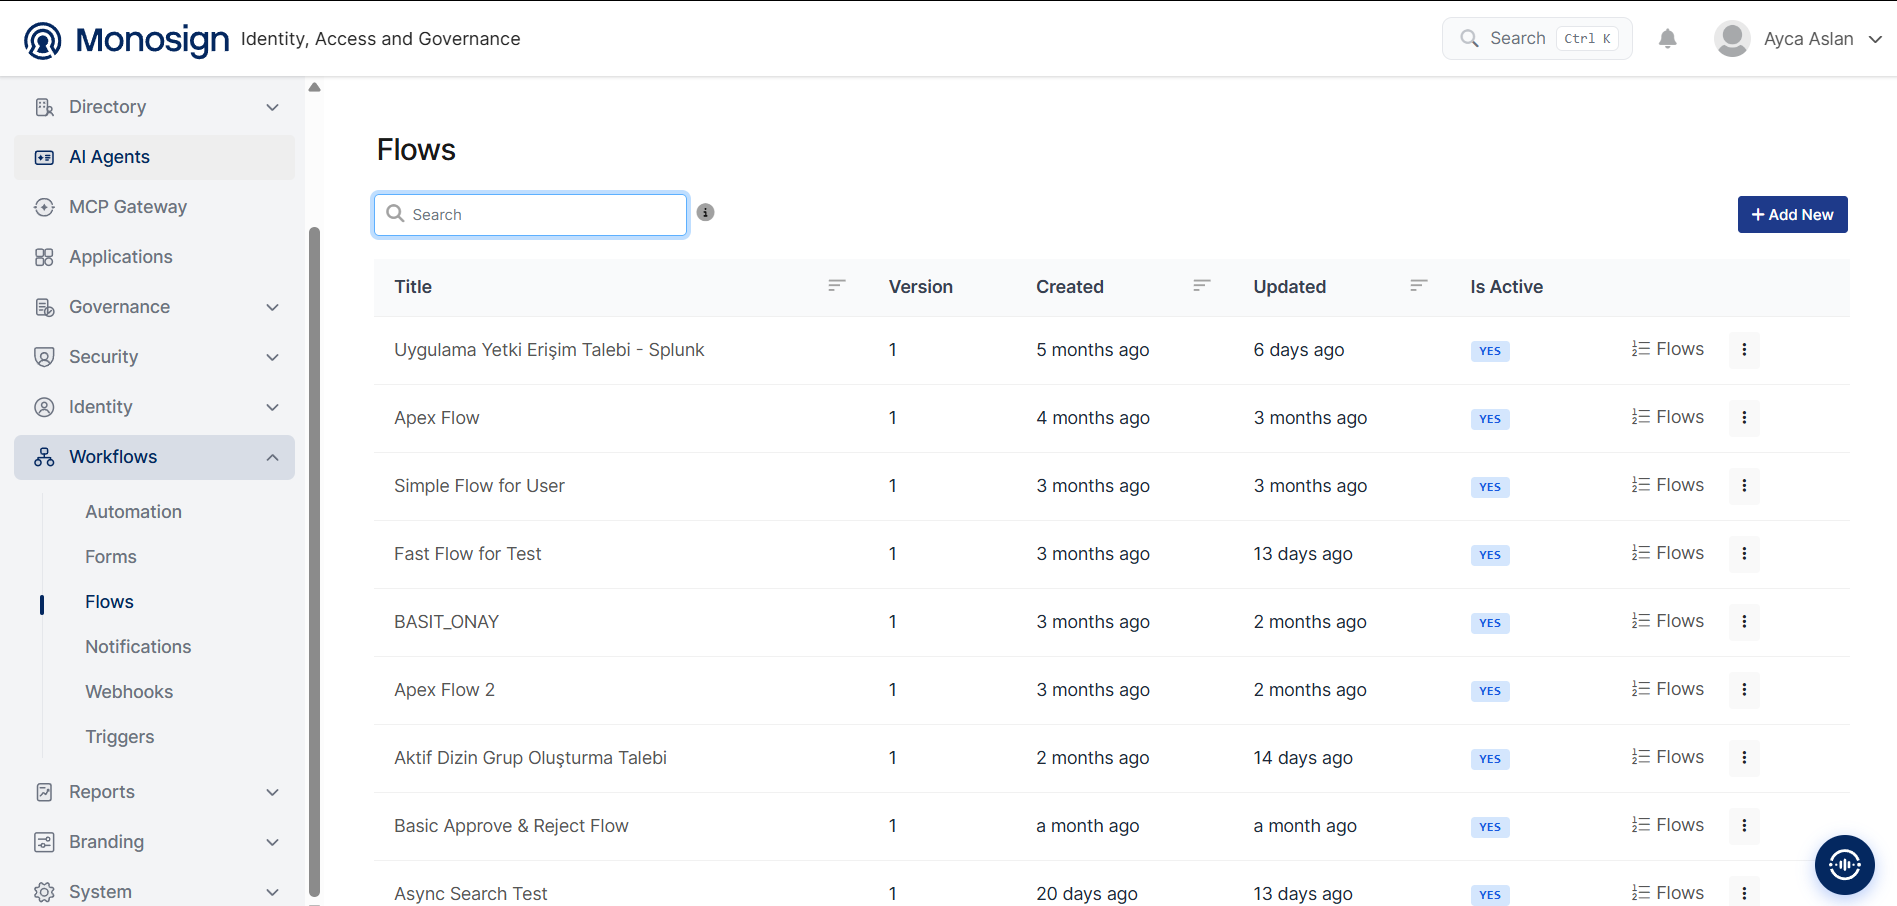
Permitted users are allowed to create Flow by clicking “Add New“ button on the Flows list page.
In MonoSign, the workflow creation step consists of three standard sections.
|
Section |
Description |
|---|---|
|
Overview |
The Overview section is where you define the basic information and settings of the workflow. |
|
Flow |
The Flow section is where you design the workflow steps and configure the specific actions that will be executed within the flow. |
|
Anomaly Detection |
The Anomaly Detection section is where you define what should happen if an anomaly occurs while the workflow is running in the background. |
1. Overview
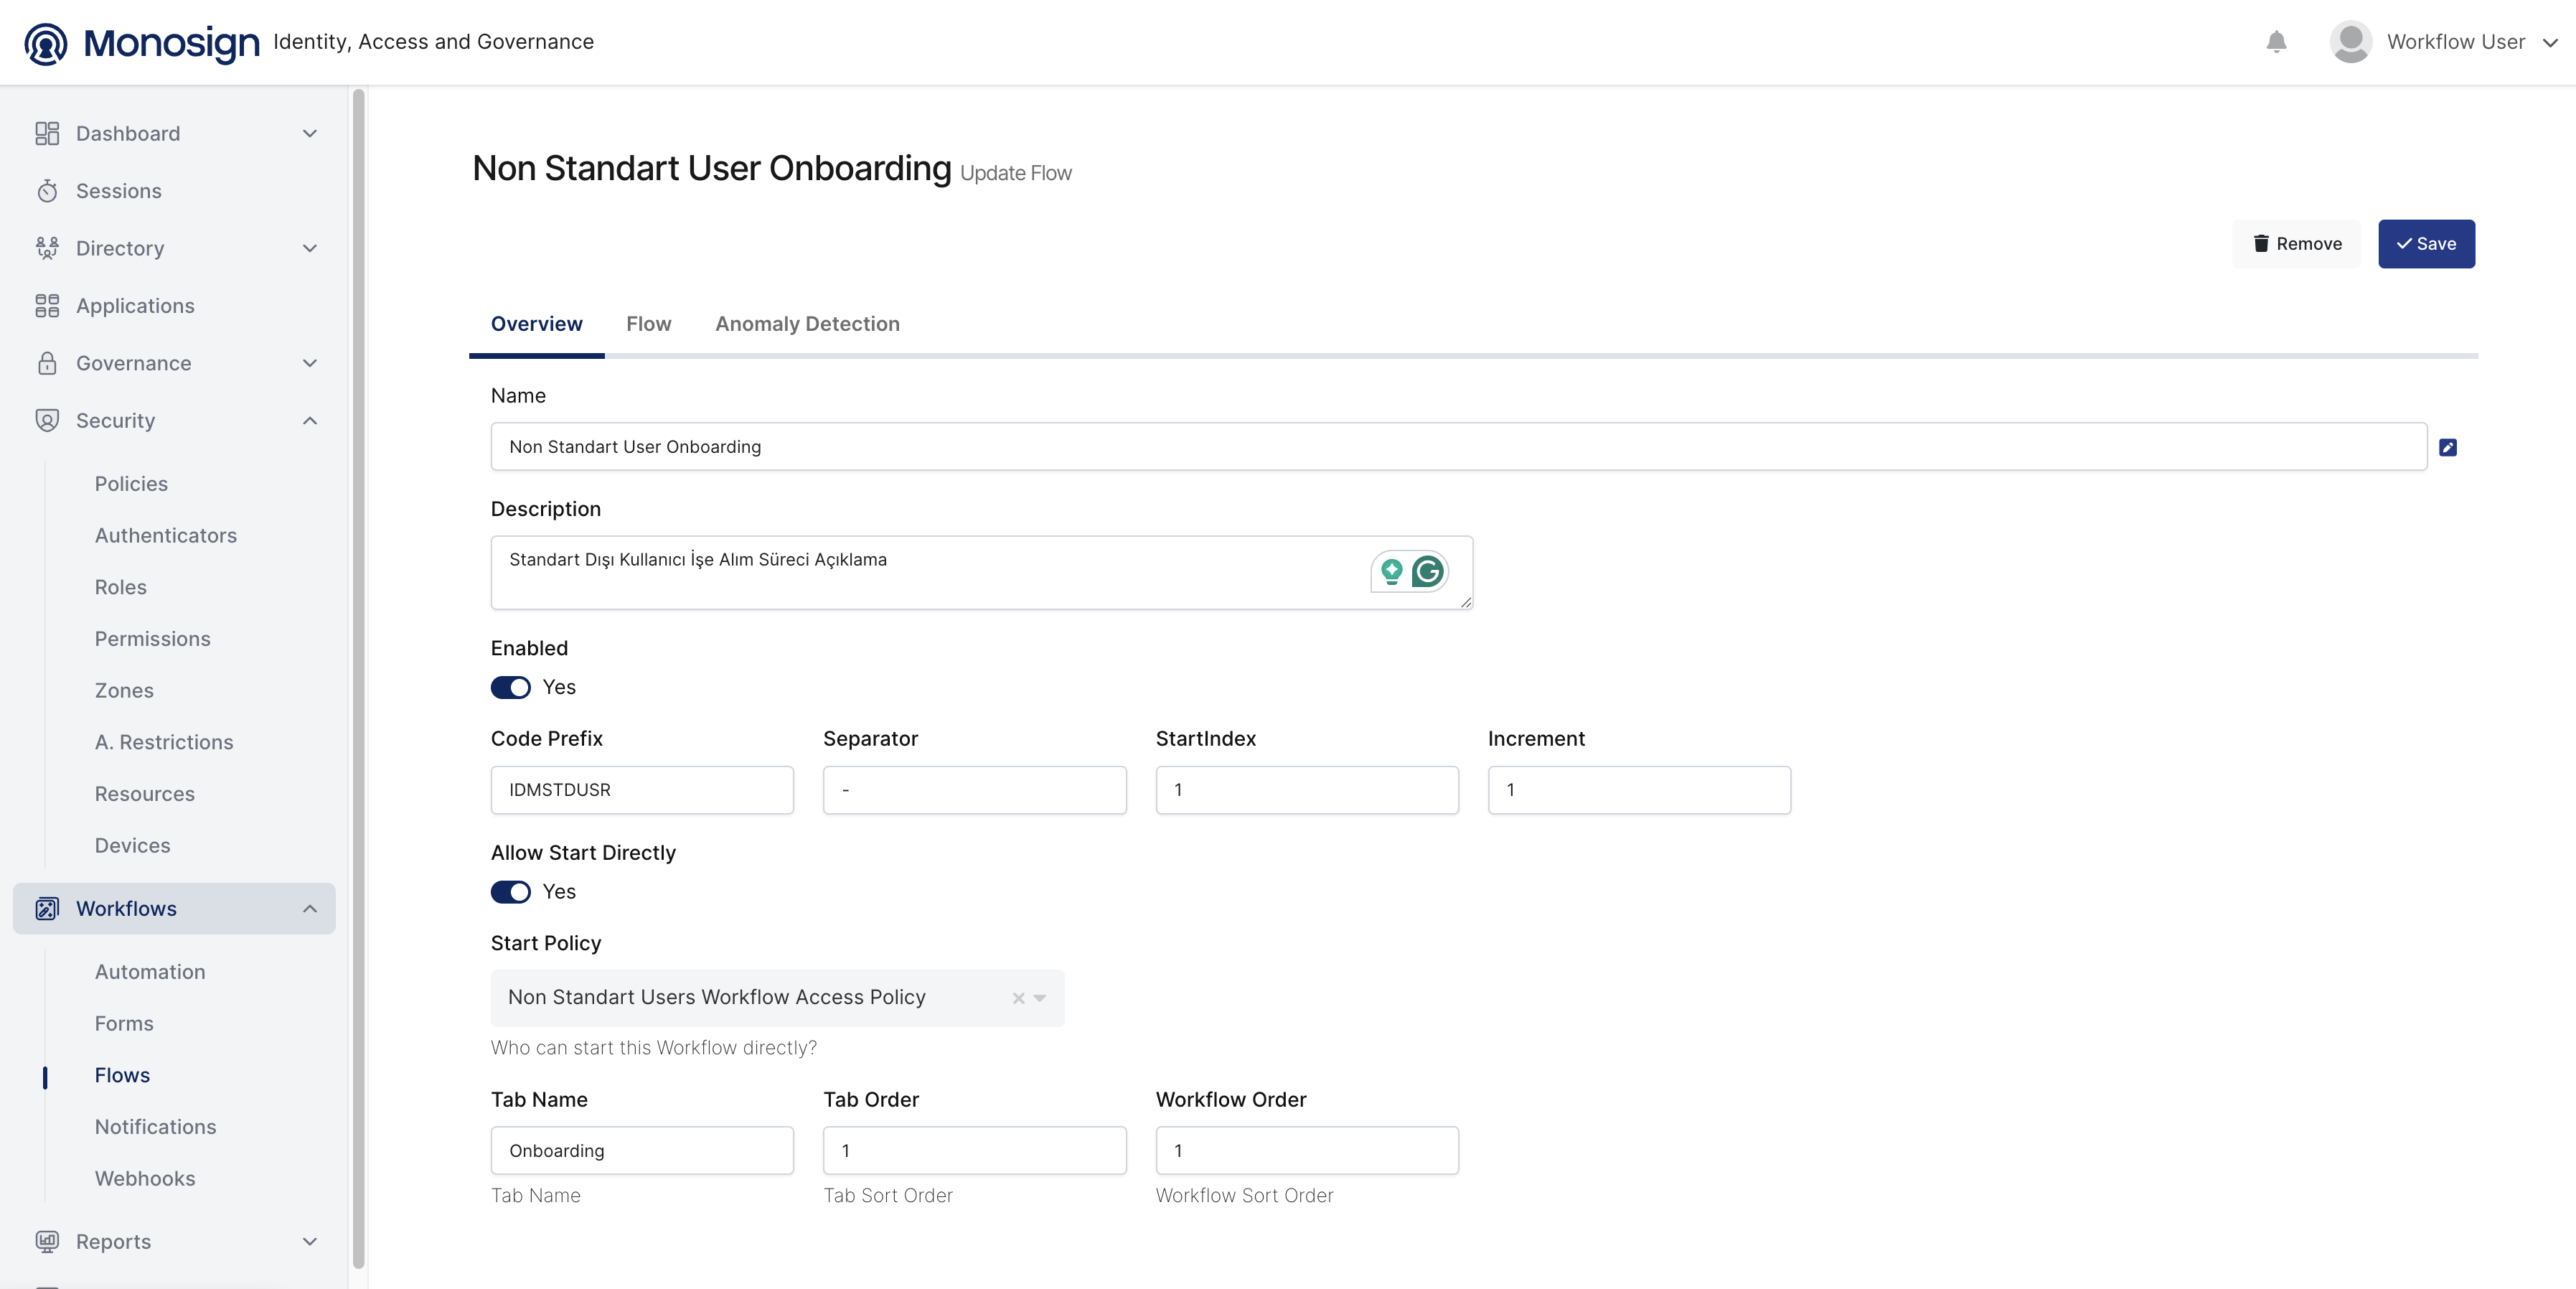
Please note that at least one policy should be created on the “Policies“ page. Therefore, flow manager can set a policy who is allowed to start the workflow directly.
If there is no policy created for the workflow, please create a generic type policy by reading this documentation.
Documentation:
|
Configuration Name |
Description |
|---|---|
|
Name |
A required field where you enter the name of the workflow. This should be a clear and descriptive title. |
|
Description |
A text area to provide additional details about what this flow does or when it should be used. |
|
Enabled |
A toggle switch that activates or deactivates the flow.
|
|
Code Prefix |
An optional field for defining a short prefix code used to identify tasks or actions generated by this workflow. It helps users to search and filter by the prefix of the workflow. |
|
Allow Start Directly |
If enabled, users can manually trigger/start this workflow without any external event or prerequisite. Useful for self-service flows. |
|
Start Policy |
A dropdown to select the policy that controls who is allowed to start this workflow directly. This determines user permissions for initiating the flow. |
|
Tab Name |
The name that will appear in the UI tab for this workflow. This helps categorize or group flows visually. |
2. Flow
The Flow section is where you design and configure the actual workflow steps. In this area, you define how the workflow operates from start to finish. In Monosign, flow typically includes:
To add a step to your workflow, right-click on the flow canvas and select Add New Step from the context menu.
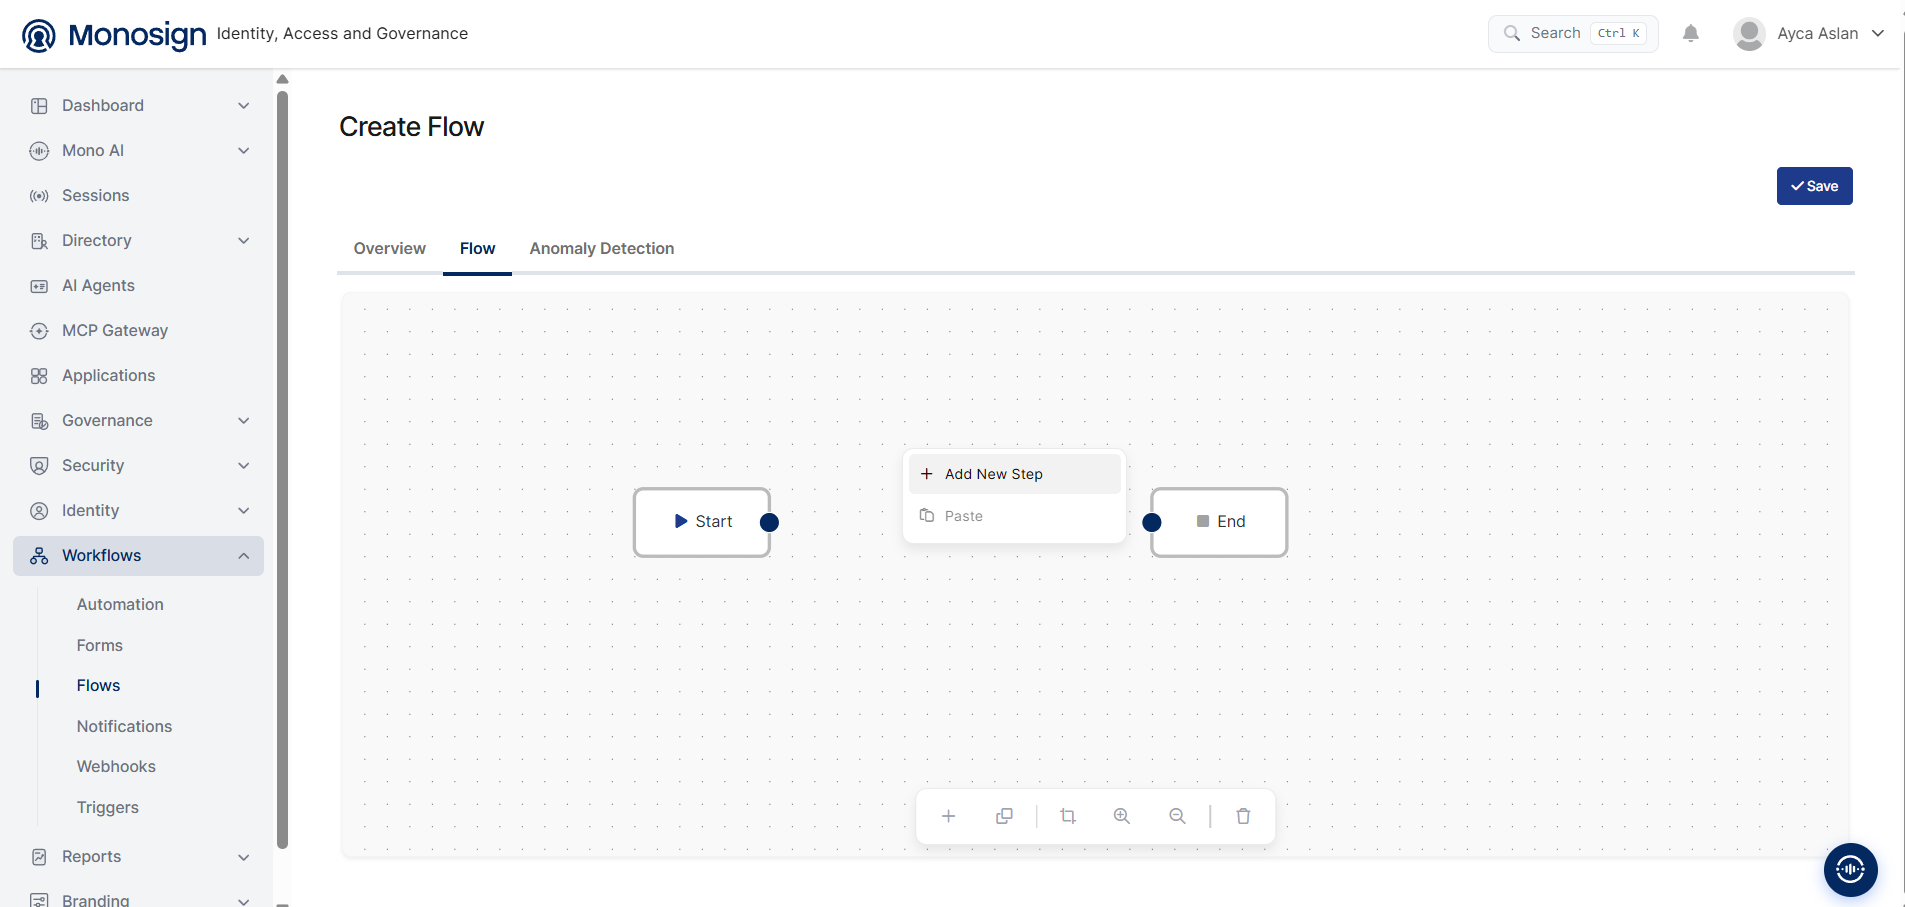
Once you click Add New Step, the Add Step panel opens with the available step types:
-
Approval
-
Form
-
HTTP (Web) Request
-
Code
-
Branch
-
Notification
Select the step type you need to add it to your flow.

1. Approval
This action creates an approval task within the workflow. It is typically used when a request requires validation by a manager, system owner, or security team.
What it does:
-
Sends an approval task to assigned approvers
-
Waits for a decision (Approve / Reject)
-
Continues the workflow based on the approver’s decision
Common use cases:
-
Access request approval
-
User creation or privilege assignment validation
-
Account termination approval
Approval action consists of three standard sections.
|
Section |
Description |
|---|---|
|
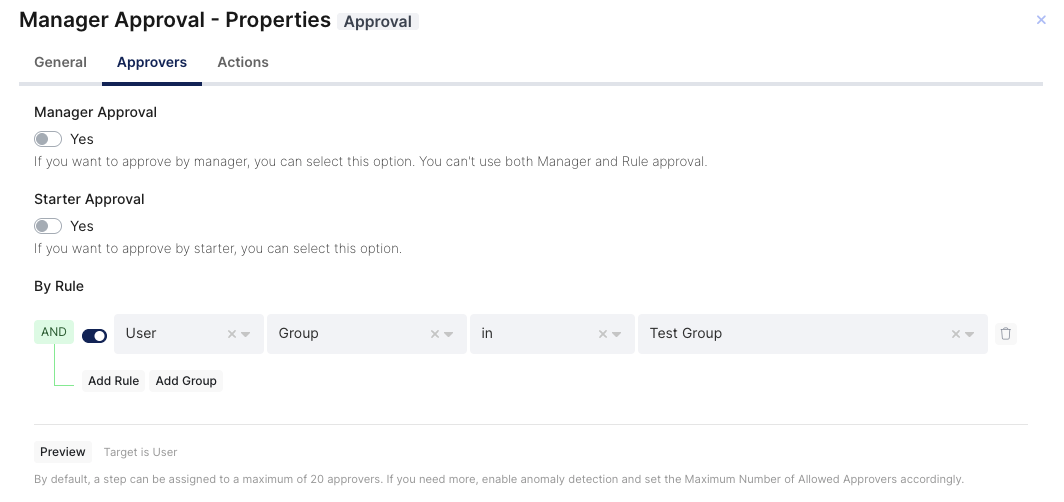
General |
The Overview section is where you define the basic information and settings of the workflow. 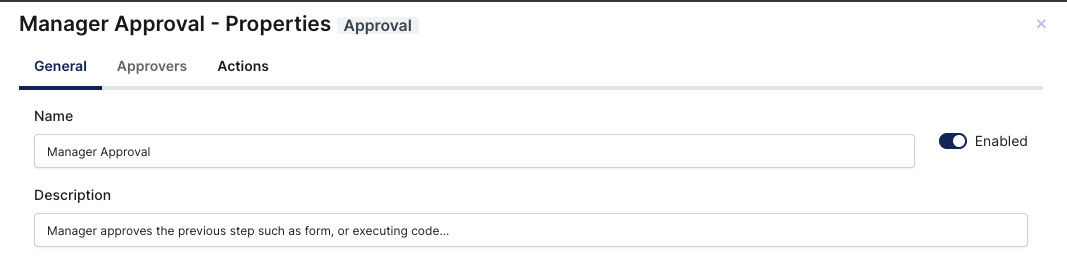
|
|
Approver |
The Approver section is where you define who will approve the previous step in the workflow.
|
|
Actions |
The Actions section defines what will happen when the approval step is assigned to a user or multiple users. You can send a notification to the approvers when the approval step is assigned to them. For example, an informational email can be sent to the selected approver(s). You can use a system content for sending notification to approver/approvers. You can find the contents on System → Contents page. 
When you click Add Action, the When field determines at which stage of the approval step the action will be triggered. The following options are available: On Step Assigned: The action is triggered when the approval step is assigned to the approver(s). For example, an informational notification can be sent to the approvers when the step is assigned to them. On Step Approved: The action is triggered when the approver(s) approve the step. On Step Rejected: The action is triggered when the approver(s) reject the step. On Step Canceled: The action is triggered when the approval step is canceled. After selecting the appropriate option, click Add to create the action. 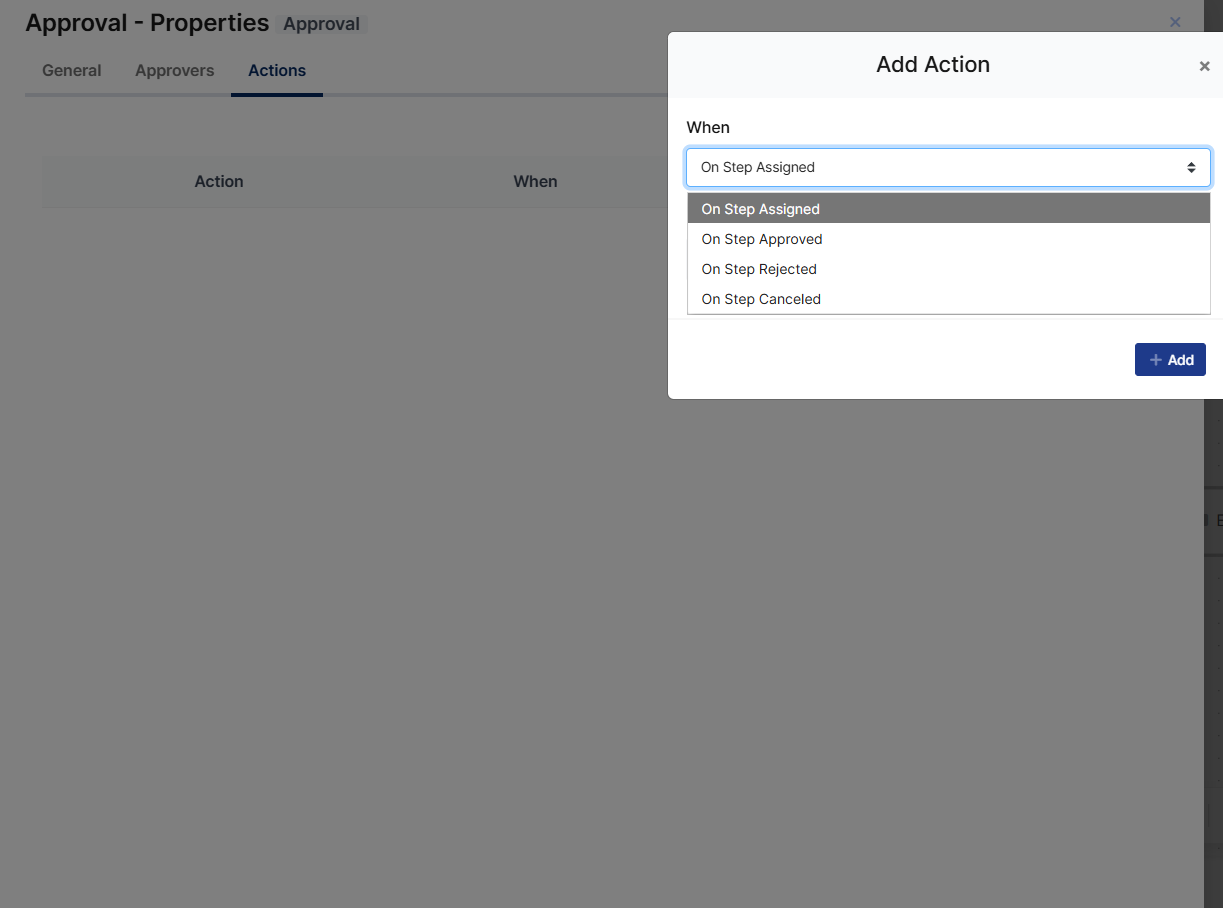
|
2. Form
This step displays a form to the user or an administrator to collect necessary information.
What it does:
-
Presents customizable fields (text, dropdown, number, checkbox, etc.)
-
Collects input required by later steps
-
Stores form responses as variables that can be reused in the workflow
Common use cases:
-
Request justification form
-
Collecting user details (department, role, email, etc.)
-
Multi-step onboarding forms
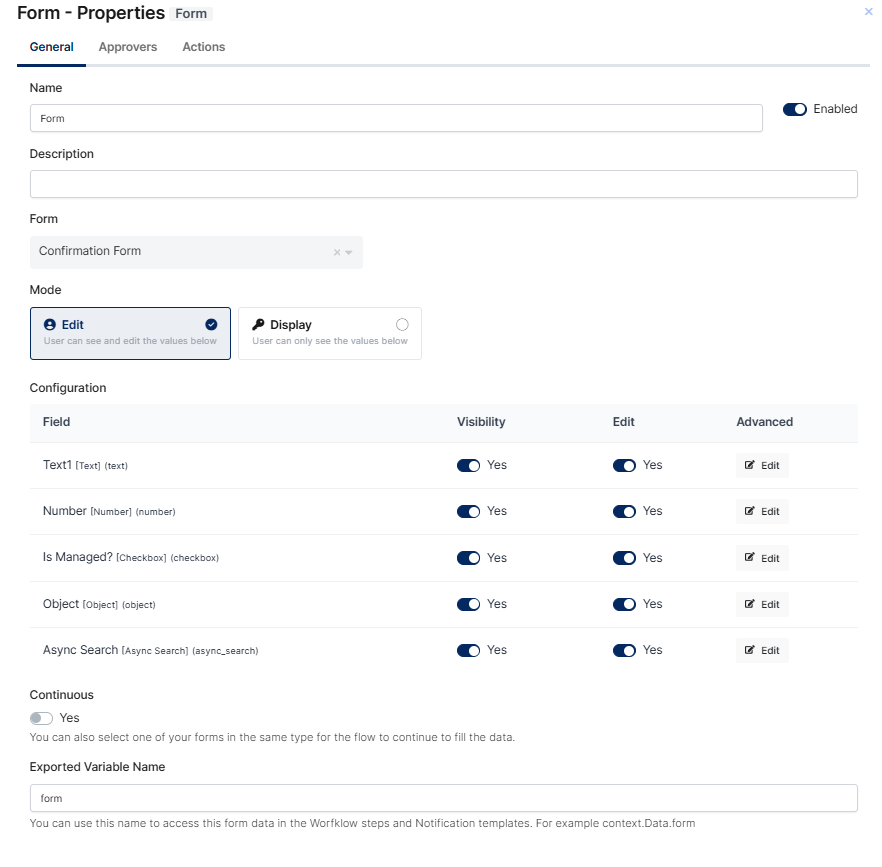
In the General tab, you can configure the basic settings of the Form step:
Name: The display name of the step. You can rename it to describe its purpose in the flow.
Enabled: Determines whether the step is active in the flow. When disabled, the step is skipped.
Description: An optional description explaining the purpose of the step.
Form: The form that will be presented to the user. You can search and select one of the forms defined in the system.
Mode: Determines how the user interacts with the form:
-
Edit: The user can see and edit the values on the form.
-
Display: The user can only view the values; no changes can be made.
Configuration: Allows you to configure the visibility and edit permissions of each form field individually.
Continuous: When enabled, you can select another form of the same type so that the flow continues to fill the data.
Exported Variable Name: The variable name used to access this form's data in other workflow steps and notification templates. For example, .context.Data.form
3. HTTP (Web) Request
This action sends an HTTP(S) request to an external system or API.
What it does:
-
Supports methods like GET, POST, PUT, DELETE
-
Sends headers, query parameters, and JSON/XML body
-
Reads the response and stores the returned data as workflow variables
Common use cases:
-
Creating or updating users in external systems
-
Integrating with HR, ticketing, or CRM systems
-
Triggering automation scripts or webhooks
In the General tab, you can configure the settings of the HTTP (Web) Request step:
Name: The display name of the step.
Enabled: Determines whether the step is active in the flow. When disabled, the step is skipped.
Description: An optional description explaining the purpose of the request.
Url: The endpoint URL to which the request will be sent.
Method: The HTTP method of the request. Available options are GET, POST, DELETE, PUT, PATCH, OPTIONS, and HEAD.
Body: The request body. You can use workflow variables in the body, for example {{context.Data.security.securityGroupName}}, to send data collected in previous steps.
Headers: The HTTP headers to be sent with the request. You can add key-value pairs such as an API key. If the value contains sensitive information, you can enable the Is Encrypted option to store it securely.
Ignore TLS: When enabled, TLS certificate validation is skipped. This can be used for endpoints with self-signed certificates.
Timeout (Seconds): The maximum time to wait for a response. The maximum allowed value is 30 seconds.
Retry Count: The number of retries in case of failure. The maximum allowed value is 100.

4. Code
This action allows writing custom logic using supported scripting languages (C#).
What it does:
-
Performs advanced logic or calculations (Example: Getting user or manager information based on the employee id comes from HR.)
-
Manipulates variables
-
Builds dynamic data to be used in other steps
-
Implements custom integration logic if needed
Common use cases:
-
Formatting or validating data
-
Conditional API payload creation
-
Parsing API responses
-
Custom business logic
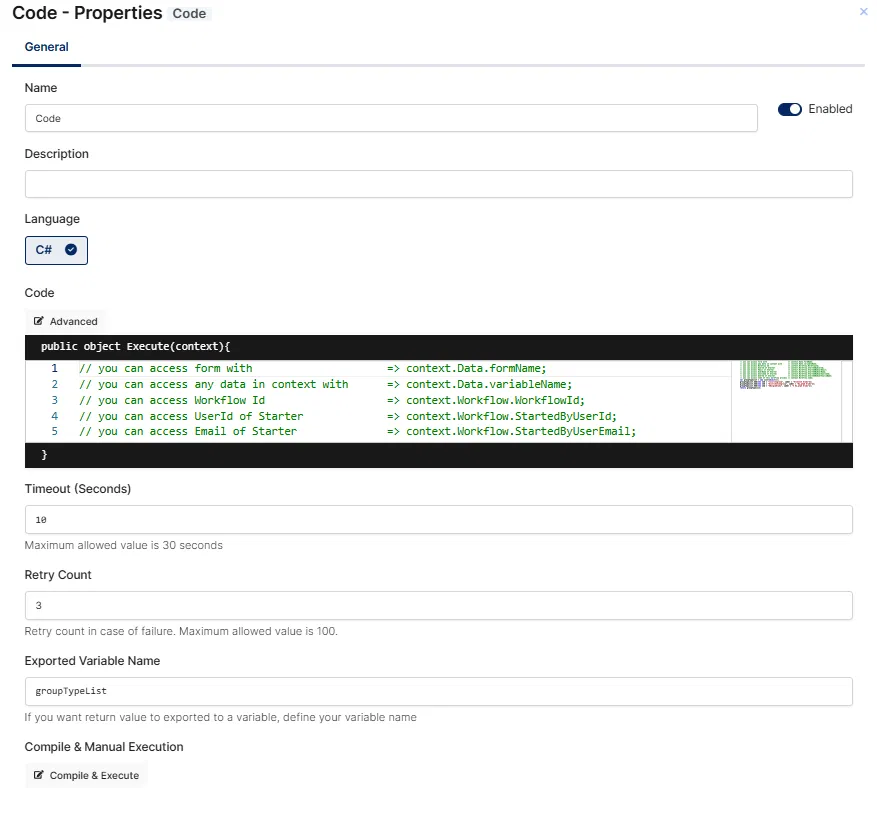
In the General tab, you can configure the settings of the Code step:
Name: The display name of the step.
Enabled: Determines whether the step is active in the flow. When disabled, the step is skipped.
Description: An optional description explaining the purpose of the step.
Language: The programming language of the code. Currently, C# is supported.
Code: The code to be executed within the flow. The code runs inside the Execute(context) method, and you can access workflow data through the context object. For example:
-
context.Data.formName– access form data -
context.Data.variableName– access any data in the context -
context.Workflow.WorkflowId– access the Workflow Id -
context.Workflow.StartedByUserId– access the UserId of the starter -
context.Workflow.StartedByUserEmail– access the email of the starter
Timeout (Seconds): The maximum execution time of the code. The maximum allowed value is 30 seconds.
Retry Count: The number of retries in case of failure. The maximum allowed value is 100.
Exported Variable Name: If you want the return value of the code to be exported to a variable, define your variable name here. This variable can be used in other workflow steps.
Compile & Manual Execution: You can use the Compile & Execute button to compile and test your code manually before running the flow.
5. Branch
This action enables conditional workflow branching.
What it does:
-
Evaluates a condition (e.g., “if department = IT”)
-
Directs the flow to different paths based on the result
-
Supports multiple branches and fallback paths
Common use cases:
-
Different approval chains per department
-
Different onboarding tasks for contractors vs. employees
-
Assigning access levels based on job role
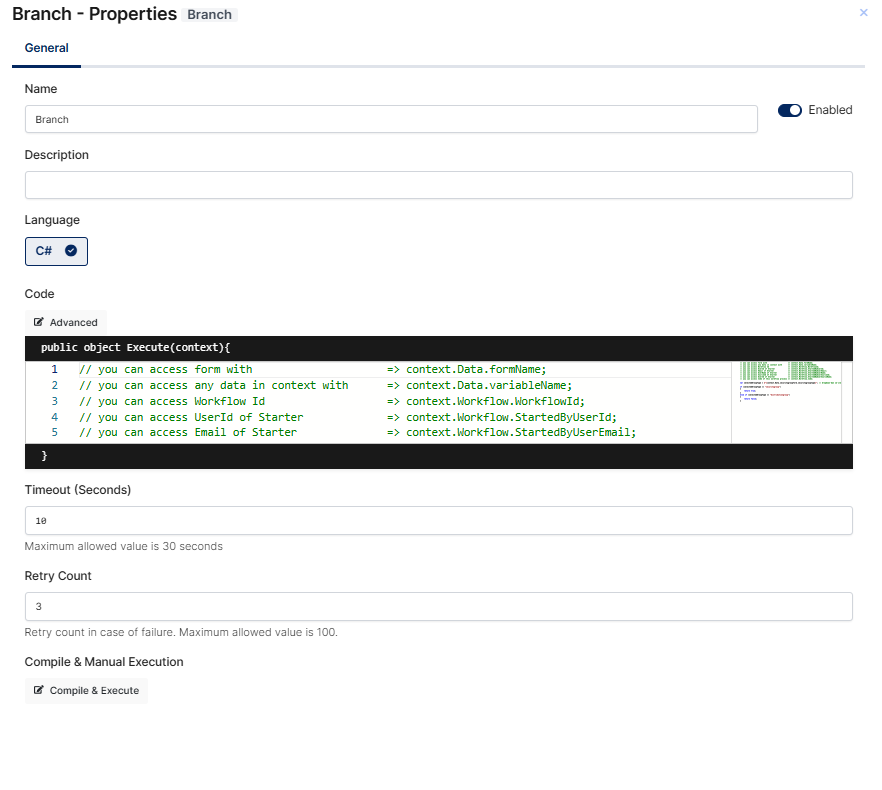
The Branch step allows you to split the workflow into multiple paths based on defined conditions. In the General tab, you can configure the following settings:
Name: The display name of the step.
Enabled: Determines whether the step is active in the flow. When disabled, the step is skipped.
Description: An optional description explaining the purpose of the branch.
Language: The programming language of the branching logic. Currently, C# is supported.
Code: The code that determines which path the flow will follow. The code runs inside the Execute(context) method, and the returned value is used to decide the branch. You can access workflow data through the context object, for example:
-
context.Data.formName– access form data -
context.Data.variableName– access any data in the context -
context.Workflow.WorkflowId– access the Workflow Id -
context.Workflow.StartedByUserId– access the UserId of the starter -
context.Workflow.StartedByUserEmail– access the email of the starter
Timeout (Seconds): The maximum execution time of the code. The maximum allowed value is 30 seconds.
Retry Count: The number of retries in case of failure. The maximum allowed value is 100.
Compile & Manual Execution: You can use the Compile & Execute button to compile and test your branching logic manually before running the flow.
6. Notification
This action sends a notification to users or administrators or spesific users based on a policy or a rule.
What it does:
-
Sends an email, SMS, or in-app notification
-
Can include dynamic content using workflow variables (e.g., username, request ID)
-
Notifies relevant stakeholders about workflow status
Common use cases:
-
Informing users about approval decisions
-
Sending confirmation once a task is completed
-
Alerting admins when an error occurs or manual action is needed
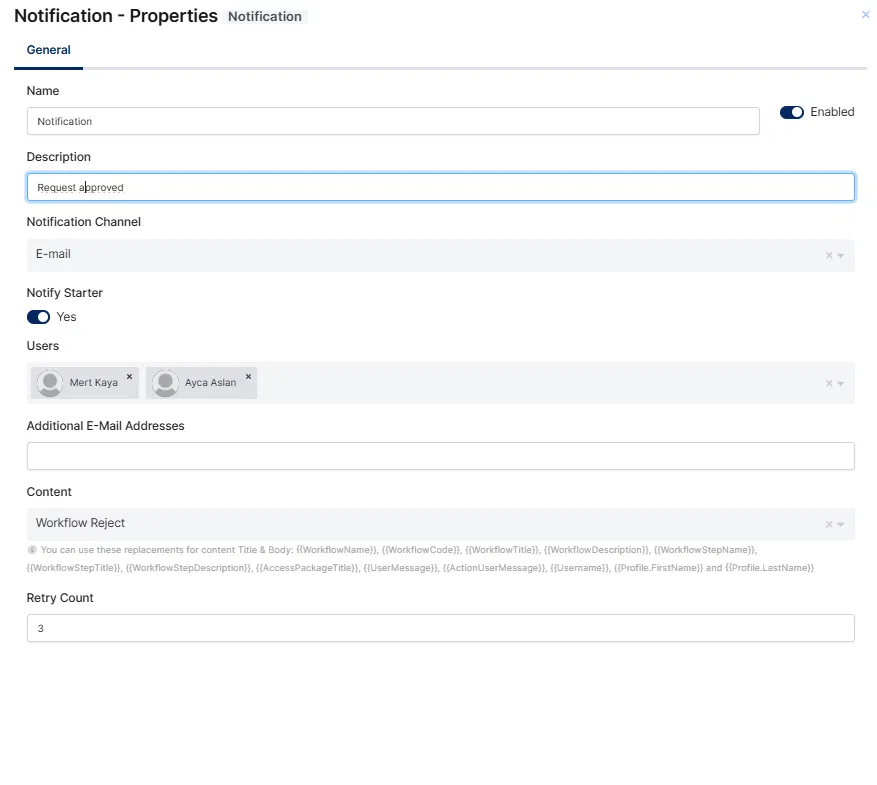
The Notification step allows you to send a notification to specified users at a certain point in the flow. In the General tab, you can configure the following settings:
Name: The display name of the step.
Enabled: Determines whether the step is active in the flow. When disabled, the step is skipped.
Description: An optional description explaining the purpose of the notification.
Notification Channel: The channel through which the notification will be sent, such as E-mail.
Notify Starter: When enabled, the user who started the workflow also receives the notification.
Users: The users who will receive the notification. You can select one or more users.
Additional E-Mail Addresses: You can also send the notification to e-mail addresses that are not defined as users in the system.
Content: The content (template) of the notification. You can select one of the system contents defined on the System → Contents page. In the content title and body, you can use replacements such as {{WorkflowName}}, {{WorkflowTitle}}, {{WorkflowStepName}}, {{Username}}, {{Profile.FirstName}}, and {{Profile.LastName}} to include dynamic workflow data.
Retry Count: The number of retries in case of failure.
7. Anomaly Detection
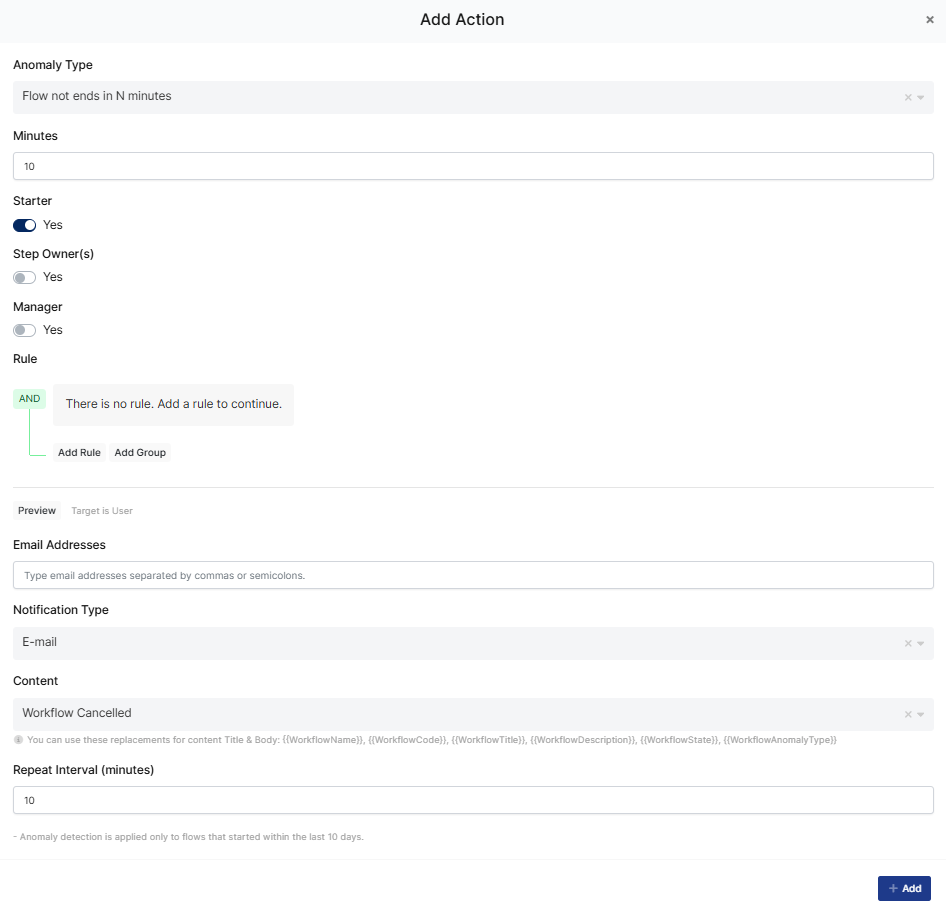
The Anomaly Detection section allows you to monitor your workflow for unexpected or problematic situations and to notify the relevant people when such situations occur. Instead of manually tracking flows that get stuck, fail, or take too long, you can define anomaly actions that automatically send notifications when a specific anomaly condition is met. Anomaly detection is applied only to flows that started within the last 10 days.
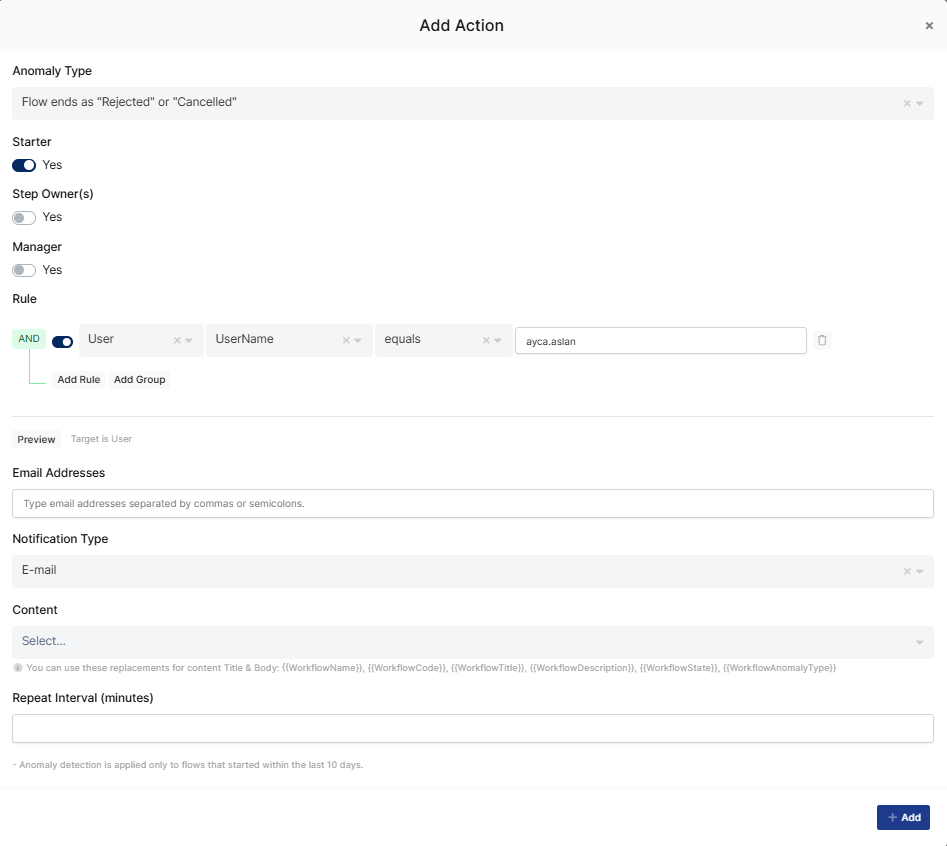
After selecting the anomaly type, you can configure who will be notified and how:
Starter: When enabled, the user who started the workflow is notified when the anomaly occurs.
Step Owner(s): When enabled, the owner(s) of the related step are notified.
Manager: When enabled, the manager of the user is notified.
Rule: Allows you to define conditions to notify specific users. You can build rules using attributes such as User → UserName equals a specific value, and combine multiple rules with Add Rule and Add Group. The Preview button shows the matching targets.
Email Addresses: You can also send the notification to additional e-mail addresses, separated by commas or semicolons.
Notification Type: The channel through which the notification will be sent, such as E-mail.
Content: The content (template) of the notification. In the content title and body, you can use replacements such as {{WorkflowName}}, {{WorkflowCode}}, {{WorkflowTitle}}, {{WorkflowDescription}}, {{WorkflowState}}, and {{WorkflowAnomalyType}}.
Repeat Interval (minutes): Determines how often the notification will be repeated while the anomaly condition continues.
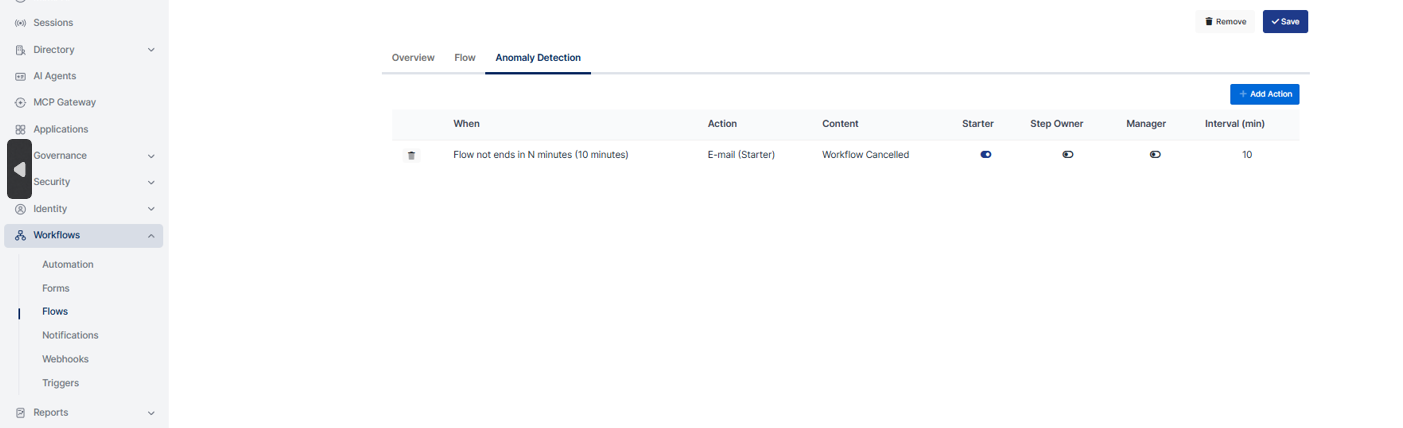
After completing the configuration, click Add to create the anomaly action.
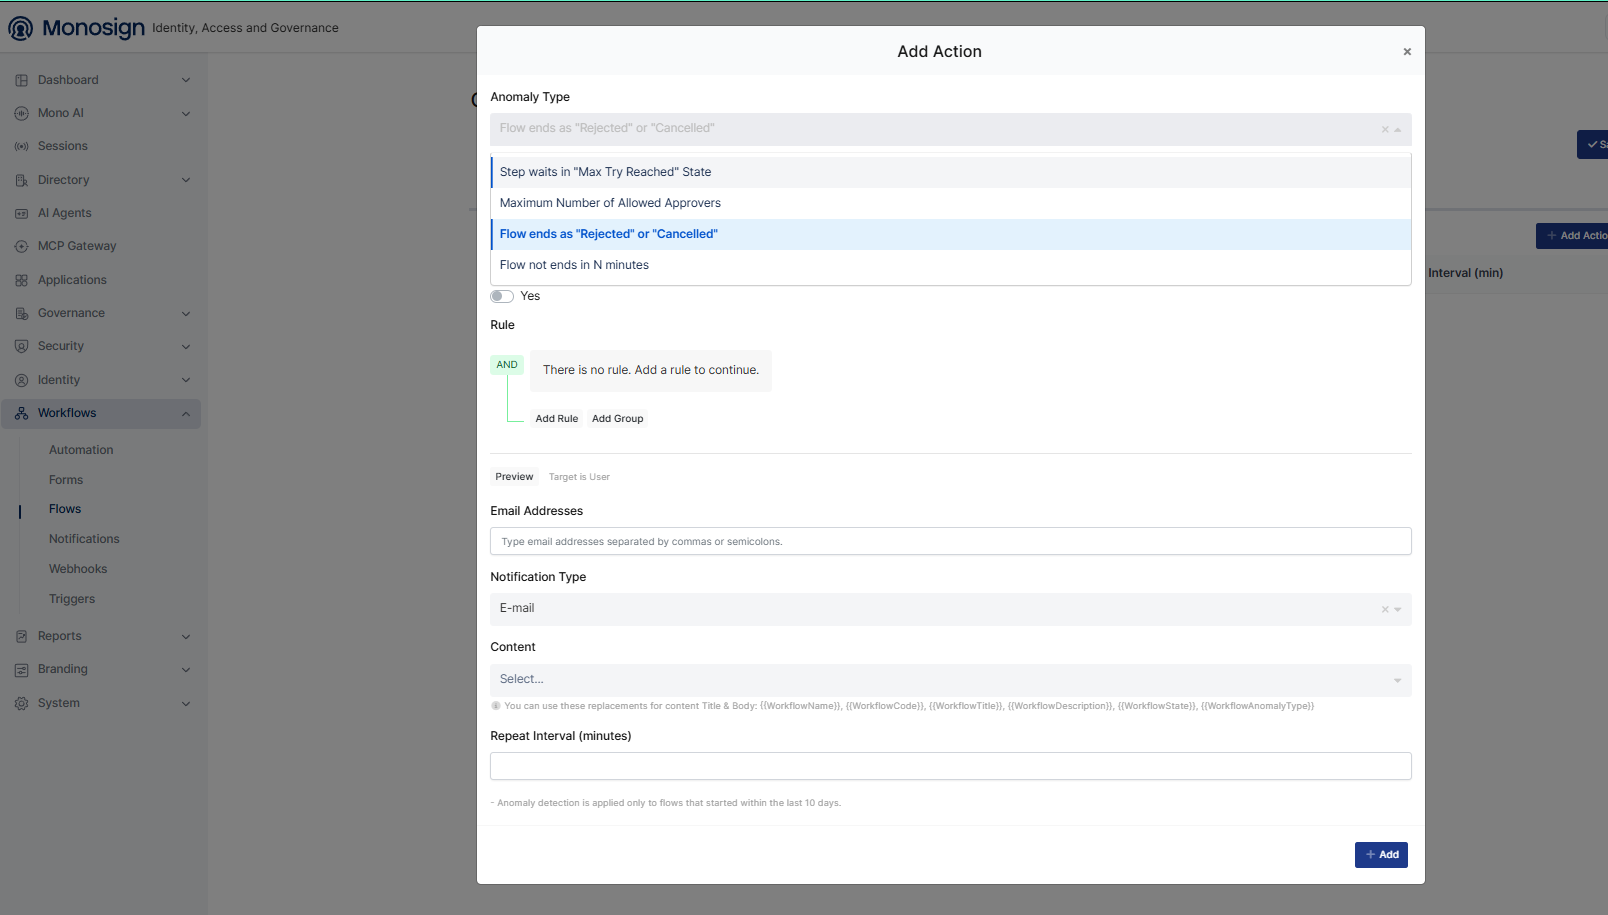
Selecting the Anomaly Type in the Add Action panel ;
To define an anomaly action, click Add Action. The Anomaly Type field determines which situation will be detected as an anomaly. The following options are available:
Step waits in "Max Try Reached" State: Triggered when a step fails repeatedly and remains waiting after reaching its maximum retry count.
Maximum Number of Allowed Approvers: Triggered when the number of approvers in a step exceeds the allowed limit.
Flow ends as "Rejected" or "Cancelled": Triggered when the workflow ends with a rejected or cancelled state.
Flow not ends in N minutes: Triggered when the workflow does not complete within the specified number of minutes.
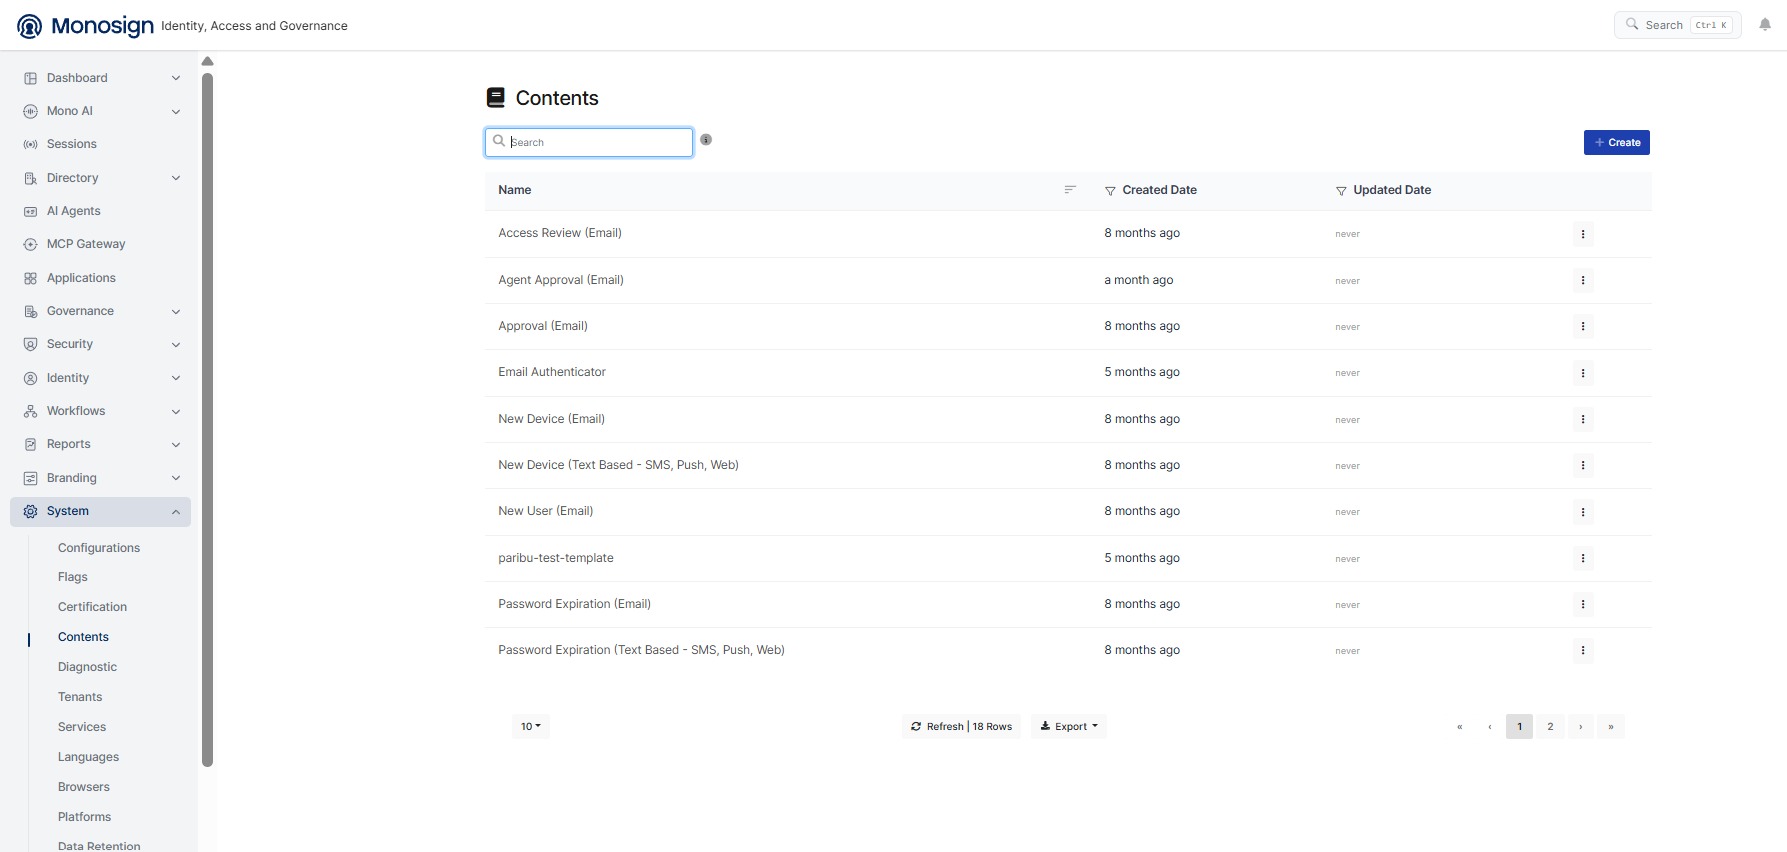
Selecting the notification content for the anomaly action;
In the Content field, you can select one of the system contents to be used as the notification template, such as Approval (Email) or Access Review (Email). The contents are defined on the System → Contents page.

In this example, an anomaly action is defined with the Flow not ends in N minutes anomaly type. When this type is selected, the Minutes field appears, where you specify the time limit. In the example, the value is set to 10, meaning the action will be triggered if the flow does not complete within 10 minutes.
The Starter option is enabled, so the user who started the workflow will receive the notification. Workflow Cancelled is selected as the notification content, and the Repeat Interval is set to 10 minutes, so the notification will be repeated every 10 minutes as long as the anomaly condition continues. After completing the configuration, click Add to create the action.
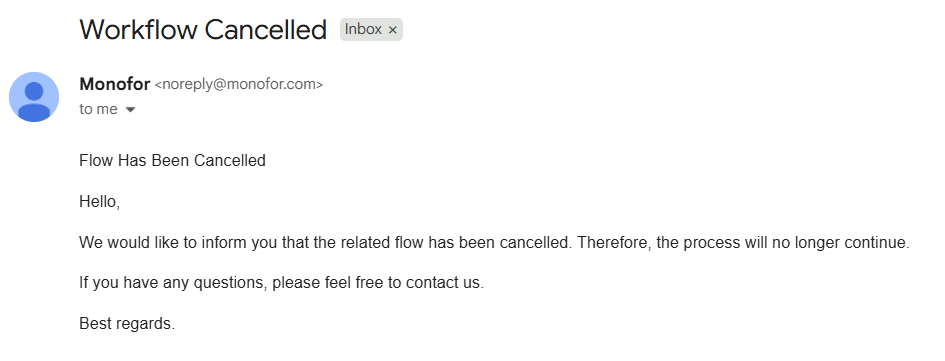
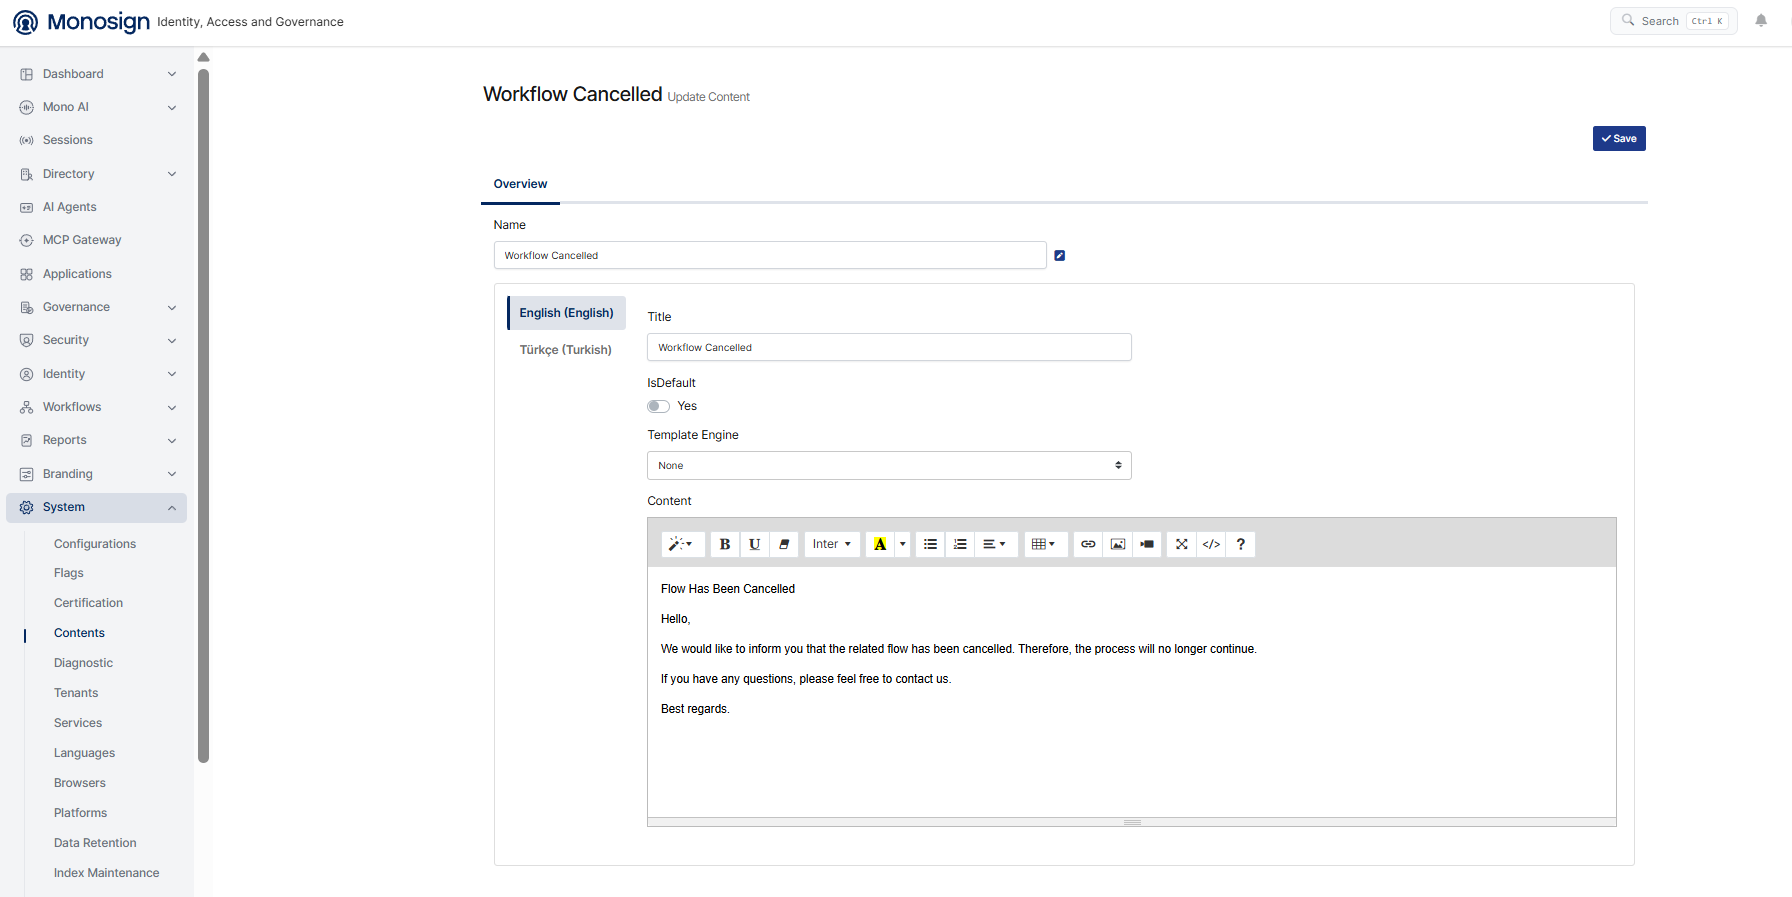
When the defined anomaly condition occurs, the notification is sent to the selected recipients through the configured channel. The example below shows the e-mail notification sent with the Workflow Cancelled content when the flow is cancelled.
Managing Notification Contents
The contents selected in the anomaly actions are managed on the System → Contents page. On this page, you can view the existing system contents, create a new one using the Create button, or edit an existing content to customize it.
When you open a content, you can customize its details on the Overview tab:
Name: The name of the content.
Title: The title of the notification. You can define it separately for each language (e.g., English, Turkish).
IsDefault: Determines whether this content is used as the default.
Template Engine: The template engine to be used for rendering the content.
Content: The body of the notification. You can edit the text using the rich text editor and customize it with formatting, links, and images. You can also use replacements such as , , and to include dynamic workflow data.{{WorkflowName}}{{WorkflowTitle}}{{WorkflowAnomalyType}}
Example Flows
1. Access Replacement on End Applications

The workflow is used to manage and update user access on end applications using the MonoSync solution, it performs permission updates on target systems according to the access rights of other users.
Steps
1. Get Enforcement List (Code) and Get Systems (Code) - Parallel
These two steps are working parallel to prepare some informations for the next step.
a. Get Enforcement List (Code)
This section generates a list of “Yes/No” options to be utilized in the next step of the “Replacement Form”.
Once the Name and Description are defined for the step, the below code snippet creates the list and exports it as a variable to be consumed by the subsequent step.
// you can access form with                     => context.Data.formName;
// you can access any data in context with      => context.Data.variableName;
// you can access Workflow Id                   => context.Workflow.WorkflowId;
// you can access UserId of Starter             => context.Workflow.StartedByUserId;
// you can access Email of Starter              => context.Workflow.StartedByUserEmail;
// you can access UserName of Starter           => context.Workflow.StartedByUserName;
// you can access SourceId of Starter           => context.Workflow.StartedByUserSourceId;
// you can access UserId of Starter             => context.Workflow.StartedByUserSourceName;
// you can access Code of this workflow process => context.Workflow.Code;

var enforcementList = new List<object>();

enforcementList.Add(new {Id = $"Yes", Label = $"Yes"});
enforcementList.Add(new {Id = $"No", Label = $"No"});

return enforcementList;
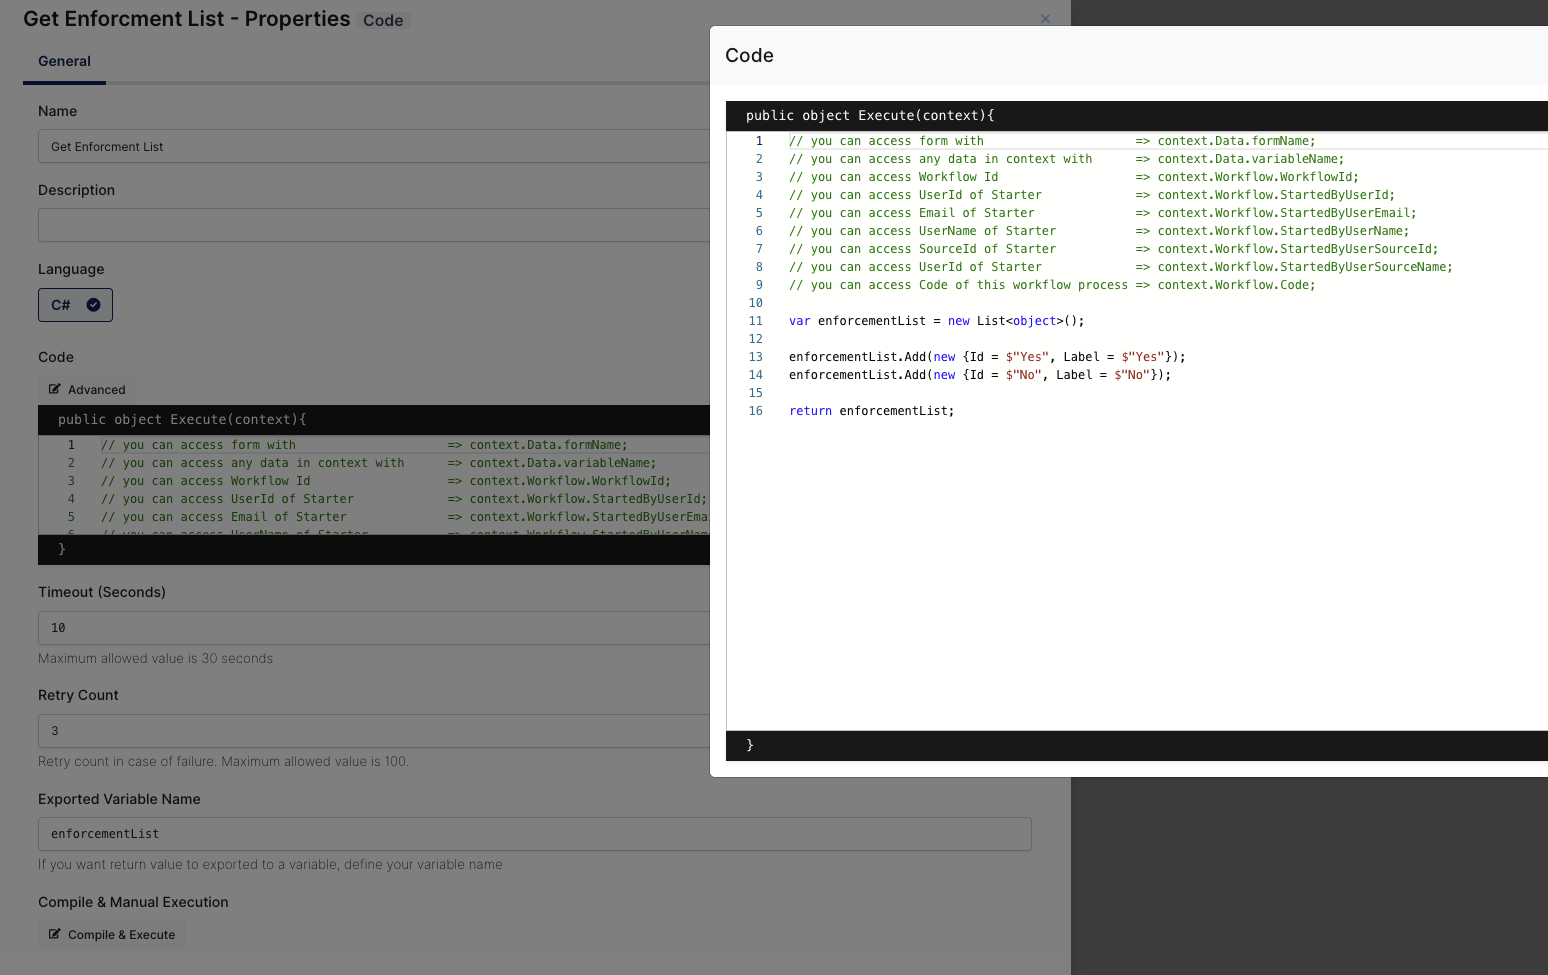
Prepared “enforcementListGet“ is exported as a variable to be used in the form step.
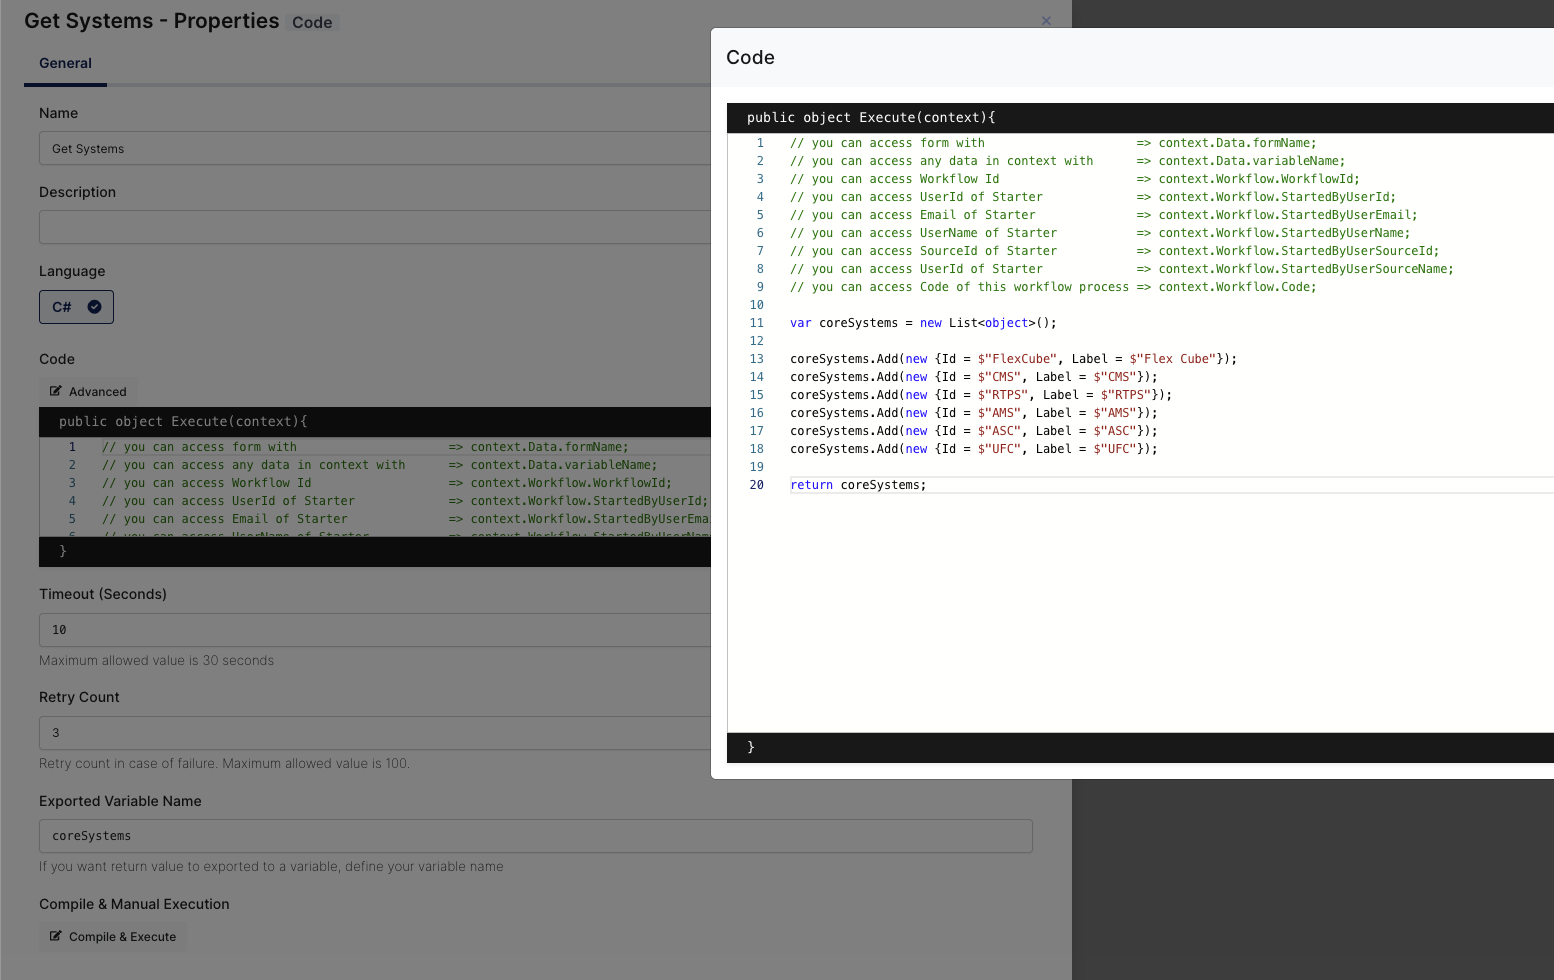
b. Get Systems (Code)
This section generates a list of applications to be utilized in the next step of the “Replacement Form”.
Once the Name and Description are defined for the step, the below code snippet creates the list and exports it as a variable to be consumed by the subsequent step.
// you can access form with                     => context.Data.formName;
// you can access any data in context with      => context.Data.variableName;
// you can access Workflow Id                   => context.Workflow.WorkflowId;
// you can access UserId of Starter             => context.Workflow.StartedByUserId;
// you can access Email of Starter              => context.Workflow.StartedByUserEmail;
// you can access UserName of Starter           => context.Workflow.StartedByUserName;
// you can access SourceId of Starter           => context.Workflow.StartedByUserSourceId;
// you can access UserId of Starter             => context.Workflow.StartedByUserSourceName;
// you can access Code of this workflow process => context.Workflow.Code;

var coreSystems = new List<object>();

coreSystems.Add(new {Id = $"FlexCube", Label = $"Flex Cube"});
coreSystems.Add(new {Id = $"CMS", Label = $"CMS"});
coreSystems.Add(new {Id = $"RTPS", Label = $"RTPS"});
coreSystems.Add(new {Id = $"AMS", Label = $"AMS"});
coreSystems.Add(new {Id = $"ASC", Label = $"ASC"});
coreSystems.Add(new {Id = $"UFC", Label = $"UFC"});

return coreSystems;
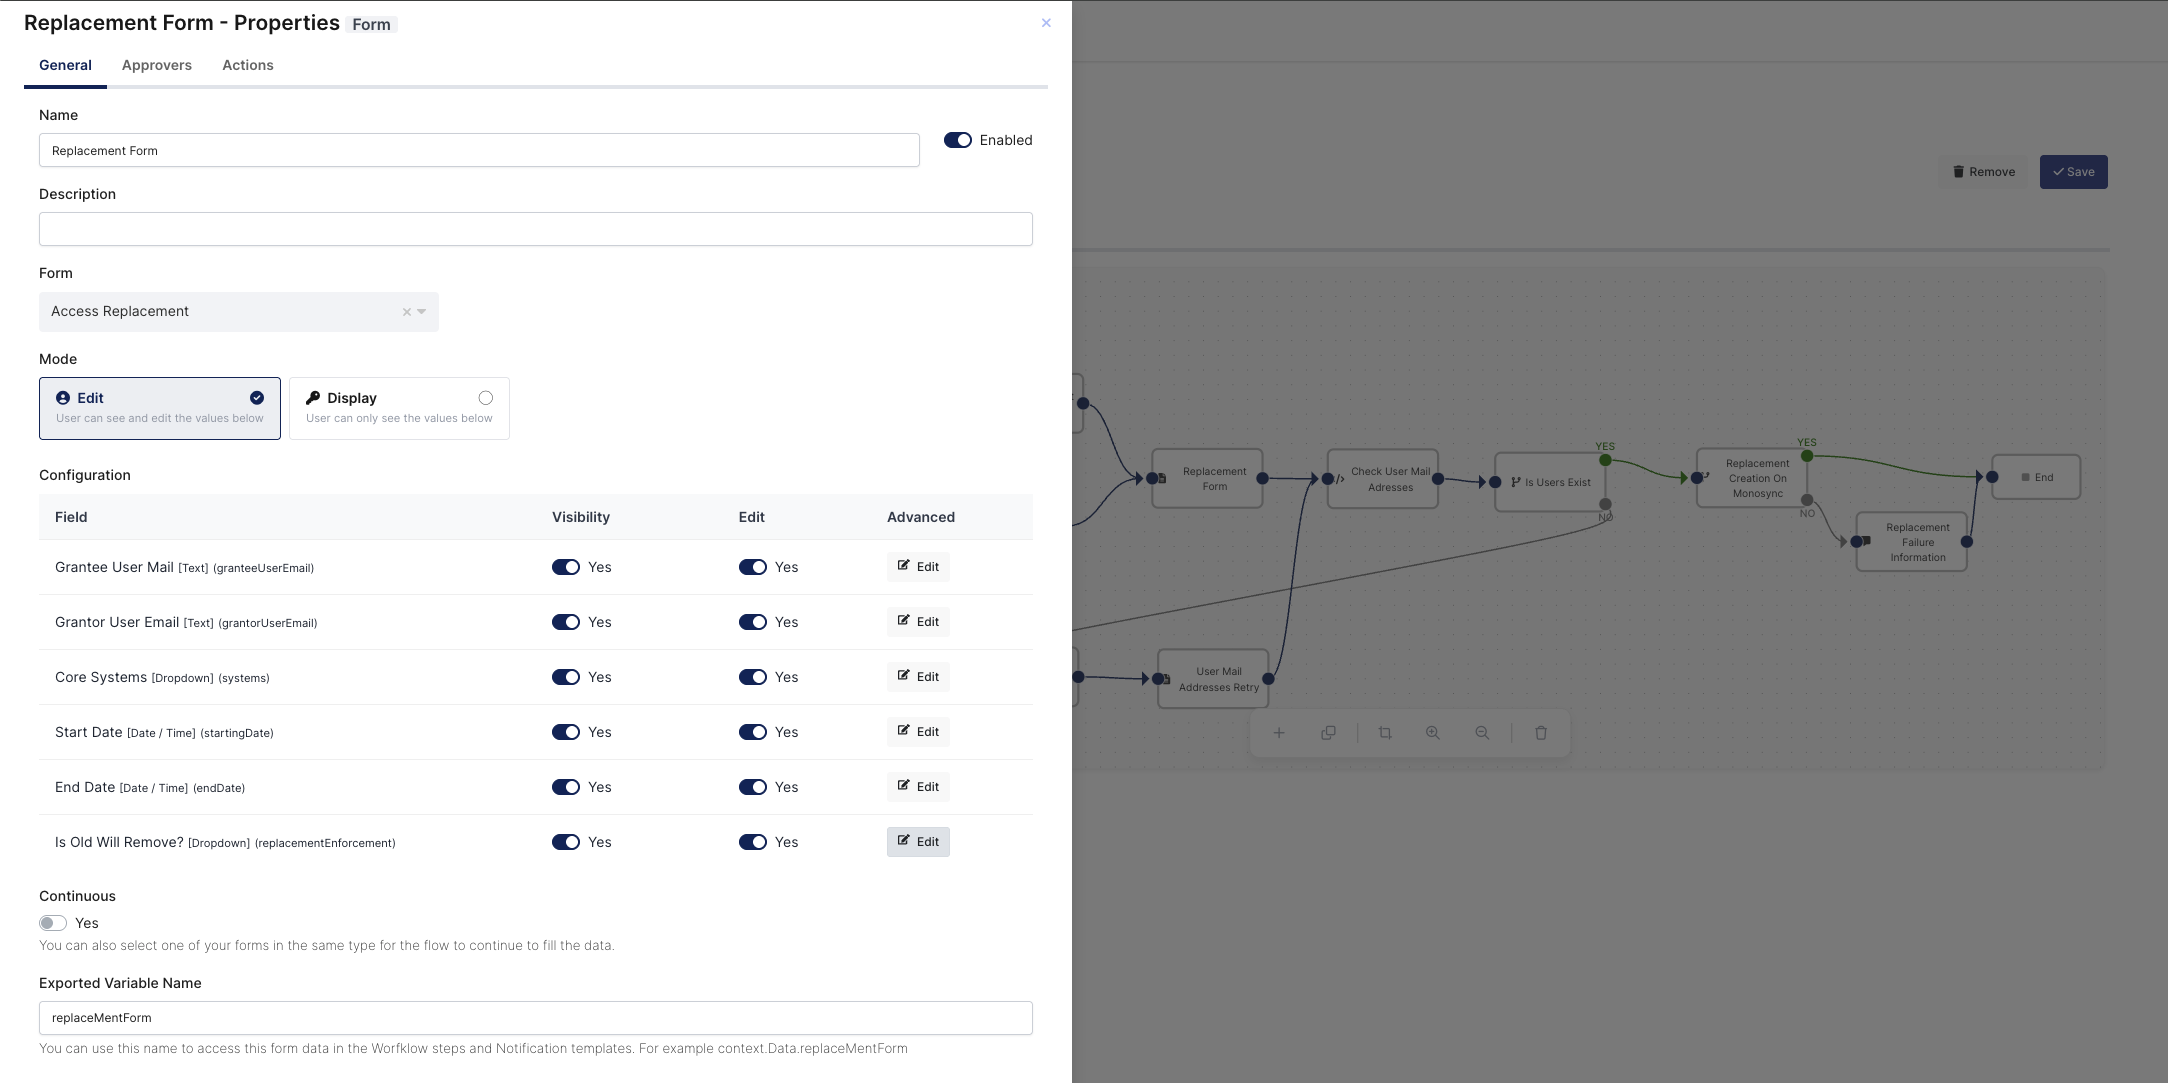
2. Replacement Form (Form)
The Replacement Form step is used to collect information from the user who initiates the flow. You can find the details of the form fields and descriptions
|
Form Fields |
Description |
|---|---|
|
Grantee User Mail [Text] (granteeUserEmail) |
It’s a textbox to get Grantee User Email address. It determines which user will get roles and permissions on the end application. |
|
Grantor User Email [Text] (grantorUserEmail) |
It’s a textbox to get Grantor User Email address. It determines which user accesses will be given to Grantee user such as roles and permissions on the end application. |
|
Core Systems [Dropdown] (systems) |
A dropdown that allows the user to select which system(s) the permissions will be granted for. The Core Systems dropdown values are generated in the previous step. To bind them, click the “Edit” button under the “Advanced” tab, as demonstrated. 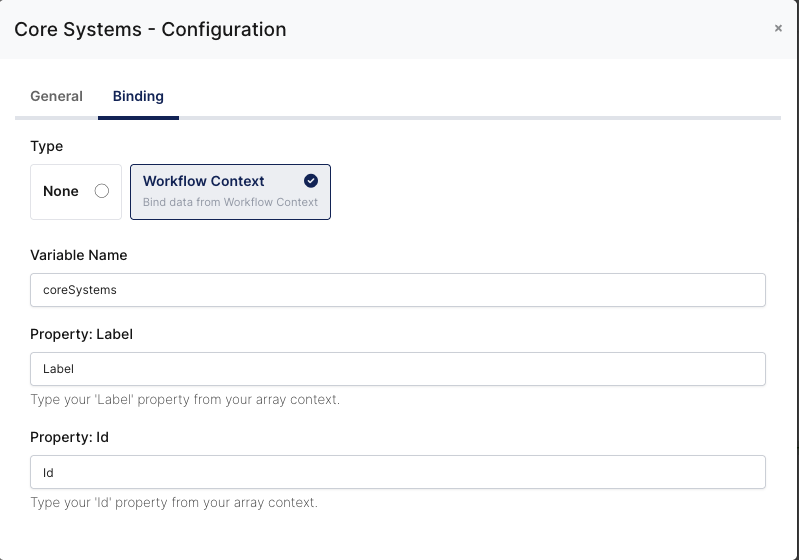
|
|
Start Date [Date / Time] (startingDate) |
A date picker that allows the user to specify the date on which their roles and permissions will be granted on the systems. |
|
End Date [Date / Time] (endDate) |
A date picker that allows the user to specify the date on which their roles and permissions will be revoked from the systems. |
|
Is Old Will Remove? [Dropdown] (replacementEnforcement) |
It specifies whether the user will keep their existing access rights on the systems. Is Old Accesses Will Remove? dropdown values are generated in the previous step. To bind them, click the “Edit” button under the “Advanced” tab, as demonstrated. 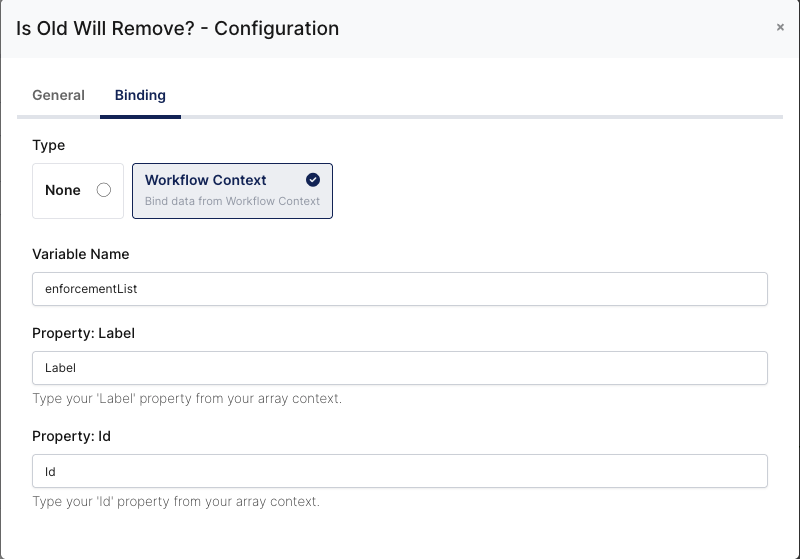
|
On the approvers tab, you should specify the “Starter Approval“, because