Custom OpenID/OIDC Application
This document explains how to implement Monosign with a Custom OpenID/OIDC application. It covers Single Sign-On.
Monofor has no responsibility to do Custom OpenID/OIDC application configurations. If you need support, please contact your Research and Development team.
📑 Instructions
This documentation contains 5 main steps for integration.
Creating an Application on Monosign
Assign a user to the Custom OpenID/OIDC application
Integration Process with Custom OpenID/OIDC application
Sign In Test
Validate Tokens
Example Project
1- Creating an Application on Monosign
Create an application on Monosign and configure your access policy. Once you create, click “Keys” and add a new Access Key for OIDC/OpenID Key for access.
This information will be necessary when configuring the Custom OpenID/OIDC application.

Create a New Access Key 1
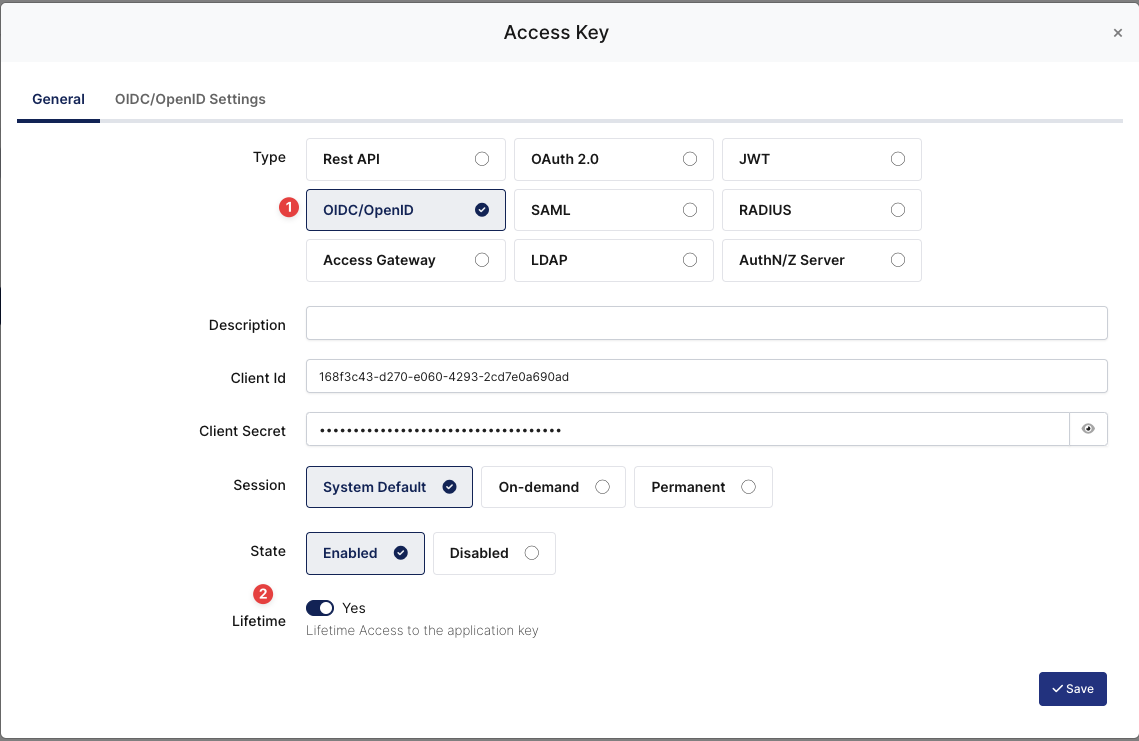
Create a New Access Key 2
Property | Value | Options |
|---|---|---|
Key Type | OIDC/OpenID | Rest API, OAuth 2.0, JWT, OIDC/OpenID, SAML, RADIUS, Access Gateway, LDAP, AuthN/Z Server |
Expiration | Lifetime | Lifetime or Specific Date/Time - By Default Lifetime is Enabled. |
Configuration details for the Custom OIDC/OpenID application are provided as follows:
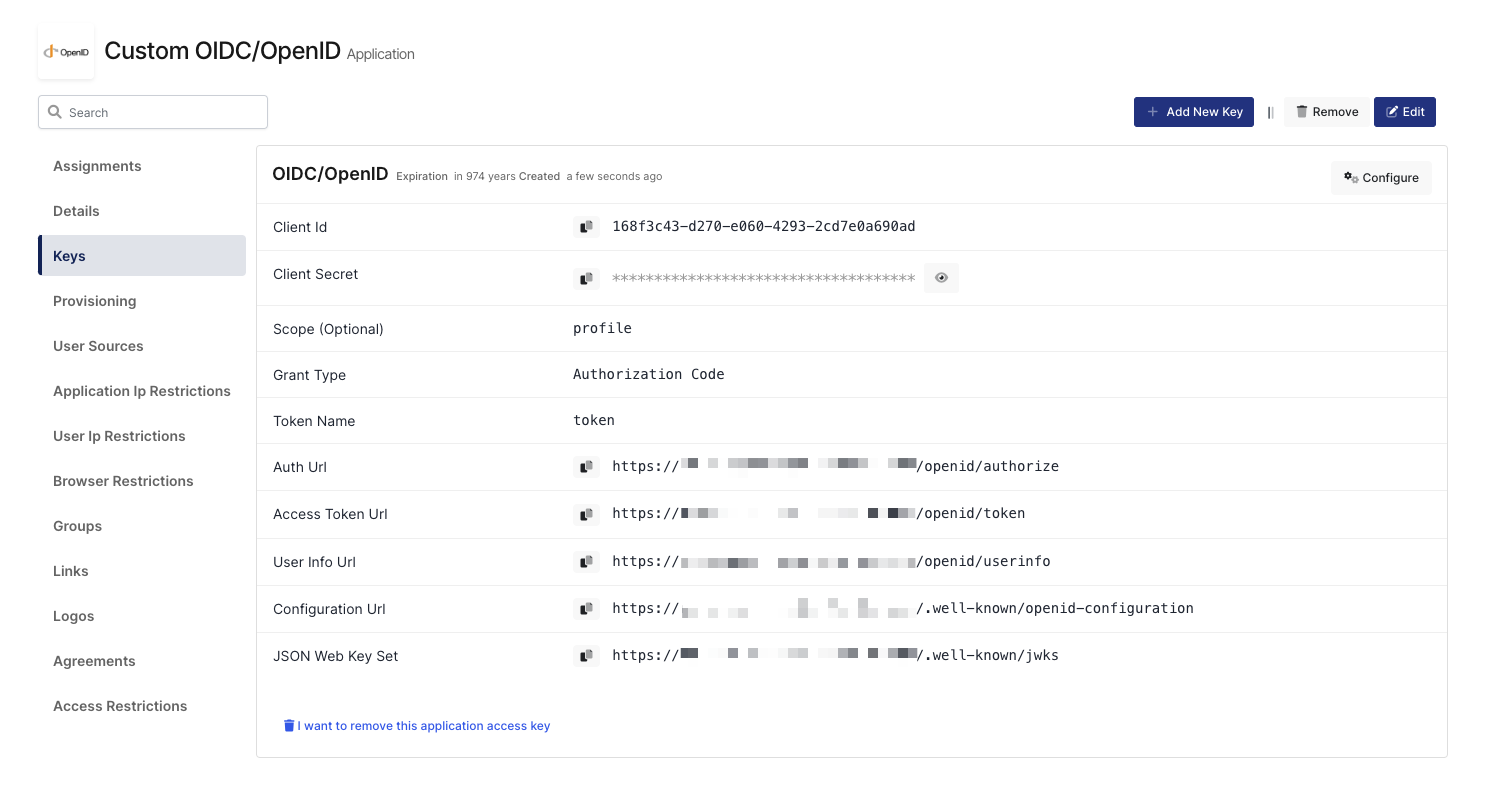
OIDC/OpenID Access Key Details
The second step will use information in the “OIDC/OpenID Access Key Details“ section to configure the Custom OIDC/OpenID settings.
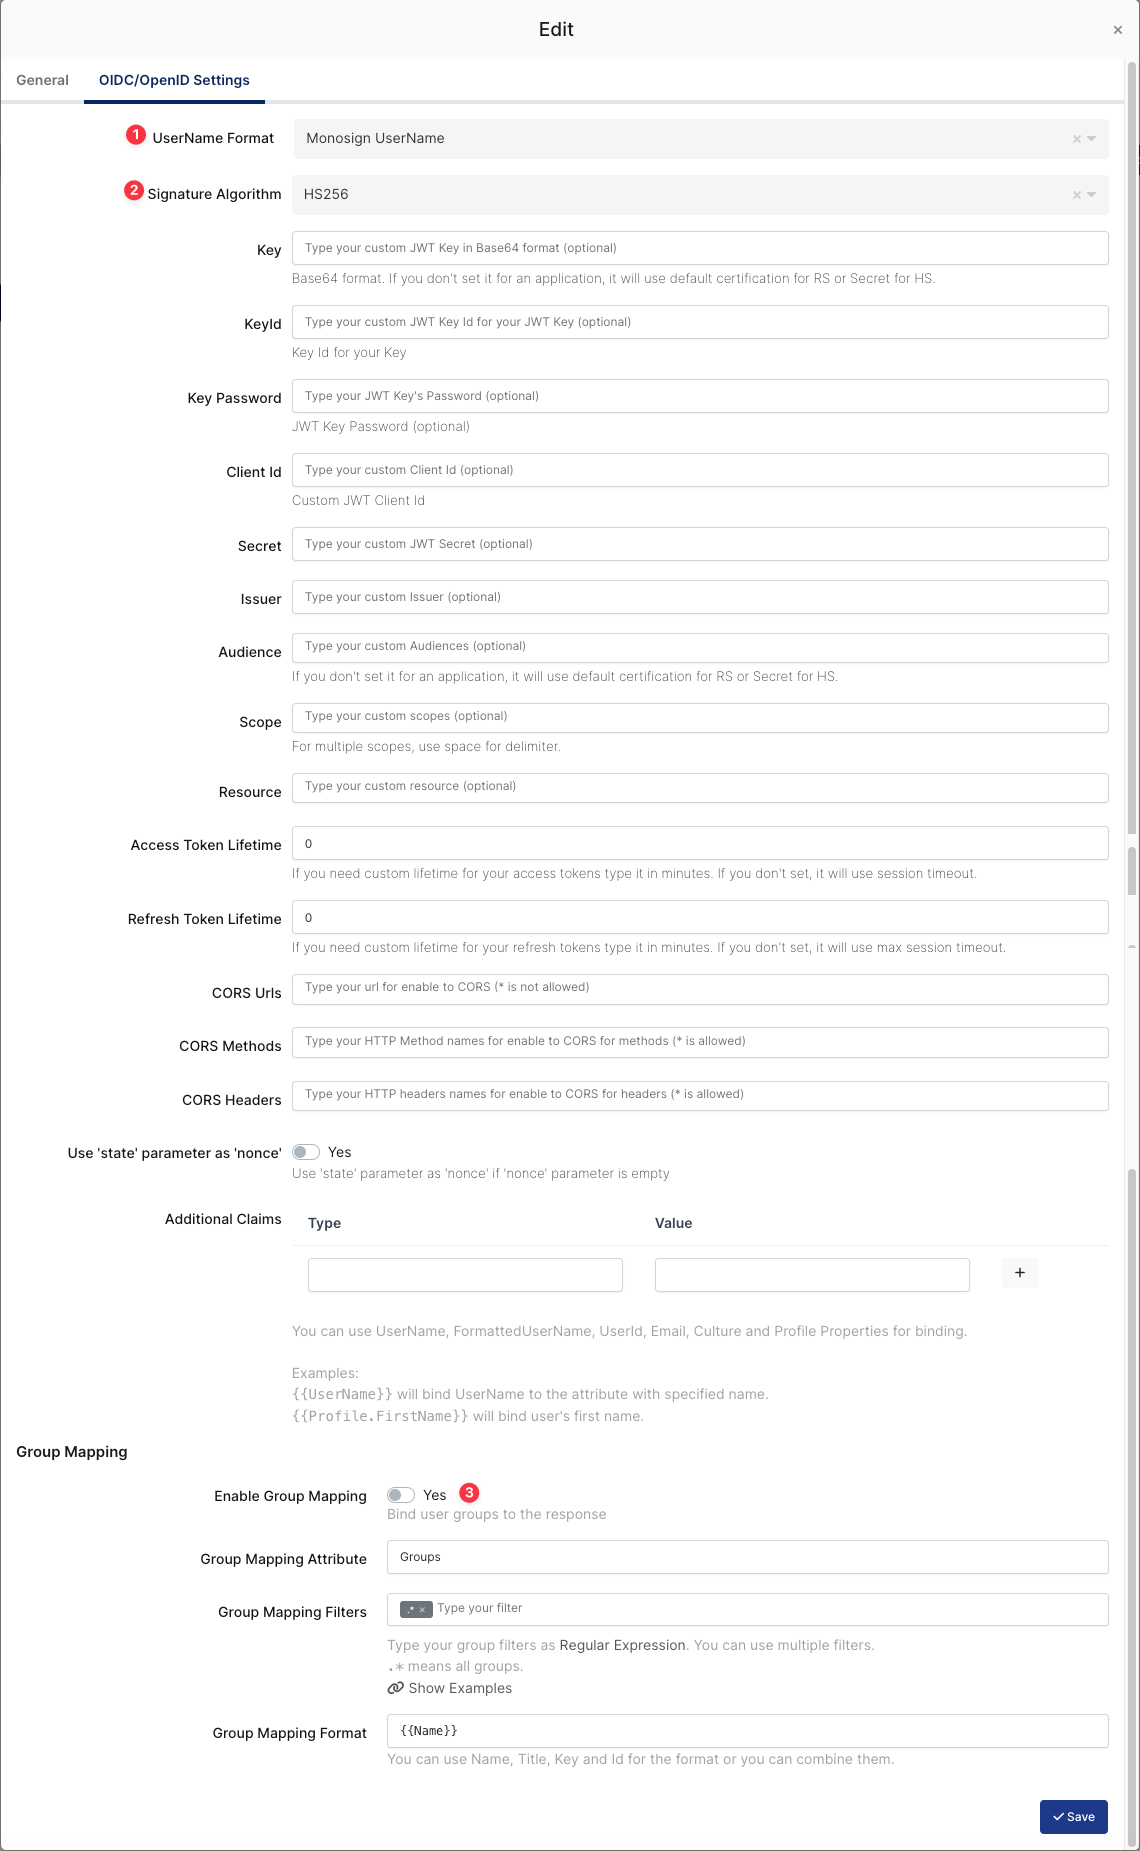
OIDC/OpenID Configuration on Monosign
Property | Value | Description |
|---|---|---|
UserName Format |
| Defines the UserName format such as |
Signature Algorithm |
| This specifies the algorithm used to sign the JWT. |
Additional Claims | These are additional pieces of information (claims) that are included in the JWT payload. Example: userPrincipalName, employeeID etc. |
To ensure that the application has access to user groups, follow these steps:
If the application hasn't been configured yet, click the “Edit” option for the application.
In the application settings, navigate to the “Source, Provider, and Profile” tab.
Configure the “User Access Type“ and “User Group Access Type” as “Only Assigned Users.”
Configuring this setting will allow the application to access by user groups when users sign in.
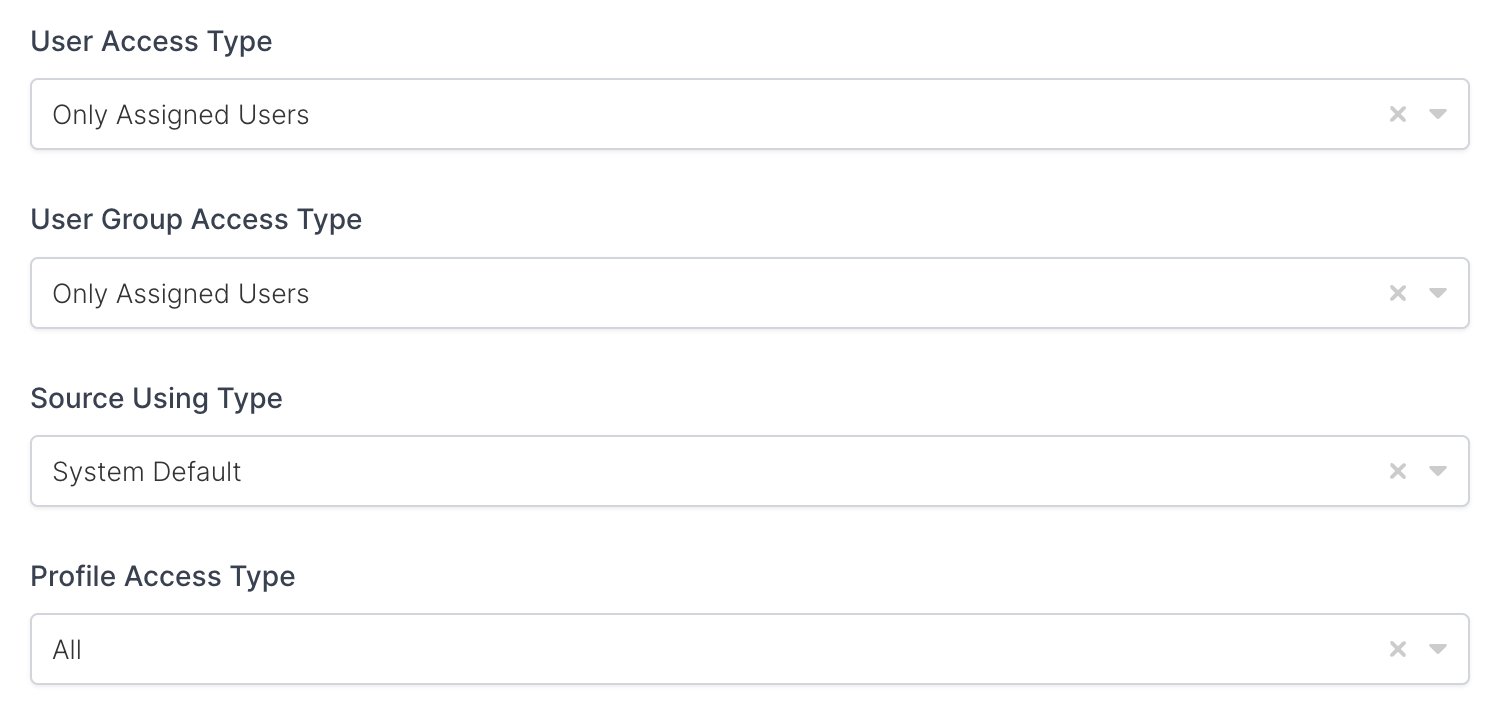
Property | Description | Options |
|---|---|---|
User Access Type | Defines which Users will access to this application. | Only Assigned Users |
User Group Access Type | Defines application’s user group access | Only Assigned Users |
Profile Access Type | Defines Application’s user’s profile access | Restricted - Only restricted user profile attributes |
2- Assign a User to the Custom OIDC/OpenID Application
Please follow the below instructions on how to assign a user to the Custom OIDC/OpenID application. In this example john.smith will assign to the application access.
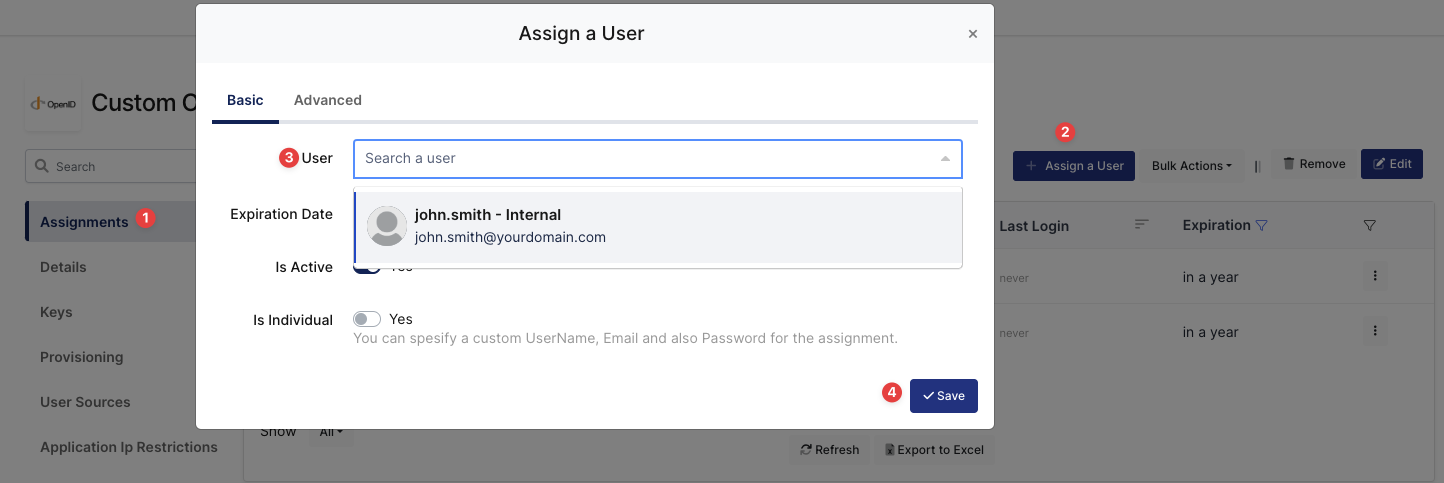
Assign User to Custom OIDC/OpenID

User Assigned to Custom OIDC/OpenID
3- Integration Process with Custom OIDC/OpenID Application
This section will help to develop the custom application based on the OIDC/OpenID authentication type.
Property | Description | Example |
|---|---|---|
Auth Url | This is the authorization endpoint of Monosign. It is used to initiate the authentication process. |
|
Response Type | Specifies the type of response expected from the authorization server. In this case, the value is |
|
Client ID | A unique identifier issued to the client application by the authorization server during the registration process. |
|
Redirect URI | The URI where the authorization server sends the user after successfully authenticating them. This must be a pre-registered URI with the authorization server. |
|
Scope | Defines the level of access being requested. In this case, the scope If the application needs the refresh_token information, |
If the application needs refresh token. |
The custom OIDC/OpenID application needs to redirect to the URL below with the information created in the first section.
The redirect URL needs to be prepared as shown with the given information.

Redirect URL: {{AUTH_URL}}?response_type=code&client_id={{CLIENT_ID}}&redirect_uri={{REDIRECT_URI}}&scope=profile
Once the Custom OIDC/OpenID is redirected to the above URL, the Monosign login page will be opened as shown.
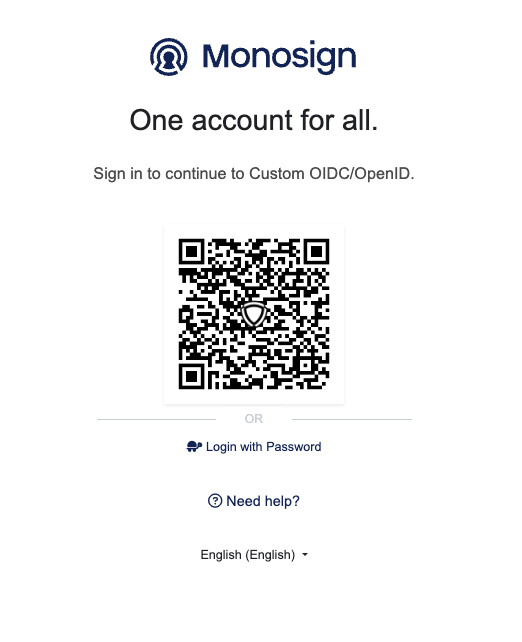
Login to the Custom OIDC/OpenID Application via Monosign
Please type your testing username and password to log in to Monosign.
After logging into Monosign, Monosign will redirect to the “Redirect URI“ of the Custom OIDC/OpenID application with the authorization code.
https://custom-application-domain/loginWithIDP?code=CfDJ8BjpYemFkHlLjfZjou2fIMsqumO3t8Pvb6hYI6jy9lsBUMeKKgwy3wh2SFZhxbrcEjNlzaPat0udtAegRqbzvhn6kzuSKsmEEBhiAElalyA4JvrJKA-q1tH1IapWHt5c-3LzbvkVim_c6jK6k7aL9MOzvDmRMVmH3Bd6viB_U1q3BOxm664MN3NlUeNPzwh_w4Eu8jnct4O-3VNBBLcYcdbU6cgRxWb7DXhCUXzWbDduRUzZfnGK4HGtzBAXxMZlYVm-Mq9YTW_8nGxMHBYDdfaUMGfbmBZB2CZSFinP3rmnrngQpreJjyafcIQvmZkdq4QUlSiB7GkXB6dK29VgIHKm0J-Mg970IUP844v2p8S20iA8fBx617YtYo2tlpYyysMKzIAMHVulU9NvziQ2Ax7IIuhtpOBYHjnQG85kdRRX6xeA4qw31djZFiMaljkY1Ac3V_lzRVsY4g69yRU5D7T-v7QK8Qhb6x5lQ5eEg88BZEOYHq-fNNY-0r_sL1Cfe8W1JQ9C9AWh75OmD-xIIN_kHxulSOGnKHWmiyIz-p-WRyS0SHQCvsKrpbmHUAdz6CvGR5hZA_-sPt-CD6BaZCSEZl7iKCFmwPIkscX5jzRBt2F5rcl331ZXoUzdqRxx3Lz-qBLl1hAlX8zaVEZ4fz8qMRetQpyAUp9nVVTGByy7RHSu-kIhCVWCEhzXLmlISED5tDOarELvFfTvf3TxyUL0JsykDVNxSw1-B-N9Qd0cx53V6DSPRuUEc0wcXkHSz0Js4AW4Uo2ZbiwCyUirLiKwKYtKx9Zf4MOqP4sBZMtNpo18xQnYOIiYdjFlsIFtFFSRPJ_xYN6zFOluBG83DH1uL-NmTjMTa0PxY0hTjUjfJXxFbaD5vhI11iYUwysTuSrI4IYm12XkmNsjFSRluxRseYbqWRzBL8hxBHWwT7CzXqduXmkrWog0gElfo0nj041vlRXDnzVX6dMq5zegAxgovhkLnyLvIALve6h3aVXXKTQqcludb_hK7ZnarmxzoziX9YXQTt9pG0zCQsH95eEHRR3opaR-n15JbFlKaD8XKZv4xYmcyxRHR2OuKphDBiz9S6Y1yBElwxN457KVOWRm5tRzIgI0lxu5SnUERDWEFNV9jIDNeVzdJ_RzcFZU2fBPnmmO9IsruEiuzZ-1SMeBFgQ52G1YSymkY4IAEl0CToe9iSZzoBHuLHmr0ND3NjAJ5t9V7ghSMO7eSX9pCrpbsk8pXnI34y5mgwpIaSZ2wfuatW0Tv3RLl0mTm_QljGOZqvp5OKvj7tk-WsioeQ6XxArweqVT3SBCxldvAwEAPG6wEeG2s9diiuUYq1ffYDv0JzkjLARU3s14A78adiPP4bhk_X-7U7kaZoSeuSyuYOLetHr_hmhN3GTI6zEjaWxnU2yBRmG6FvIbWd3Ra8_pPBleAxTmWlBmDA9uQrzjuIVYlzxP8P5D6RZgMjw20h10vr2KzyrKC0j9M-J9oLSd3vg88lVulMyrgYBng_K_KUtoF9CgD1ZDq8veeLLheScVpnajzVKcxD9PfvCeiZjdMPOZcdu4nizR16Z_TmXg05hpRt2Woo9M0__-Xcy9C7ClIBm-e33CXupNoDT-kd0VFLAWuaxj0FHkvXwR3F5b2EGeNsqmBG1UE_XQqfYud7Hewu-DbKaQx6WJdW3_oAmDvSsih0rDMW4DdAN3YCMtC2_KLFMWGePR91VWODCKK-WRF5FOQ3uta2HTPn2CSYM9Cr1VVLL8xIoda0cAz6vzCEc1gm4amSQjO0HRNGPfbztQMluC1IQRy93q6ApKV0j3mv_PYJLqqd4FGt1BgUYFdIQPXpdnc8nfj11dSl5mOBUK_eUHSYoc6Uq1F23avZQvRNRumnQatfd7Js3pGrJMsQqM5SUq0G3IpsdwbgCykK45oFB9opDMSHTDBAzHqyT3DV6T2x_BUiuRhqYqKzAfteQMMBHUM48dJF8_KG-oye546DtNKHhyNIoh4eAzsmyxQGqcfrPDdItkyNU_CO7022BWFOvSbI7cSdv1Qm8XKeFnGeXl5ZYRVQrwqhD2b22hzhKP3USwa7Giqc82BNRVThe authorization code in the URL will be used to get the authenticated user's access token.
When the “https://custom-application-domain/loginWithIDP“ endpoint is called with the code parameter, the Custom OIDC/OpenID application should handle this request.
The authorization code must be extracted from the URL and the OIDC/OpenID application will send another request to the Monosign to get the user’s access token as shown.
Property | Description | Example |
|---|---|---|
Token URL | This is the token endpoint of Monosign. It is used to get the access token of the authenticated user. |
|
Request Body | The request body contains key-value pairs in the |
|
Header | The header |
|
Method: POST
Request URL: Token URL copied from Monosign. Example -> https://{your-domain}/openid/token

Request Body:
The below information will be added to the request body as key-value pair in the format of "x-www-form-urlencoded"

code: {{authorization-code}}
client_id: 168f3c43-d270-e060-4293-2cd7e0a690ad
client_secret: 37d12781-eedc-d0a5-fbee-19d967349be9
redirect_uri: https://custom-application-domain/loginWithIDP
grant_type: authorization_code

Header:
Content-Type: "application/x-www-form-urlencoded"

Once the Request URL is triggered with the parameters, Monosign service will return
the access token of the authenticated user as shown.

{
    "scope": "profile",
    "token_type": "Bearer",
    "access_token": "eyJhbGciOiJIUzI1NiIsImtpZCI6ImNmMzk5YjhlZTg3NGQ5ZmYwM2MzNjdkYTBlODQ2NjcyIiwidHlwIjoiSldUIn0.eyJuYW1lIjoiam9obi5zbWl0aCIsInNzbzphdXRocmVxdWVzdGlkIjoiNWIyNTEzZWYtYmRkMS00MDM3LTgxMWEtNDQ3ZGE4NTVjYTYxIiwic3NvOnNlc3Npb25pZCI6ImY1MWE5NzQxLTkzY2YtNGE3Zi05MTA4LTA1MWRjNThiYTIwYiIsImlhdCI6MTcyNDE0NDQwOSwibmJmIjoxNzI0MTQ0MTA5LCJqdGkiOiI1YjI1MTNlZi1iZGQxLTQwMzctODExYS00NDdkYTg1NWNhNjEiLCJzaWQiOiJmNTFhOTc0MS05M2NmLTRhN2YtOTEwOC0wNTFkYzU4YmEyMGIiLCJ1bmlxdWVfbmFtZSI6ImpvaG4uc21pdGgiLCJlbWFpbCI6ImpvaG4uc21pdGhAeW91cmRvbWFpbi5jb20iLCJHcm91cHMiOltdLCJwcm9maWxlX2lkIjoiN2ViNzczYzAtNTdjMC00NzEyLWE3ZTktYzIyMTIxMzgxOTY3IiwicHJvZmlsZSI6eyJGaXJzdE5hbWUiOiJKb2huIiwiTGFzdE5hbWUiOiJTbWl0aCJ9LCJzdWIiOiJqb2huLnNtaXRoIiwiZXhwIjoxNzI0MTQ2MjMzLCJpc3MiOiJodHRwczovL21vbm9zaWduLmNvbS8ifQ.2JudD87QjDpt-FGeucoHDBsBpGJ1r7KoPIaJTL93-JY",
    "expires_in": 2592000
}
Here you can see an example of a Postman request and the response is shown below.
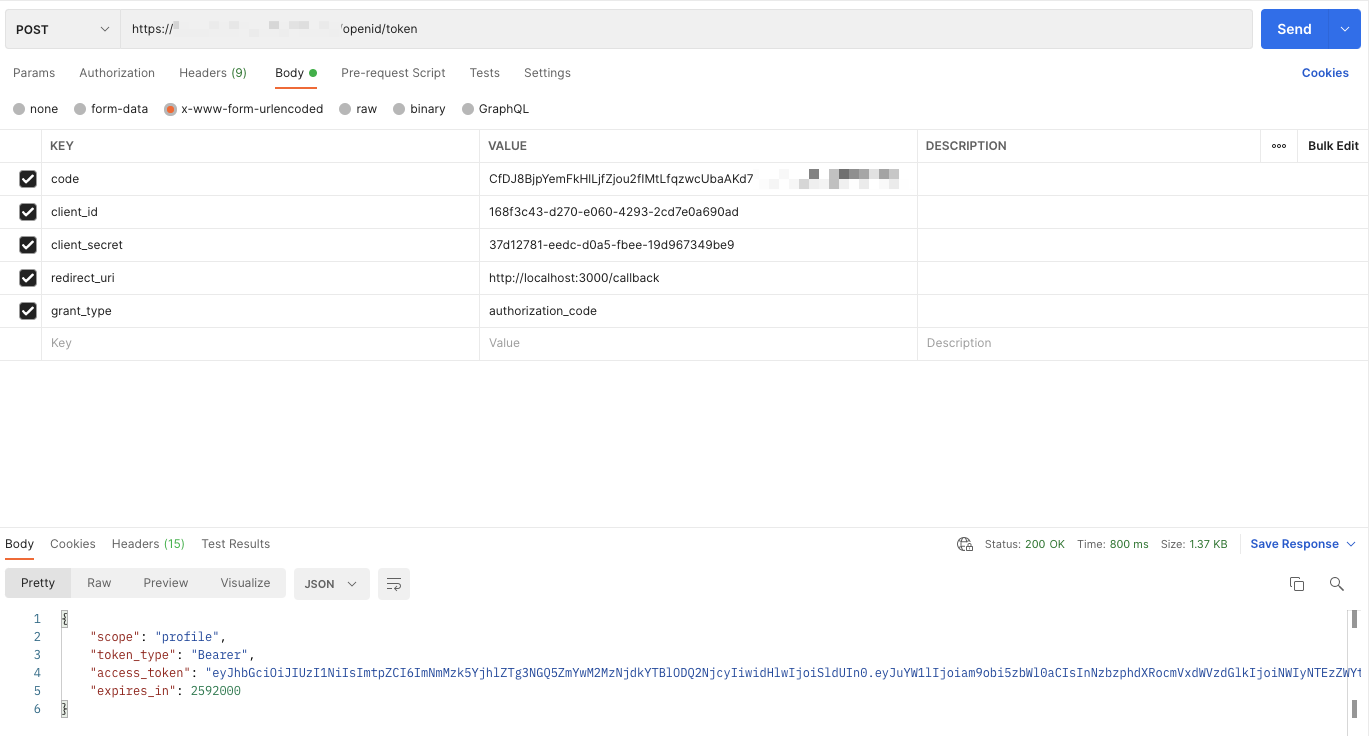
Get Access Token from Monosign
The access token can be validated on the https://jwt.io/ website for testing. The token will include the below information. Any requested information such as Active Directory groups, employeeId etc. can be added to the token.
{
  "name": "john.smith",
  "sso:authrequestid": "d5e97b2a-eb9f-409c-8cda-dc9bebacc42e",
  "sso:sessionid": "bee62fec-fc00-4207-b7fb-8b87a1a10773",
  "iat": 1724145106,
  "nbf": 1724144806,
  "jti": "d5e97b2a-eb9f-409c-8cda-dc9bebacc42e",
  "sid": "bee62fec-fc00-4207-b7fb-8b87a1a10773",
  "unique_name": "john.smith",
  "email": "john.smith@yourdomain.com",
  "Groups": [
    "test-group"
  ],
  "profile_id": "7eb773c0-57c0-4712-a7e9-c22121381967",
  "profile": {
    "FirstName": "John",
    "LastName": "Smith"
  },
  "sub": "john.smith",
  "exp": 1724146946,
  "iss": "https://monosign.com/"
}
After successfully getting the access token, the token must be decoded based on the software technology you are using.
4- Sign In Test
Once the user is authenticated to Monosign and redirected to a custom OIDC/OpenID application with the token information, the process is completed from Monosign.
Now, the user login process can be handled on your custom application with the given information in the access token.
5- Validate Tokens
If the Custom OIDC/OpenID application needs to validate the access and refresh tokens, userInfo and token URLs can be used.
Property | Description | Example |
|---|---|---|
Token URL | This is the userinfo endpoint of Monosign. It is used to get the user info with the given access token of the authenticated user. |
|
Header | The header |
|
Validating Access Token:
Method: GET
Request URL: Token URL copied from Monosign. Example -> https://{your-domain}/openid/userinfo

Header:
Authorization: "Bearer {{access-token}}"

Once the Request URL is triggered with the parameters, Monosign service will return
the user information. If the user information comes from the service,
it means access token is valid. If not access token is not valid.

Service return when the token is valid.
{
    "UserId": "236de2a0-d2b1-40ea-90c3-dd19bef958d2",
    "UserSourceId": "00000000-0000-0000-0000-000000000000",
    "ApplicationUserId": "b313426e-d87e-421a-ac2d-da8a22d63d34",
    "FormattedUserName": null,
    "UserName": "john.smith",
    "Email": "john.smith@yourdomain.com",
    "Session": {
        "SessionId": "25f795f8-70dd-49db-9ac1-e2cc052728eb",
        "UserId": "236de2a0-d2b1-40ea-90c3-dd19bef958d2",
        "ApplicationUserId": "b313426e-d87e-421a-ac2d-da8a22d63d34",
        "StartDate": "2024-09-02T06:26:37.4623943",
        "UpdatedDate": "2024-09-02T06:48:53.8113937Z",
        "ApplicationId": "e80811dd-c107-4828-9eff-ba65aef34f26",
        "Application": null,
        "ExpirationDate": "2024-09-02T07:18:53.8113932Z",
        "IsLocked": false,
        "LockMessage": "",
        "LogoutUrl": "https://{{your-domain}}/logout?sid=25f795f8-70dd-49db-9ac1-e2cc052728eb",
        "IsMfaVerified": false,
        "IsExpired": false,
        "BrowserName": null,
        "BrowserVersion": null,
        "OperatingSystem": null,
        "DeviceType": 0,
        "DeviceBrand": null,
        "DeviceModel": null,
        "DeviceName": null,
        "Location": null,
        "User": null,
        "IsTwoFactorVerified": false,
        "IsTwoFactorRequired": false,
        "LocationInfo": null,
        "UserIp": null
    },
    "Profile": {
        "ProfileId": "7eb773c0-57c0-4712-a7e9-c22121381967",
        "IsRequireUpdate": false,
        "Values": {
            "FirstName": "John",
            "LastName": "Smith"
        }
    },
    "State": 1,
    "IsActive": true,
    "Culture": "en",
    "MfaRequired": false,
    "PasswordChangeRequired": false,
    "LastPasswordChangeDate": "2024-08-14T22:15:11.3829274",
    "PasswordChangeType": 0,
    "ApplicationIds": [],
    "TimeZone": "",
    "IsFavorite": false,
    "ApplicationId": "e80811dd-c107-4828-9eff-ba65aef34f26",
    "ApplicationName": "custom-oidcopenid",
    "ApplicationTitle": null,
    "CreatedDate": "0001-01-01T00:00:00",
    "ExpirationDate": "2025-08-14T22:15:11.3742344",
    "Attributes": {
        "UserPrincipalName": null
    },
    "IsFirstSignIn": false,
    "IsExpired": false,
    "Groups": [
        "test-group"
    ]
}

Service return when the token is not valid
{
    "error": "invalid_token",
    "error_description": "The specified access token is not valid."
}
Validating Refresh Token:
Property | Description | Example |
|---|---|---|
Token URL | This is the token endpoint of Monosign. It is used to get the access token of the authenticated user. |
|
Request Body | The request body contains key-value pairs in the |
|
Header | The header |
|
Method: POST
Request URL: Token URL copied from Monosign. Example -> https://{your-domain}/openid/token

Request Body:
The below information will be added to the request body as key-value pair in the format of "x-www-form-urlencoded"

grant_type: refresh_token
client_id: 168f3c43-d270-e060-4293-2cd7e0a690ad
client_secret: 37d12781-eedc-d0a5-fbee-19d967349be9
refresh_token: {{refresh-token}}

Header: Content-Type: "application/x-www-form-urlencoded"

Once the Request URL is triggered with the parameters, Monosign service will return
the access token and refresh token.

Service return when the token is valid.
{
    "scope": "profile offline_access",
    "token_type": "Bearer",
    "access_token": "eyJhbGciOiJIUzI1NiIsImtpZCI6ImNmMzk5YjhlZTg3NGQ5ZmYwM2MzNjdkYTBlODQ2NjcyIiwidHlwIjoiSldUIn0.eyJuYW1lIjoiam9obi5zbWl0aCIsInNzbzphdXRocmVxdWVzdGlkIjoiYWI5NzNiODMtMmM0MC00MzMxLTk2MTktZjUwNjgwZDk0ODZjIiwic3NvOnNlc3Npb25pZCI6IjdhYmQxNjI2LWEzOTEtNGNjNi04ZmQ1LWUzZDk0NjVhOThhOCIsInN1YiI6ImpvaG4uc21pdGgiLCJleHAiOjE3MjUyNjIwODYsImlzcyI6Imh0dHBzOi8vbW9ub3NpZ24uY29tLyJ9.1H-_uPaBn7rKYmPnalXCEZcgZACIZGRDNZfOoEvuA_0",
    "expires_in": 2592000,
    "refresh_token": "CfDJ8BjpYemFkHlLjfZjou2fIMtaxeSsJb3VV1AZXU8SHc9UdP_rn28XwhrWeMrkKokUwzCuiQSgX4fD9jQnlP8E5UI0tVO27cWT8YmHvY2fzyPqT-M7Ht6sL4MTPqpGwB3sECr6Gsb0CulbWrU1Lc8qxsOCGeX67XSbcjrcm84A_k-PKOPdtIu-Bl6AMRbIaaP2qVcI2kEvo7ZAzy715K1JIXdgsF5YwUfkLy6z8QWRecqUO3pC40LY-YtnA-piyJjCv3pCBS2H6XvUBPWEO_O4t1G5FdDmskyIdfNk4HCaXpsV2M0DPeZUjRnIPY4kmUiep558X-h_qDtLZd1E3GqspvAhC-YRXb3YD86B9Y_gtYTk6bYeKYwXnMCYtFYO6oKbawUUBHTsr1N4bMRJNUXvNx9e3wW7ZCUJsQAIrFiAcmPnaUaHat_t8QZsGib49IyaMKrJFxA102ihtPmK9y_Av6E0IGR7aKX2VJ5NgcEdfGLTbb2DUaAHJlEOlcbS2z3Qz3-6IWFPvOiJULULs8FyhZv3bnYz56hNAdLERPasoJLw27AFlqQde9ATm-cHkp92HE1p-FTeTuIINHUoXm7T3DPch39rfeL40VSeXJ04bckX_oXgbVQ62V7RqpXMKIorneHn2Efk6DqZdVEAWM01KdtTayVGeDBwFB696dX0sSY3ndkzTt4BcoSbRrgEpyuoAJFscfn2hm2f6UwpSXP2PsE6smJdrRddvkMQrieqAL0FfU-N3jksqXDjPHzHmBeLNuSW8cIn8UQb3dfPM1X54qeroa9Awvei8lrI3Gh7PrlwNGsE4aH0bP9oCwsclu1QxazX3CBsXb0IMfPVe_WYMpQSlMcvGa2nxlO3LlrdSkxX5FnA63JHBP2OMtT2oYSvJV5Cq66uY0Y6uMDl2EYq4uM66Zc8CG_qFuvKNs2nkgMnKQy4MLmKGjqKZmgsaKAtVp-8dSx6rdKeOPGRFTtQ7q_1vlKJgnb76g71CUJ6yM8OHSFNq92ggpqXJvlucjKmef8rsW_zwwkixWEHISQ9eLJmN22ynTiz7oSgvQkZvgFcNQj9kFmvAOTv5Gct29hBmAsj2-WxKqEh4v5PqY3yf7M-jXrzjzoh-bCXgN2oT13b1tzpjwmPaQ3LuWkAOrxDLWDy4nJIUqTcaDc9jRN3SUOrPSV2VVnas2jPs1VKEIy0hN-jVh-k_r-uD7T6hioshVSVxnGgpNA37OTTggSQffzf-Ln2yhAgqNN63m6BHqua9jhqMQjlT6NseeYTUguHyLl1FEPmduxBG1KJP7qWPQEICNXT807PuFPcjOr_CVKUf2QnB4Hv_7KgZGNtExSKtKvJwsHmTQh6PGUcjo5uC7S-UZEdf5i-c1VWlCWBmZzc1L6rMC3eX8-HAxdJpEt-KWY7TJnfuAU26XuZBUpl38lBEYr2_gWy8hQSUeiuYMhxzIhaqE_kTHren_xrC4aYJkly3qsizh5W81gU00FQzbViJOjbbp6QWss3PsvpKTys0rsGPSC_-CXZz63knxEwWVwt7Fcwgus2CkqExYjx4QQXO0c_6ZsE-7TAyvQ39BAgZTlOIC1saI5l60iW9E8jDRMy-68WV5Qh5bD0Y--58hNiGFLC-U_SrO9qCRJzgmPe_Q5kaehbYWQoqkUG5dCYEmrA2ud8D_yn3Dmy4YRThgyq-kxIwvXPWAW8TKuVbeMrGsN6TDGS43dFR3AEwpty7ApMQx7hF_JxQdQqICXgBOJNCHISSvFuMm-gh92n4fzBr7eUCBVueYbCX2oMSjvDcZn4wuy-OekbN7JXwV1fzRrDgI71WRbGyn8lndK9LctymrelC031XUjP9brxWXuSHwOveYnPceJsUq5A5NmU_MipwvPIMSNcxPZIJGyC7B4Yo34g_gKNcM7gom6W_JGtT6NNoGcb93jyiIfmjo9cfxIuEZMxnnYbPZiSSXPLL0XIJttirIVmrEKr1-RG74k0KYs7aEvv3G4Gp9-XEcOE3X9TAYy9W8W1OUk_V_q19vuCCOpp9ufSp8rvur31k-VxoiMSqf-dq15TFnVS5qc2TGA"
}

Service return when the token is not valid.
{
    "error": "invalid_grant",
    "error_description": "The specified refresh token is invalid."
}
6- Example Project
You can find the Example Custom OIDC/OpenID application developed with NodeJS.
The “callback“ route must be changed based on your custom application such as loginWithIDP etc.
The environment variables in the .env file must be changed with the values that were created in the “Creating an Application on Monosign” section.
