This document explains how to implement Monosign with Drupal application. It covers Single Sign-On. Before you continue, starting with Drupal’s Single Sign-On page is better on this page.
This configuration is done with Drupal 10.3.0. If your Drupal version is different please check Drupal documentation.
Based on the documentation and the modules, the OpenID integration module works with all versions of the Drupal application.
Monofor has no responsibility to do Drupal configurations. If you need support please contact Drupal Support Services.
📑 Instructions
This documentation contains 4 main steps for integration.
-
Creating an application on Monosign
-
Configuration Single Sign-On for Drupal
-
Assign a user to the Drupal application
-
Sign In Test
1- Creating an Application on Monosign
Create your application on Monosign and configure your access policy. Once you create, click “Keys” and add a new Access Key for OIDC/OpenID Key for access.
We will need this information while we configure the Drupal application.

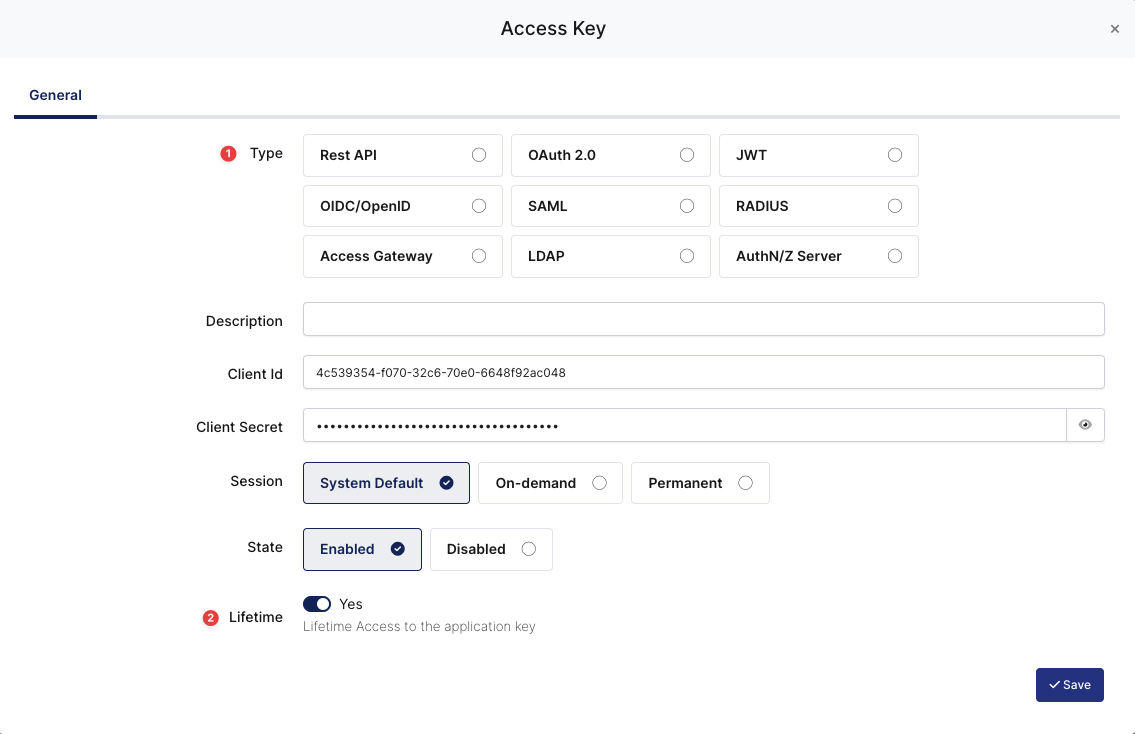
|
Property |
Value |
Options |
|---|---|---|
|
Key Type |
OIDC/OpenID |
Rest API, OAuth 2.0, JWT, OIDC/OpenID, SAML, RADIUS, Access Gateway, LDAP, AuthN/Z Server |
|
Expiration |
Lifetime |
Lifetime or Specific Date/Time - By Default Lifetime is Enabled. |
Configuration details for the Drupal application are provided as follows:
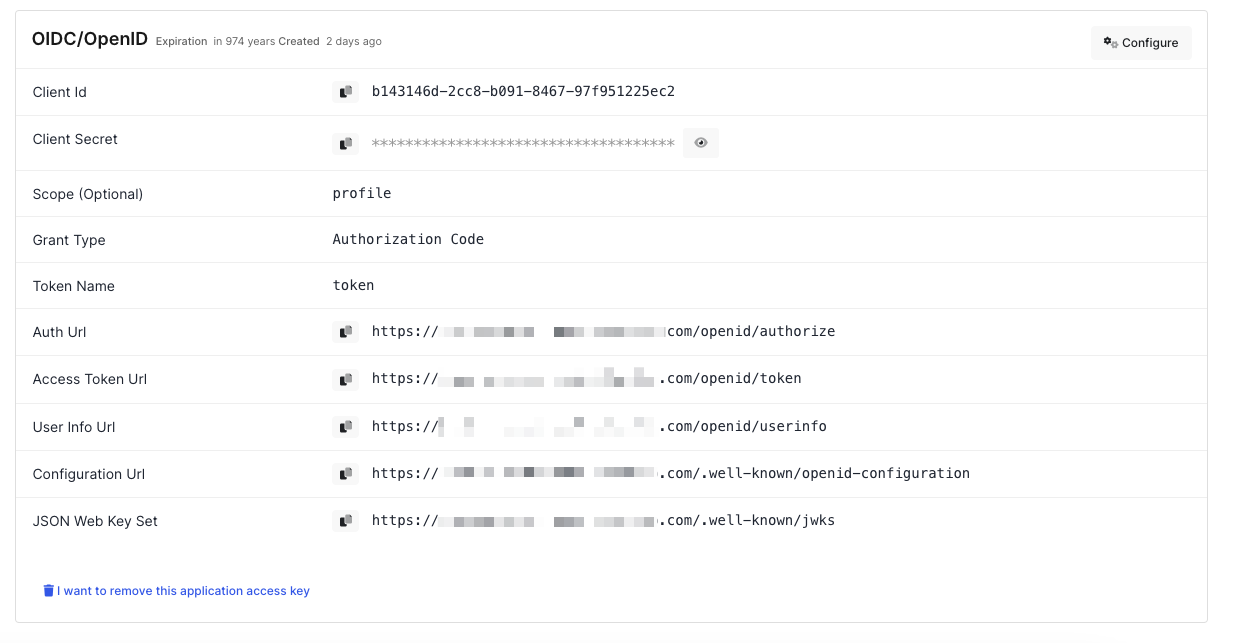
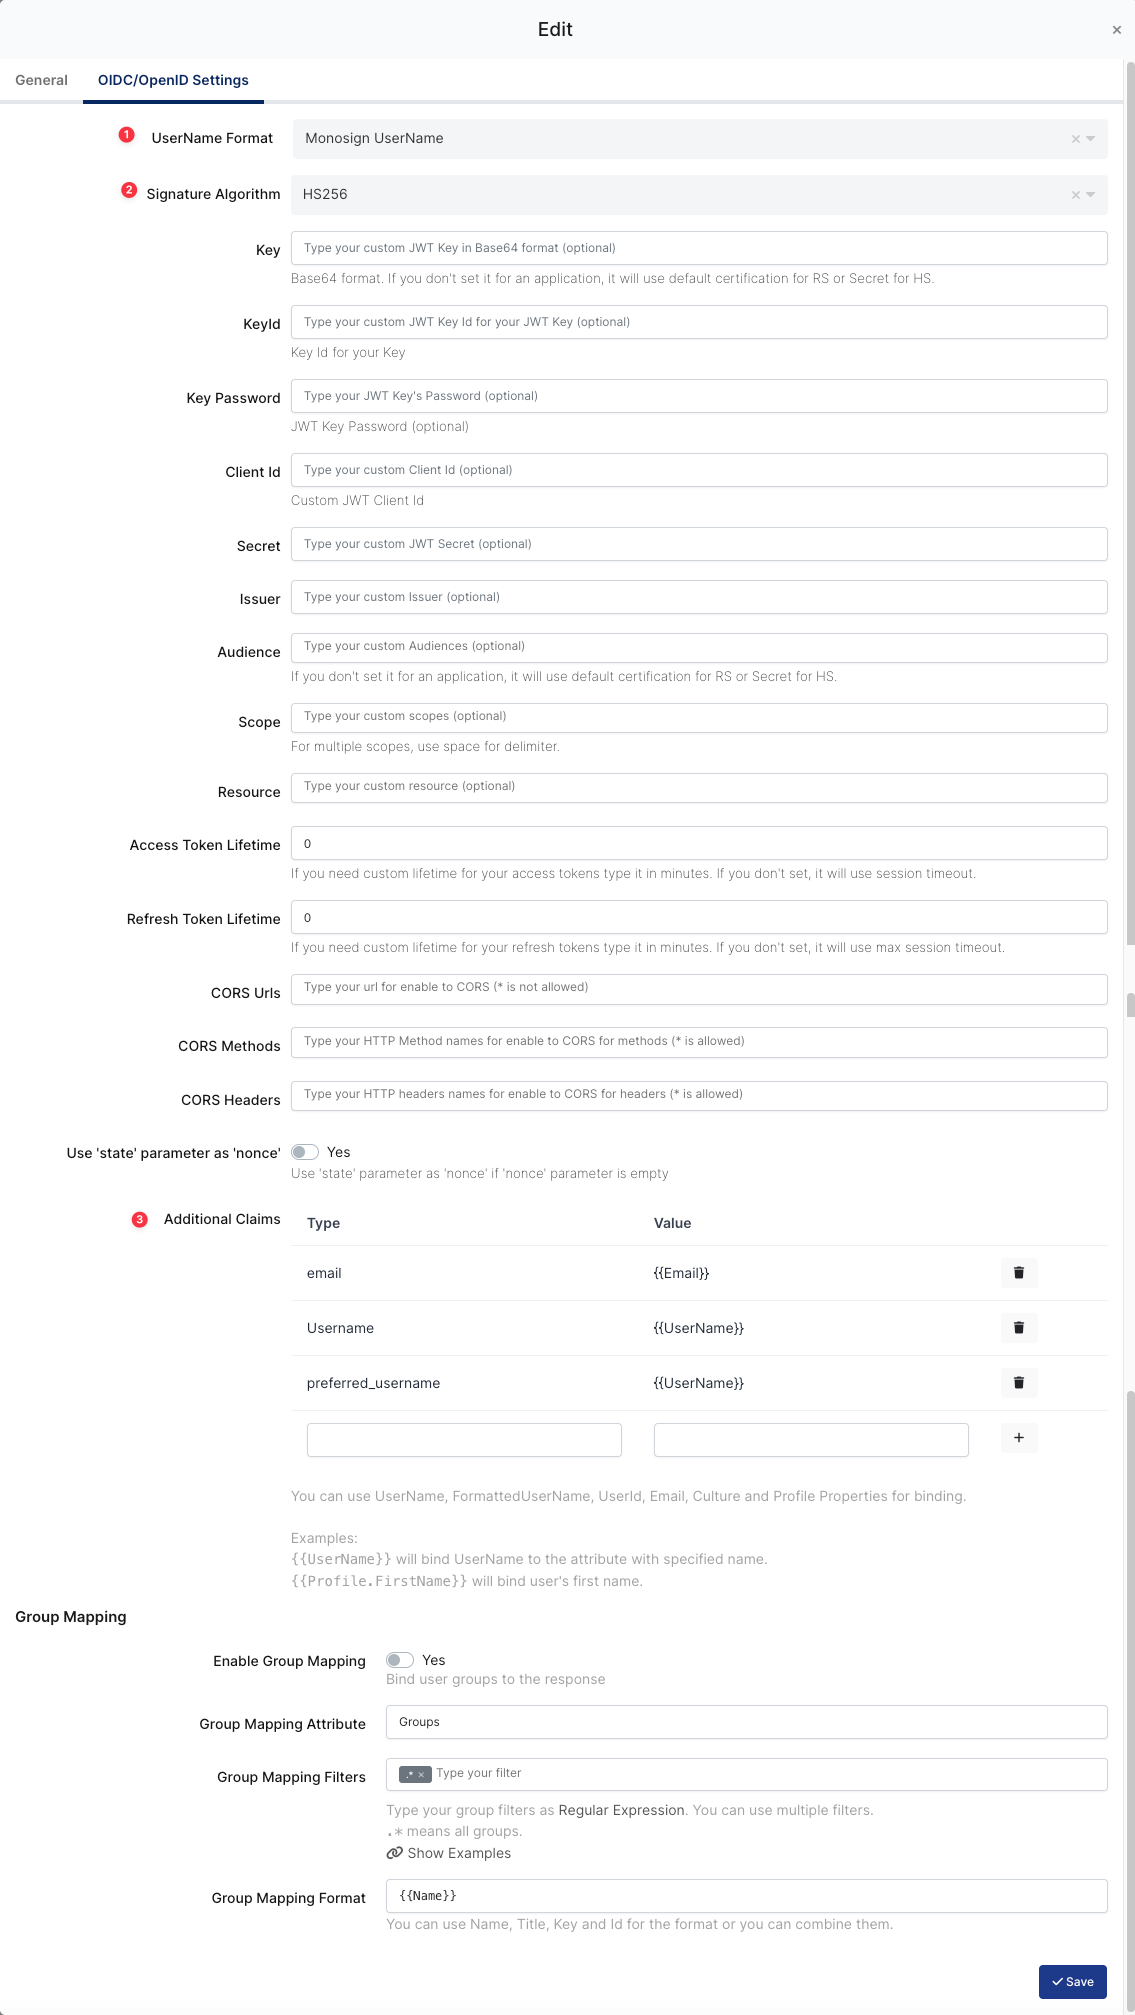
The second step will use information in the “OIDC/OpenID Access Key Details“ section to configure the Drupal OIDC/OpenID settings.
|
Property |
Value |
Description |
|---|---|---|
|
UserName Format |
|
Defines the UserName format such as |
|
Signature Algorithm |
|
This specifies the algorithm used to sign the JWT. |
|
Additional Claims |
|
These are additional pieces of information (claims) that are included in the JWT payload |
To ensure that the application has access to user groups, follow these steps:
-
If the application hasn't been configured yet, click the “Edit” option for the application.
-
In the application settings, navigate to the “Source, Provider, and Profile” tab.
-
Configure the “User Access Type“ and “User Group Access Type” as “Only Assigned Users.”
Configuring this setting will allow the application to be accessed by user groups when users sign in.
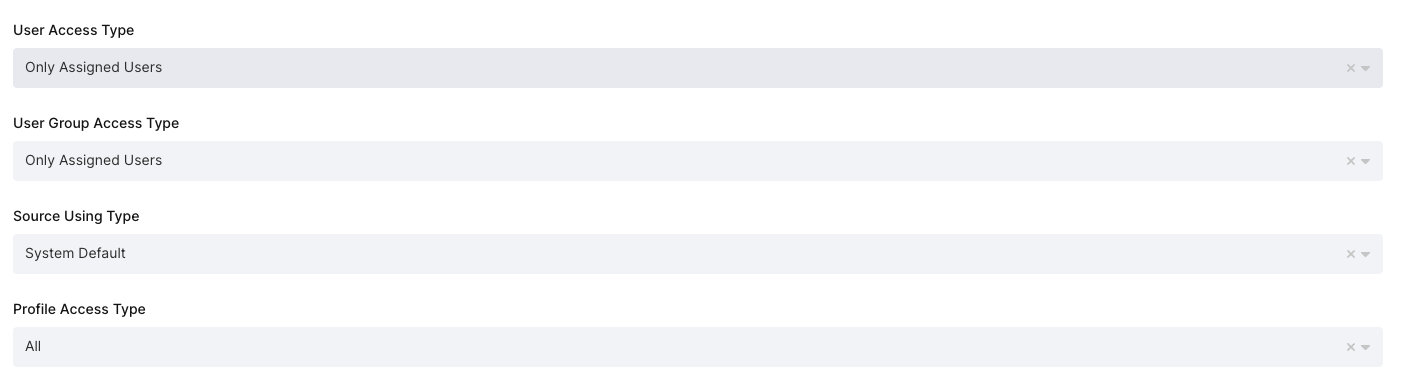
|
Property |
Description |
Options |
|---|---|---|
|
User Access Type |
Defines which Users will access this application. |
Only Assigned Users
|
|
User Group Access Type |
Defines the application’s user group access |
Only Assigned Users
|
|
Profile Access Type |
Defines the Application’s user’s profile access |
Restricted - Only restricted user profile attributes
|
2- Configuration Single Sign-On for Drupal
As highlighted at the beginning of the document, please check out Drupal’s OpenID Connect SSO configuration page first.
Drupal configuration contains below steps:
-
Install OpenID Connect module
-
Configure OpenID Connect module
a. Install OpenID Connect Module
Drupal does not support authentication via OpenID without a OpenID authentication module in the base. In this case, the Drupal Admin user needs to install the “OpenID Connect“ module for Drupal on the https://www.drupal.org/project/openid_connect.
The module installation process can be different for every Drupal application and the installation process is the responsibility of the admin user.
The example module installation process is for Drupal with the composer.
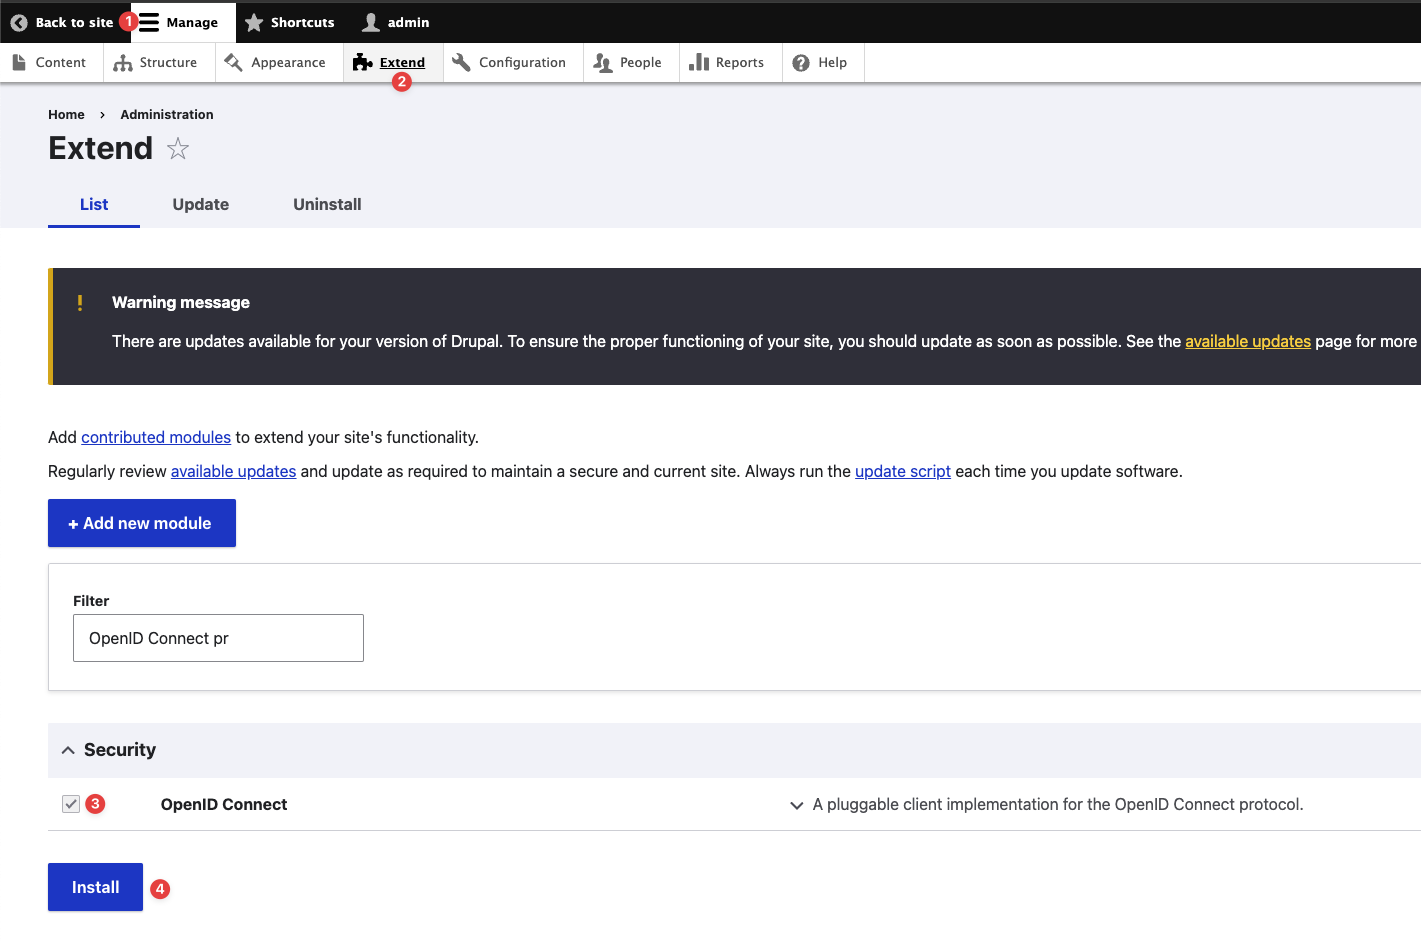
After downloading “OpenID Connect“ module from https://www.drupal.org/project/openid_connect page, you should go to the Admin page for the Drupal application.
Please navigate to the Manage → Extend page on the Admin UI and install the module as shown.
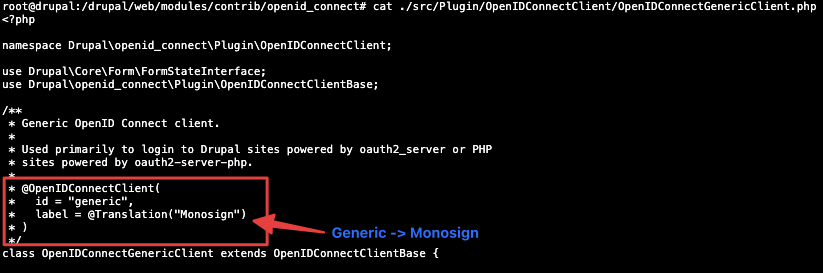
After installing the “OpenID Connect“ module, you can update some texts on the UI. On the module’s configuration page, you can change the text named “Generic“ to “Monosign“ by editing the “OpenIDConnectGenericClient.php“ file.
The default text for third-party IdPs is “Generic“ on the configuration page and the login page. Admin user of Drupal application can find the “OpenIDConnectGenericClient.php” in the folder structure of the application.
You can edit the text from “Generic“ to “Monosign“ in the file.
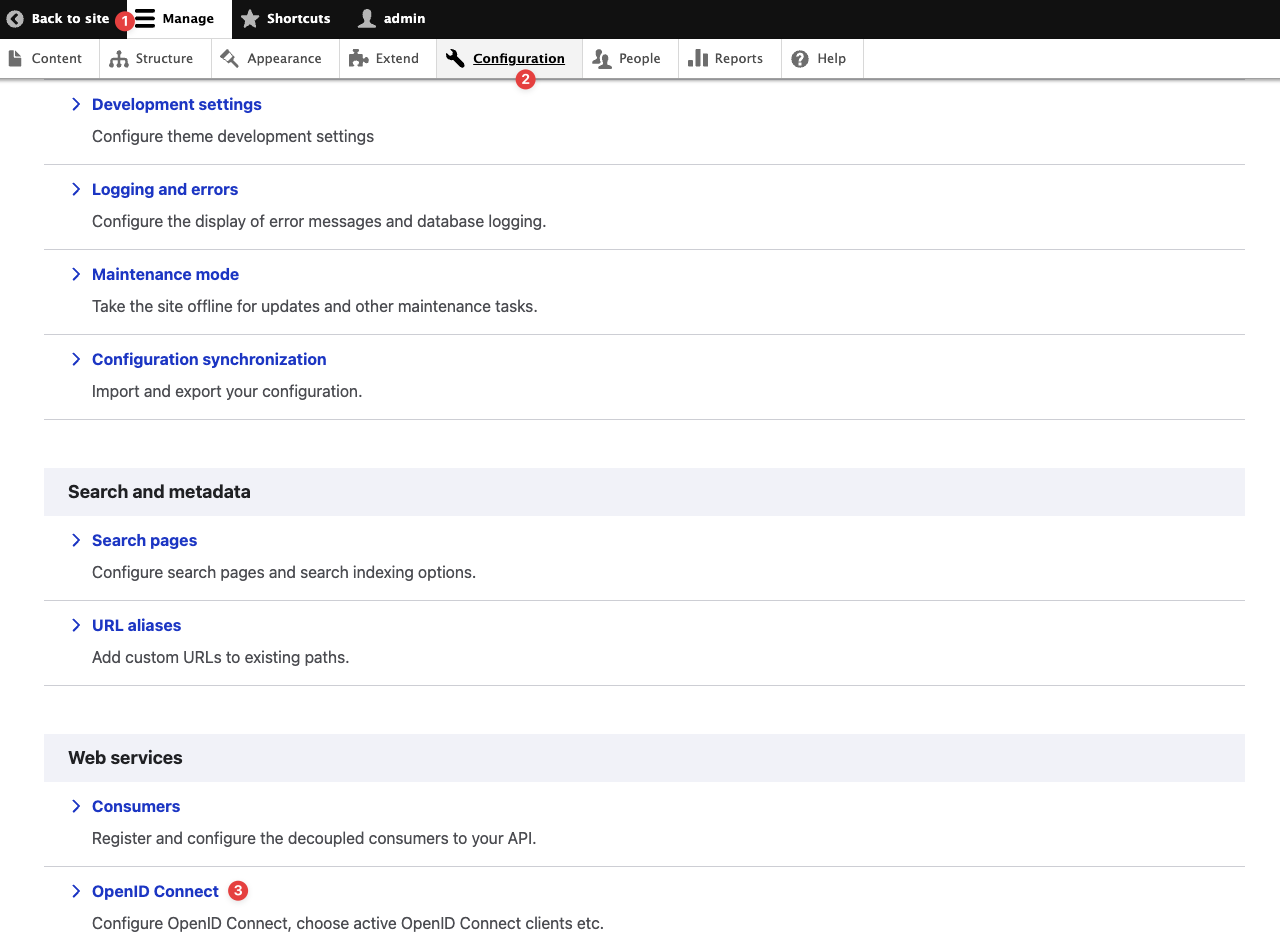
It is better to clear all caches on the Configuration → Performance after change is made.
After editing the module, please navigate to the “Configuration“ page and click the “OpenID Connect“ module to configure the OpenID settings as shown.
b. Configure OpenID Connect
The section configures the OpenID Connect module login process when users try to log in to Drupal through Monosign.
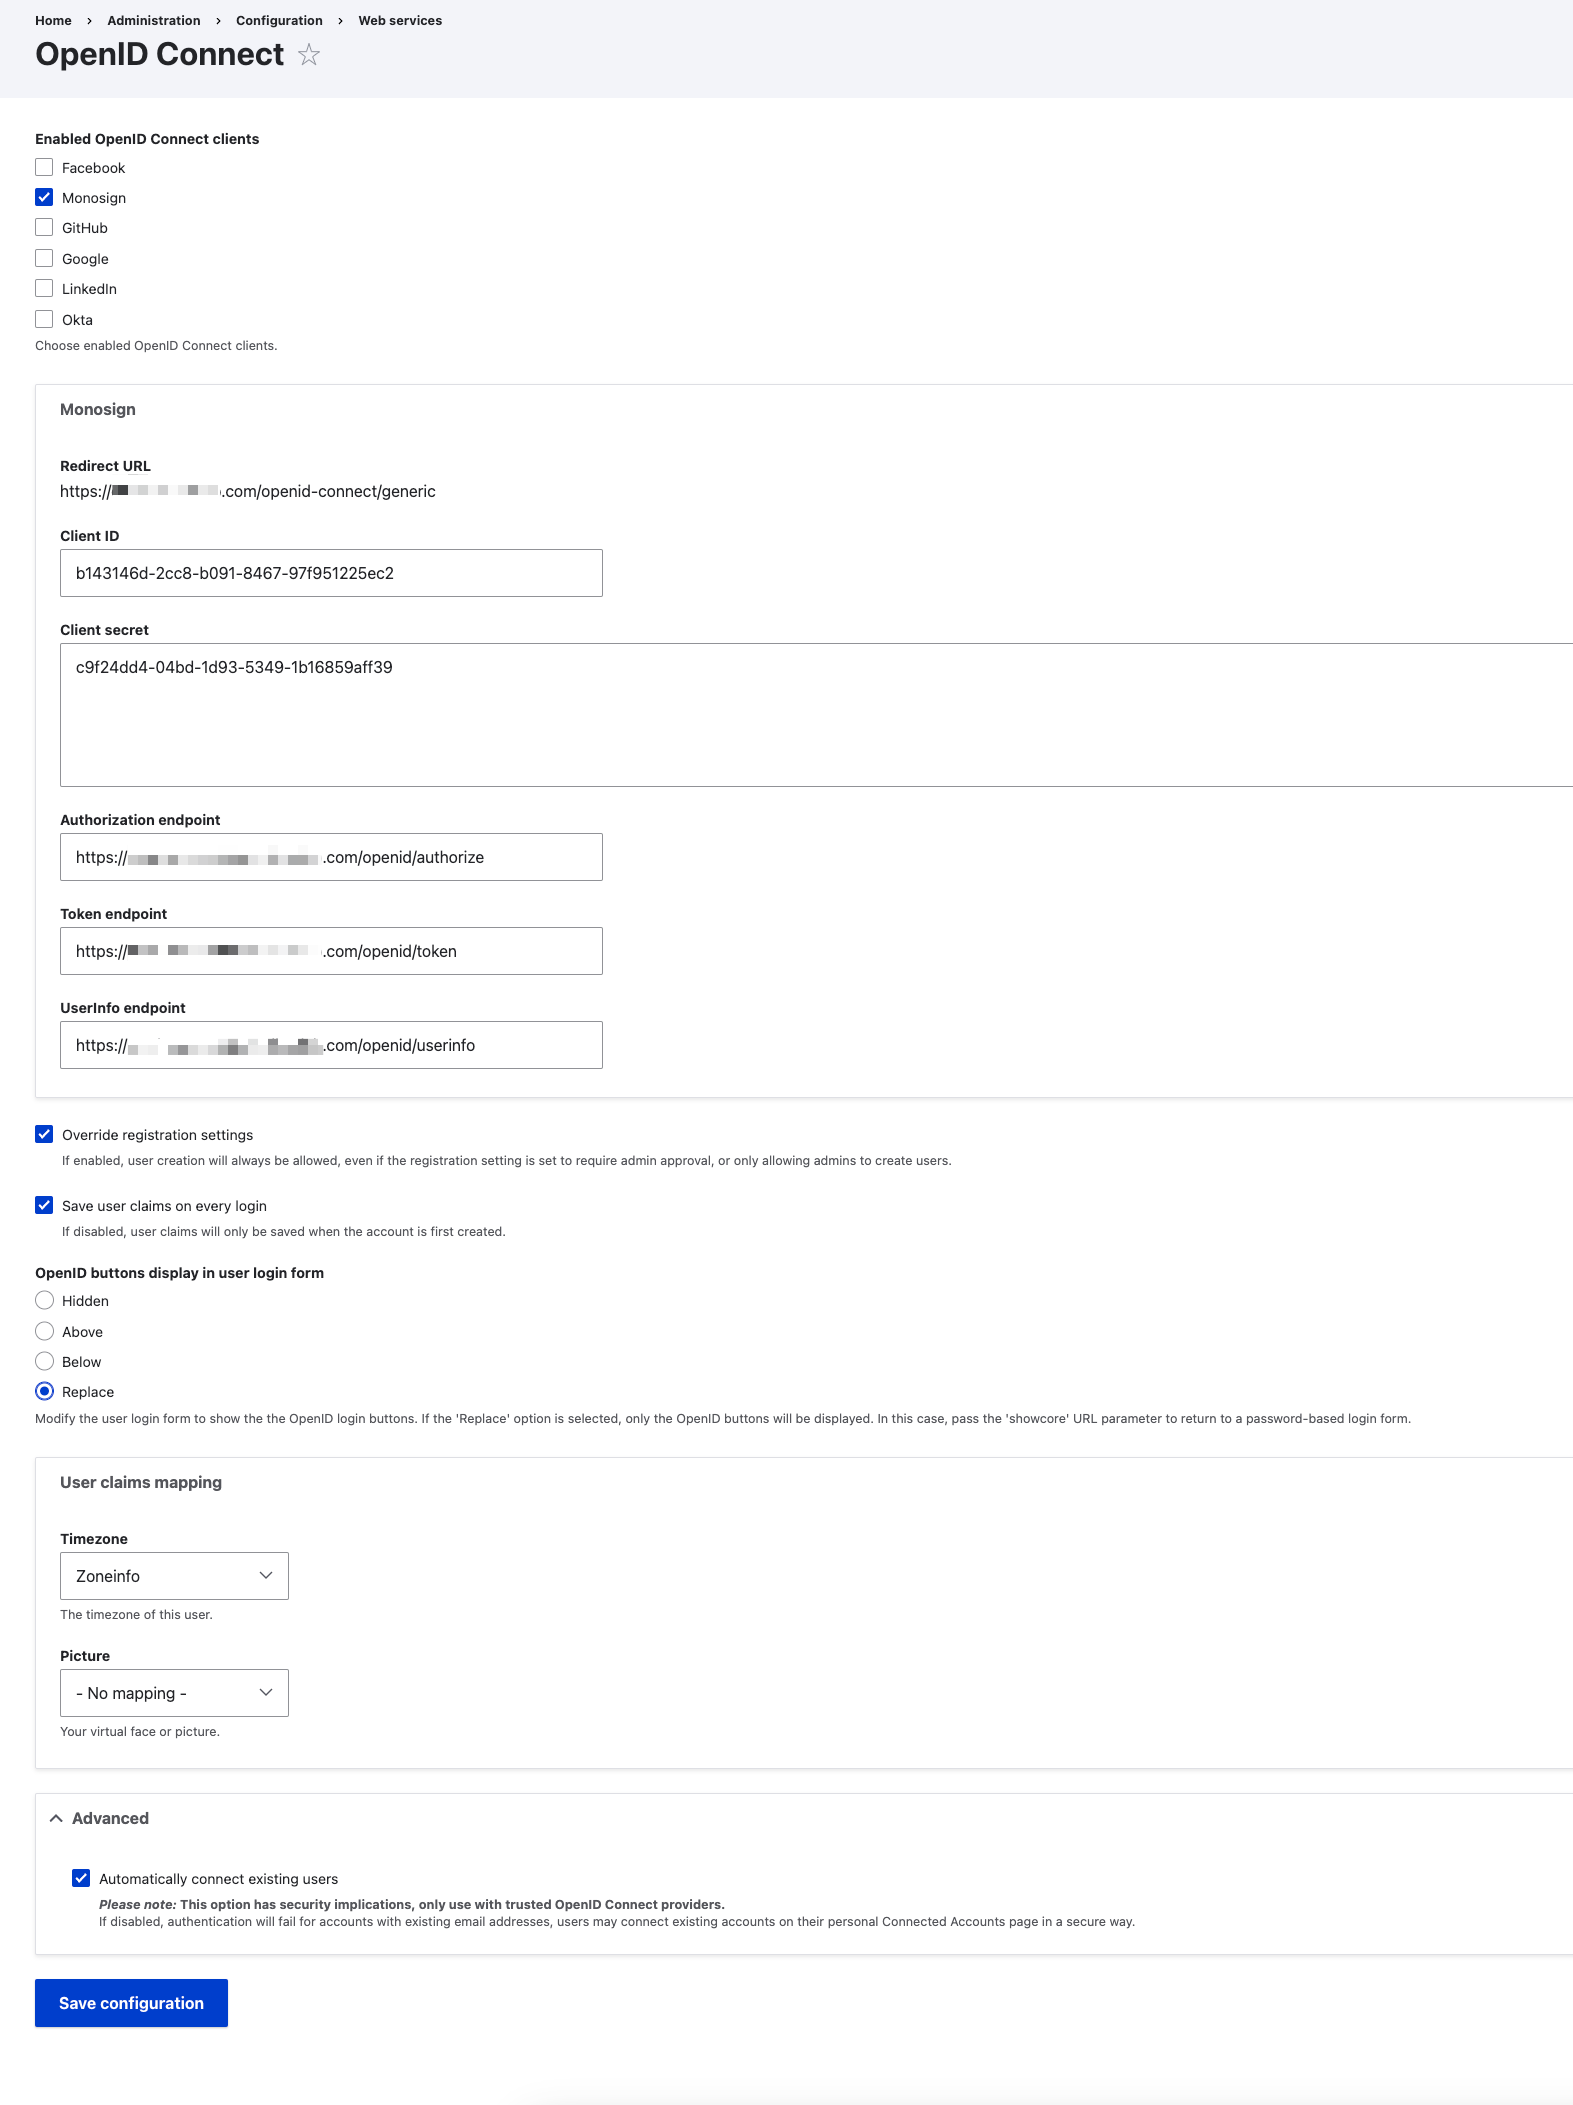
|
Property |
Value |
Description |
|---|---|---|
|
Enabled OpenID Connect clients |
or
|
Choose enabled OpenID Connect clients. |
|
Client ID |
|
A unique identifier for the client application. |
|
Client secret |
|
A secret key is known only to the application and the authorization server. |
|
Authorization endpoint |
|
The URL where the authorization request is sent. |
|
Token endpoint |
|
The URL where the token request is sent |
|
UserInfo endpoint |
|
The URL where the user information is fetched. |
|
Override registration settings |
|
When checked, user creation is always allowed, even if the registration setting is set to require admin approval or only allows admins to create users. |
|
Save user claims on every login |
|
If enabled, user claims will be saved on every login. If disabled, user claims will only be saved when the account is first created. |
|
OpenID buttons display in user login form |
|
Options to control the display of OpenID Connect login buttons on the user login form. |
|
Automatically connect existing users |
|
If disabled, authentication will fail for accounts with existing email addresses, users may connect existing accounts on their personal Connected Accounts page in a secure way. |
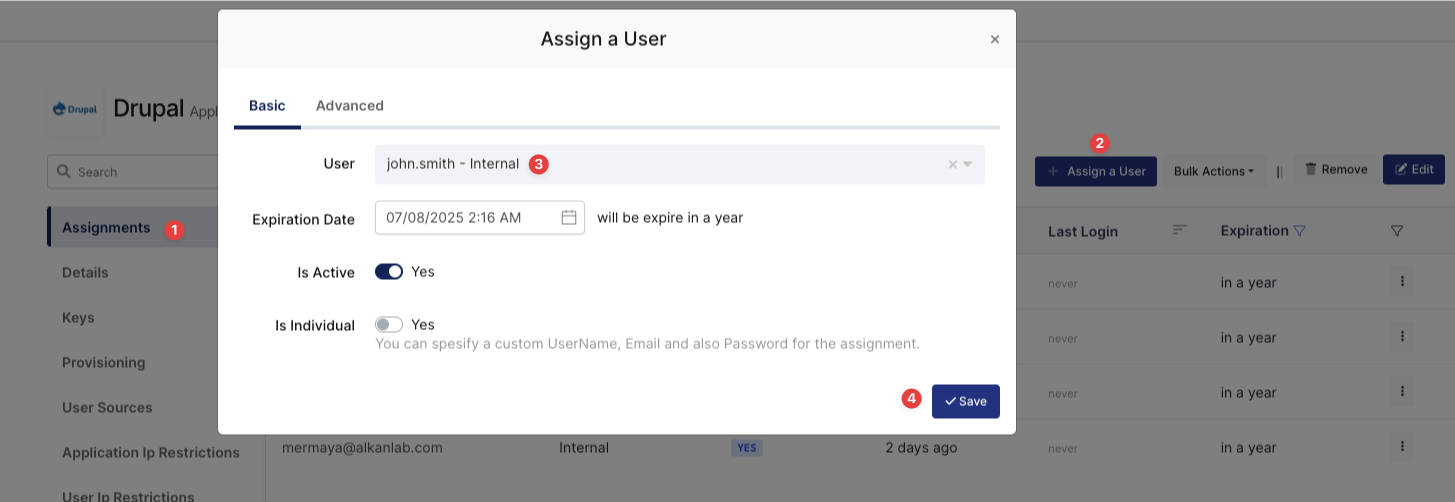
3- Assign a user to the Drupal Application
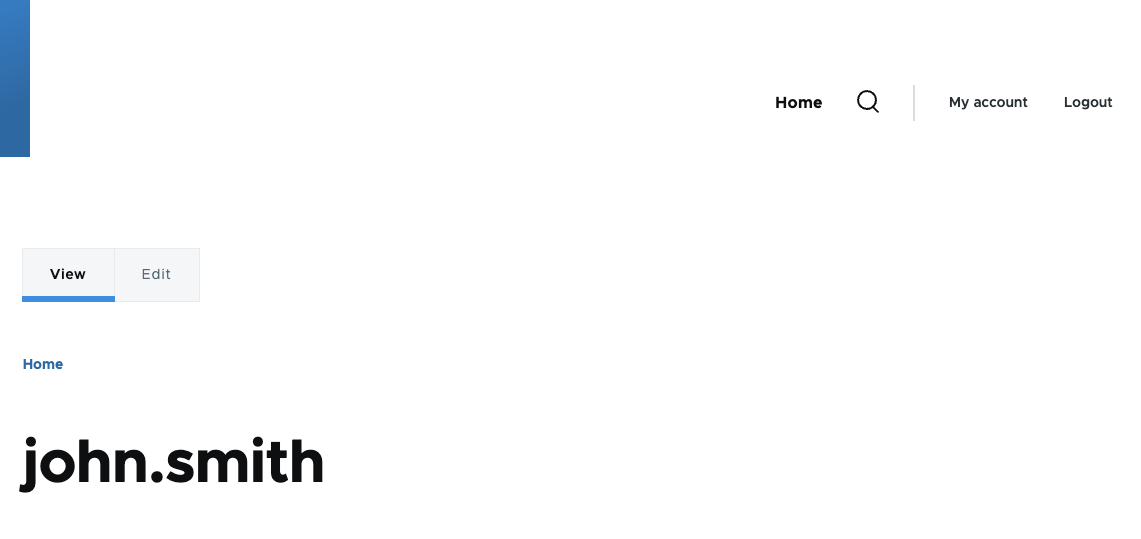
Please follow the below instructions on how to assign a user to the Drupal application. In this example john.smith will assign to the application access.
4- Sign In Test
Now try to log in to Drupal using Monosign SSO.
Open a new browser and type Drupal web address. On the Drupal web address click the “Login“ button.
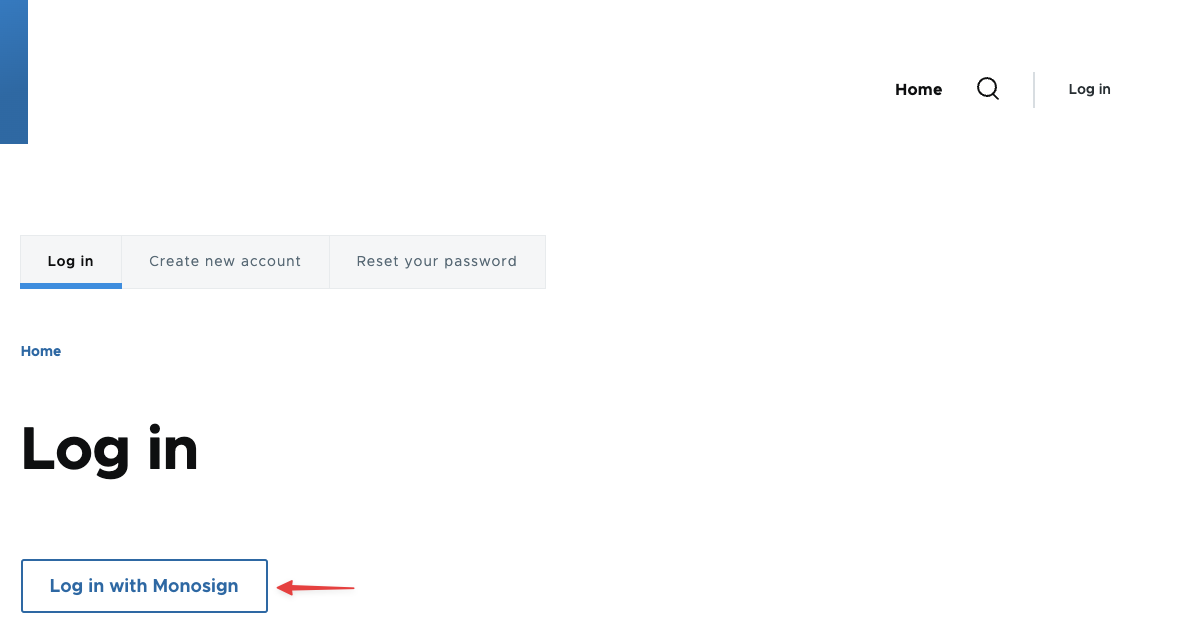
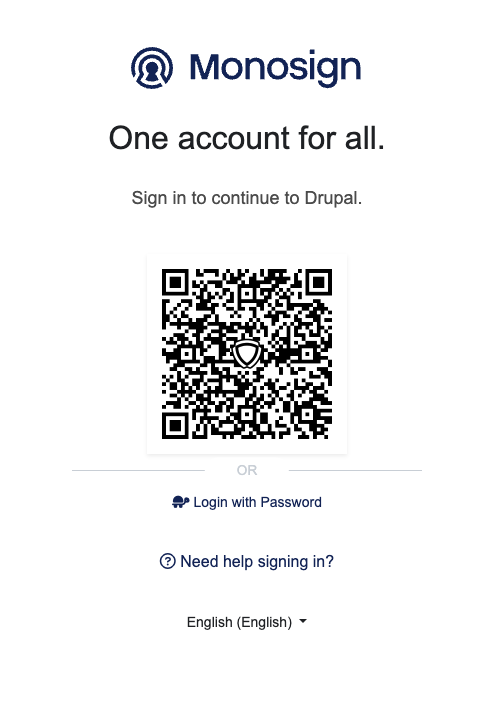
It can be login with Passwordless login(Monofor Identity), Passkey or Username and Password(Login with Password)
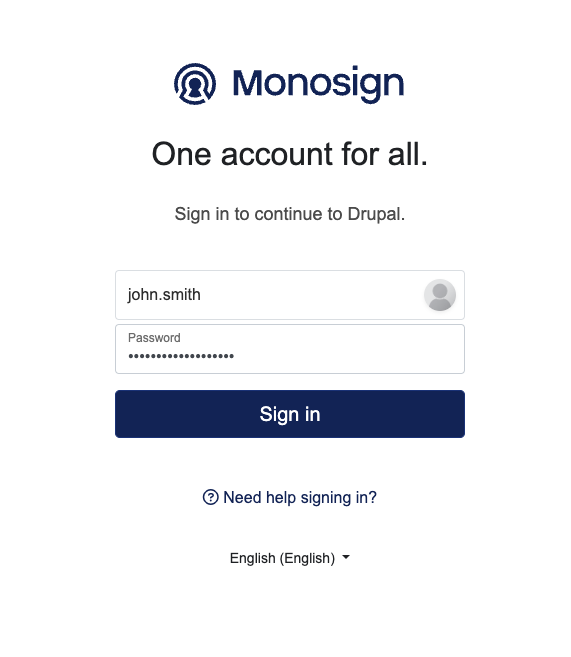
After clicking Sign in user will able to log in to Drupal.
After completing the configuration on Drupal, it is better to clear all caches on the Configuration → Performance menu if the OIDC/OpenID SSO doesn’t work.