Microsoft ECP/EAC (Exchange Admin Center) ADFS SAML
This document explains how to implement Monosign with Microsoft ECP/EAC ADFS SAML. It covers Single Sign-On. Before you continue, it is better to start with Microsoft ECP/EAC’s https://learn.microsoft.com/en-us/exchange/clients/outlook-on-the-web/ad-fs-claims-based-auth?view=exchserver-2016 documentation.
If the ADFS server is newly created for claims-based authentication, please ensure the configuration on the ADFS server is completed for ECP/EAC before starting the Monosign SAML authentication process.
The ADFS claims-based authentication might be bypassed if the configurations are already completed on the ADFS server.
Monofor has no responsibility for doing Microsoft ECP/EAC configurations. If you need support please contact Microsoft ECP/EAC Support Services.
Please note that if the authentication type is different (such as FormsAuthentication) than ADFS, the authentication type will be changed to ADFS authentication when the configurations are made for both sides.
📑 Instructions
This documentation contains 4 main steps for integration.
Creating an Application on Monosign
Configuration Single Sign-On for Microsoft ECP/EAC
Assign a user to the Microsoft ECP/EAC application
Sign In Test
Enable ADFS Authentication for ECP/EAC (Optional)
Set Default Authentication Method as Monosign (Optional)
1- Creating an Application on Monosign
Create an application on Monosign and configure your access policy. Once you create, click “Keys” and add a new Access Key for SAML Key for access.
This information will be necessary during the configuration of the Microsoft ECP/EAC application.

Creating Access Key in Monosign Microsoft ECP/EAC
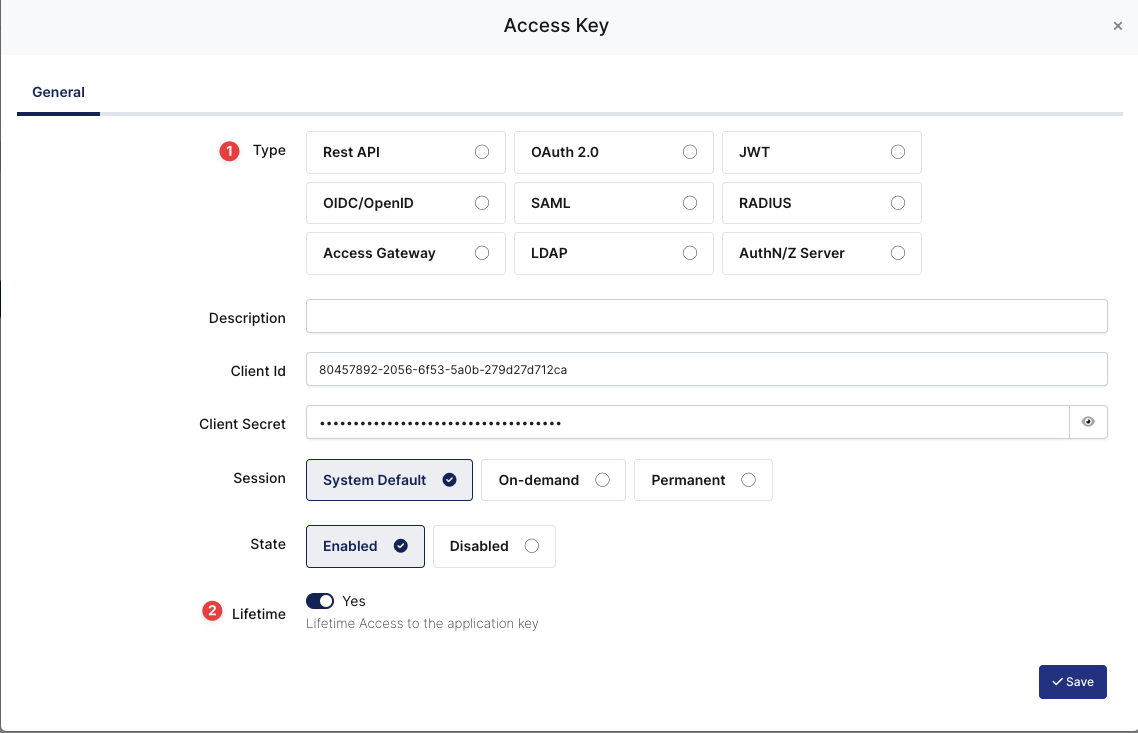
Deciding Access Key as SAML and Expiration Date
Property | Value | Options |
|---|---|---|
Key Type | Rest API, OAuth 2.0, JWT, OIDC/OpenID, SAML, RADIUS, Access Gateway, LDAP, AuthN/Z Server | |
Expiration | Lifetime | Lifetime or Specific Date/Time - By Default Lifetime is Enabled. |
Configuration details for the Microsoft ECP/EAC application are provided as follows:
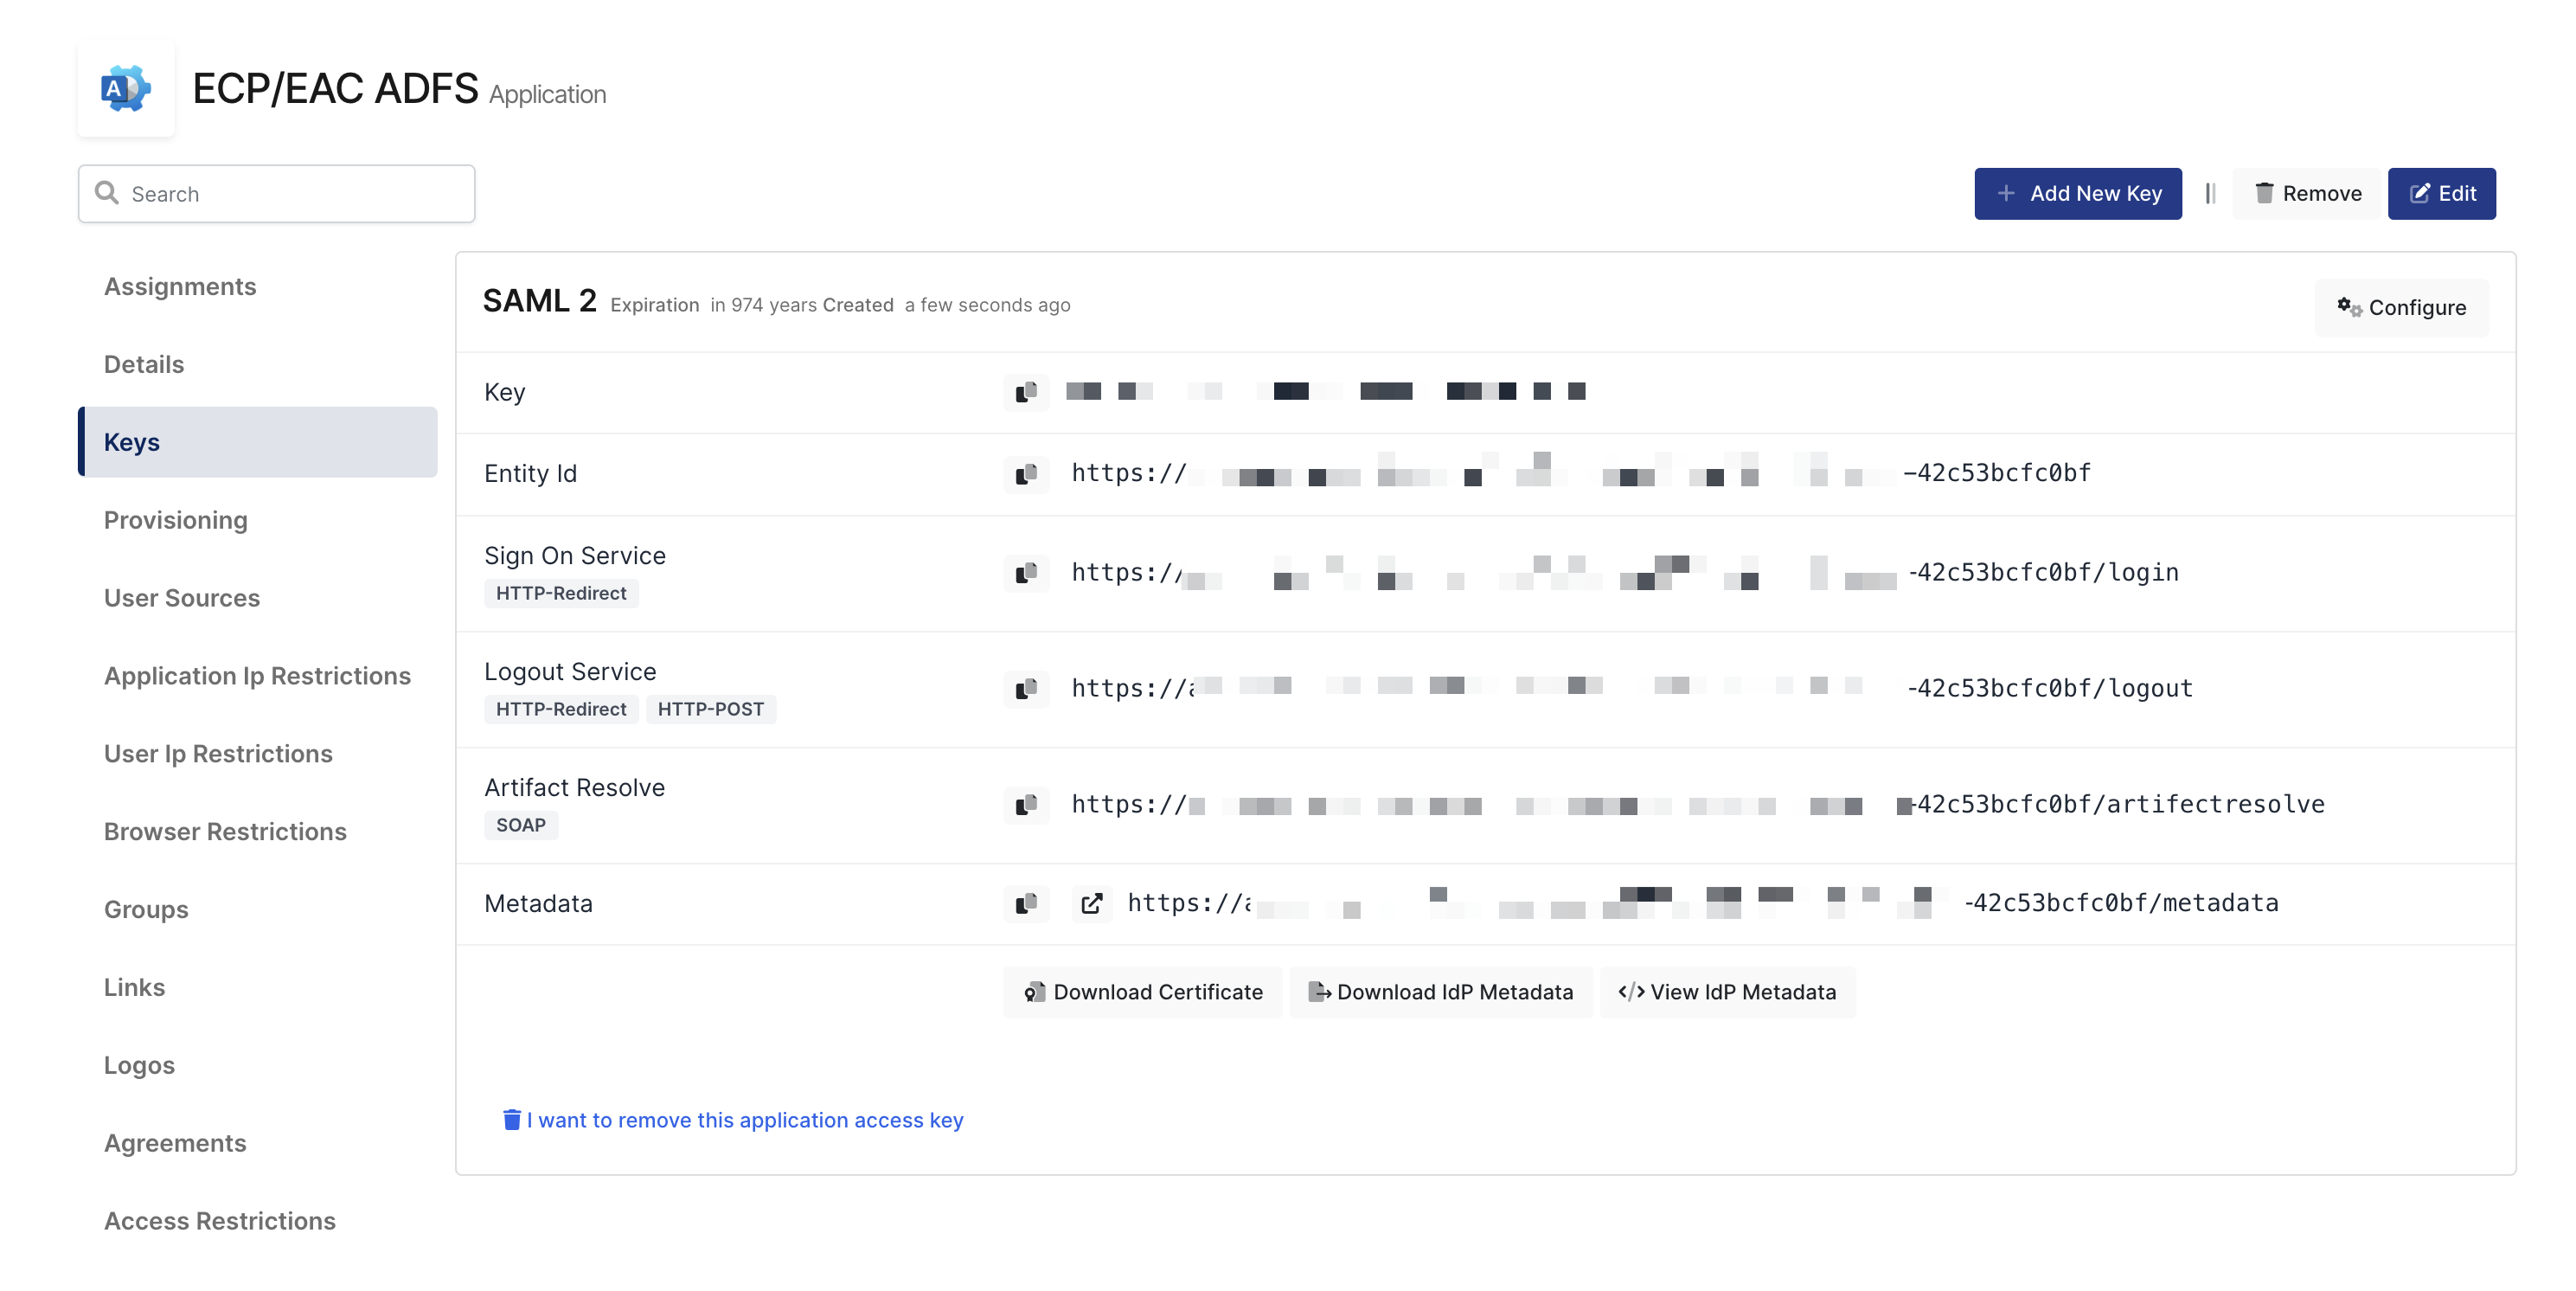
SAML Access Key Details
The second step will use information in the “SAML Access Key Details“ section to configure the Microsoft ECP/EAC SAML settings.
After creating the SAML Key on Monosign, please download the federation metadata from the given address https://{your-ADFS-domain}/FederationMetadata/2007-06/FederationMetadata.xml
Extract AssertionConsumerService, entityID attribute values. This information will be used in the below configuration window.
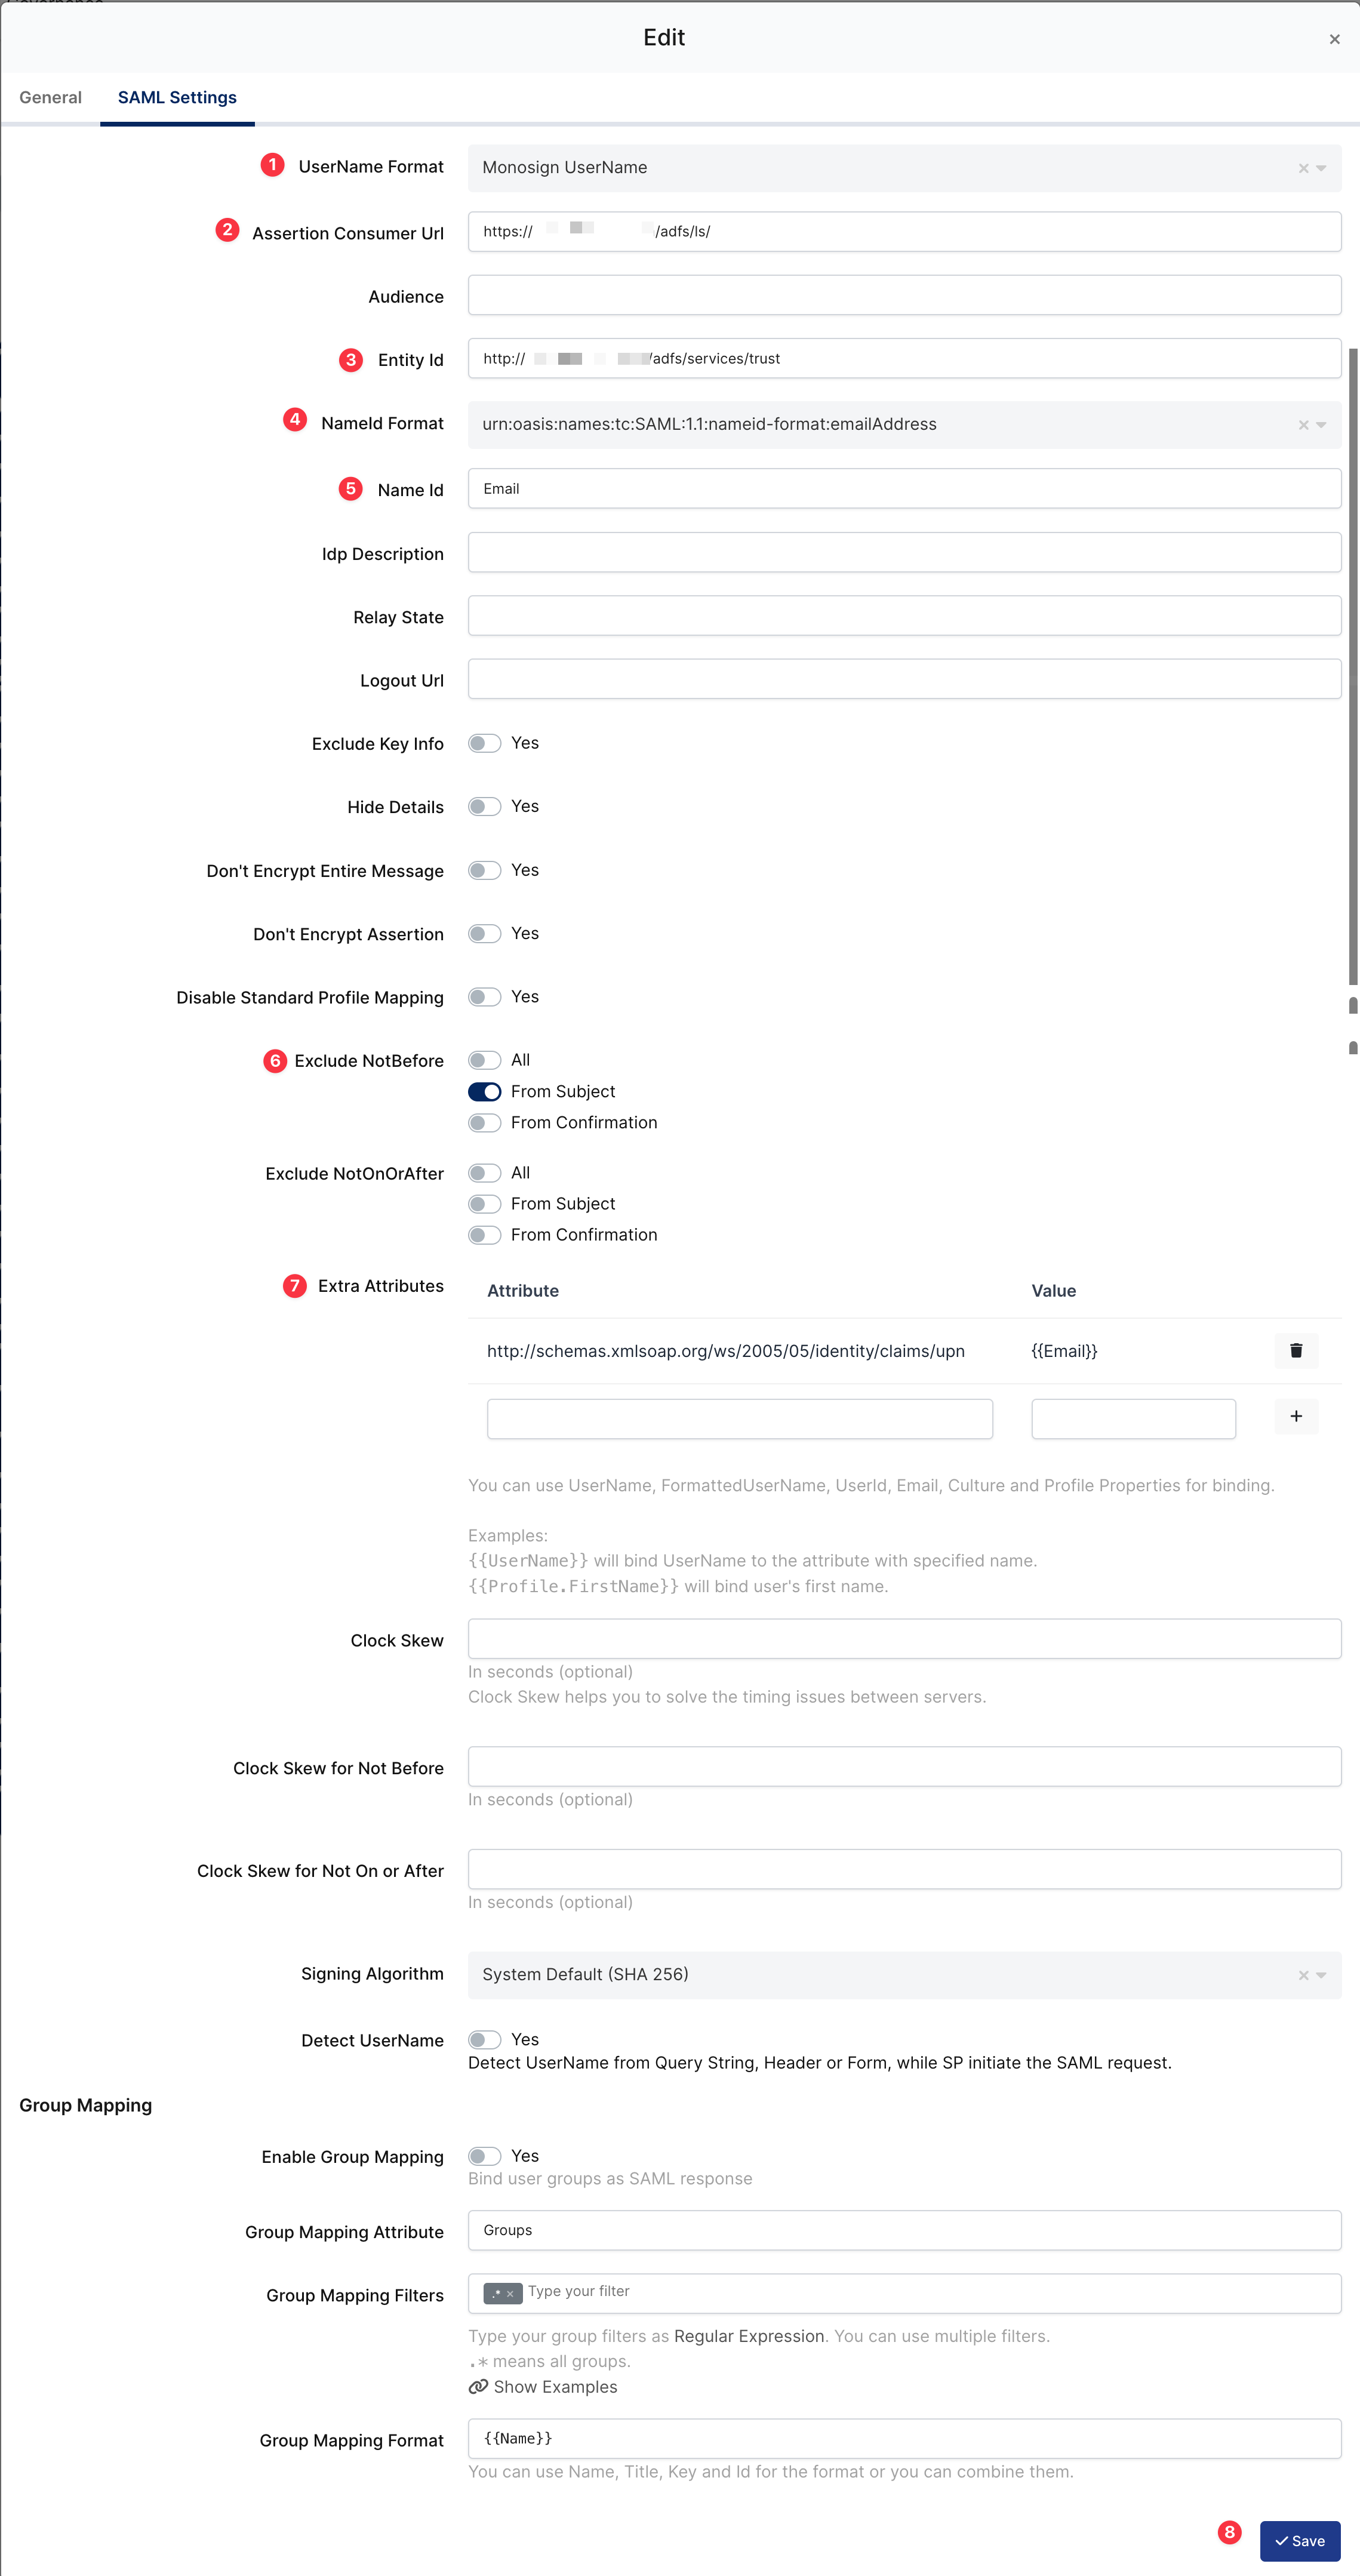
SAML Configuration on Monosign
Property | Value | Description |
|---|---|---|
UserName Format |
| Defines the UserName format such as |
Assertion Consumer Url |
| The URL where the SAML assertion is sent by the IdP. Replace |
Entity Id |
| A unique identifier for the ADFS service provider. This is used to identify ADFS to the IdP. |
NameId Format |
| NameId Format that ADFS service is accepting. |
Name Id |
| Specifies the attribute used as the NameID in the SAML assertion, which is the unique identifier for the user. Here, it is set to "Email". |
Extra Attribute |
| Additional attributes that are sent in the SAML assertion. |
To ensure that the application has access to user groups, follow these steps:
If the application hasn't been configured yet, click the “Edit” option for the application.
In the application settings, navigate to the “Source, Provider, and Profile” tab.
Configure the “User Access Type“ and “User Group Access Type” as “Only Assigned Users.”
Configuring this setting will allow the application to access by user groups when users sign in.
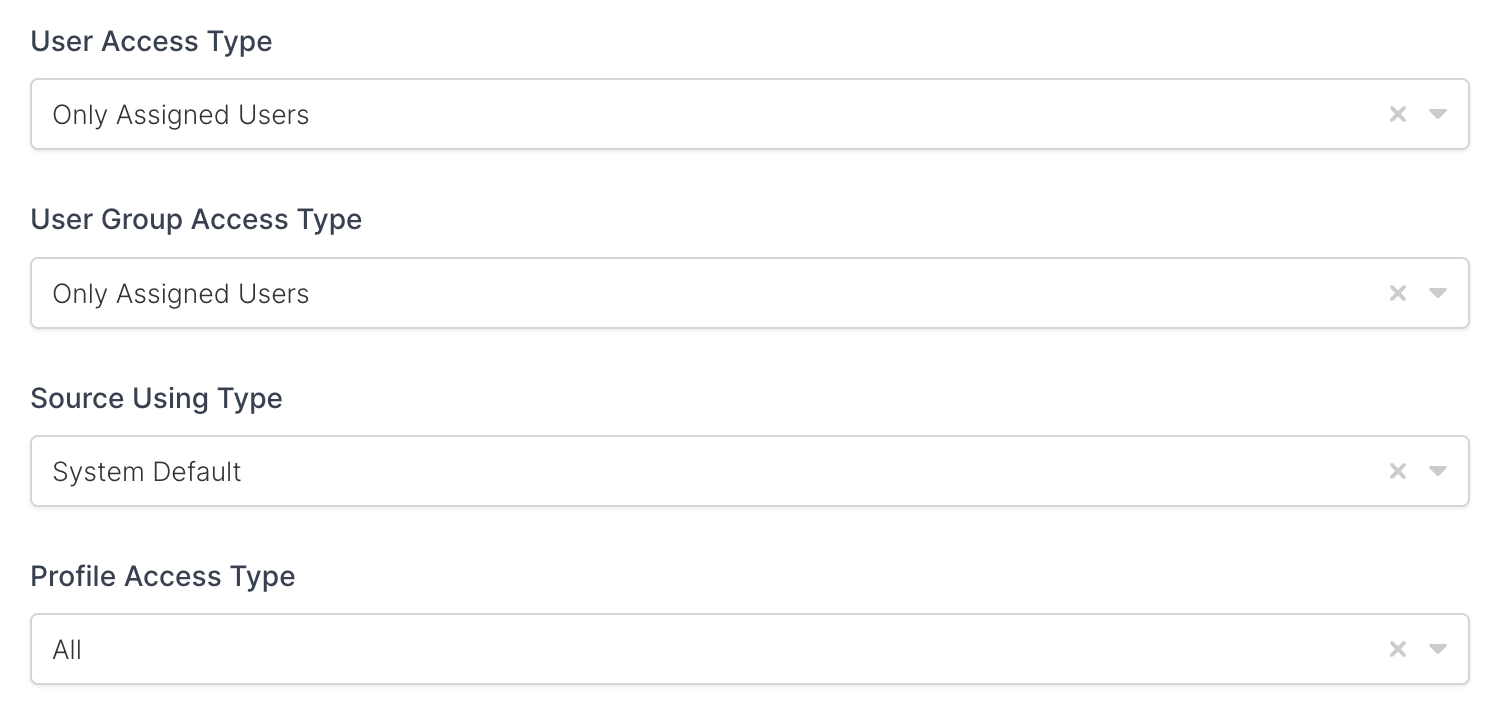
Property | Description | Options |
|---|---|---|
User Access Type | Defines which Users will access to this application. | Only Assigned Users |
User Group Access Type | Defines application’s user group access | Only Assigned Users |
Profile Access Type | Defines Application’s user’s profile access | Restricted - Only restricted user profile attributes |
2- Configuration Single Sign-On for Microsoft ECP/EAC
As highlighted at the beginning of the document, please check out the Microsoft ECP/EAC’s SSO configuration page first.
There are two ways to do the configurations on ADFS.
Configure ADFS for Microsoft ECP/EAC SAML SSO using the ADFS UI
Configure ADFS for Microsoft ECP/EAC SAML SSO using PowerShell (Simplest Way)
1- Configure ADFS for Microsoft ECP/EAC SAML SSO using the ADFS UI
Microsoft ECP/EAC configuration contains below steps:
Download the Metadata File From Monosign and Copy the File where the ADFS Service is Running
Add New Claims Provider Trusts
Edit Claim Issuance Policy and Add New Rule For ECP/EAC
Update and Verify Claims Provider For ECP/EAC Relying Party
a. Download the Metadata File From Monosign and Copy the File where ADFS Service is Running
Please, navigate to application details on Monosign Admin Panel.
Click the “Download IdP Metadata“ button to download IdP metadata. After downloading the metadata file, copy the file under the server where the ADFS service is running.
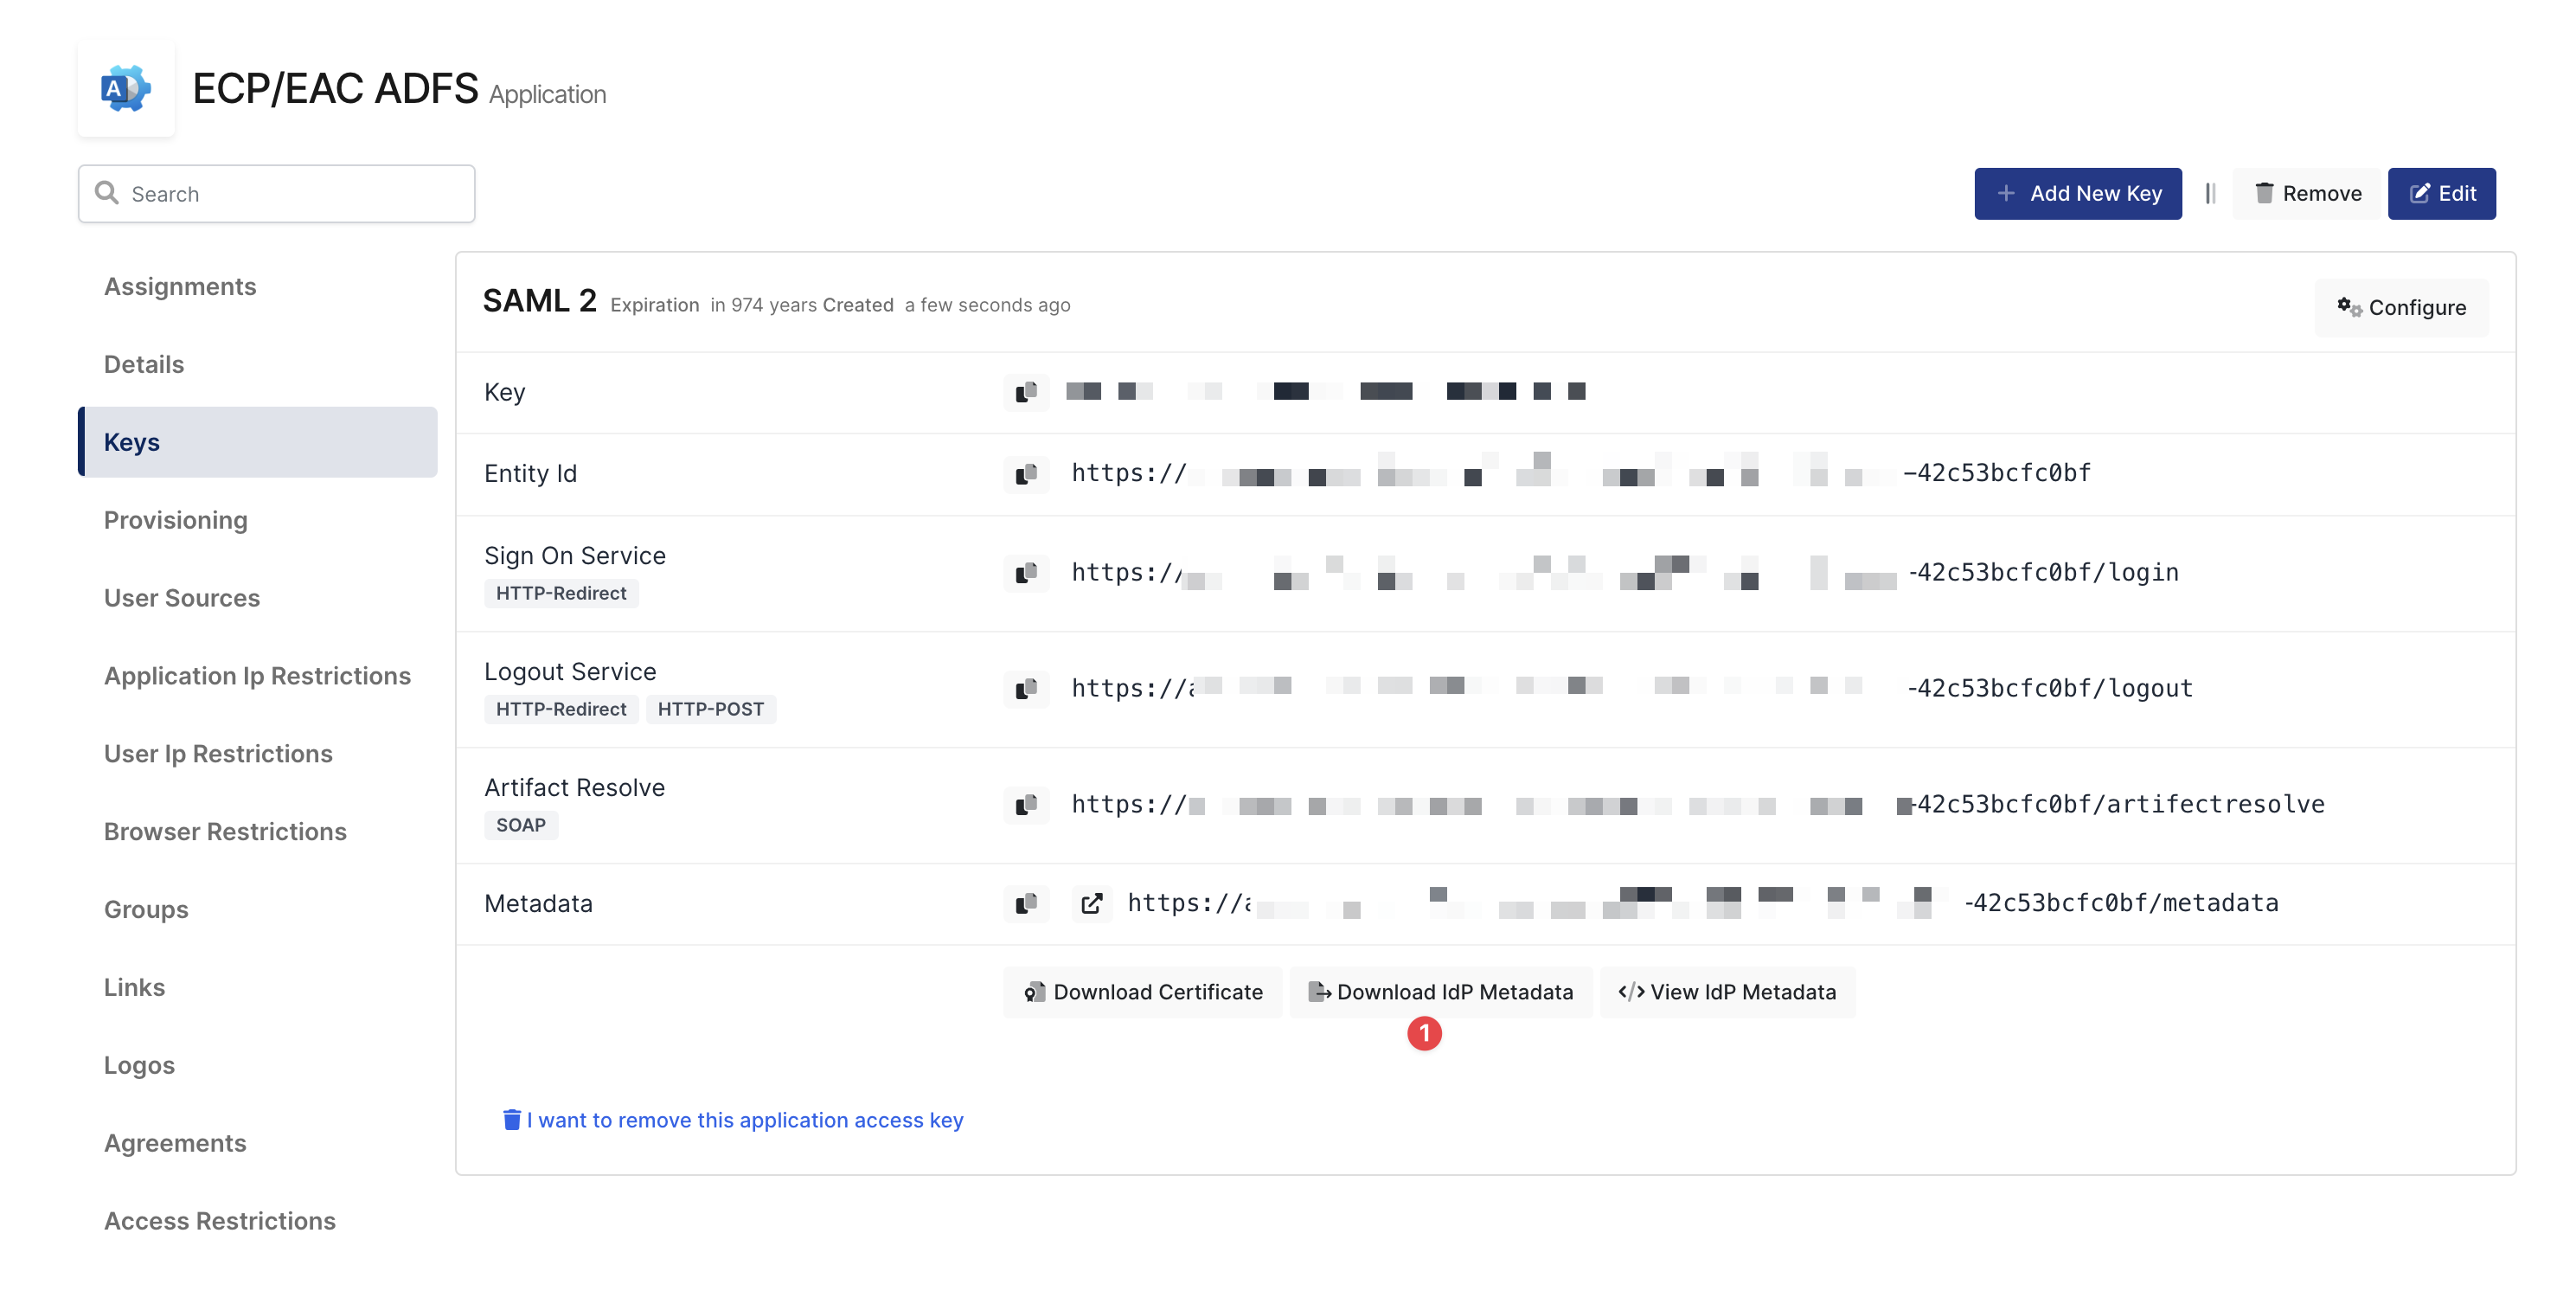
Download the Metadata From Monosign
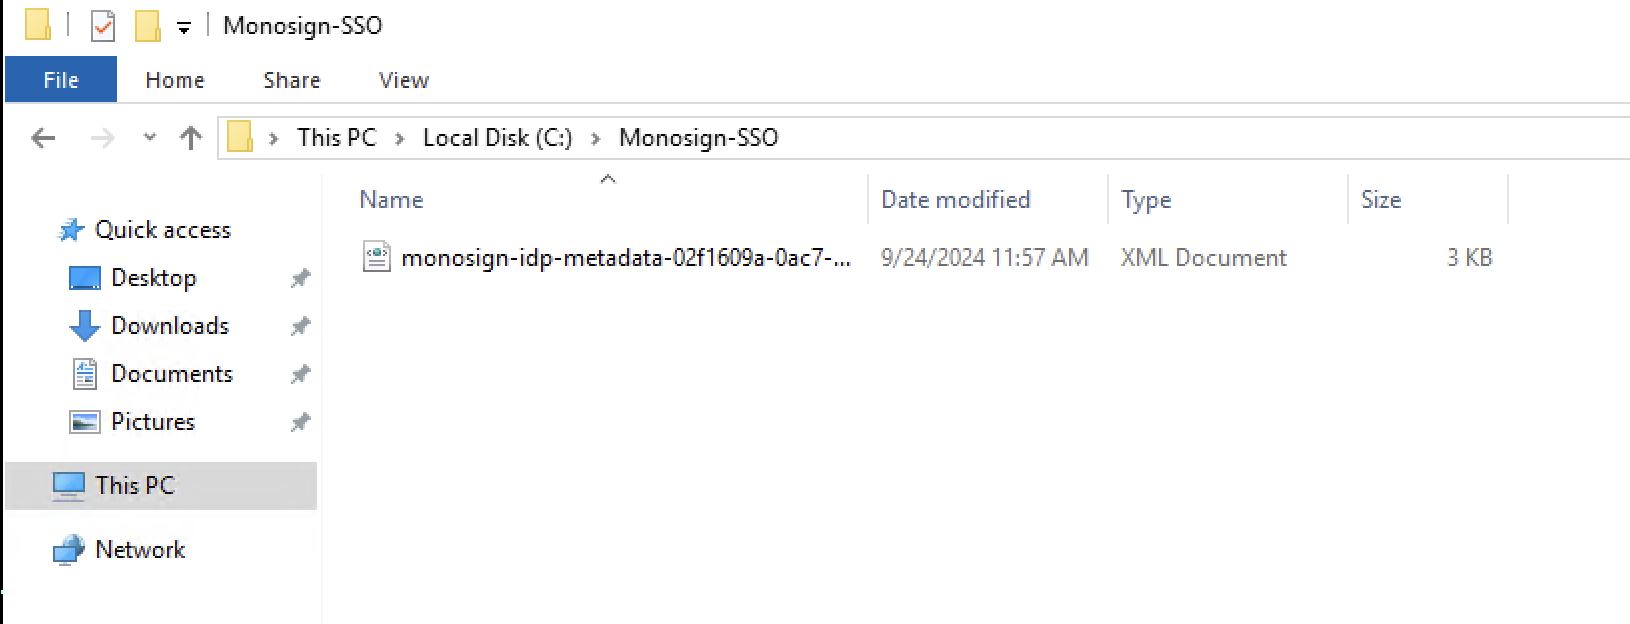
Copy Metadata File where ADFS Service is Running
b. Add New Claims Provider Trusts
Please navigate to the server where the ADFS service is running and open the AD FS Management application.
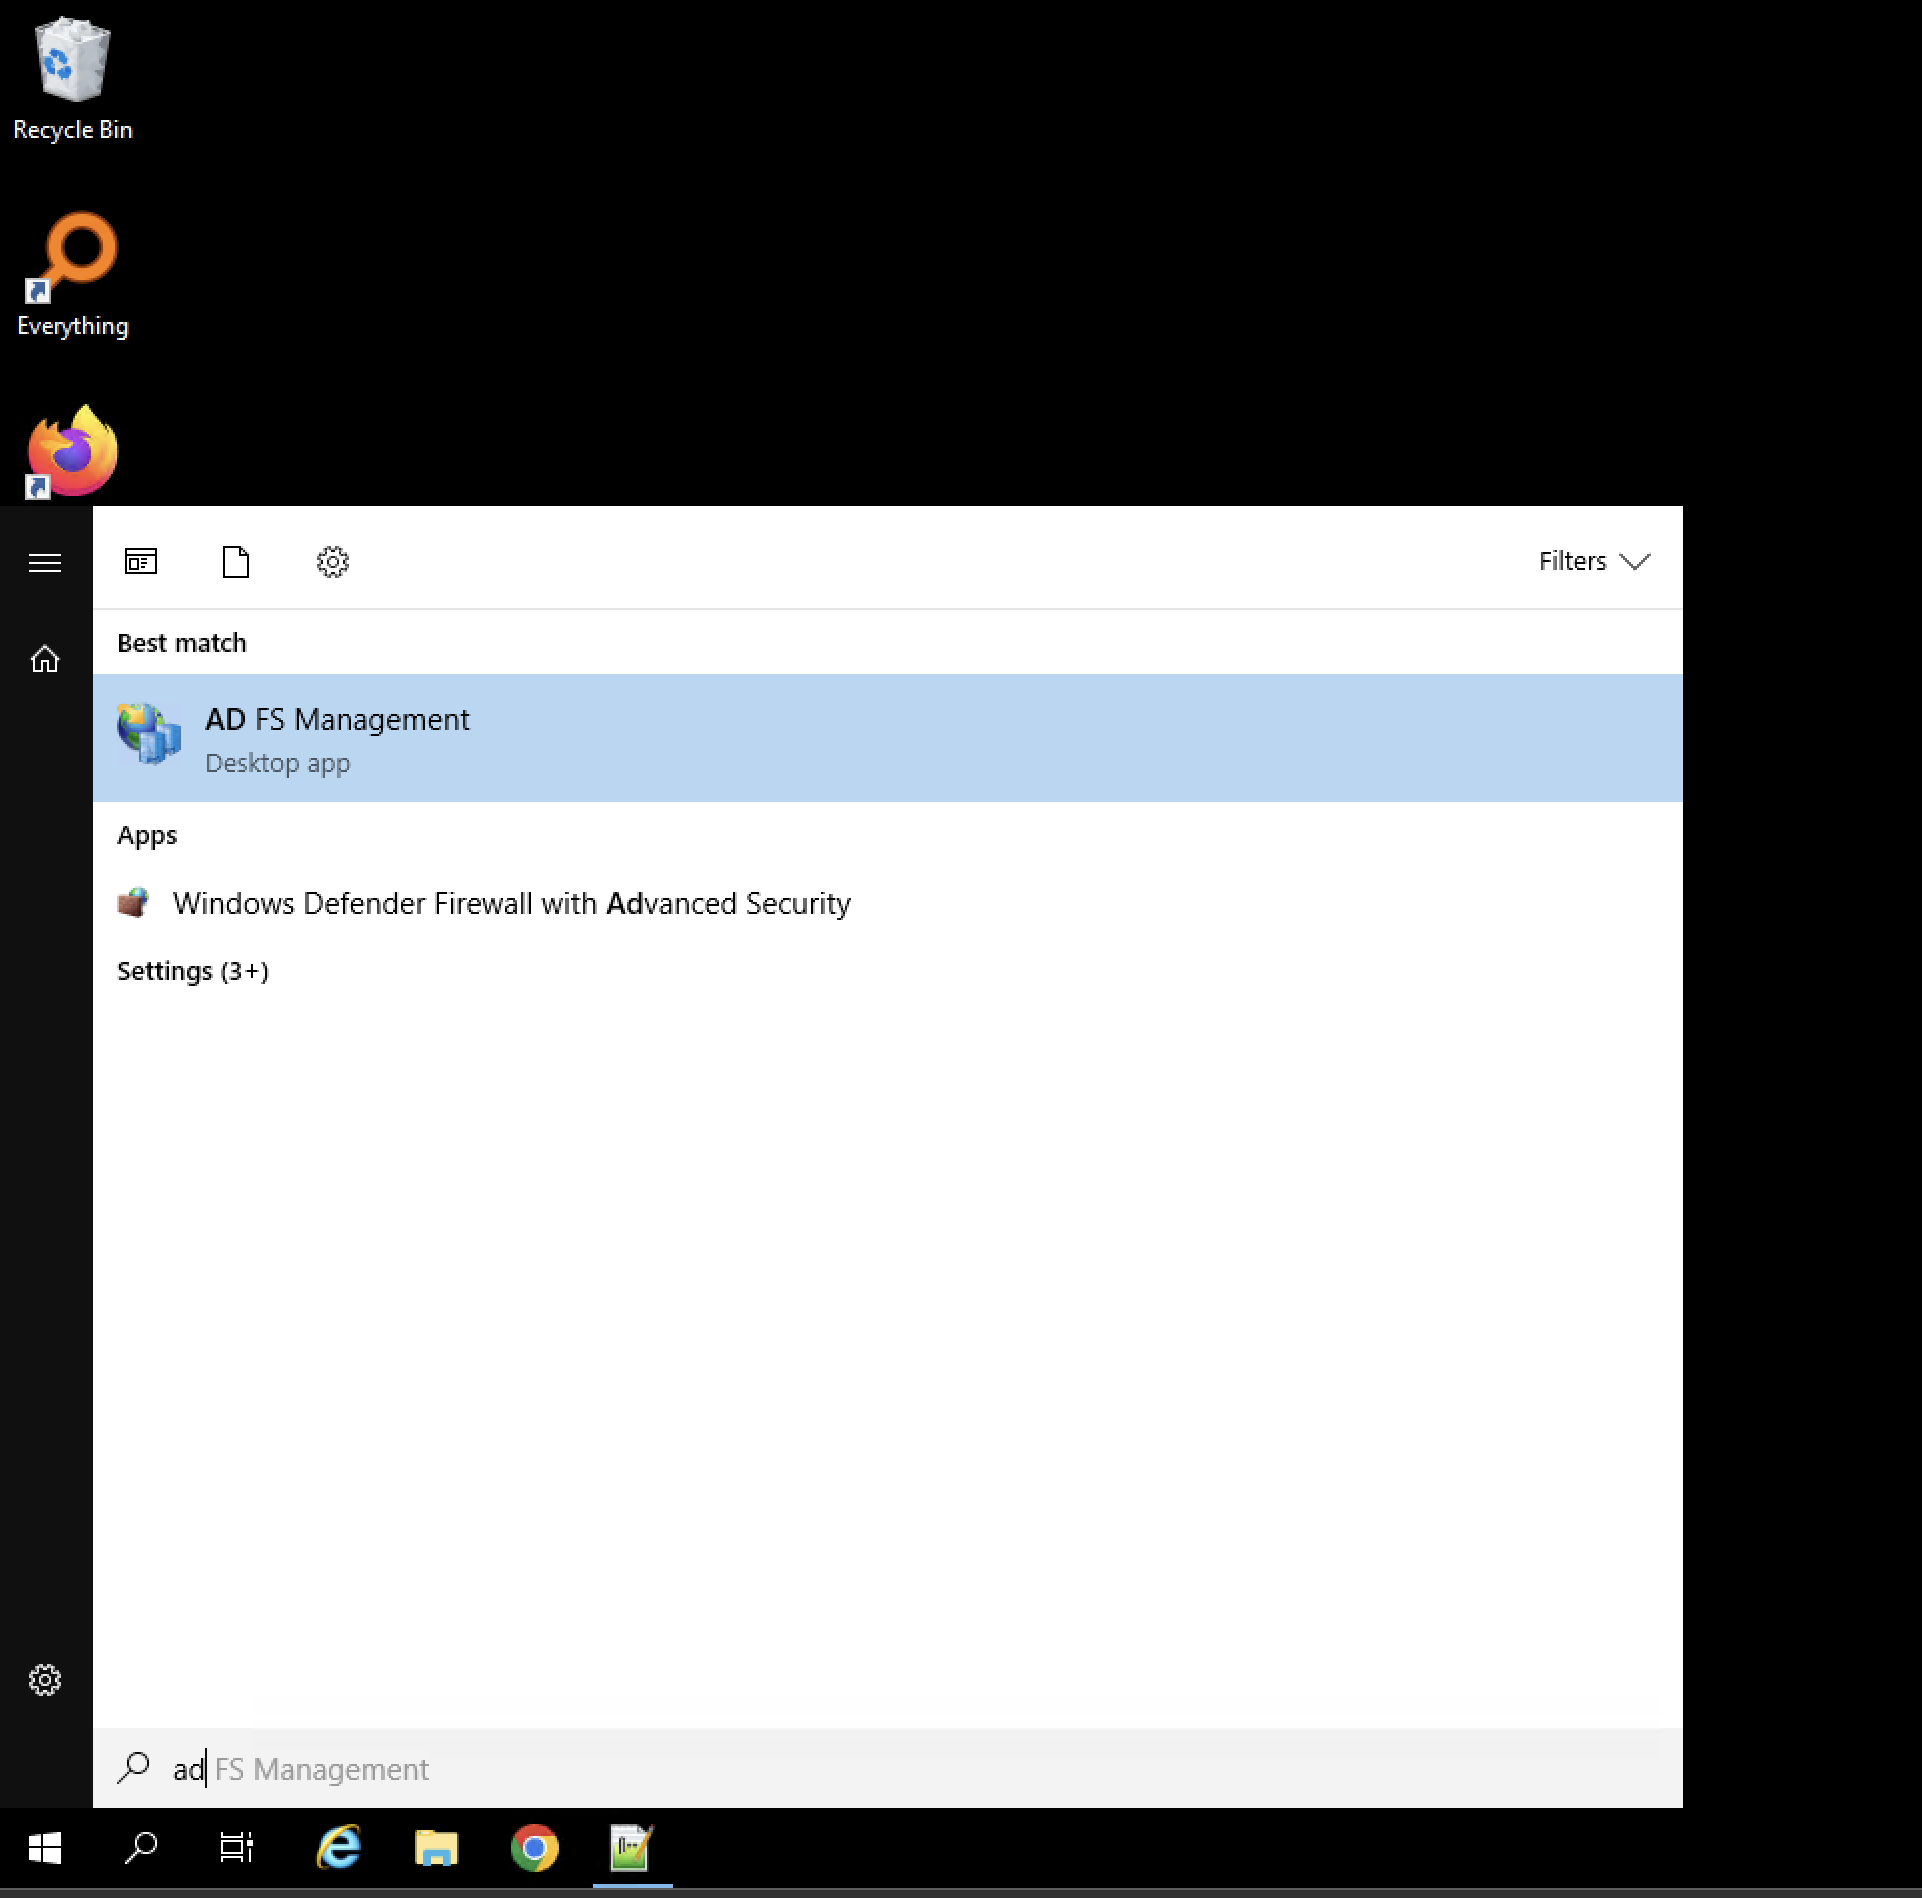
Open AD FS Management Application
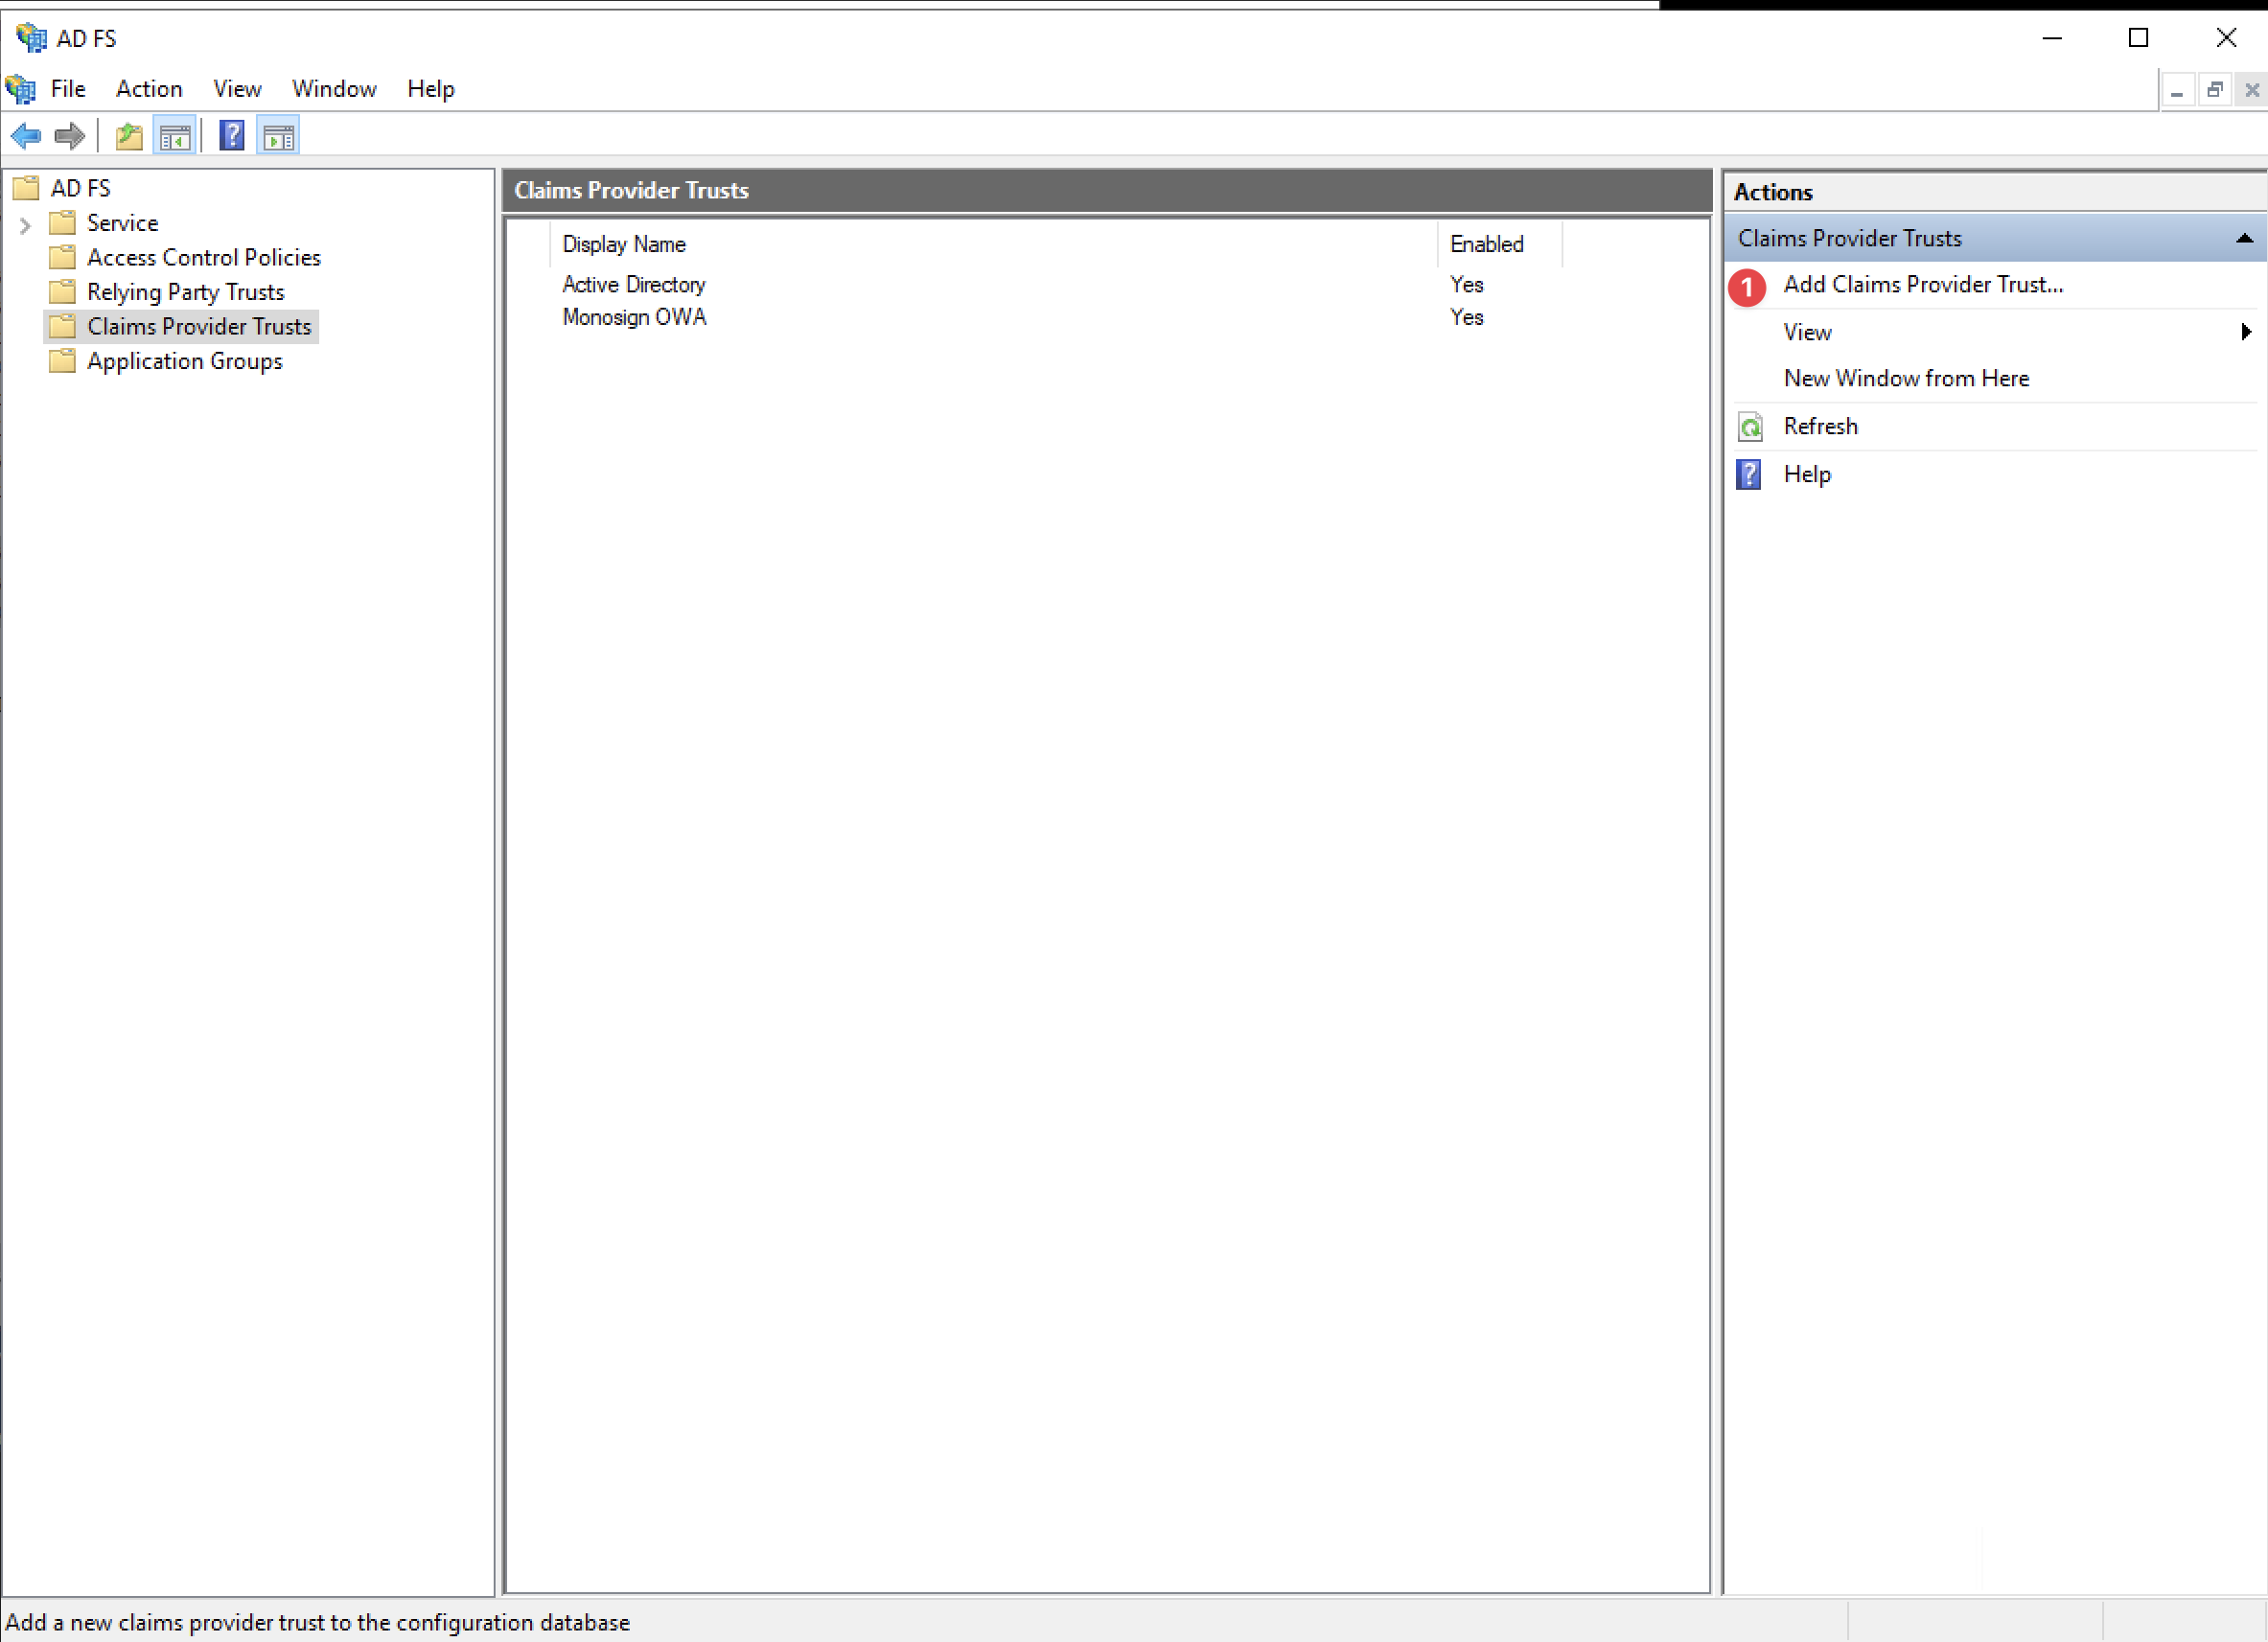
Add Claims Provider Trust
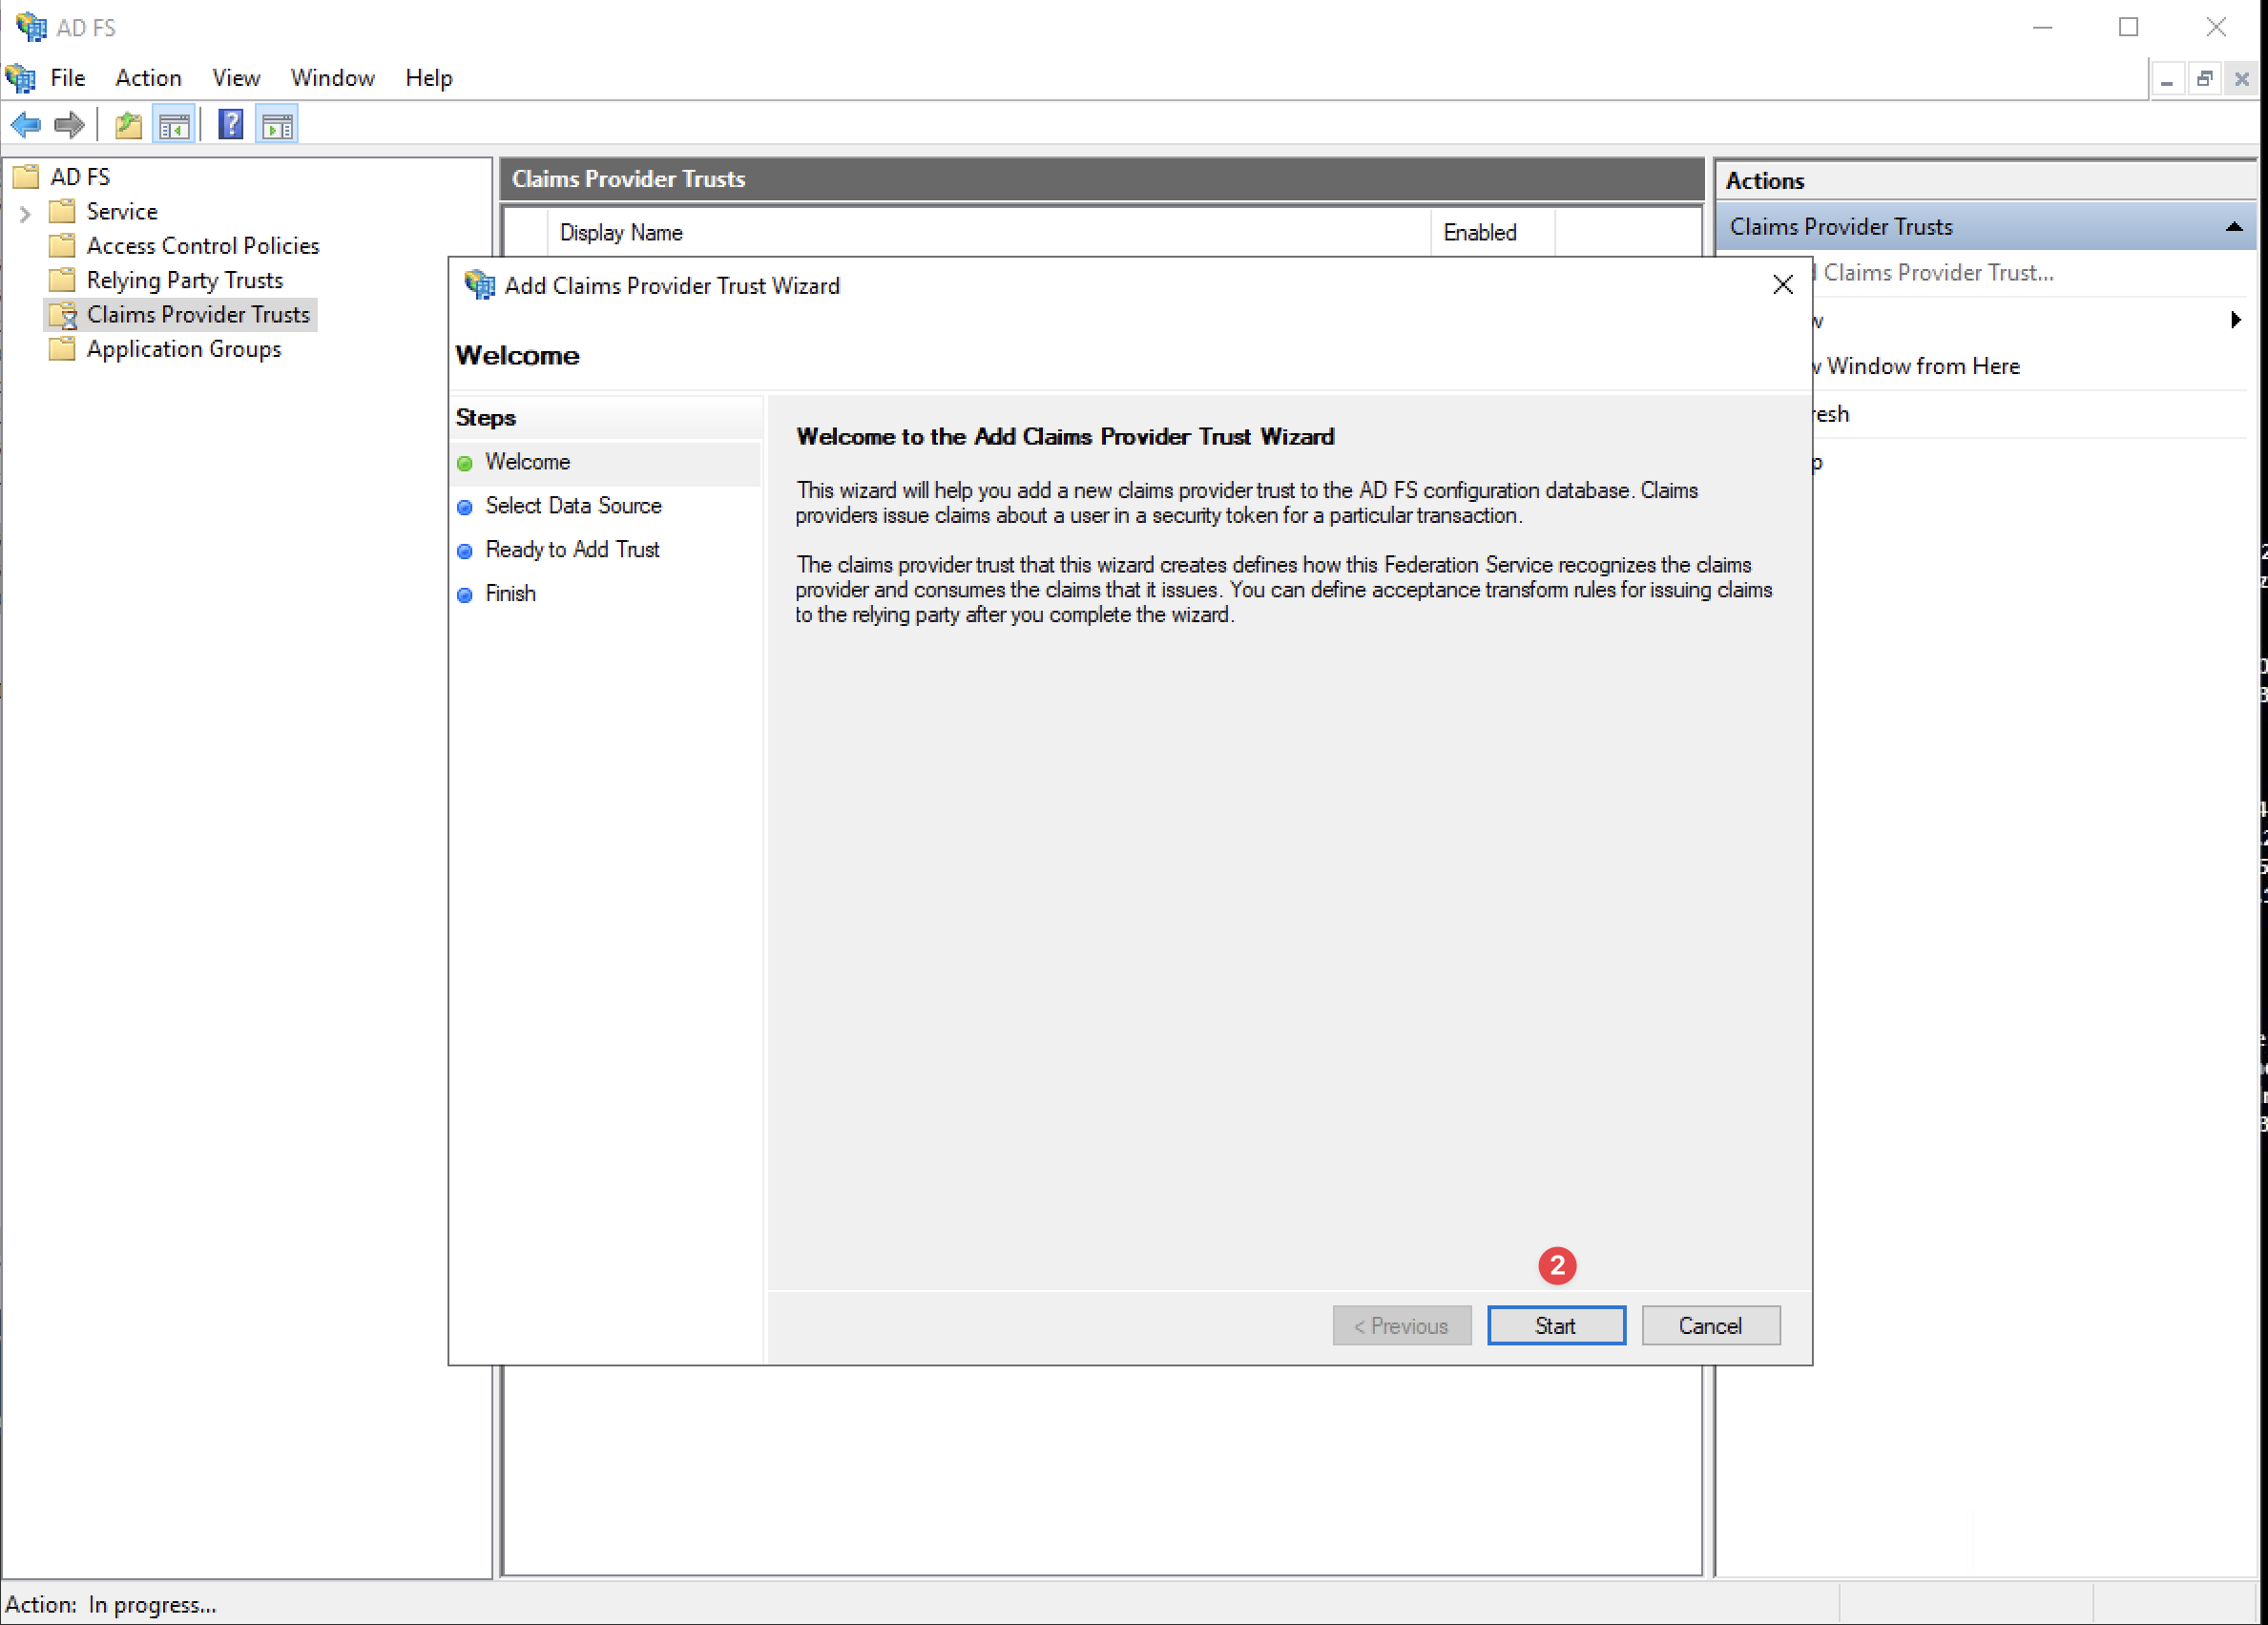
Start Configuration
Click Start to configure the new Claim Provider Trust.
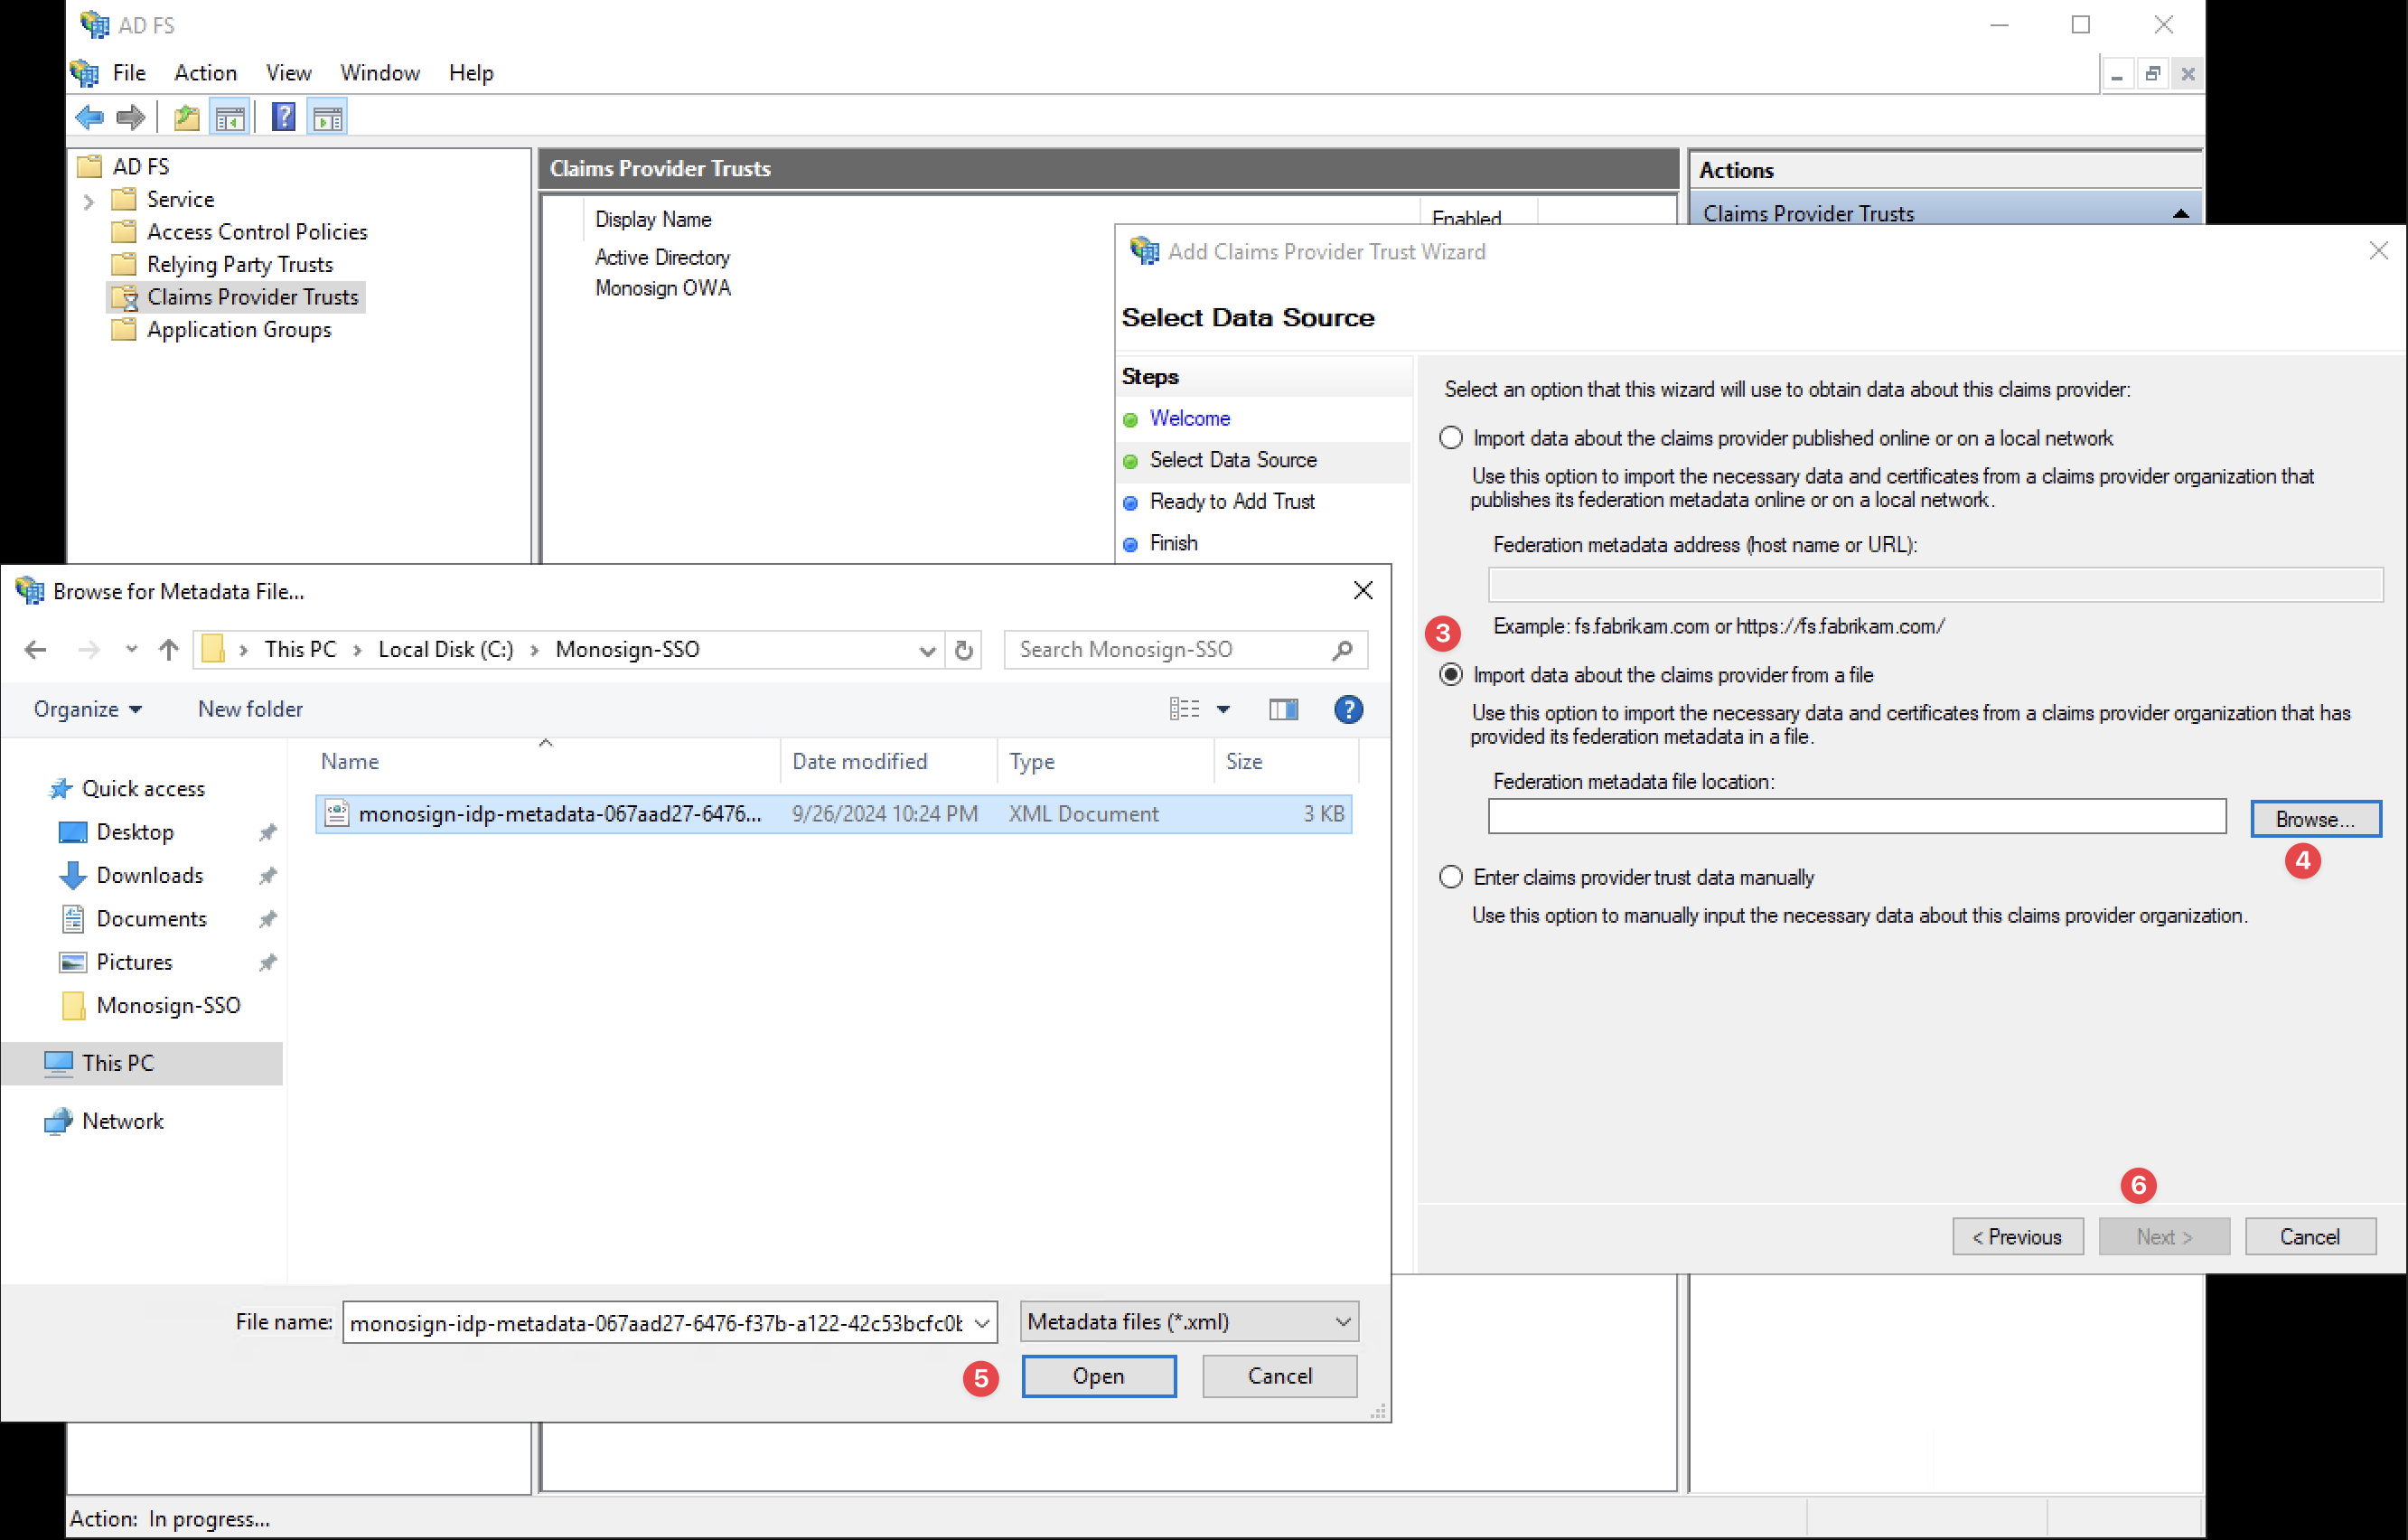
Select Data Source
On the “Select Data Source“ section, click the “Import data about the claims provider from a file“ option. Browse the Metadata file copied to the “C:\Monosign-SSO“ folder before.
After selecting the file, please click the “Next“ button.
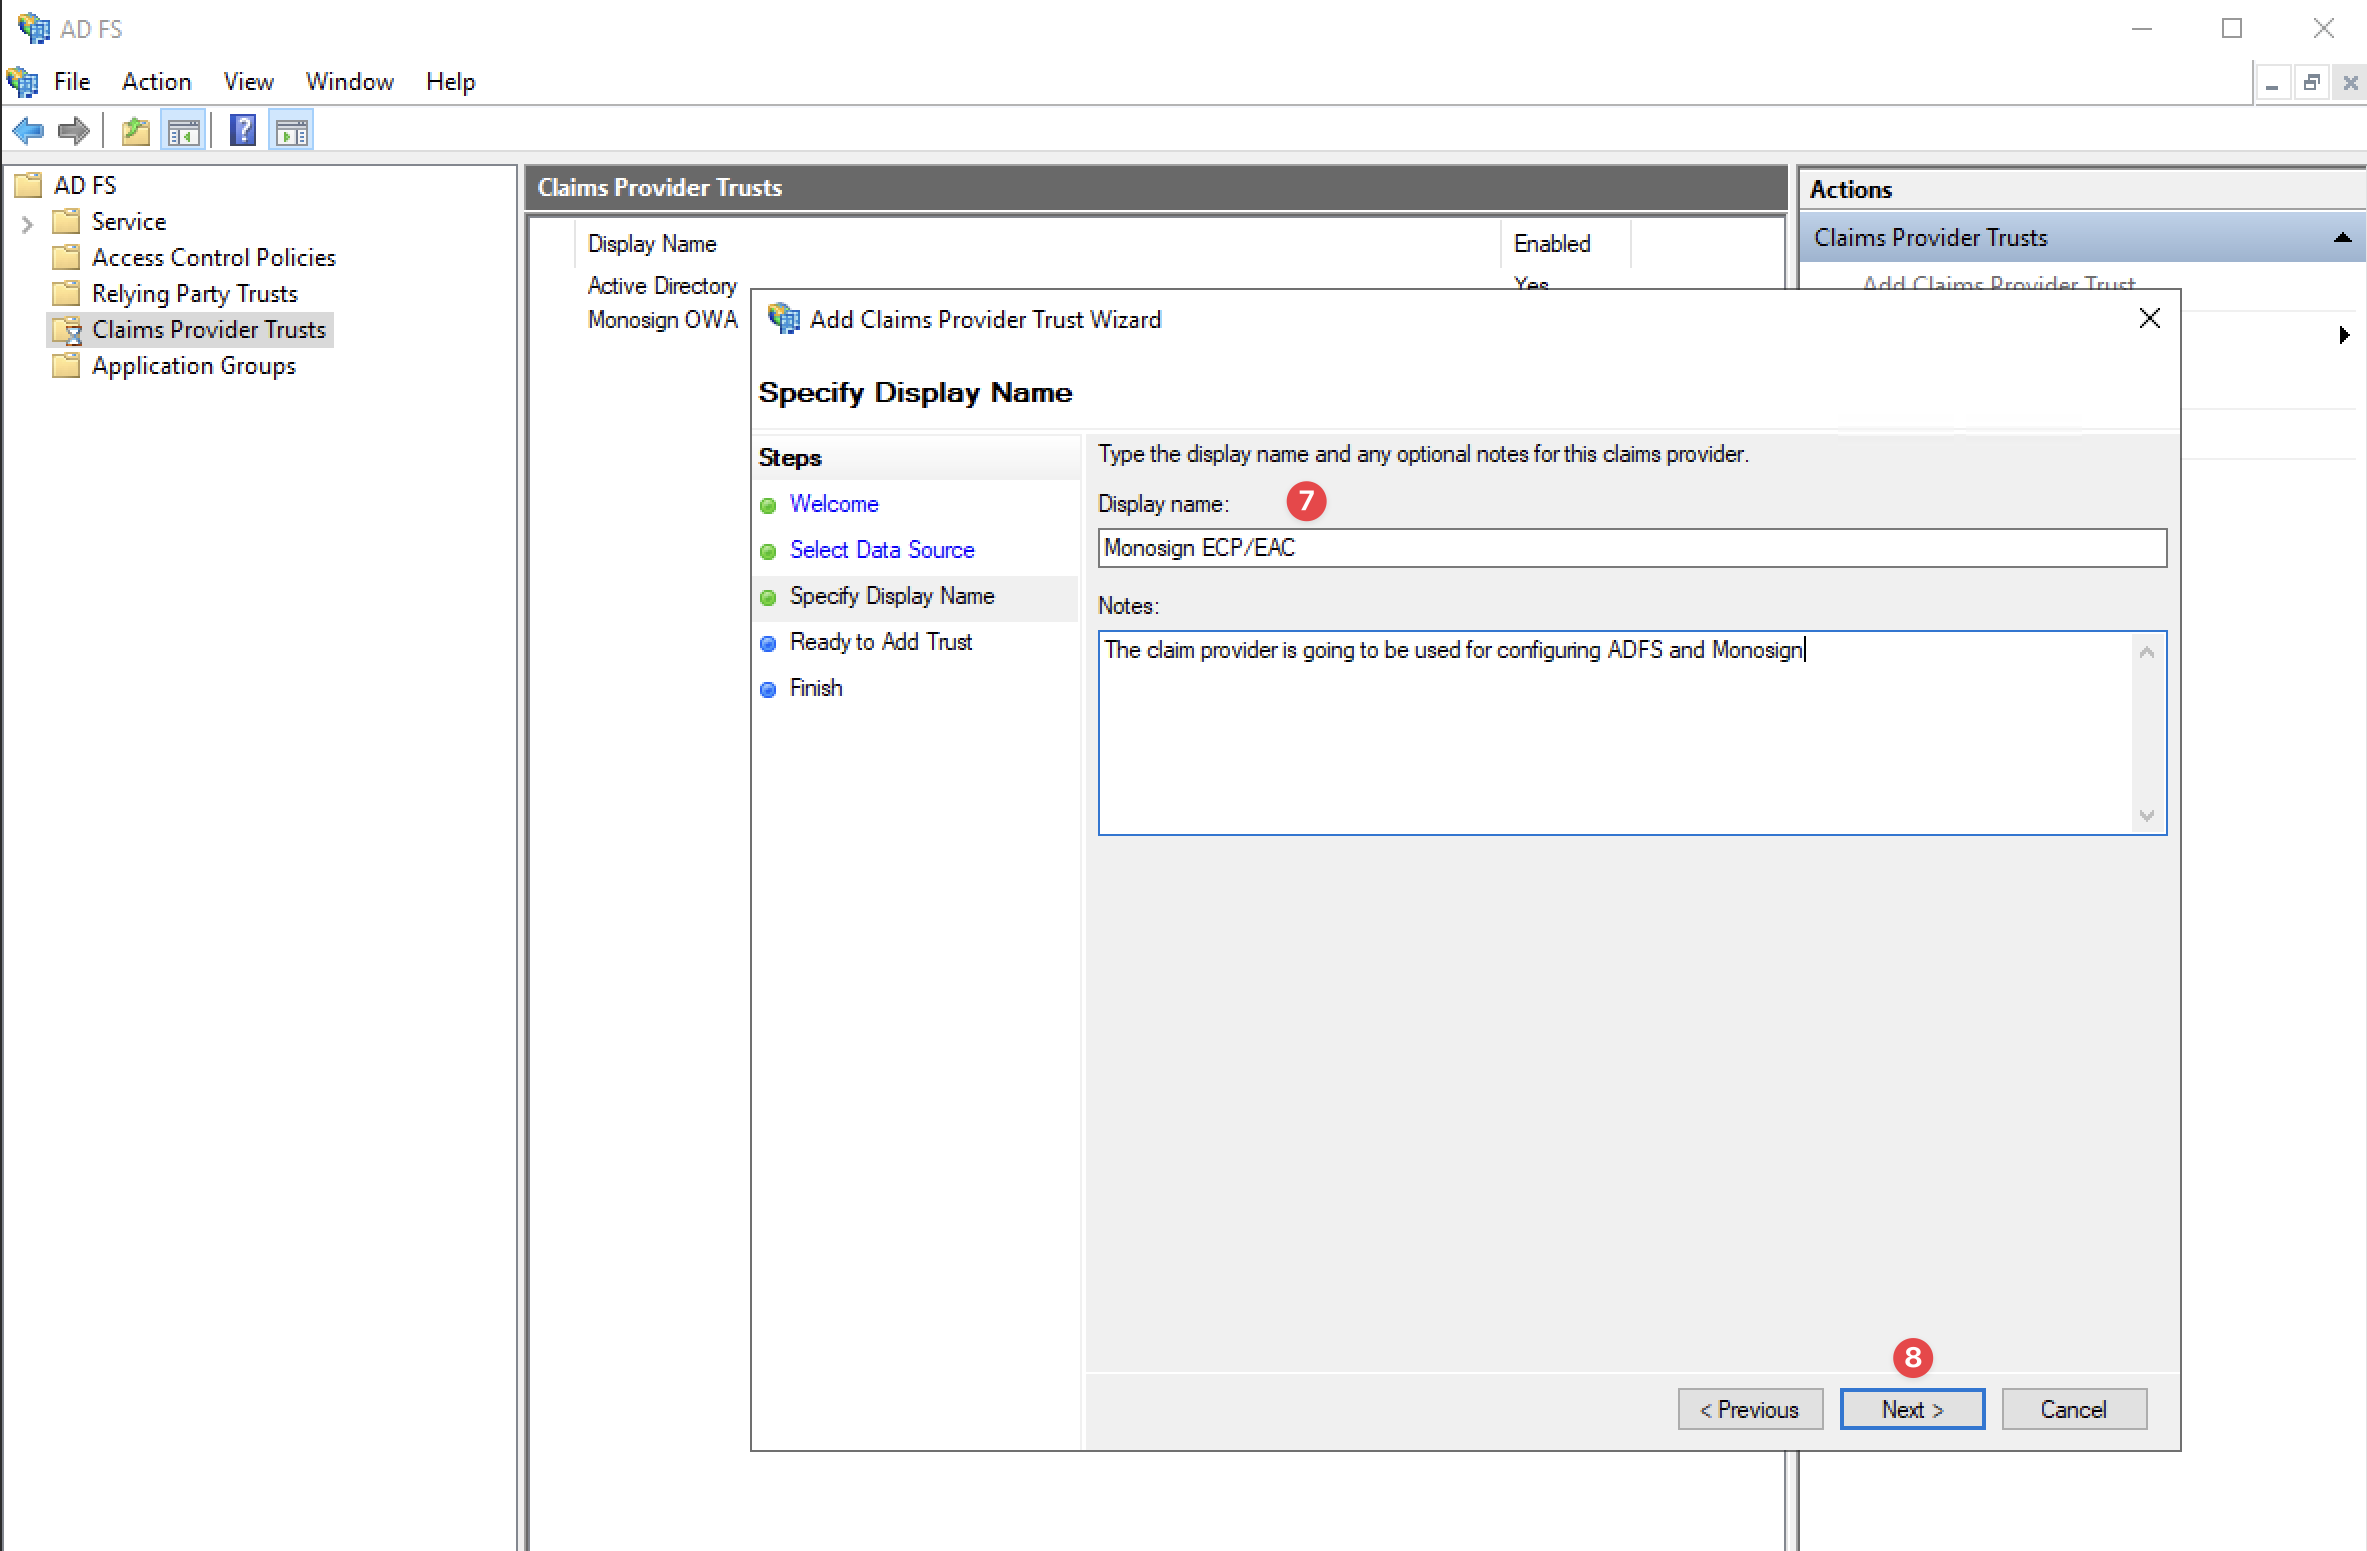
Specify Display Name
Please specify the display name related to the Monosign configuration.
For Example: Monosign ECP/EAC.
After specifying the Display Name, click the “Next“ button on the new page without doing anything and click the “Finish“ button to finish the configuration.
Once the “Claims Provider Trust“ is created, a new window will pop up and a new Claim rule can be added here.
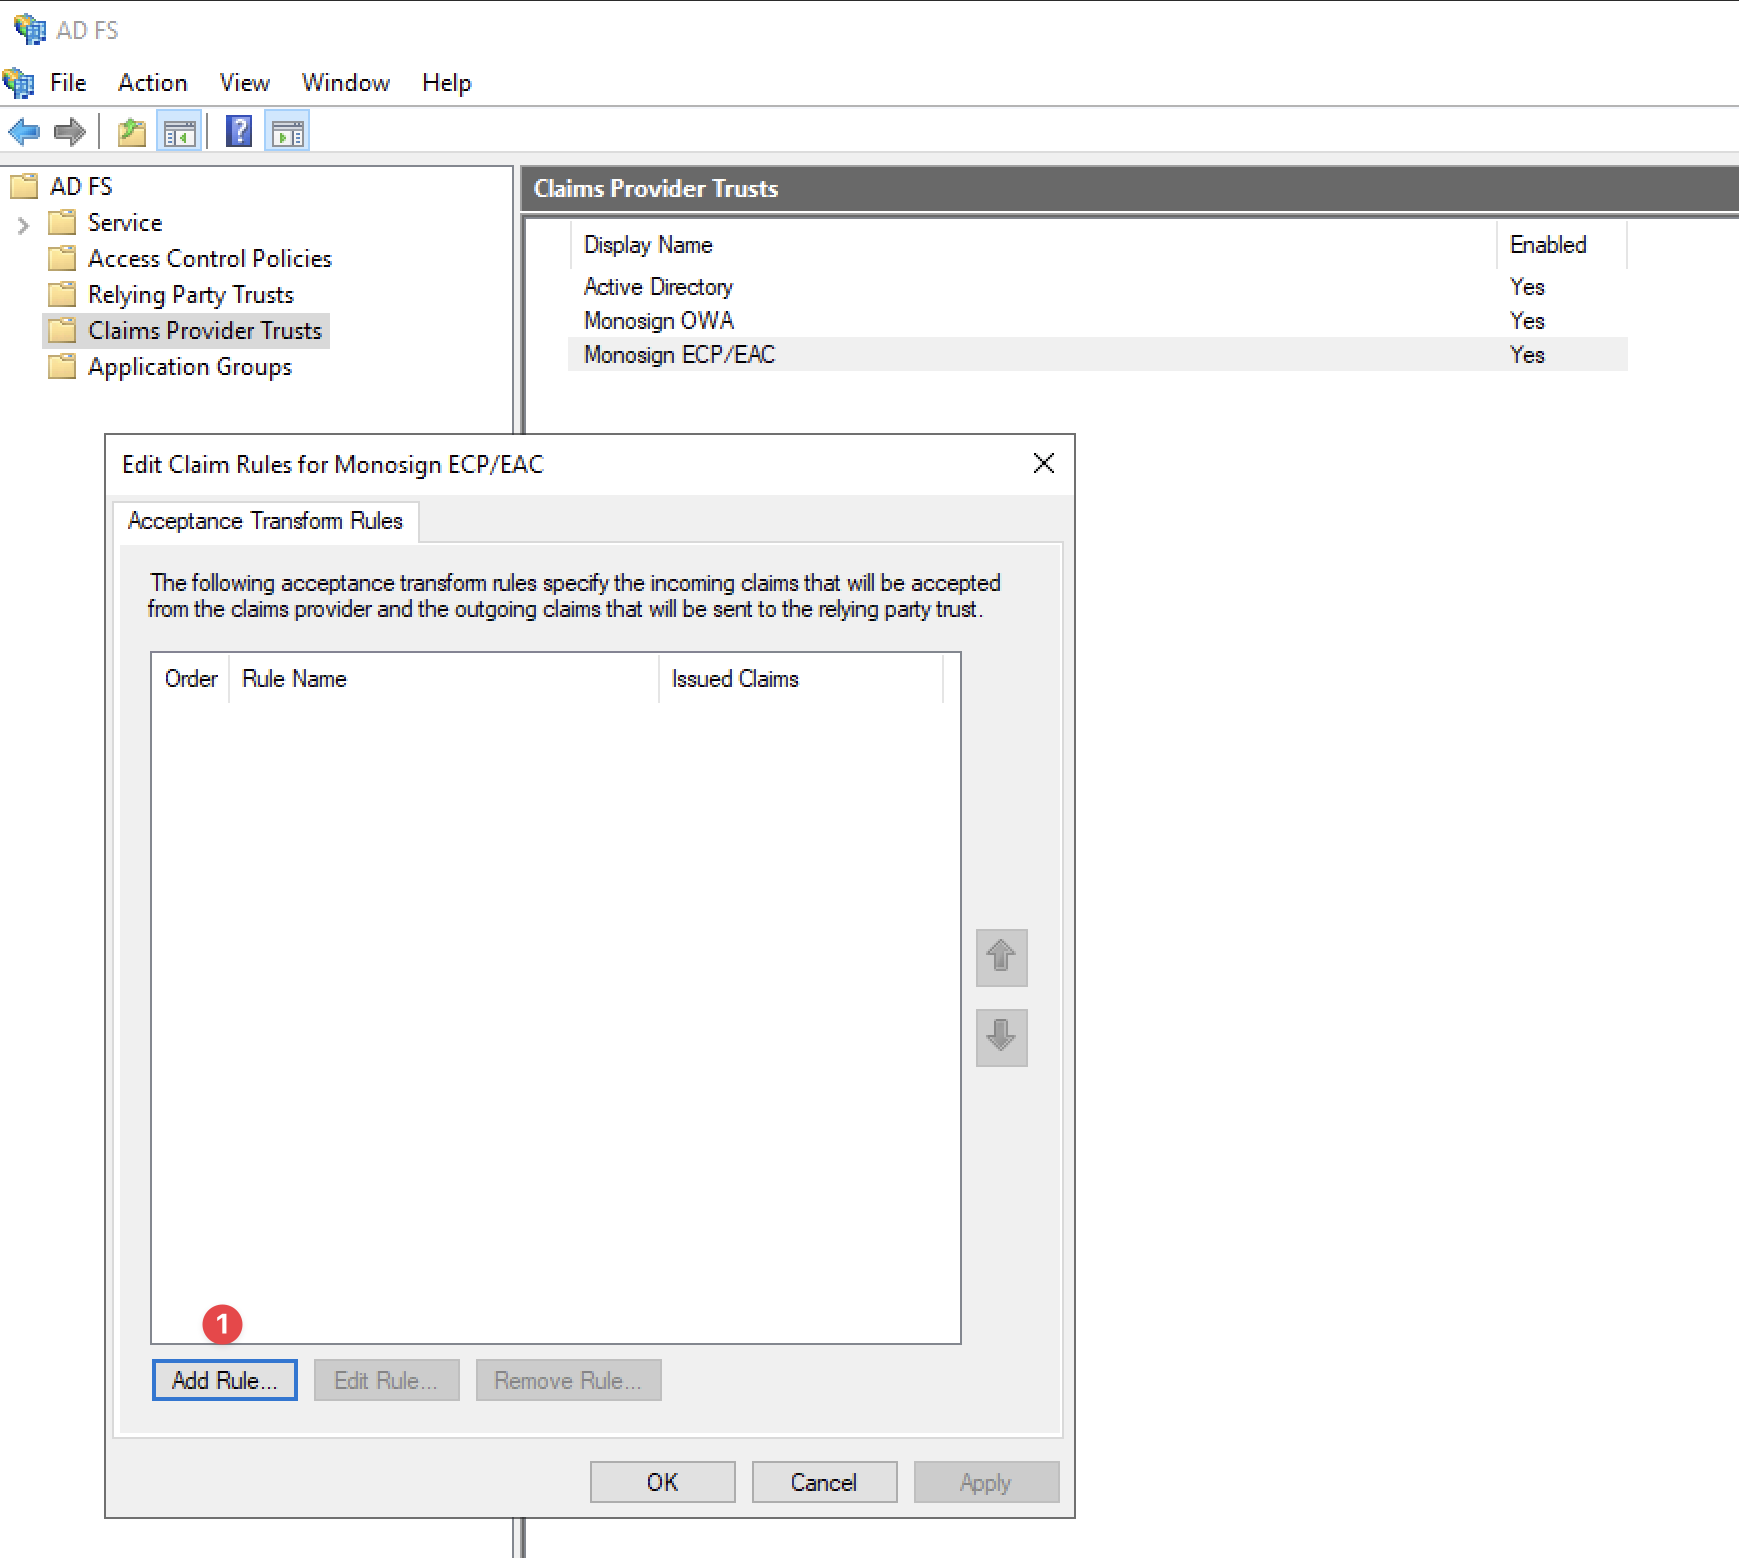
Adding a New Rule
Click the “Add Rule“ button to add a new rule for the Claim Provider Trust.
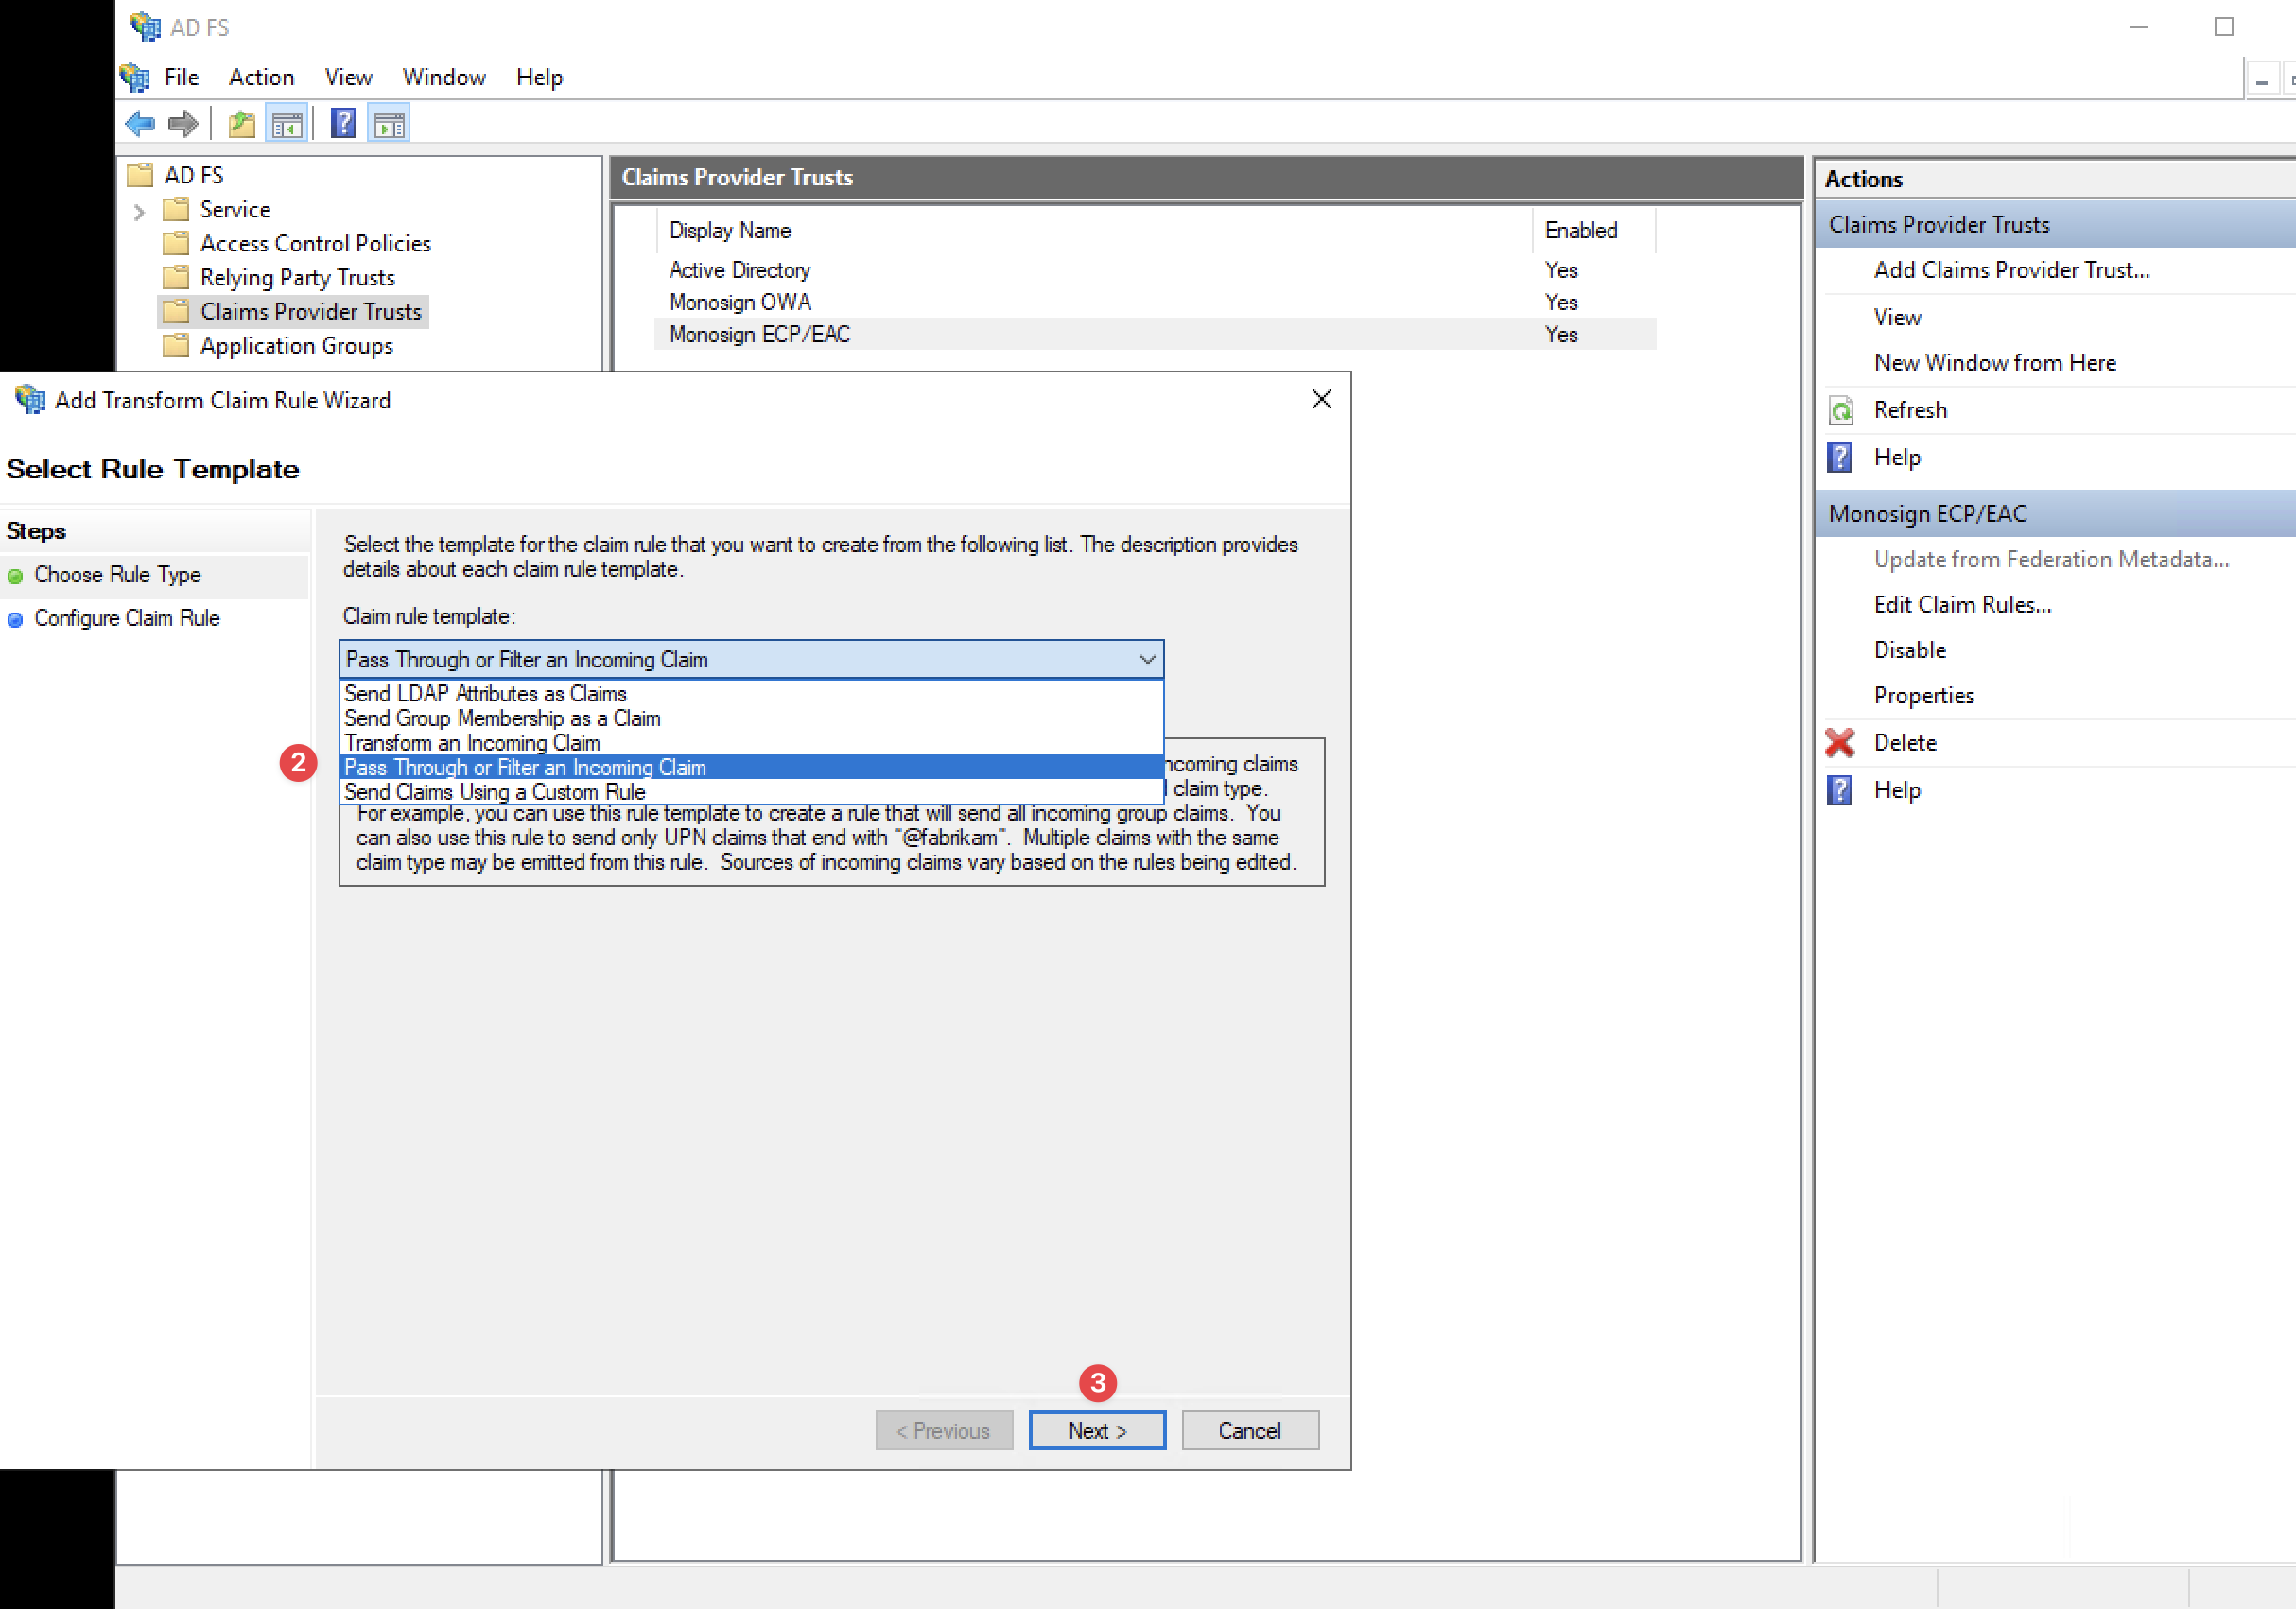
Choose Rule Type
On the “Choose Rule Type“ section, please select the “Pass Through or Filter an Incoming Claim“ option and click the “Next” button.
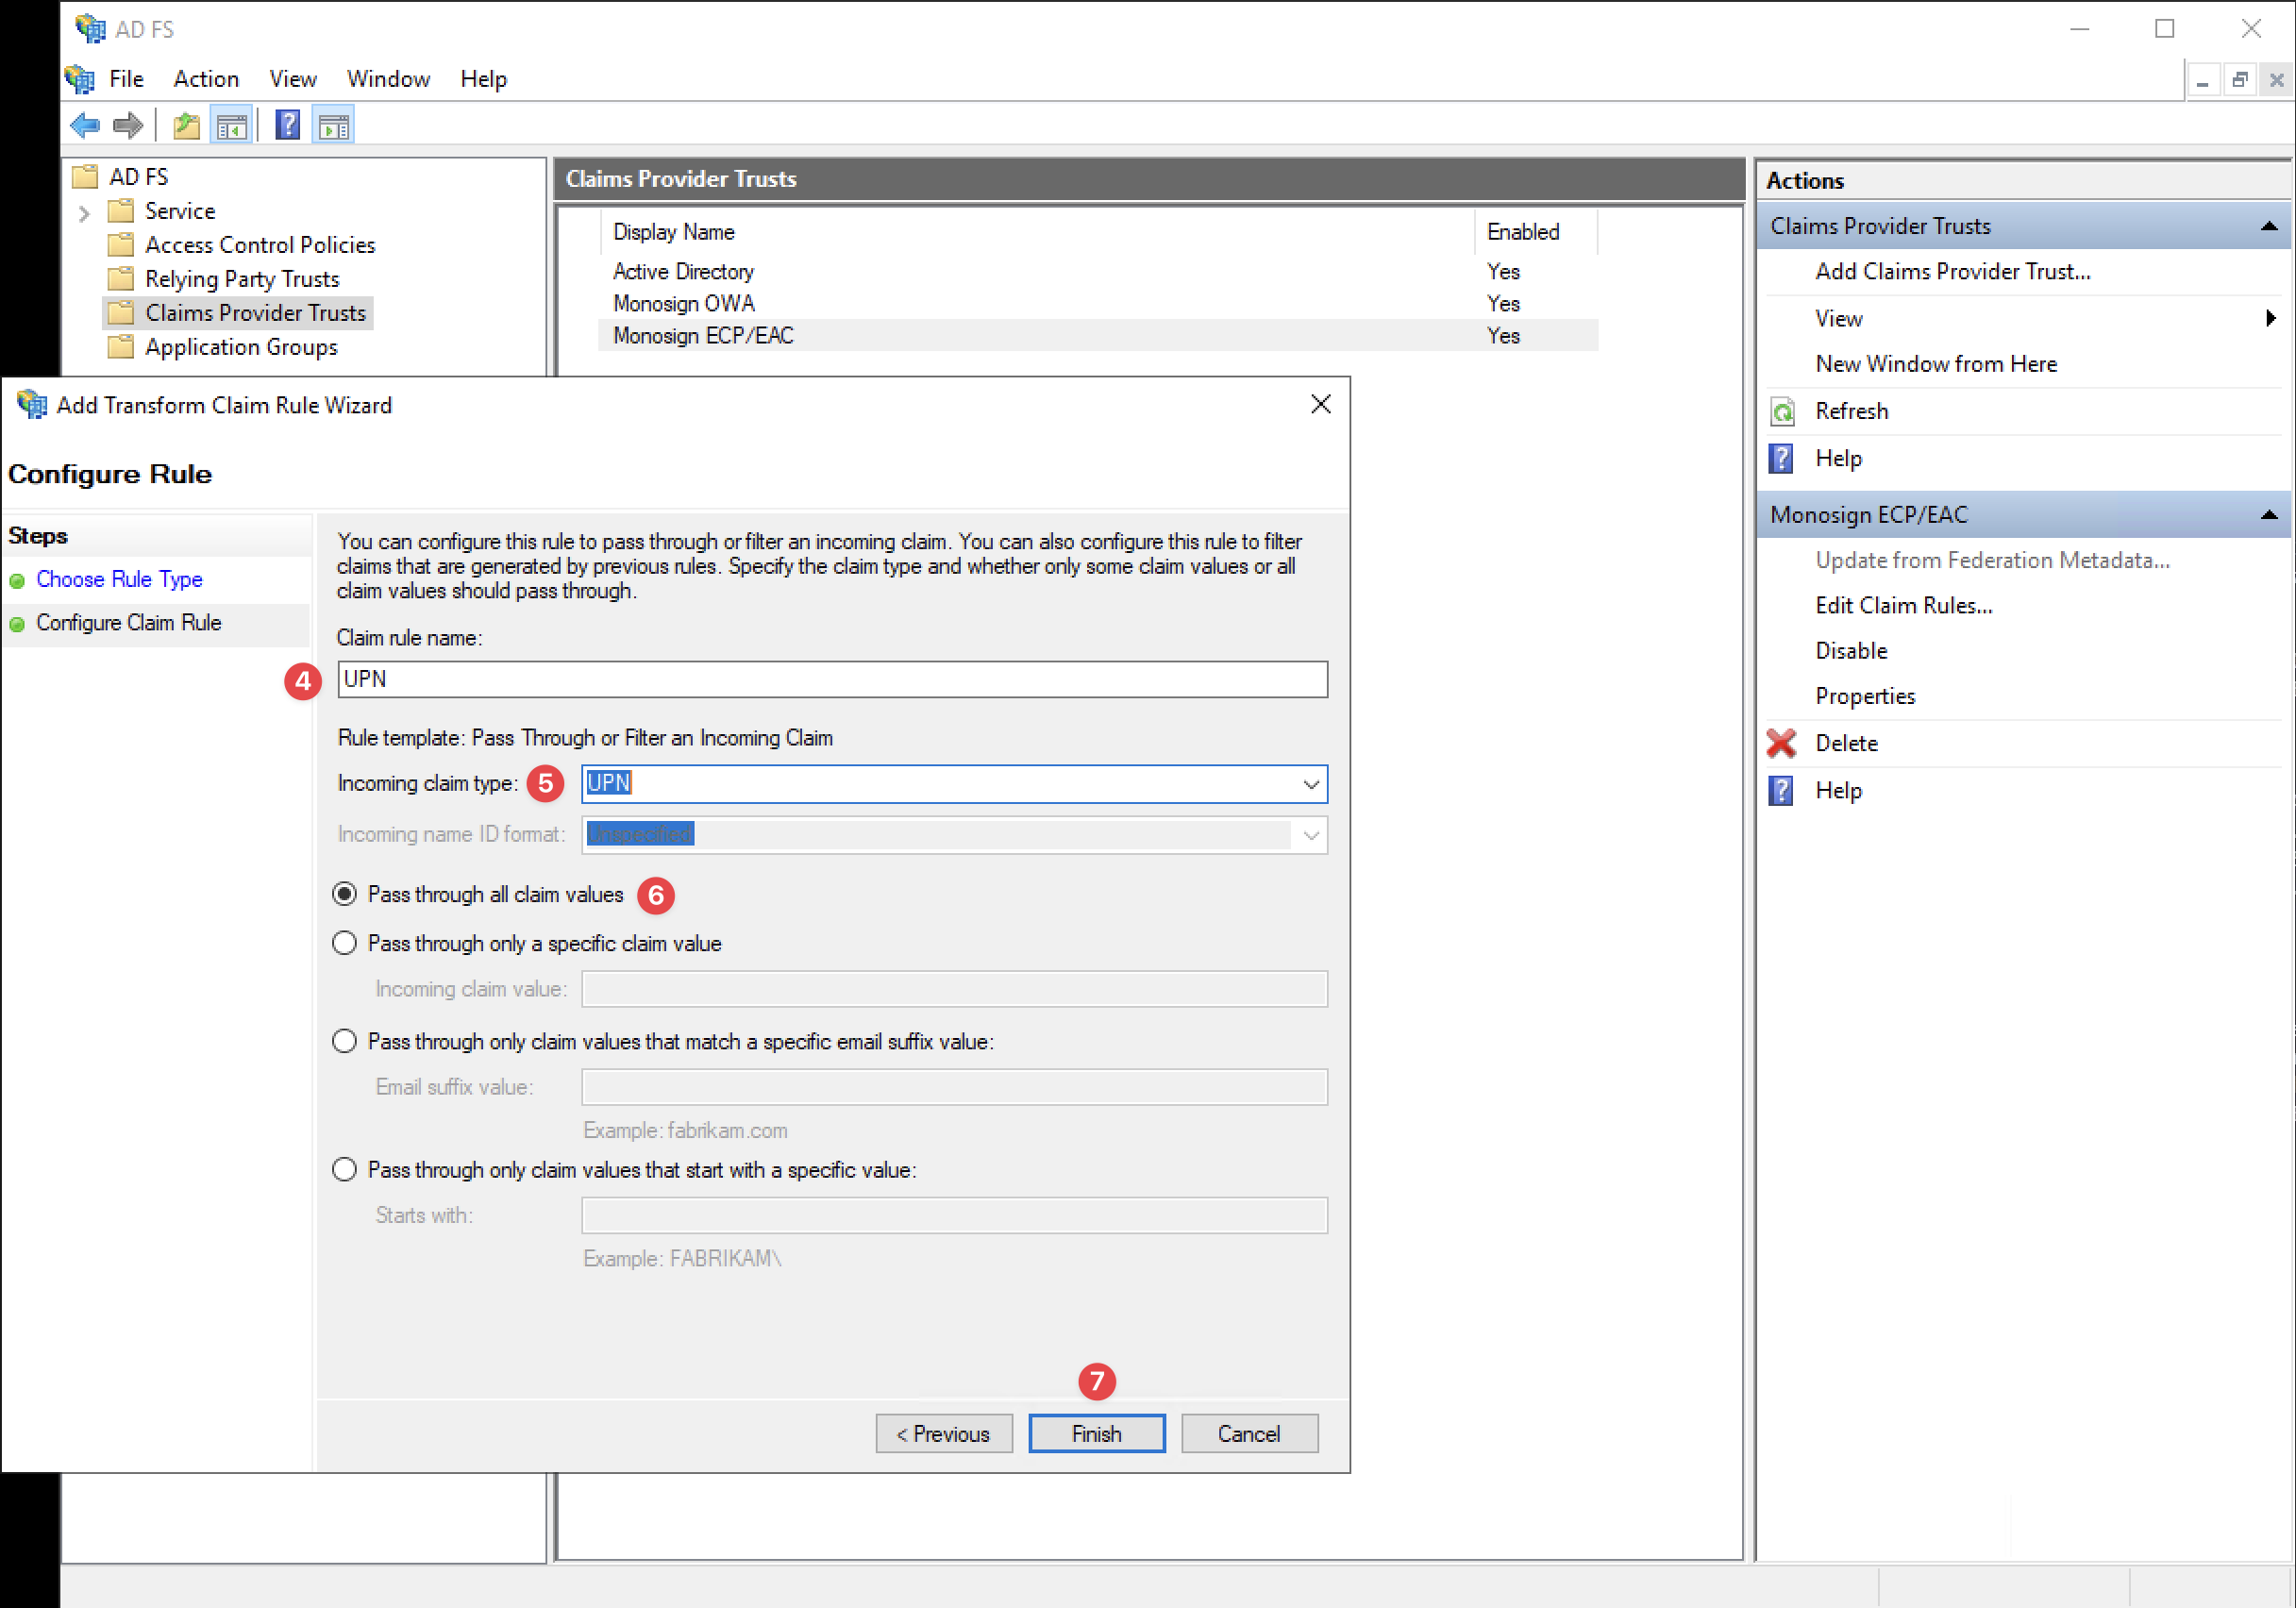
Configure Claim Rule
Please, specify the “Claim Rule Name“ as UPN, select the “Incoming Claim Type“ as “UPN“ and click the “Finish“ button. Click the “Apply” and “Ok“ button to save the new Claim Rule.
c. Edit Claim Issuance Policy and Add a New Rule For ECP/EAC
Please, navigate to “Relying Party Trusts“ on the AD FS Management application.
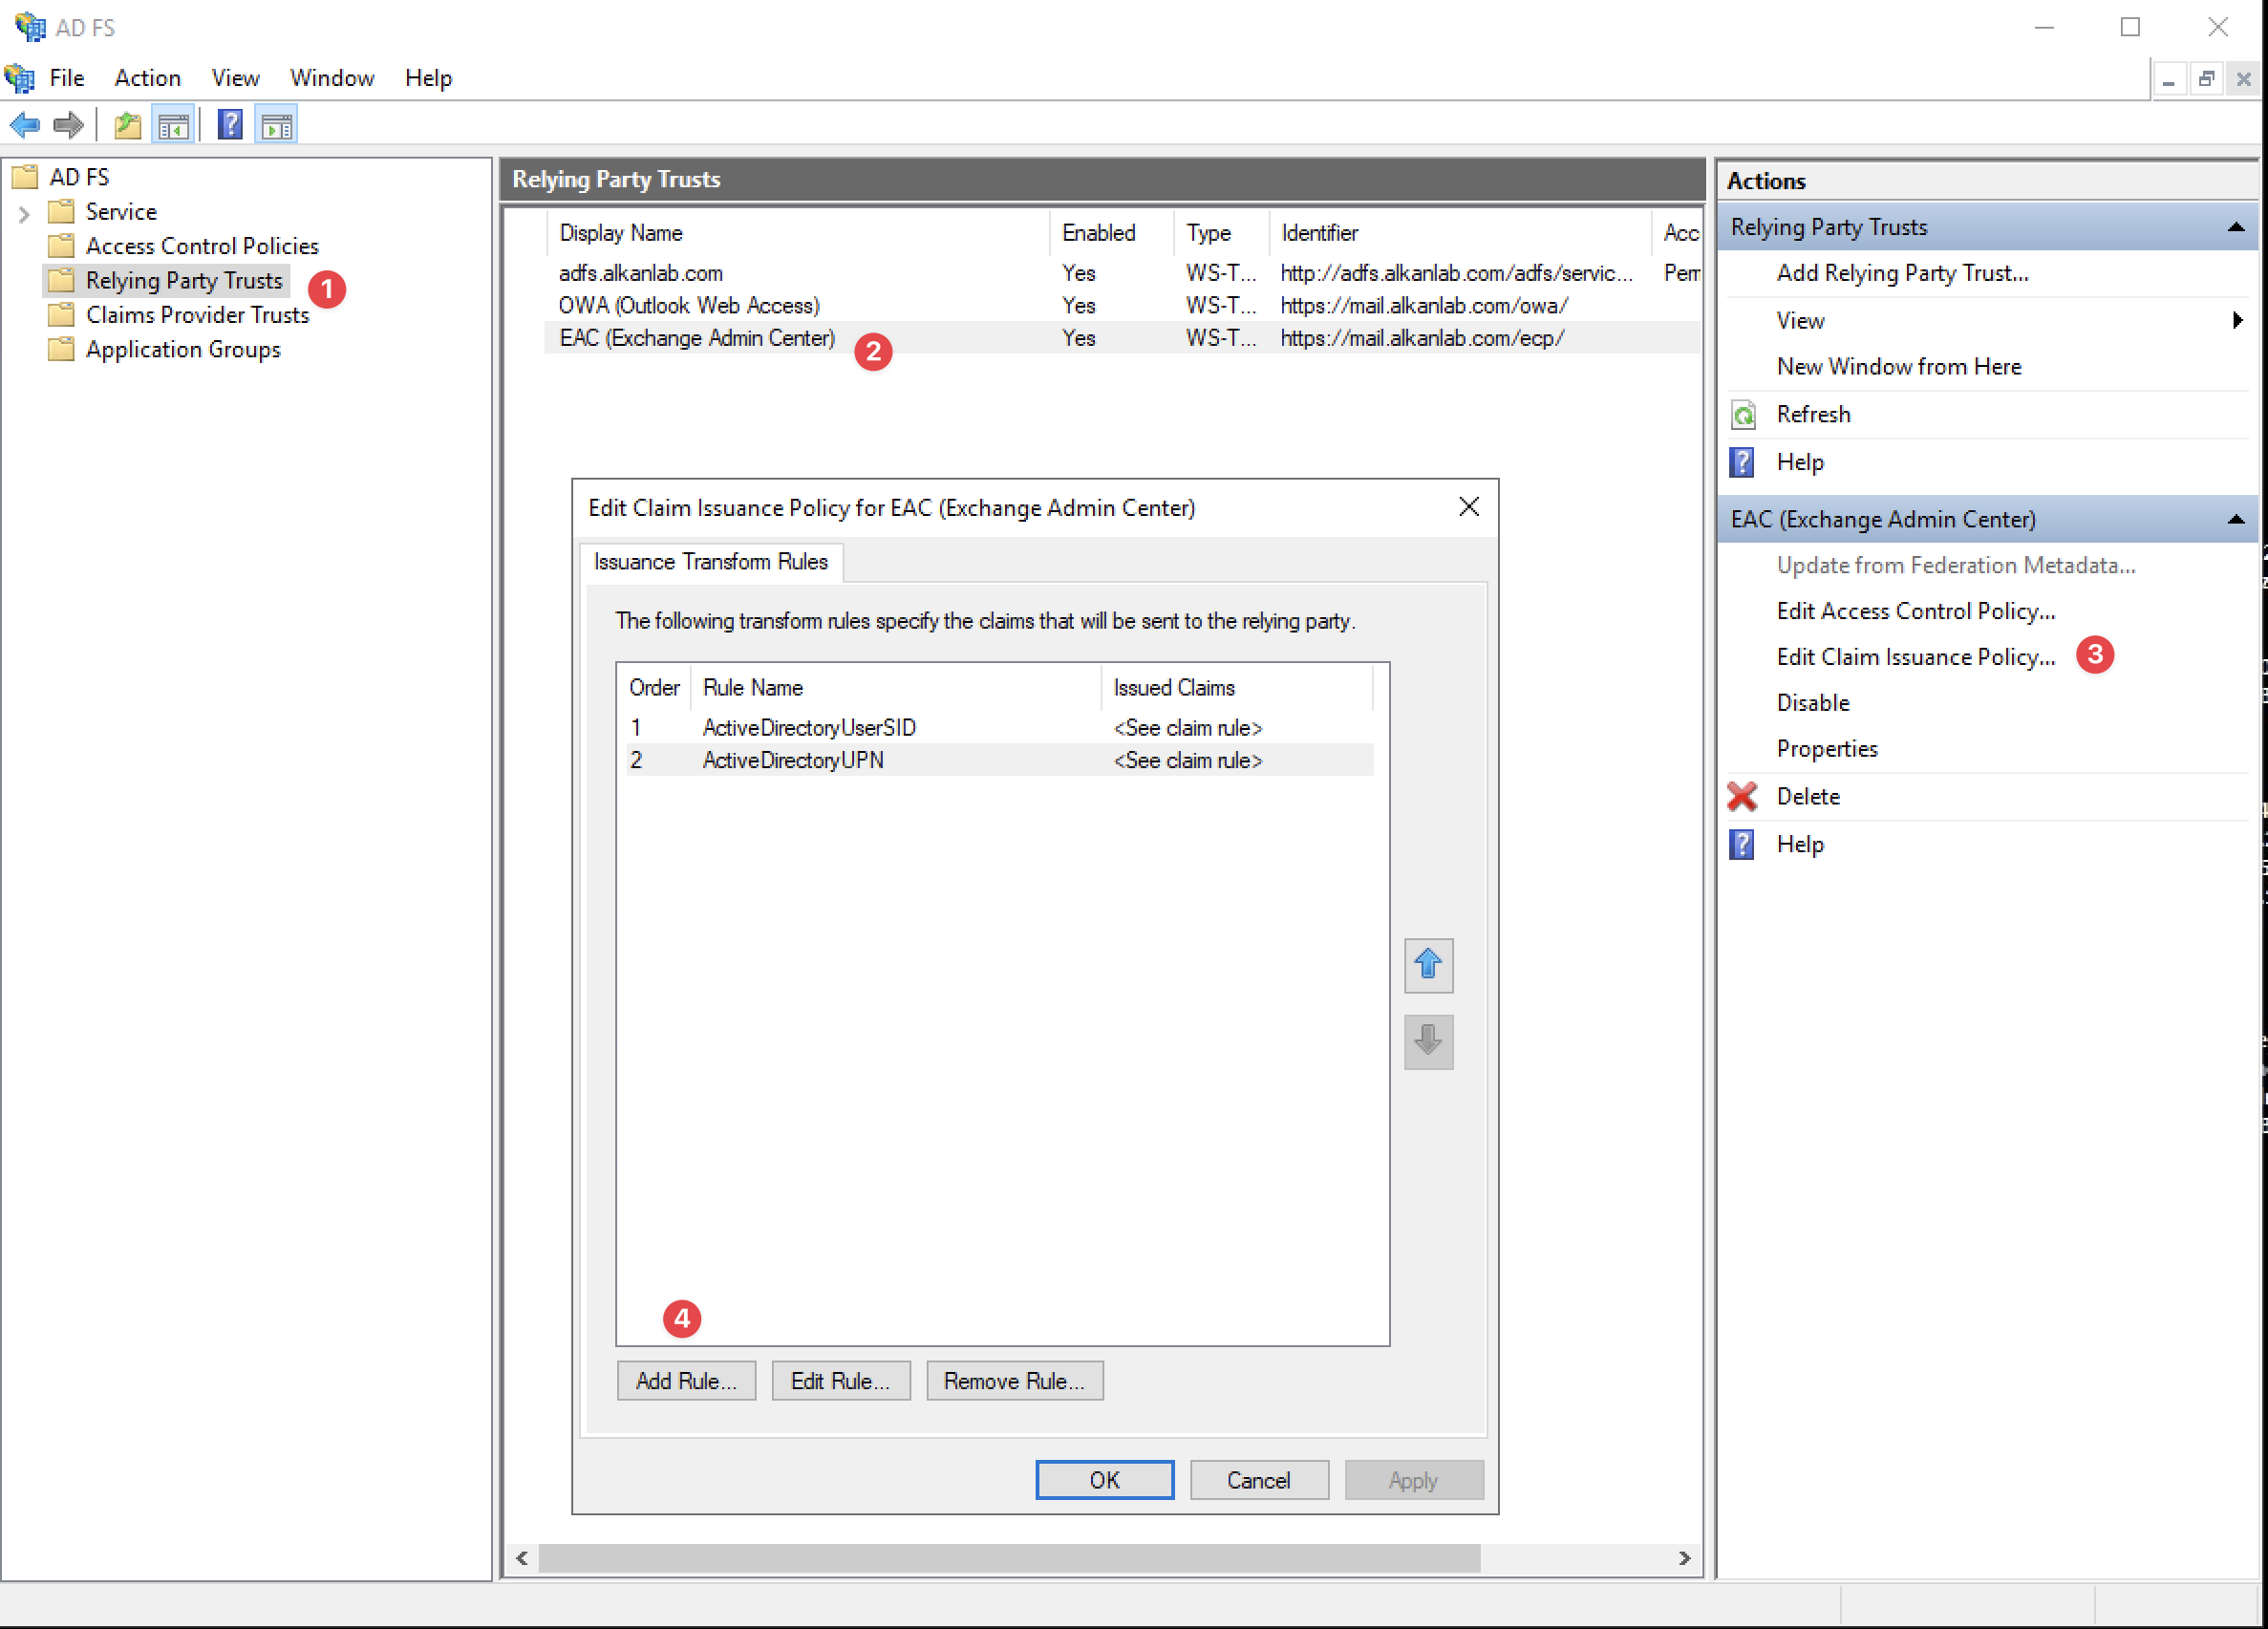
Add New Rule to Relying Part Trusts
Click the “Add Rule“ button to add a new rule for the Claim Provider Trust.
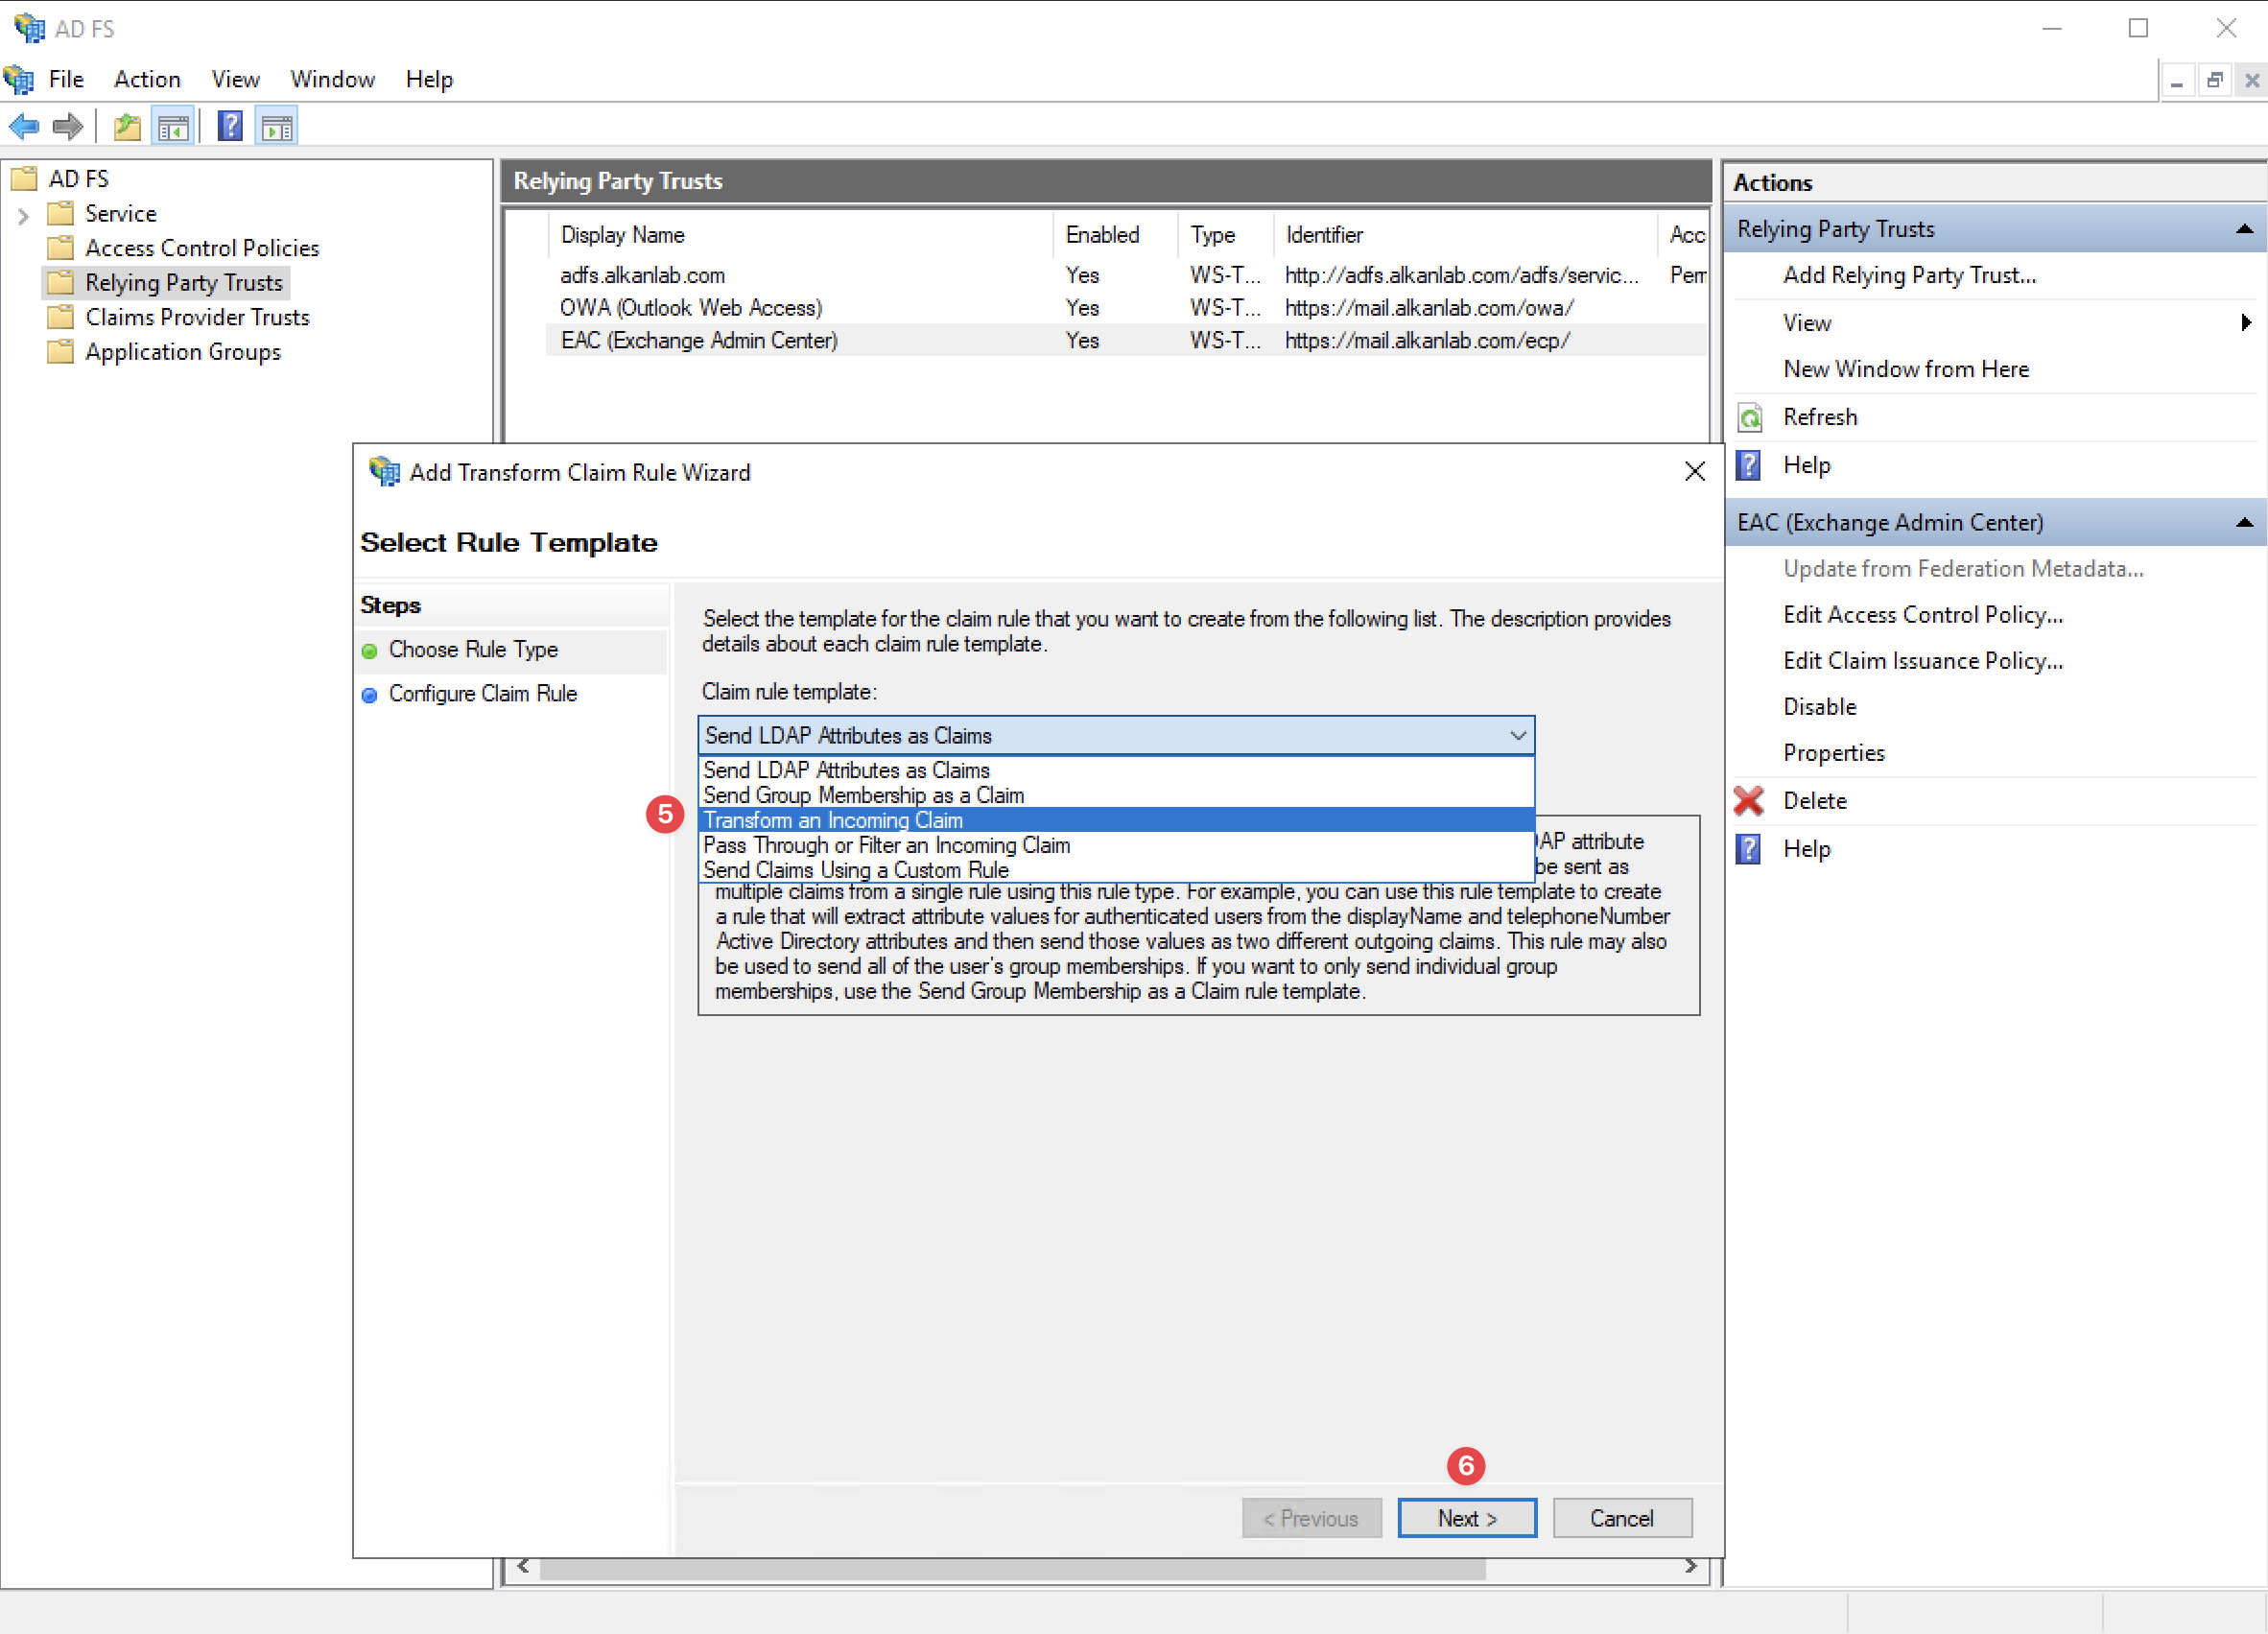
Choose Rule Type
On the “Choose Rule Type“ section, please select the “Transform and Incoming Claim“ option and click the “Next” button.
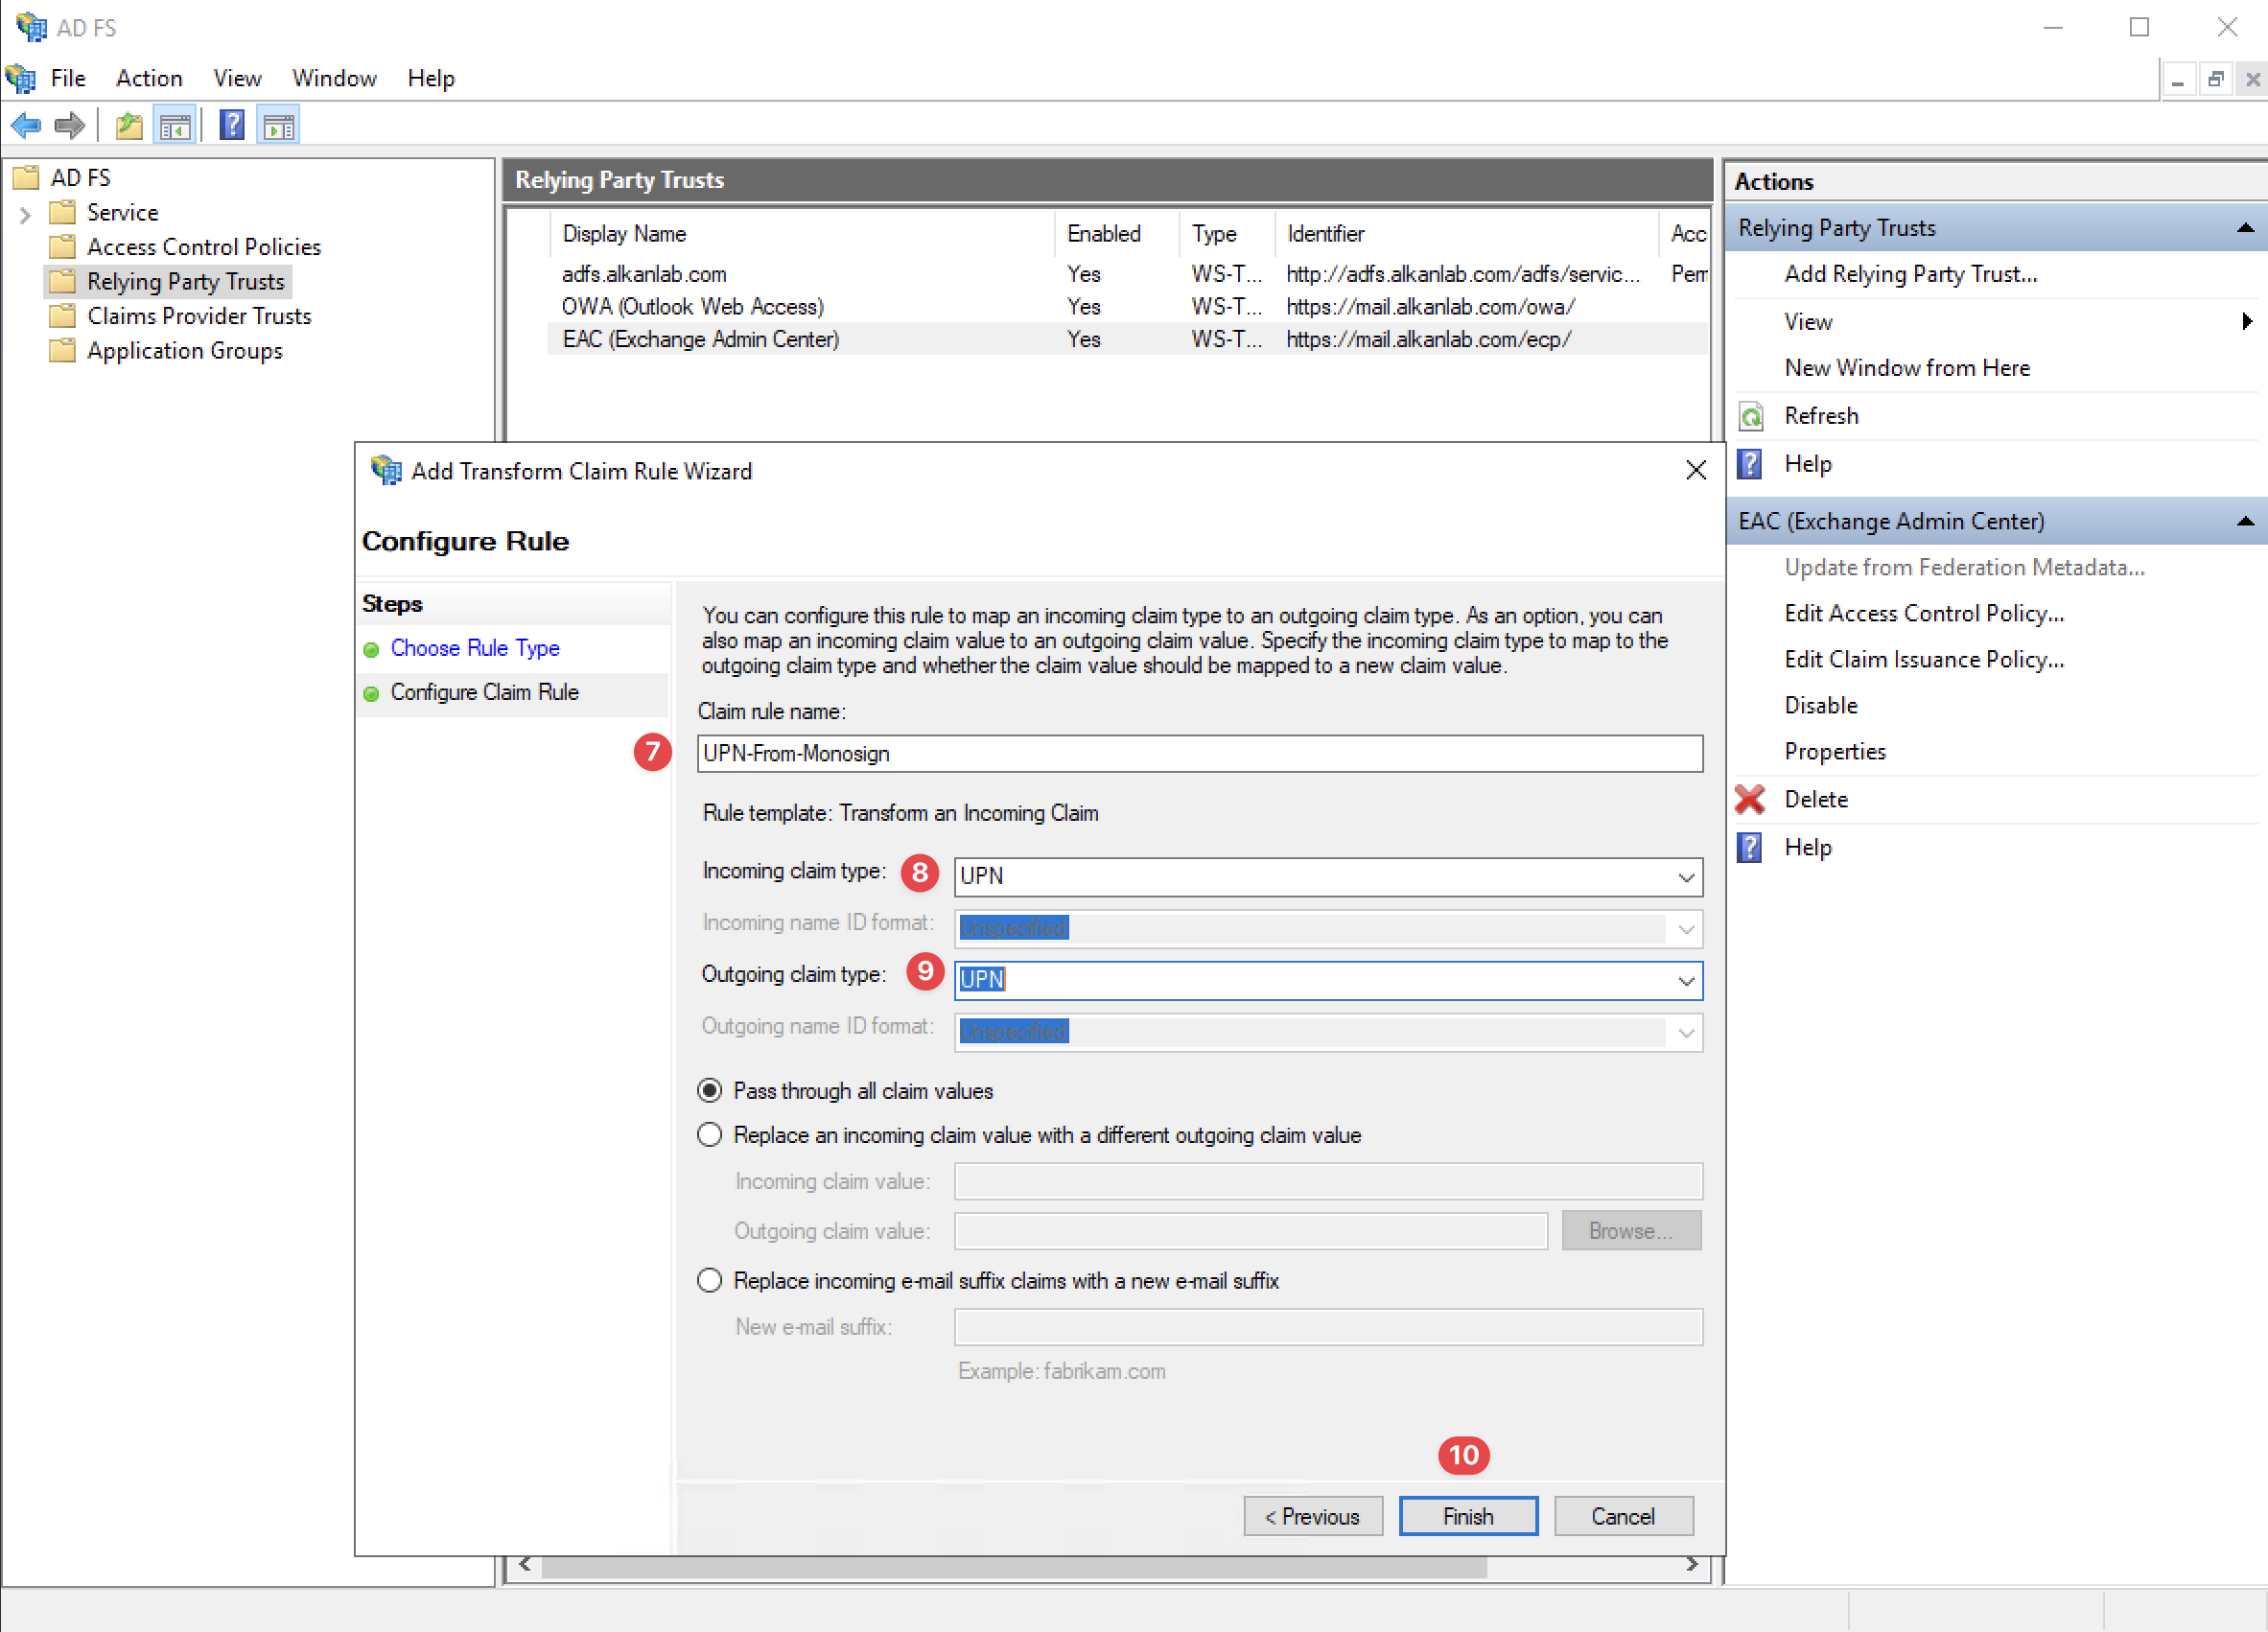
Configure Claim Rule
Please, specify the “Claim Rule Name“ as UPN-From-Monosign, select the “Incoming Claim Type“ as “UPN“, select the “Outgoing Claim Type“ as “UPN“ and click the “Finish“ button. Click the “Apply” and “Ok“ button to save the new Claim Rule.
d. Update and Verify Claims Provider For ECP/EAC Relying Party
The Claims Provider must be updated for the ECP/EAC Relying Party so the Monosign SSO Option will be seen on the Exchange Admin Center login UI.
To do that, please open the Powershell application as administrator and run the below commands.
Please change $EACRelyingPartyName and $monosignClaimsProviderName from your existing ADFS Configuration.
Update
# Change "your-relying-party-name-for-ecp/eac" name from your existing ADFS Configuration.
$EACRelyingPartyName = "your-relying-party-name-for-ecp/eac"

# Change "your-claim-provider-trust-name-for-ecp/eac" name from your existing ADFS Configuration.
$monosignClaimsProviderName = "your-claim-provider-trust-name-for-ecp/eac"

# Set Auto Update enable
# Set Unnecessary Signing Certificate Revocation Check as "None"
Set-AdfsClaimsProviderTrust -TargetName $monosignClaimsProviderName `
  -AutoUpdateEnabled $true `
  -SigningCertificateRevocationCheck "None"

# Update the Claims Provider for "your-relying-party-name-for-ecp/eac".
Set-AdfsRelyingPartyTrust -TargetName $EACRelyingPartyName -ClaimsProviderName @("Active Directory", $monosignClaimsProviderName)
Verify
# Verify the Claims Provider for "your-relying-party-name-for-ecp/eac"
Get-AdfsRelyingPartyTrust -Name $EACRelyingPartyName | Select-Object -Property ClaimsProviderName
When you run the above commands, you will see two options for “AdfsRelyingPartyTrust” as shown.

Check Relying Party Trust
If you are seeing two options here, the configuration is done for ADFS.
2- Configure ADFS for Microsoft ECP/EAC SAML SSO using PowerShell
a. Configure using a PowerShell file
Configurations can be done by using the Powershell file with the given parameters. Please copy the file on the server where the ADFS service is running and run it.
ADFSEACMonosignConfigurations.ps1
b. Configure by running PowerShell commands one by one
Please, open Powershell on the server where the ADFS service is running. Follow the instructions below to configure ADFS for Monosign SSO.
# Before run powershell command please change $monosignClaimsProviderName and $EACRelyingPartyName

# Create New ADFS Claims Provider Trust
$monosignClaimsProviderName = "your-claim-provider-name"
# Example: $monosignClaimsProviderName = "Monosign ECP/EAC"

# Example Metadata Data URL = https://account.monofor.com/saml/FD9D7F68-7B10-11EF-B5C5-AA43809AAC0C/metadata?download=true

Add-AdfsClaimsProviderTrust -Name $monosignClaimsProviderName `
  -MetadataUrl "https://account.alkanlab.com/saml/067aad27-6476-f37b-a122-42c53bcfc0bf/metadata?download=true" `
  -AutoUpdateEnabled $true `
  -EncryptionCertificateRevocationCheck "CheckChainExcludeRoot" `
  -SigningCertificateRevocationCheck "None" `
  -SignatureAlgorithm "http://www.w3.org/2001/04/xmldsig-more#rsa-sha256" `
  -ProtocolProfile "WsFed-SAML" `
  -SignedSamlRequestsRequired $false `
  -MonitoringEnabled $true

# Create Claims rule for new ADFS Claims Provider Trust
$newRule = '@RuleTemplate = "PassThroughClaims"
@RuleName = "UPN"
c:[Type == "http://schemas.xmlsoap.org/ws/2005/05/identity/claims/upn"]
=> issue(claim = c);'

# Add Claims rule for new ADFS Claims Provider Trust
Set-AdfsClaimsProviderTrust -TargetName $monosignClaimsProviderName -AcceptanceTransformRules $newRule

Get-AdfsClaimsProviderTrust -Name $monosignClaimsProviderName

# List all Relying Party Trust
Get-AdfsRelyingPartyTrust | Select-Object -Property Name

# Change ECP/EAC application from your existing ADFS Configuration.
$EACRelyingPartyName = "EAC (Exchange Admin Center)"
# Example: $EACRelyingPartyName = "EAC (Exchange Admin Center)" - Read data from the list comes from above command.

# Get existing TransformRules
$existingRules = (Get-AdfsRelyingPartyTrust -Name $EACRelyingPartyName).IssuanceTransformRules

# Create TransformRules for Monosign
$monosignTransformClaimRule = '@RuleTemplate = "MapClaims"
@RuleName = "UPN-From-Monosign"
c:[Type == "http://schemas.xmlsoap.org/ws/2005/05/identity/claims/upn"]
=> issue(
    Type = "http://schemas.xmlsoap.org/ws/2005/05/identity/claims/upn",
    Issuer = c.Issuer,
    OriginalIssuer = c.OriginalIssuer,
    Value = c.Value,
    ValueType = c.ValueType
);'

# Merge existing and new rules
$updatedRules = $existingRules + "`n" + $monosignTransformClaimRule

# Set all rules
Set-AdfsRelyingPartyTrust -TargetName $EACRelyingPartyName -IssuanceTransformRules $updatedRules

# Verify Rules
Get-AdfsRelyingPartyTrust -Name $EACRelyingPartyName | Select-Object -ExpandProperty IssuanceTransformRules

# Set Monosign and Active Directory as authentication methods
Set-AdfsRelyingPartyTrust -TargetName $EACRelyingPartyName -ClaimsProviderName @("Active Directory", $monosignClaimsProviderName)
Verify
# Verify the Claims Provider for "your-relying-party-name-for-ecp/eac"
Get-AdfsRelyingPartyTrust -Name $EACRelyingPartyName | Select-Object -Property ClaimsProviderName
When you run the above commands, you will see two options for “AdfsRelyingPartyTrust” as shown.

Check Relying Party Trust
3- Assign a user to the Microsoft ECP/EAC application
Please follow below instructions on how to assign a user to the Microsoft ECP/EAC application. In this example john.smith will assign to the application access.


4- Sign In Test
Now try to log in to the Microsoft ECP/EAC application using Monosign SSO.
Open a new browser and type ECP/EAC web address. On the Microsoft ECP/EAC web address you will see a list of options as shown. Please click the “Monosign ECP/EAC“ option.
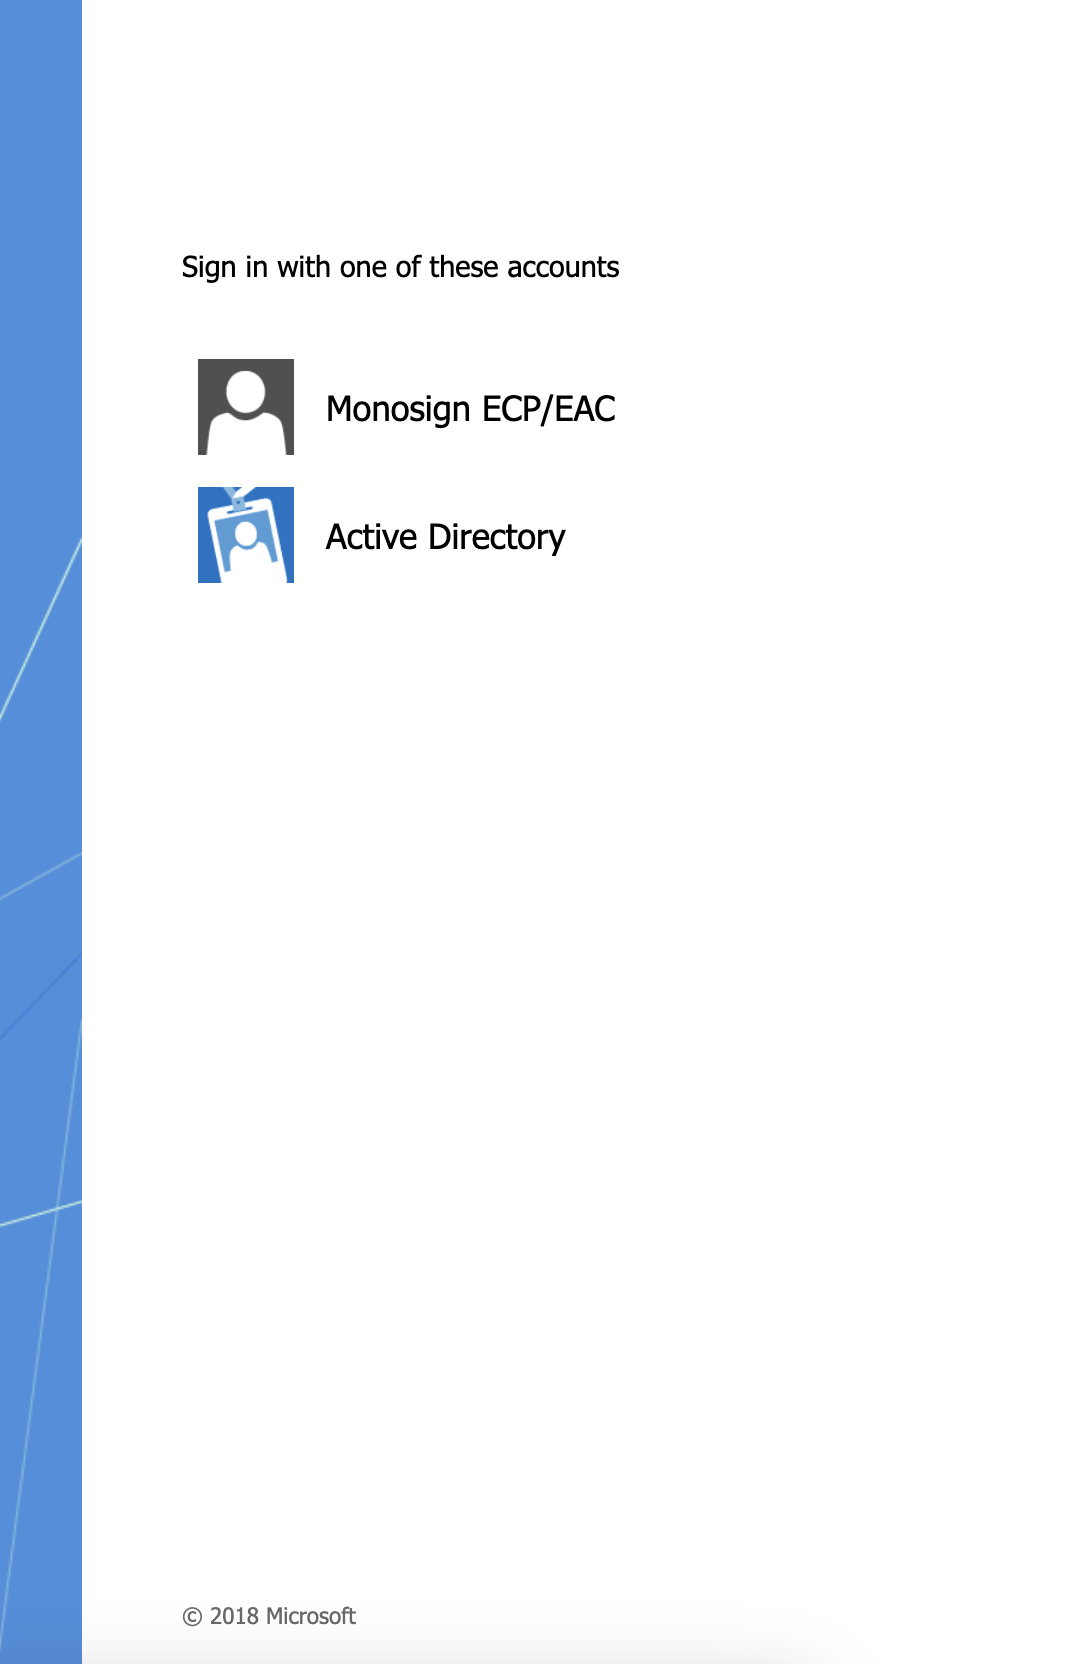
ECP/EAC Login Options
If everything is well configured, the page will be redirected to Monosign’s login page.
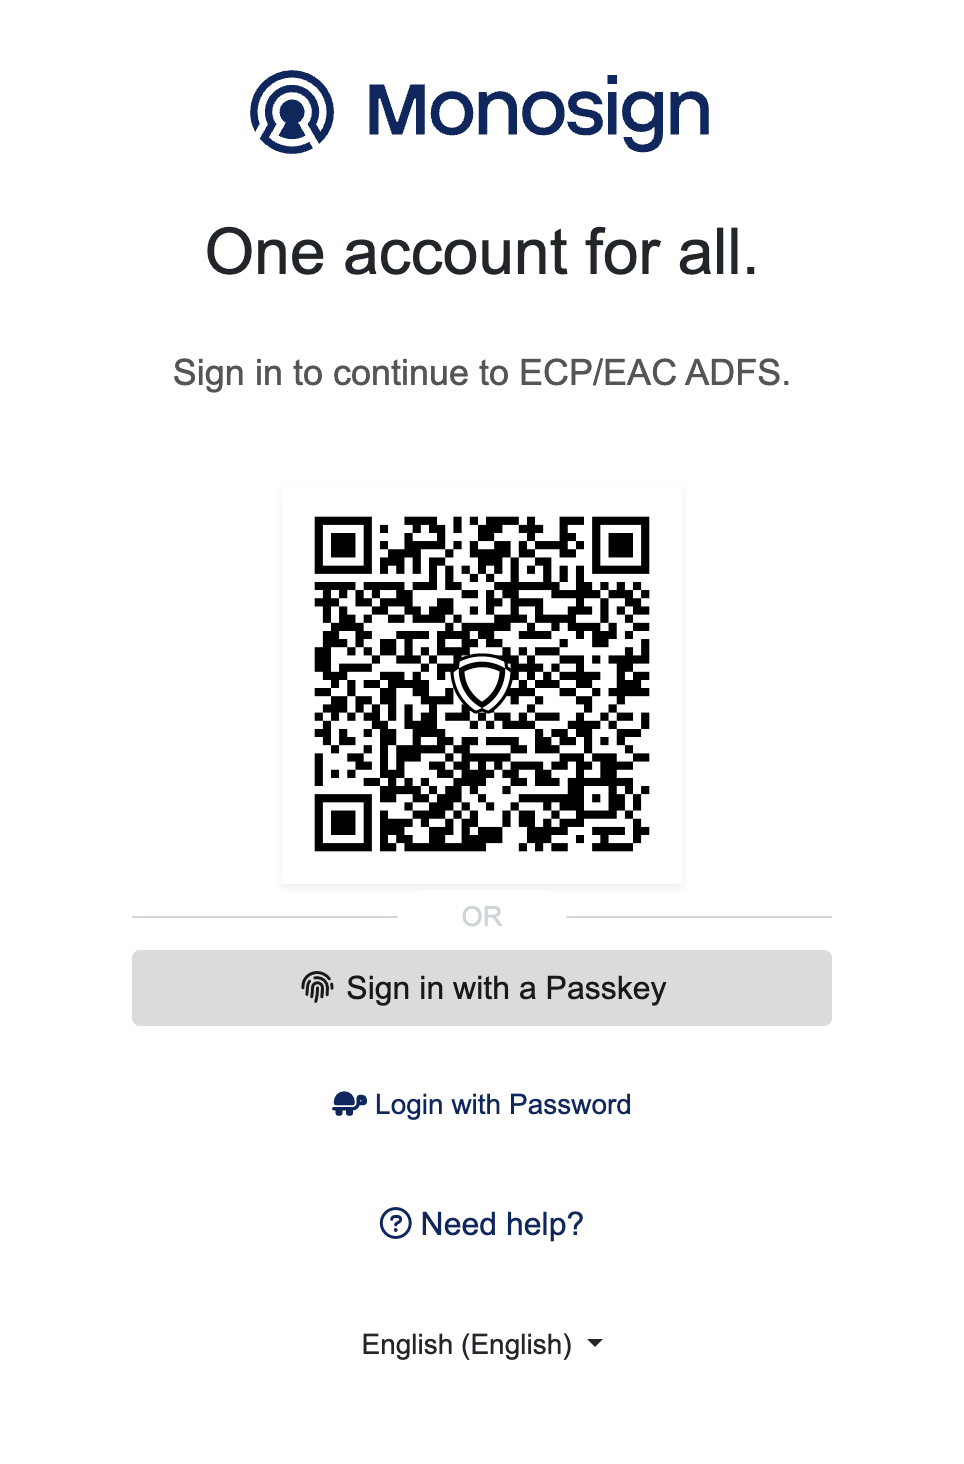
Monosign Login
It can be login with Passwordless login(Monofor Identity), Passkey or Username and Password(Login with Password)
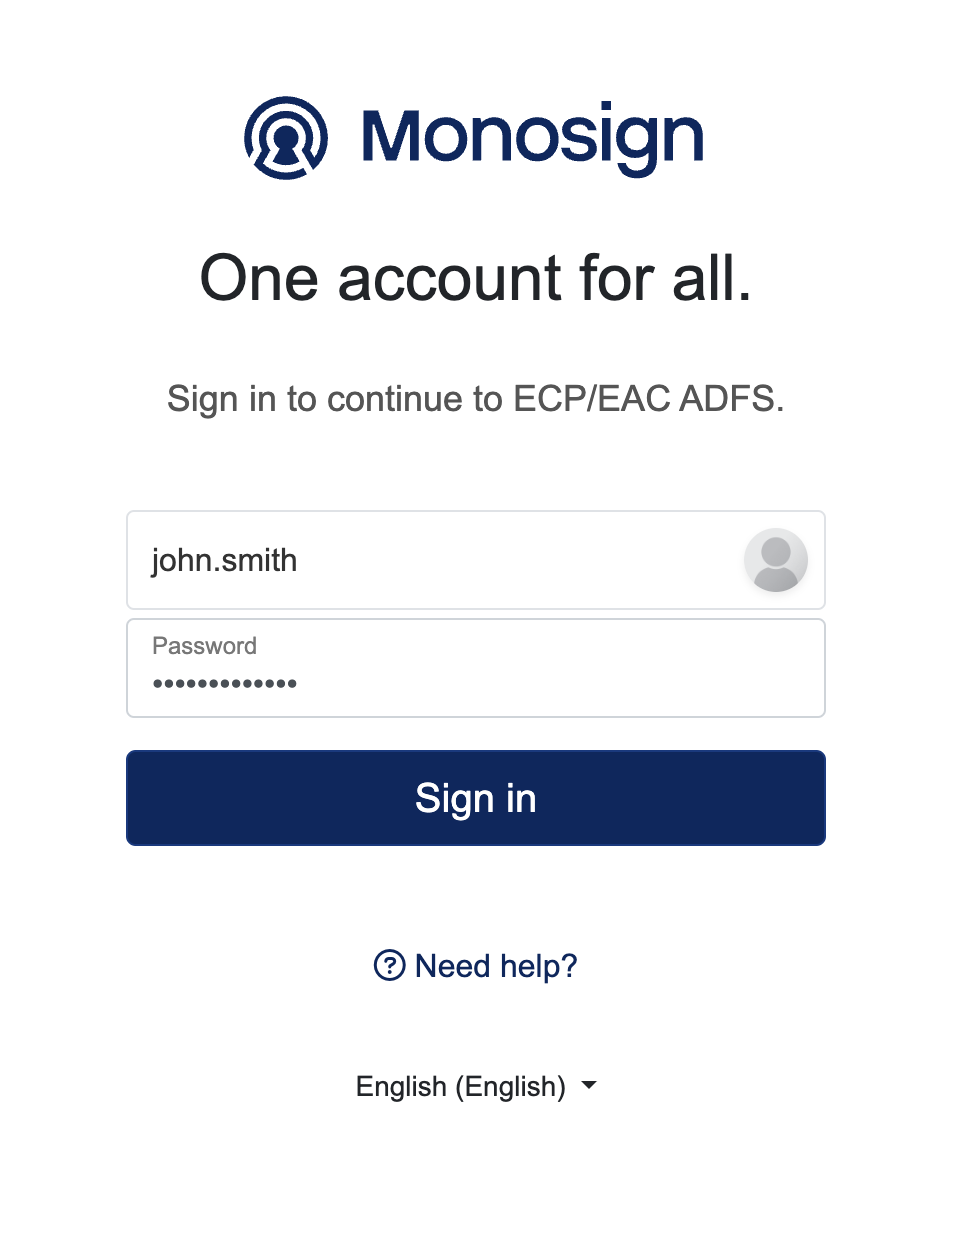
Login to Microsoft ECP/EAC with UserName and Password
After clicking Sign in user will able to log in to Microsoft ECP/EAC.
When the user logged in, the page will be redirected to the Microsoft ECP/EAC application.

User Logged In to Microsoft ECP/EAC
5- Enable ADFS Authentication (Optional)
If ADFS is newly created and ECP/EAC login is not enabled for ADFS authentication, follow the below instructions.
Please connect to the server where Exchange is running and run the below Powershell commands.
# Set the ADFS Authentication for ECP/EAC login
Get-EcpVirtualDirectory | Set-EcpVirtualDirectory -AdfsAuthentication $true -BasicAuthentication $false -DigestAuthentication $false -FormsAuthentication $false -WindowsAuthentication $false

# Restart IIS for enabling the configurations
net stop w3svc /y
net start w3svc
6- Set Default Authentication Method as Monosign (Optional)
Based on the login process of ECP/EAC ADFS, ADFS supports multiple authentication methods such as Monosign and Active Directory.
If you would like ADFS for ECP/EAC to handle only Monosign authentication instead of multiple authentication methods such as Active Directory, Monosign, etc., please run the commands below in PowerShell.
Before proceeding, ensure that Monosign SSO is properly configured and that you have successfully tested the Monosign SSO login.
# Optional Change existing relying party trust use specific IdP configuration
# List all Relying Party Trust
Get-AdfsRelyingPartyTrust | Select-Object -Property Name

# Change ECP/EAC application from your existing ADFS Configuration.
$EACRelyingPartyName = "your-relying-party-name"
# Example: $EACRelyingPartyName = "EAC (Exchange Admin Center)"

$monosignClaimsProviderName = "your-claim-provider-name"
# Example: $monosignClaimsProviderName = "Monosign ECP/EAC"

Set-AdfsRelyingPartyTrust -TargetName $EACRelyingPartyName -ClaimsProviderName @($monosignClaimsProviderName)
Get-AdfsRelyingPartyTrust -Name $EACRelyingPartyName | Select-Object -Property ClaimsProviderName
Once the configurations are completed in AD FS, users will be redirected to the Monosign SSO login page when logging into Microsoft ECP/EAC.
