Palo Alto SSL-VPN RADIUS Integration
This document explains how to implement Monosign with Palo Alto VPN. Before you continue, it is better to start with Palo Alto’s Radius documentation.
Monofor has no responsibility to do Palo Alto configurations. If you need support please contact Palo Alto Support Services.
📑 Instructions
This documentation contains 5 main steps for integration.
Creating an Application on Monosign
Configuration Radius for Palo Alto
Assign a user to the Palo Alto application
Sign In Test
Additional Configuration
1- Creating an Application on Monosign
Create application on Monosign and configure your access policy. Once you create, click “Keys” and add a new Access Key for Radius Key for access.
This information will be necessary during the configuration of the Palo Alto application.

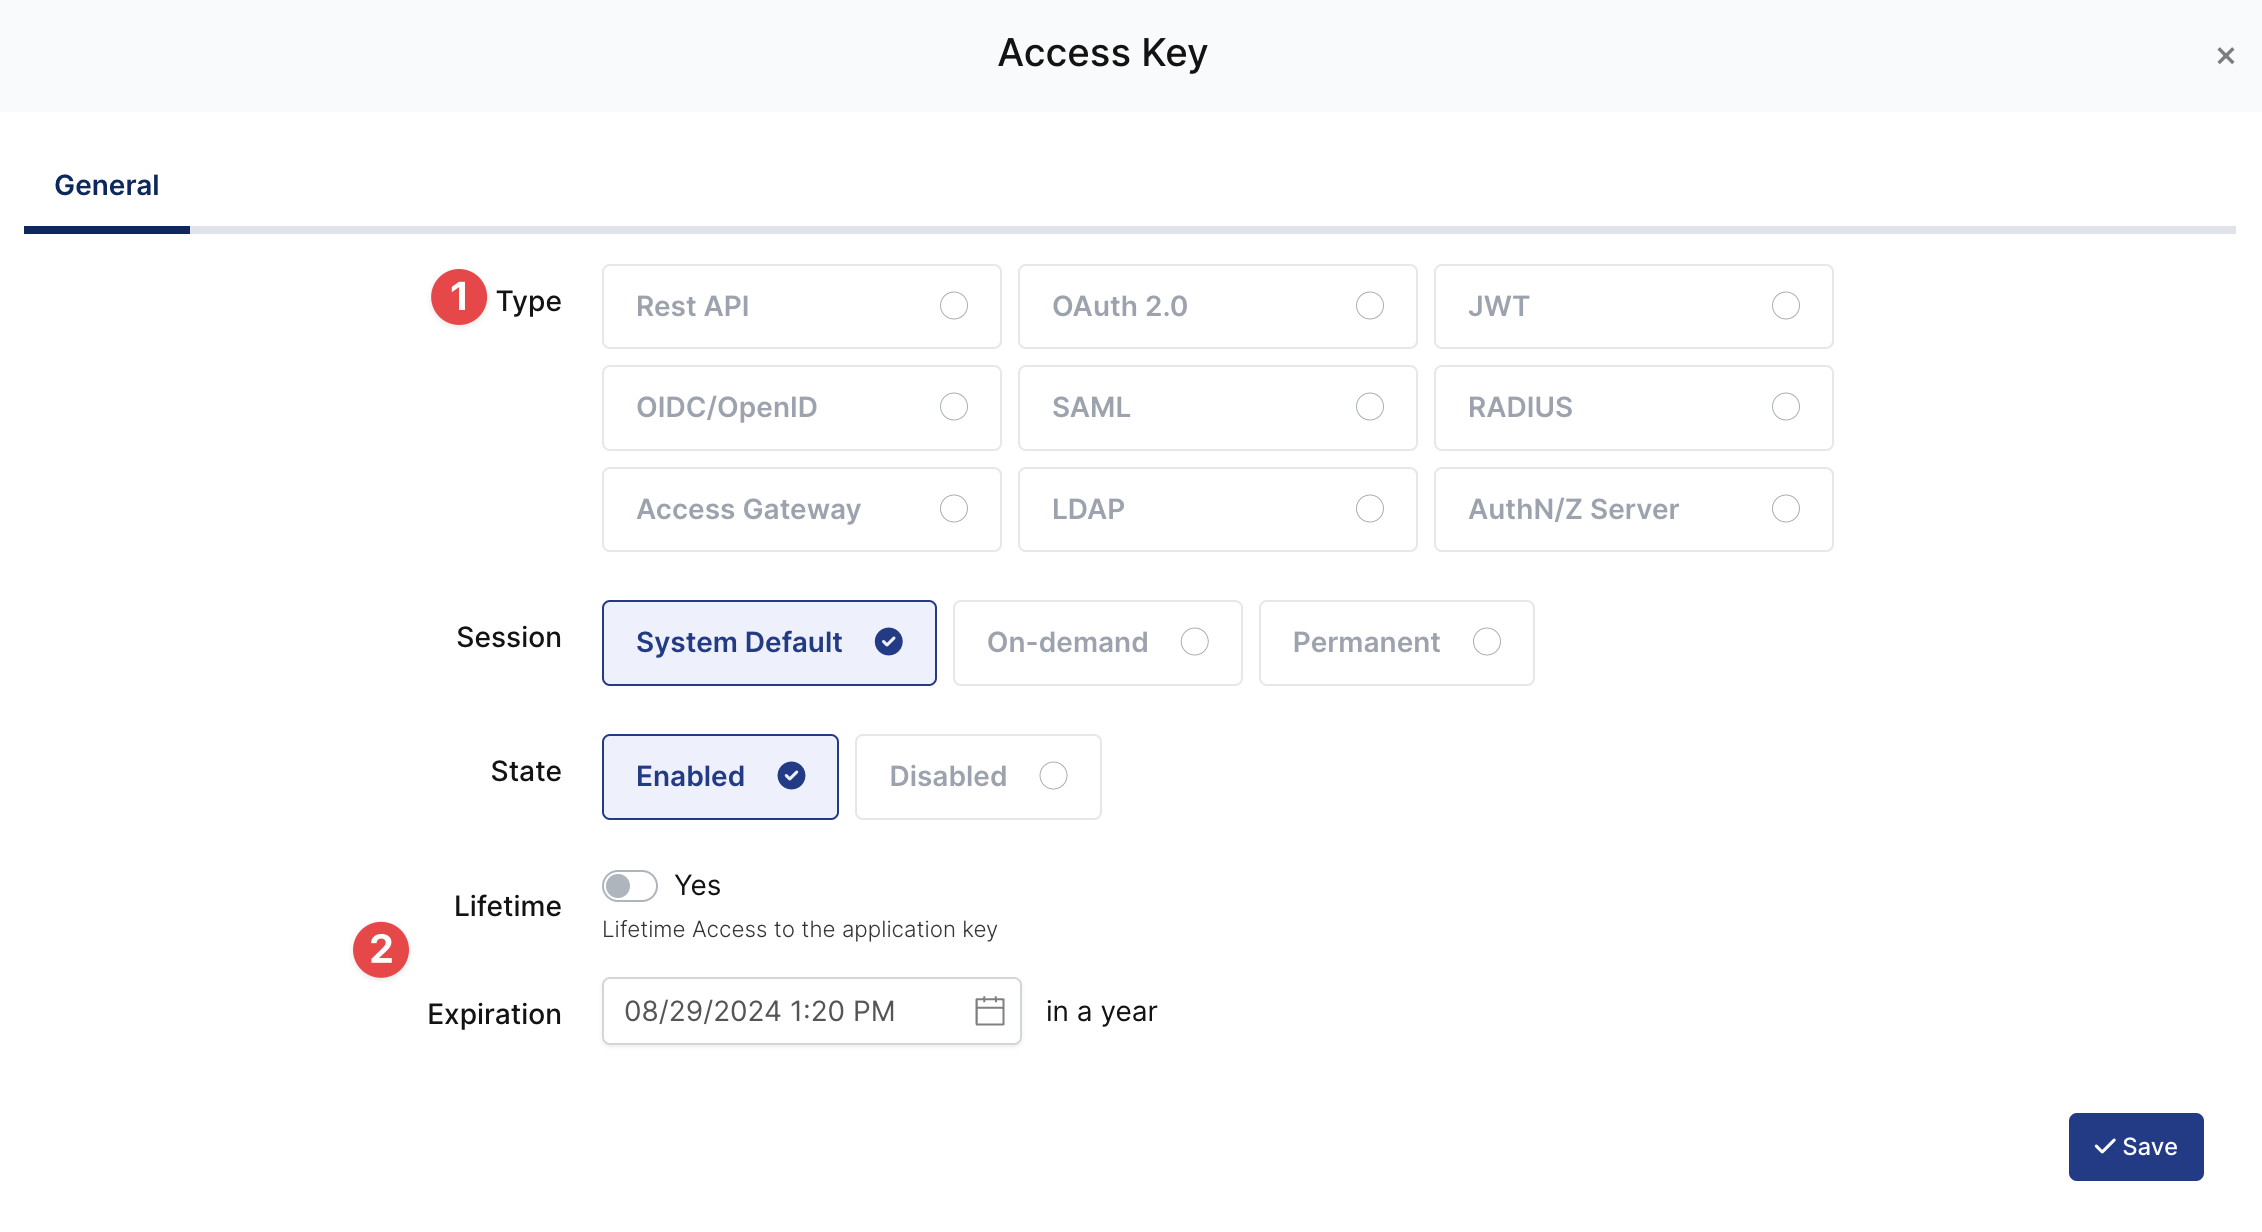
Property | Value | Options |
|---|---|---|
Key Type | RADIUS | Rest API, OAuth 2.0, JWT, OIDC/OpenID, SAML, RADIUS, Access Gateway, LDAP, AuthN/Z Server |
Expiration | Lifetime | Lifetime or Specific Date/Time - By Default Lifetime is Enabled. |
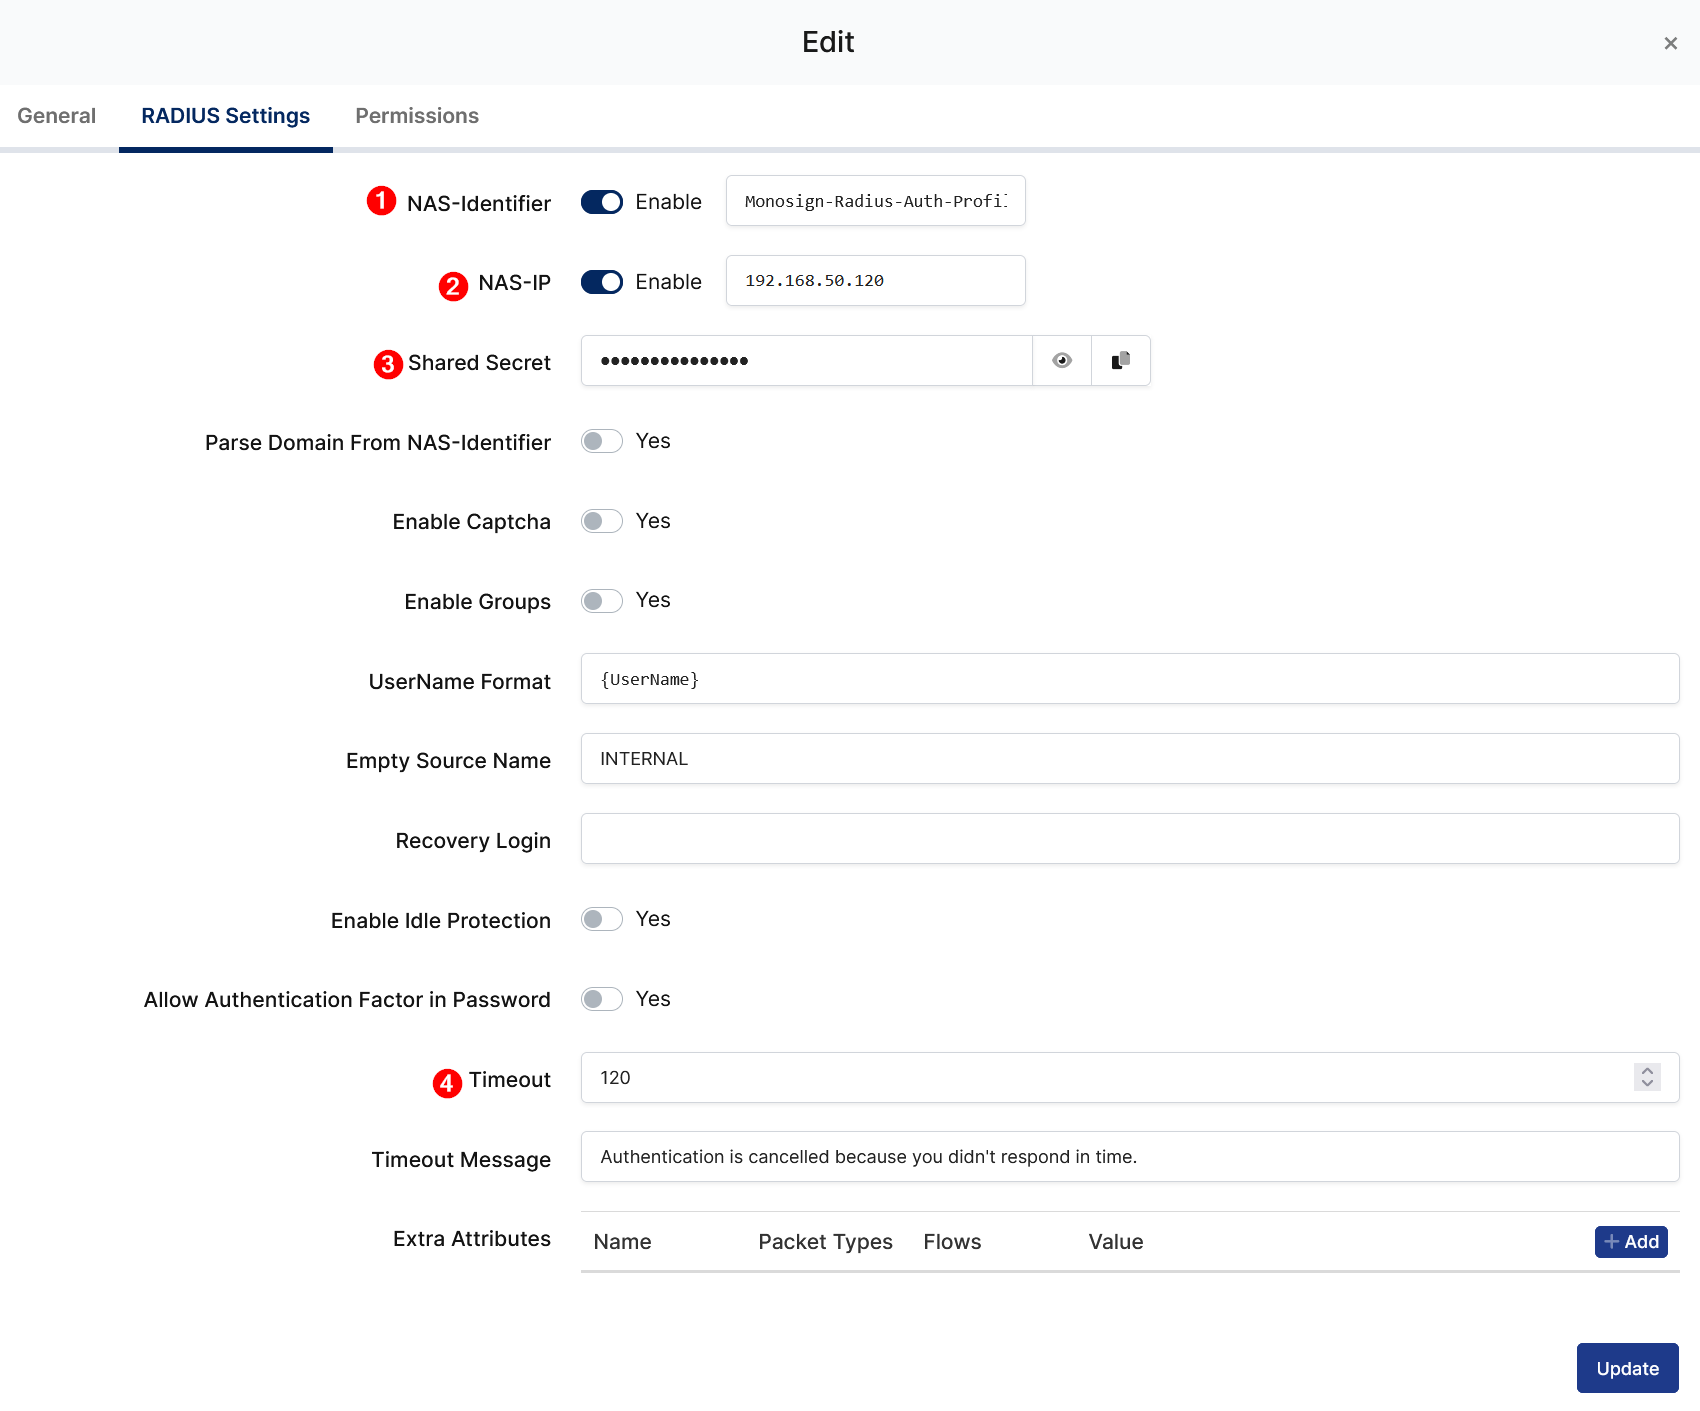
Configuration details for the Palo Alto application are provided as follows:
Property | Value | Description |
|---|---|---|
NAS-Identifier |
| Palo Alto Networks devices use the |
NAS-IP |
| NAS-IP of the Palo Alto Networks devices. |
Shared Secret |
| Shared secret it will configure on the Palo Alto Networks devices. |
Timeout |
| Default timeout value for Radius authentication |
To ensure that the application has access to user groups, follow these steps:
If the application hasn't been configured yet, click the “Edit” option for the application.
In the application settings, navigate to the “Source, Provider, and Profile” tab.
Configure the “User Access Type“ and “User Group Access Type” as “Only Assigned Users.”
Configuring this setting will allow the application to access by user groups when users sign in.
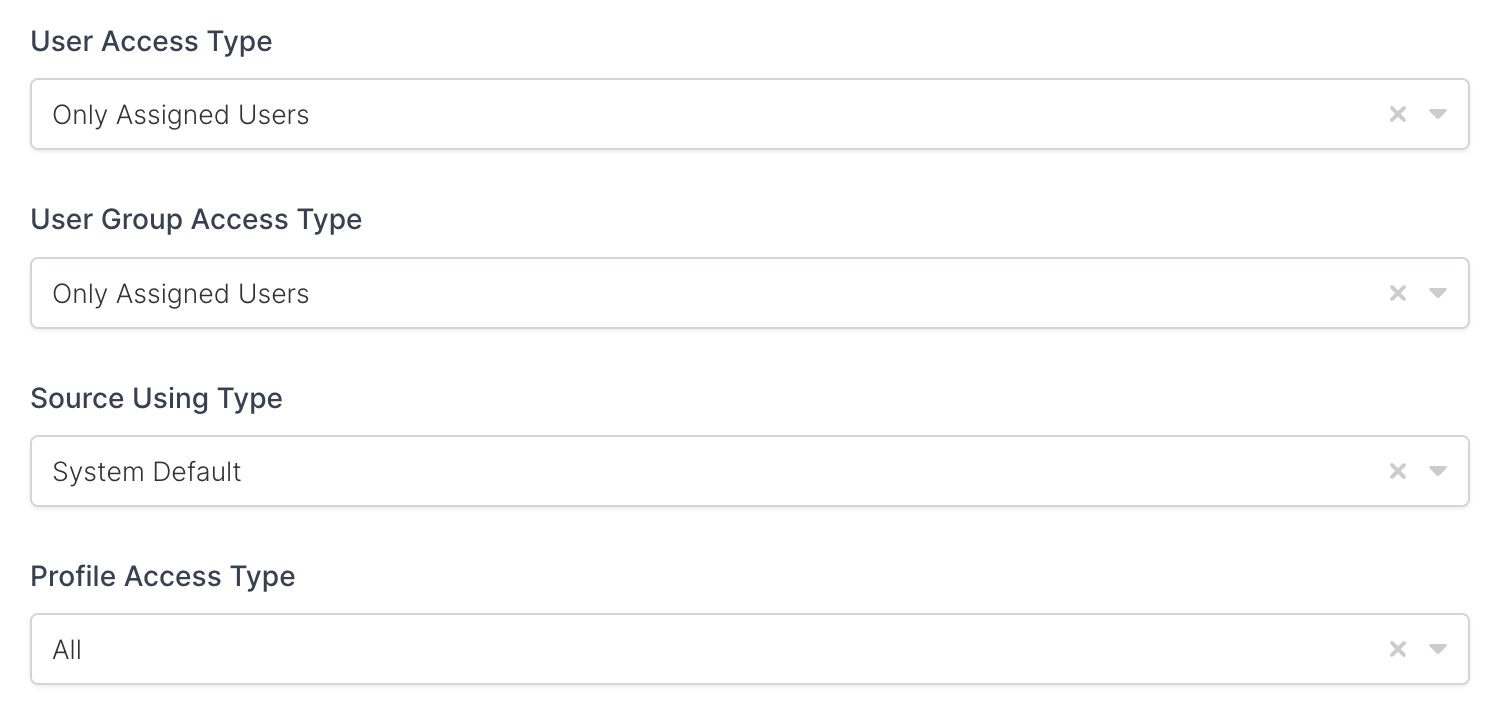
Property | Description | Options |
|---|---|---|
User Access Type | Defines which Users will access to this application. | Only Assigned Users |
User Group Access Type | Defines application’s user group access | Only Assigned Users |
Profile Access Type | Defines Application’s user’s profile access | Restricted - Only restricted user profile attributes |
2- Configuration RADIUS for Palo Alto SSL-VPN
As it highlighted at the beginning of document, please check out the Palo Alto’s RADIUS configuration page first.
Please add your RADIUS settings to the application. The following information is needed for your configuration.
a. RADIUS Server Profile
Go to Device → Server Profiles → RADIUS on the Palo Alto Network devices management UI.
Click Add.
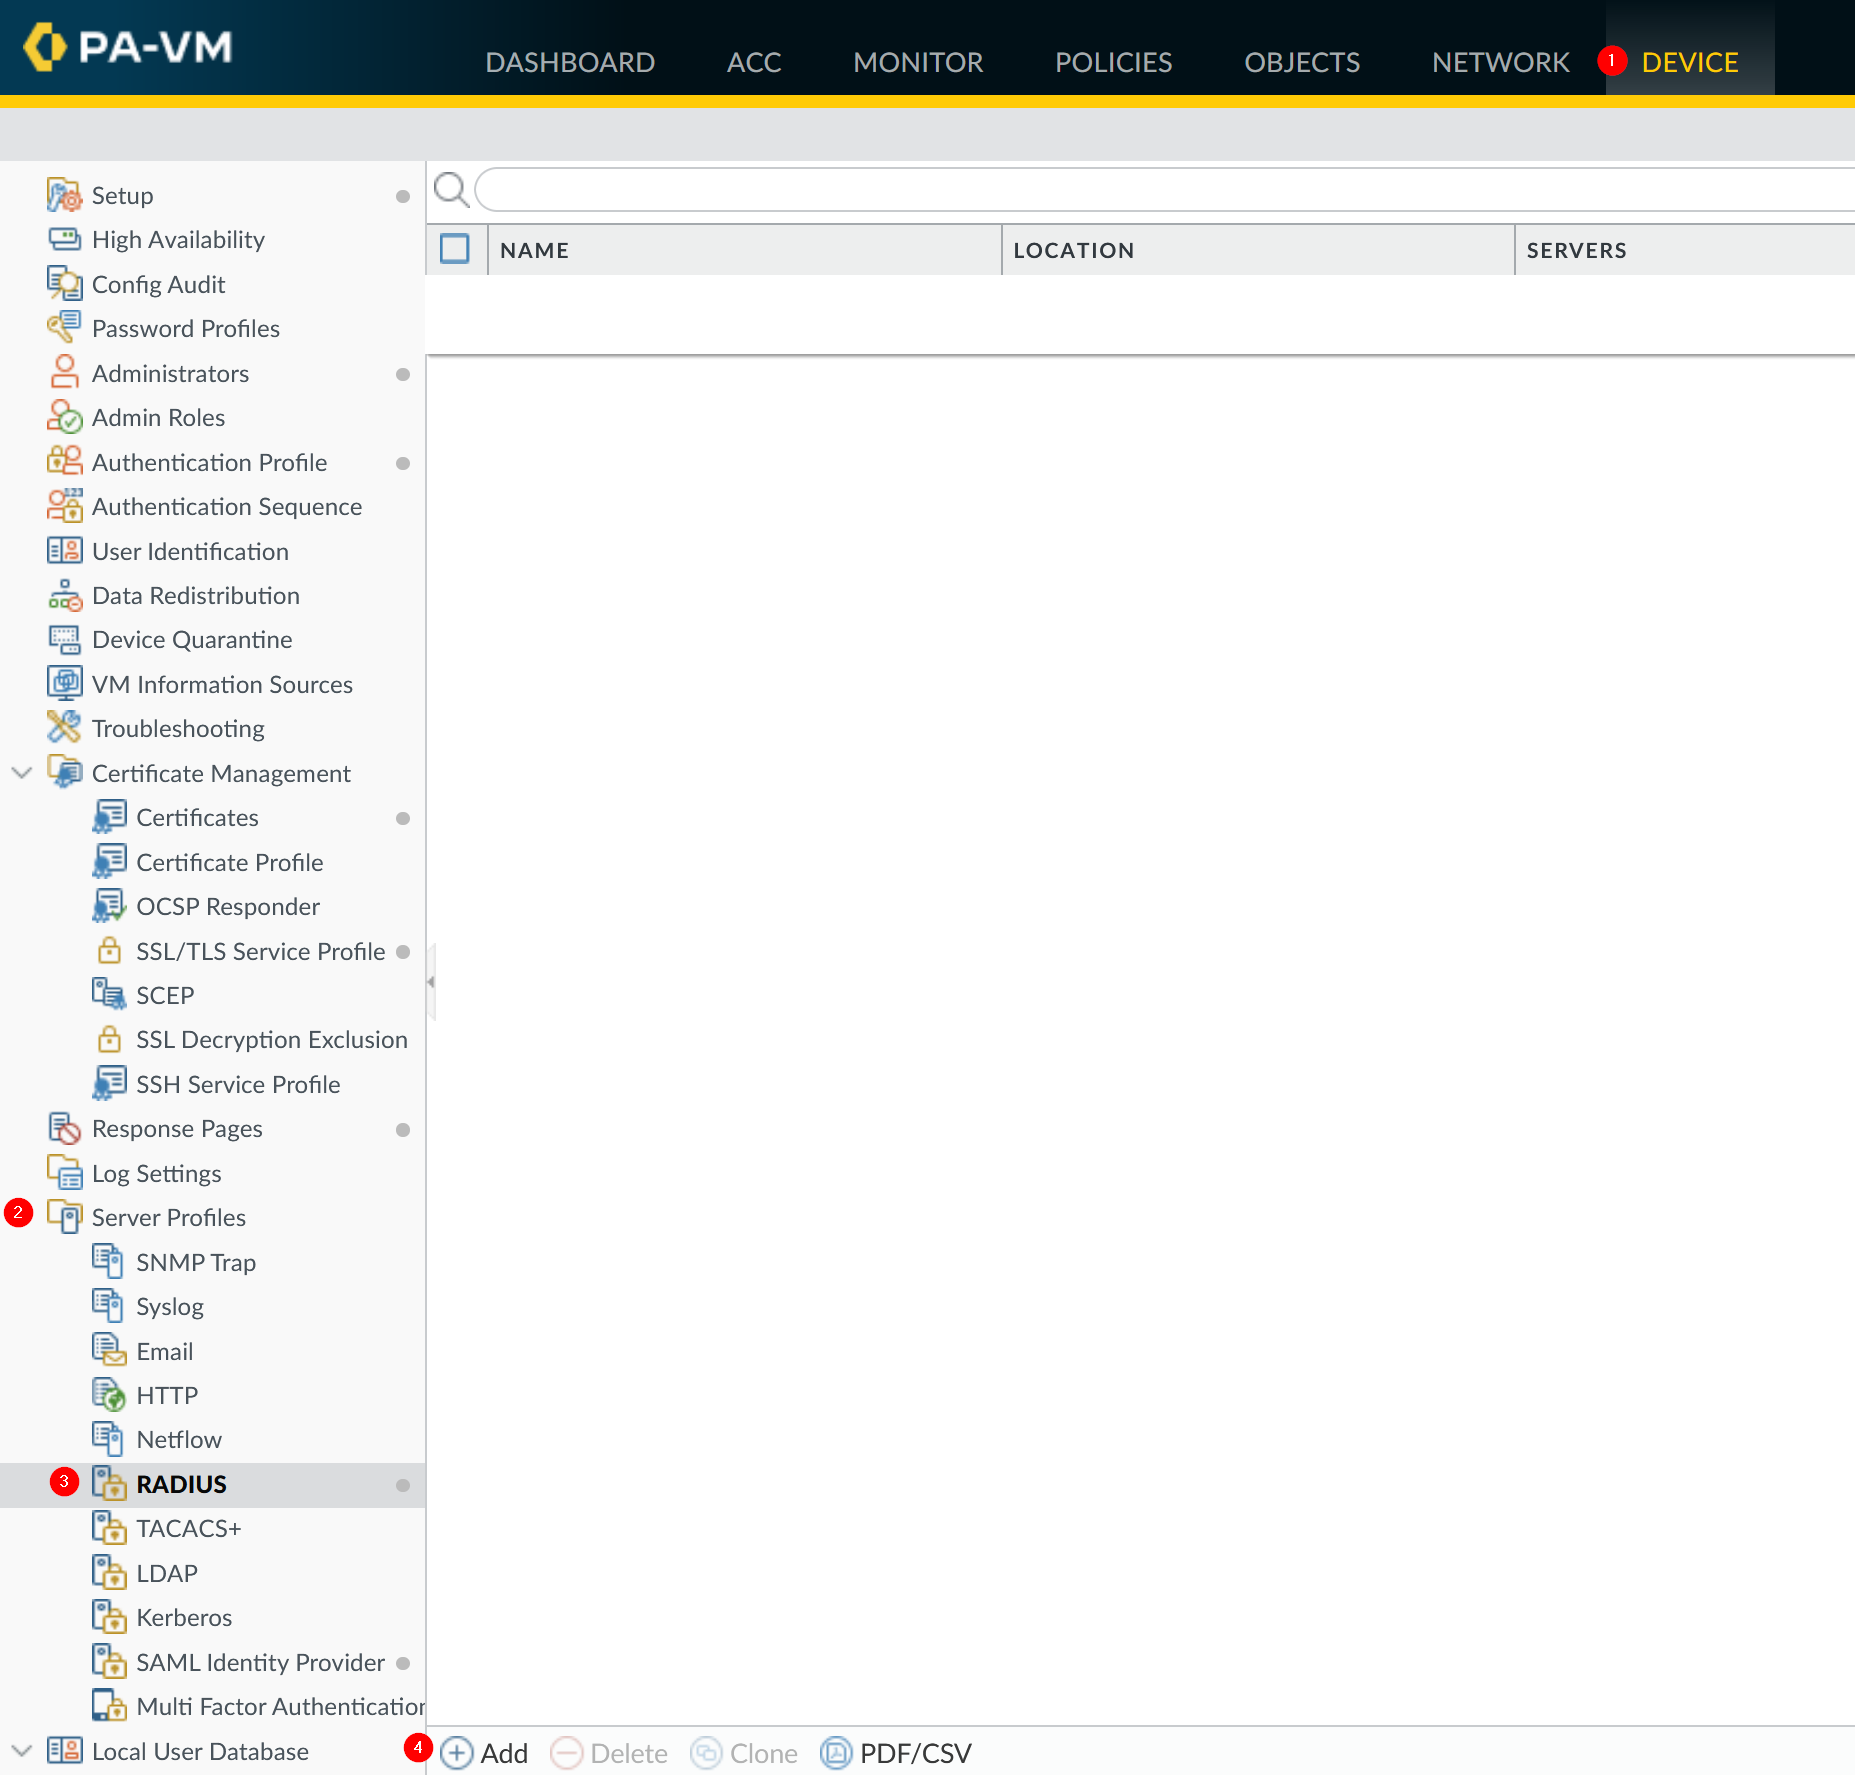
Fill below values
Property | Value | Description |
|---|---|---|
Profile Name |
| Name of the Radius Profile. |
Timeout |
| Radius Timeout |
Retries |
| |
Authentication Protocol |
| Monosign Radius Server only support PAP |
In the servers provide below values
Property | Value | Description |
|---|---|---|
NAME |
| Name of the Radius Server |
RADIUS SERVER |
| Monosign Radius Server FQDN or IP Address |
SECRET |
| Shared secret which is already configured in the Monosign Application Radius Key. |
PORT |
| Monosign Radius Server only support PAP |
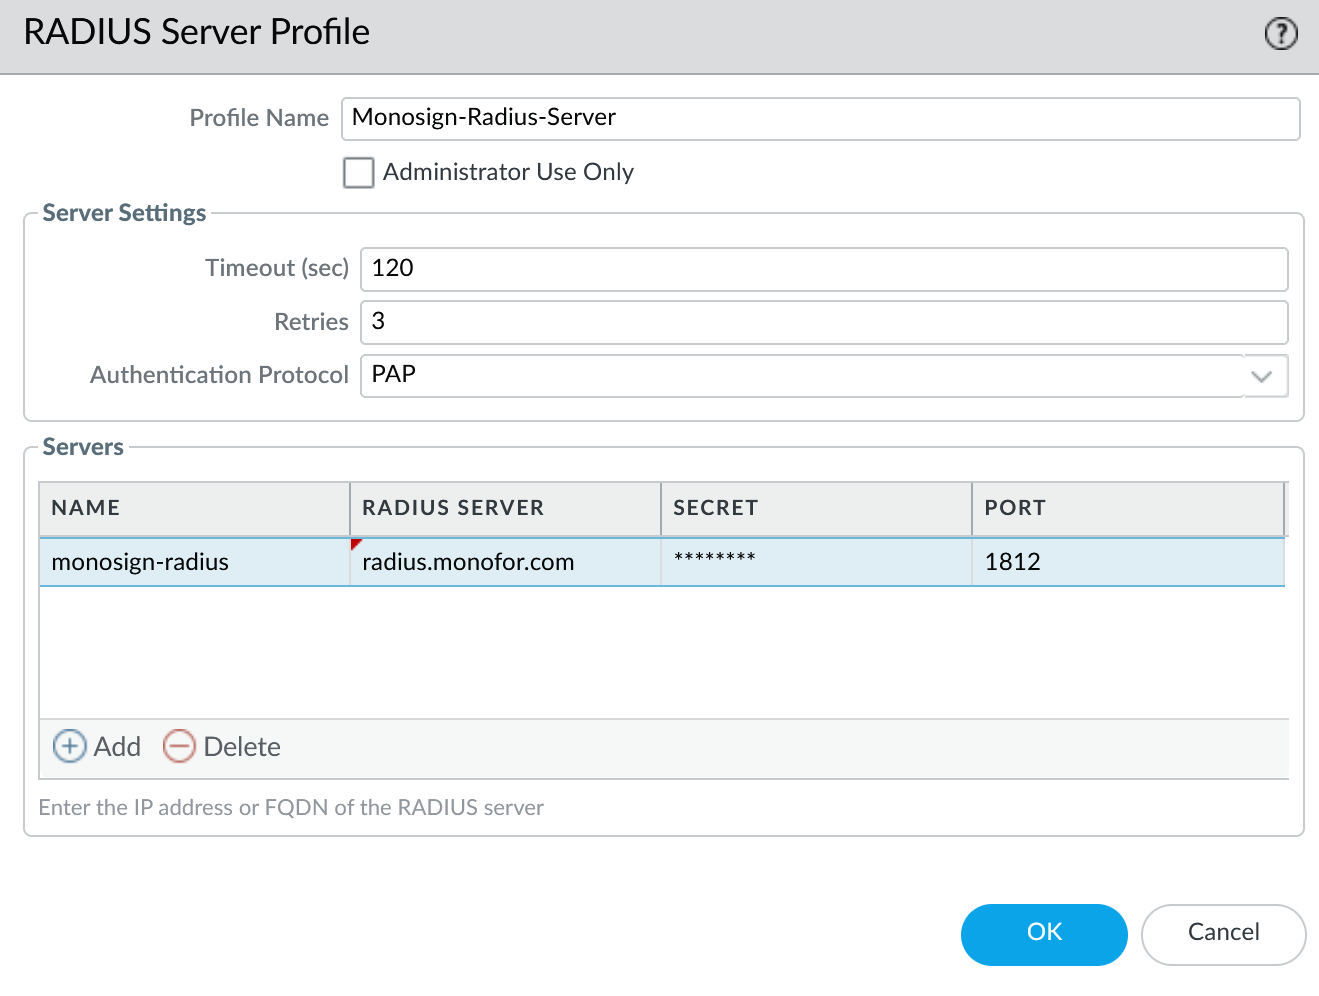
Click OK.
b. Authentication Profile
Go to Device → Authentication Profile on the Palo Alto Network devices management UI.
Click Add.
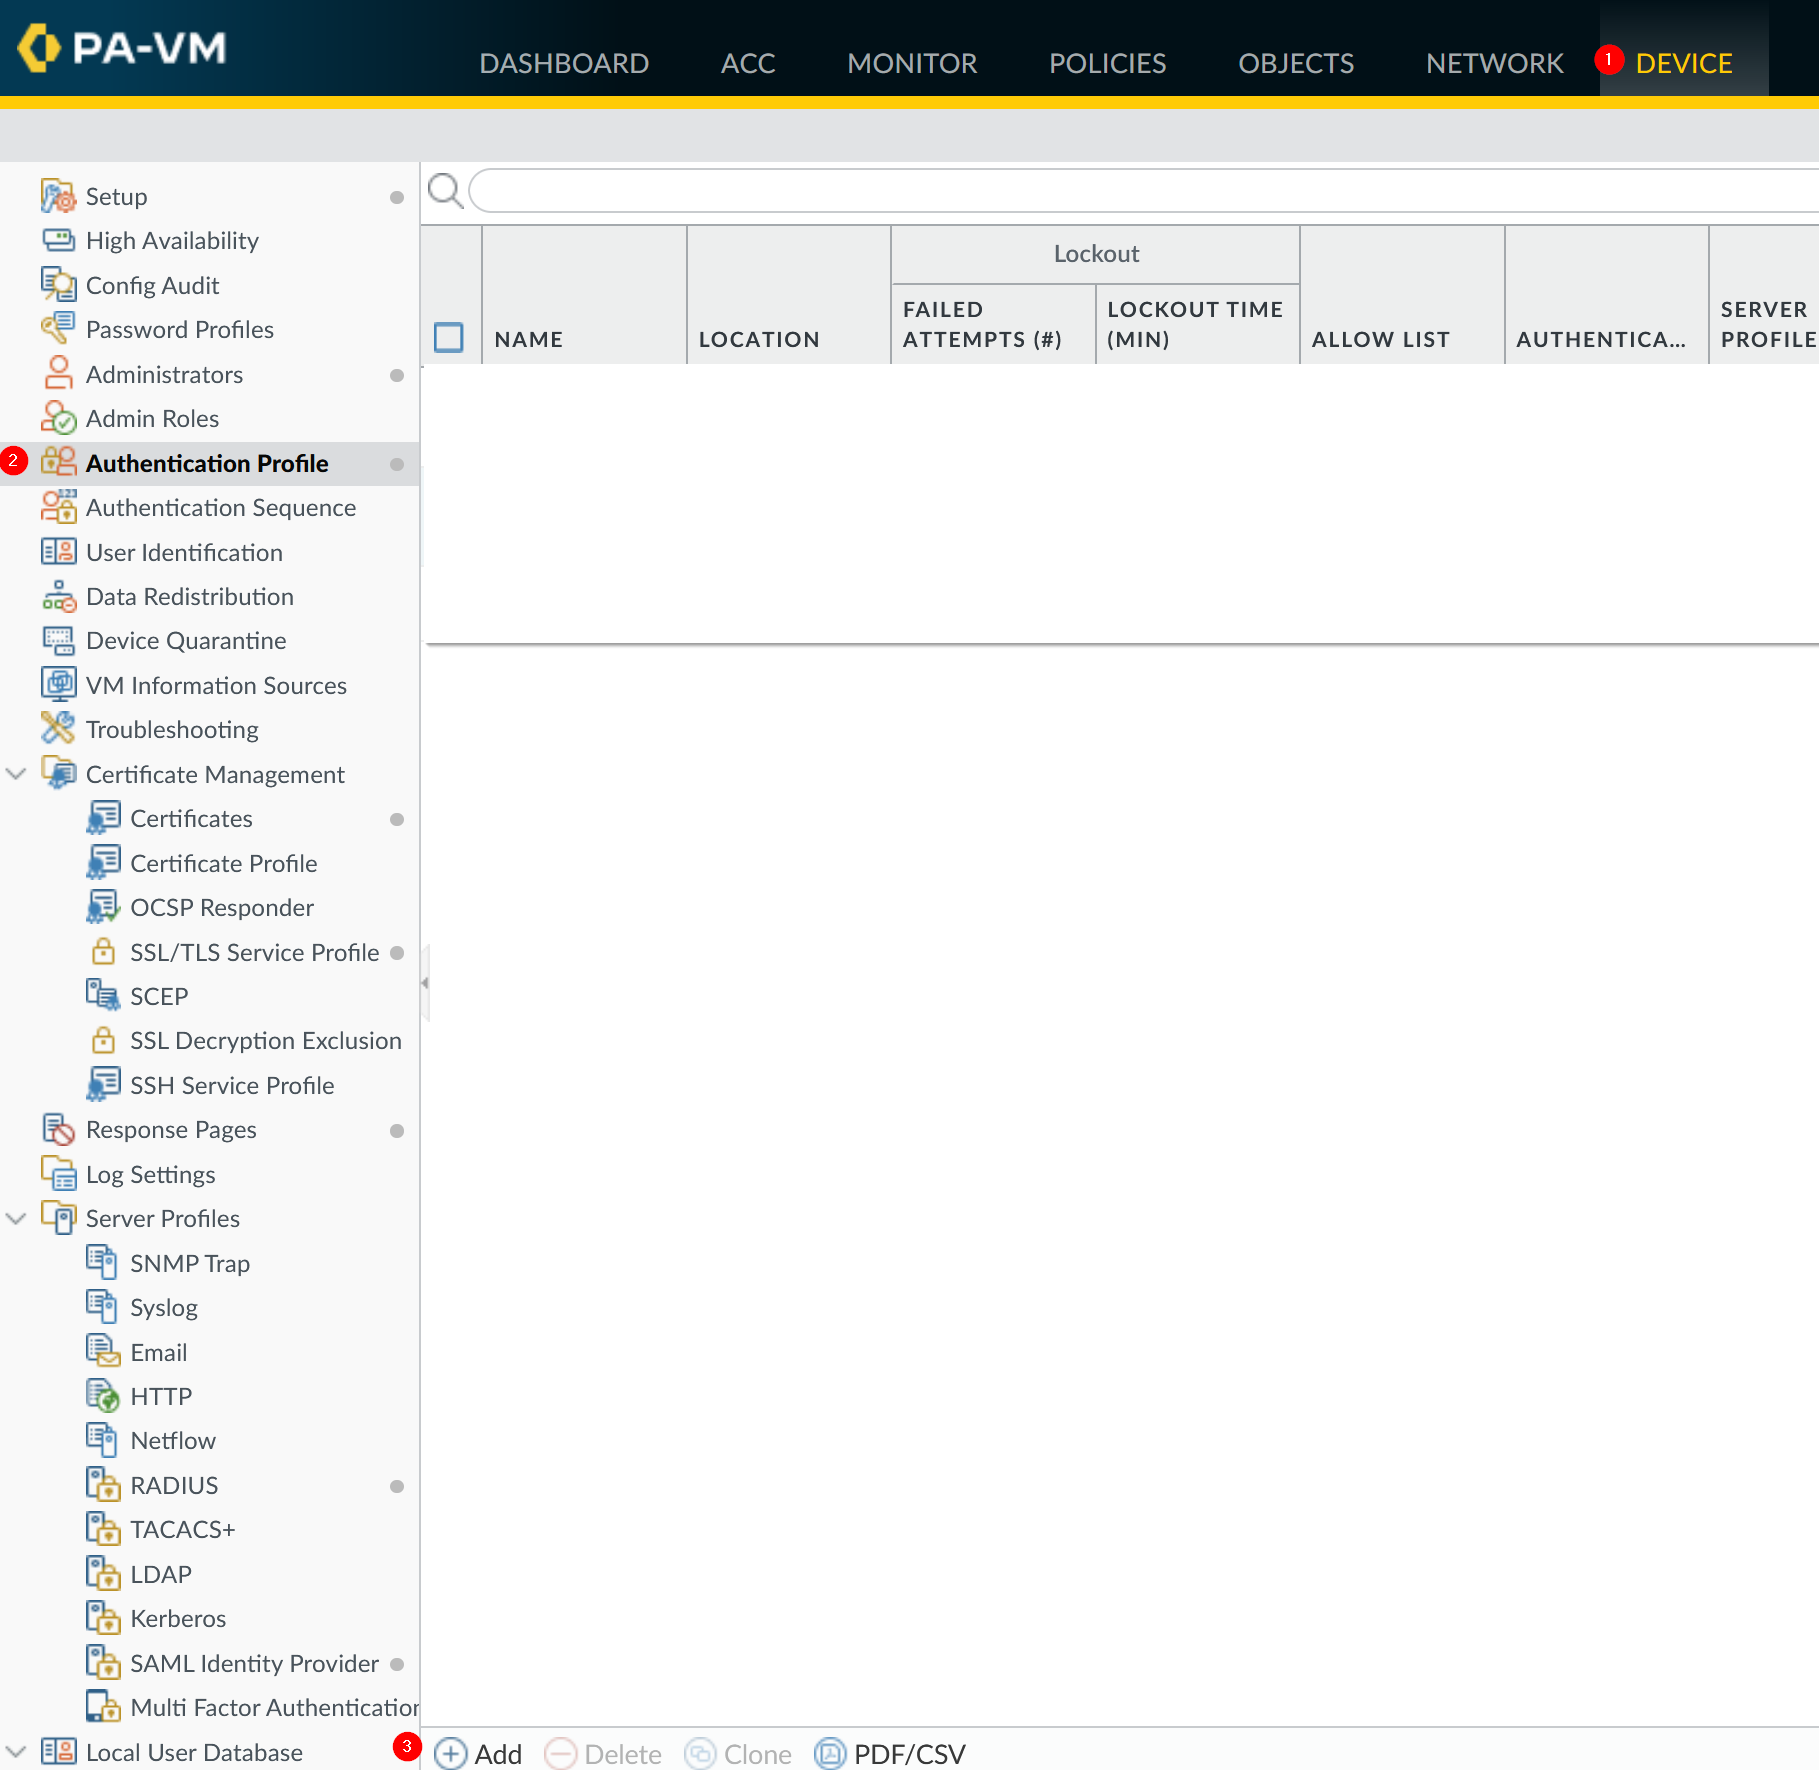
Fill below values
General
Property | Value | Description |
|---|---|---|
Name |
| This name used as a NAS-Identifier |
Authentication
Property | Value | Description |
|---|---|---|
Type |
| |
Server Profile |
|
Advanced
Property | Value | Description |
|---|---|---|
Allow List |
|
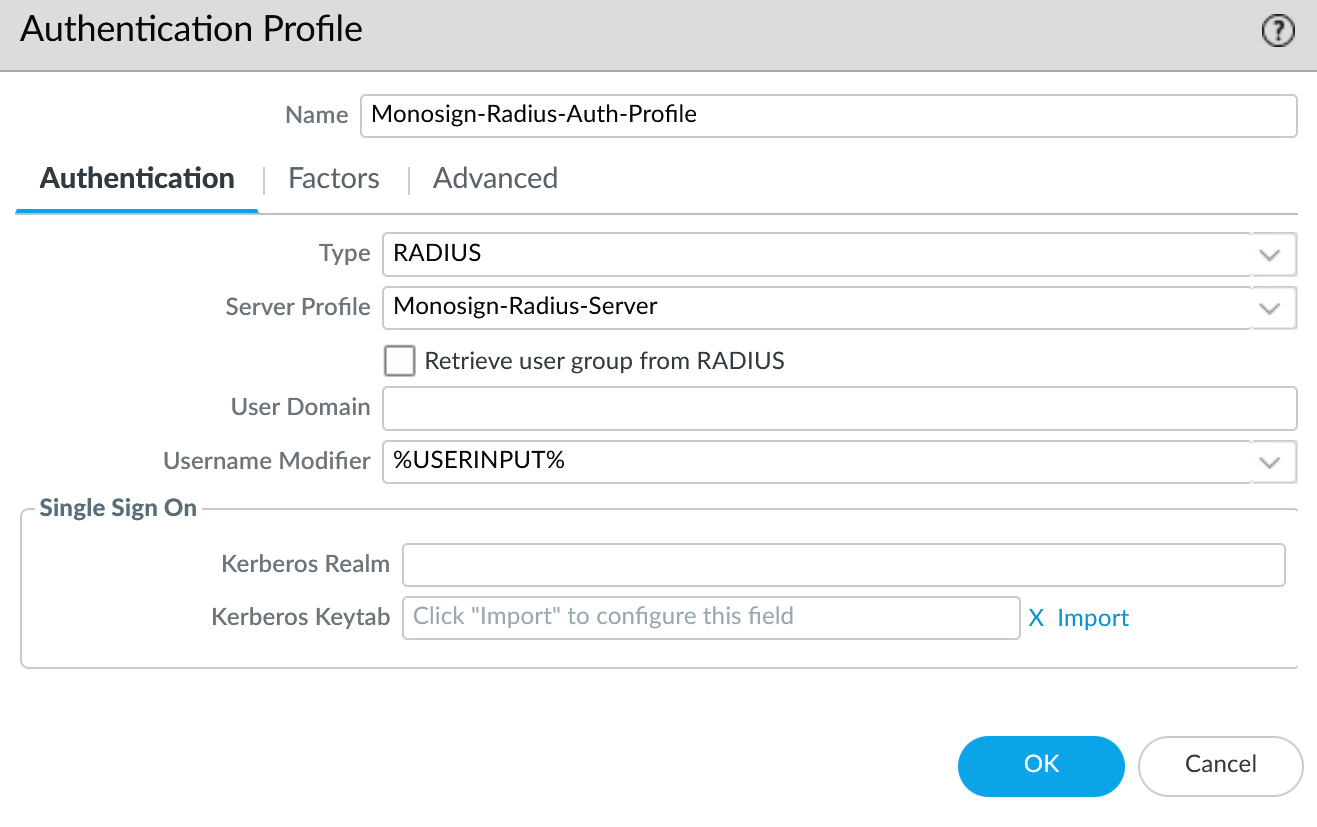
Authentication Profile - Authentication
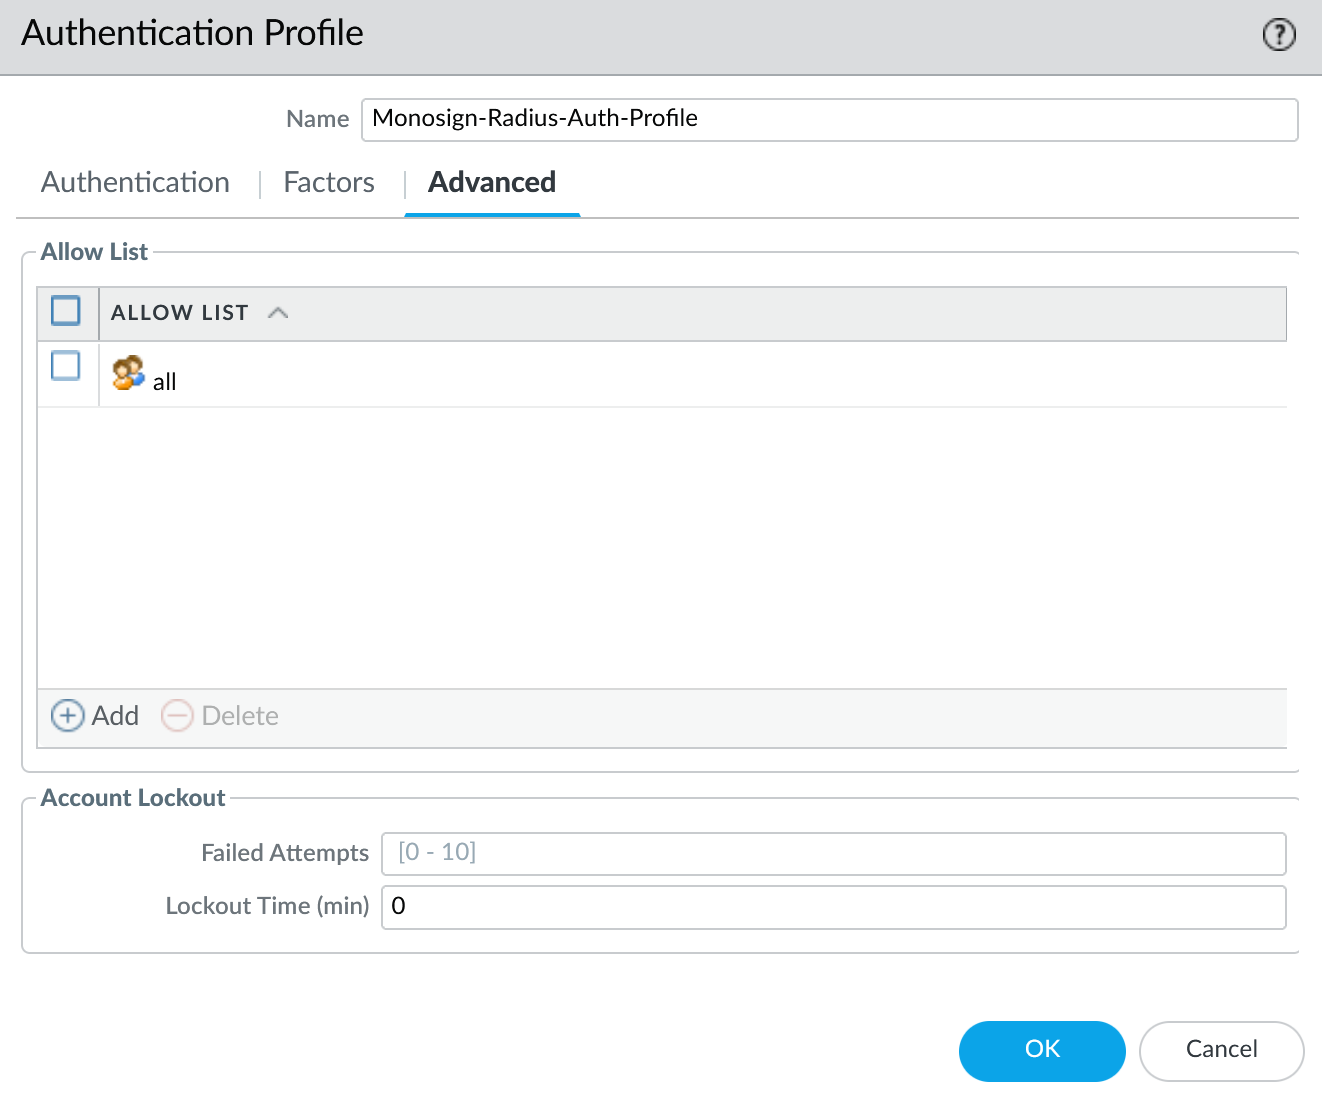
Authentication Profile - Advanced
Click OK.
This Authentication Profile can be assign to the GlobalProtect Gateway and Portal.
c. GlobalProtect Configuration
Go to Network → GlobalProtect → Portals Open existing portal configuration and edit Authentication on the Palo Alto Network devices management UI.
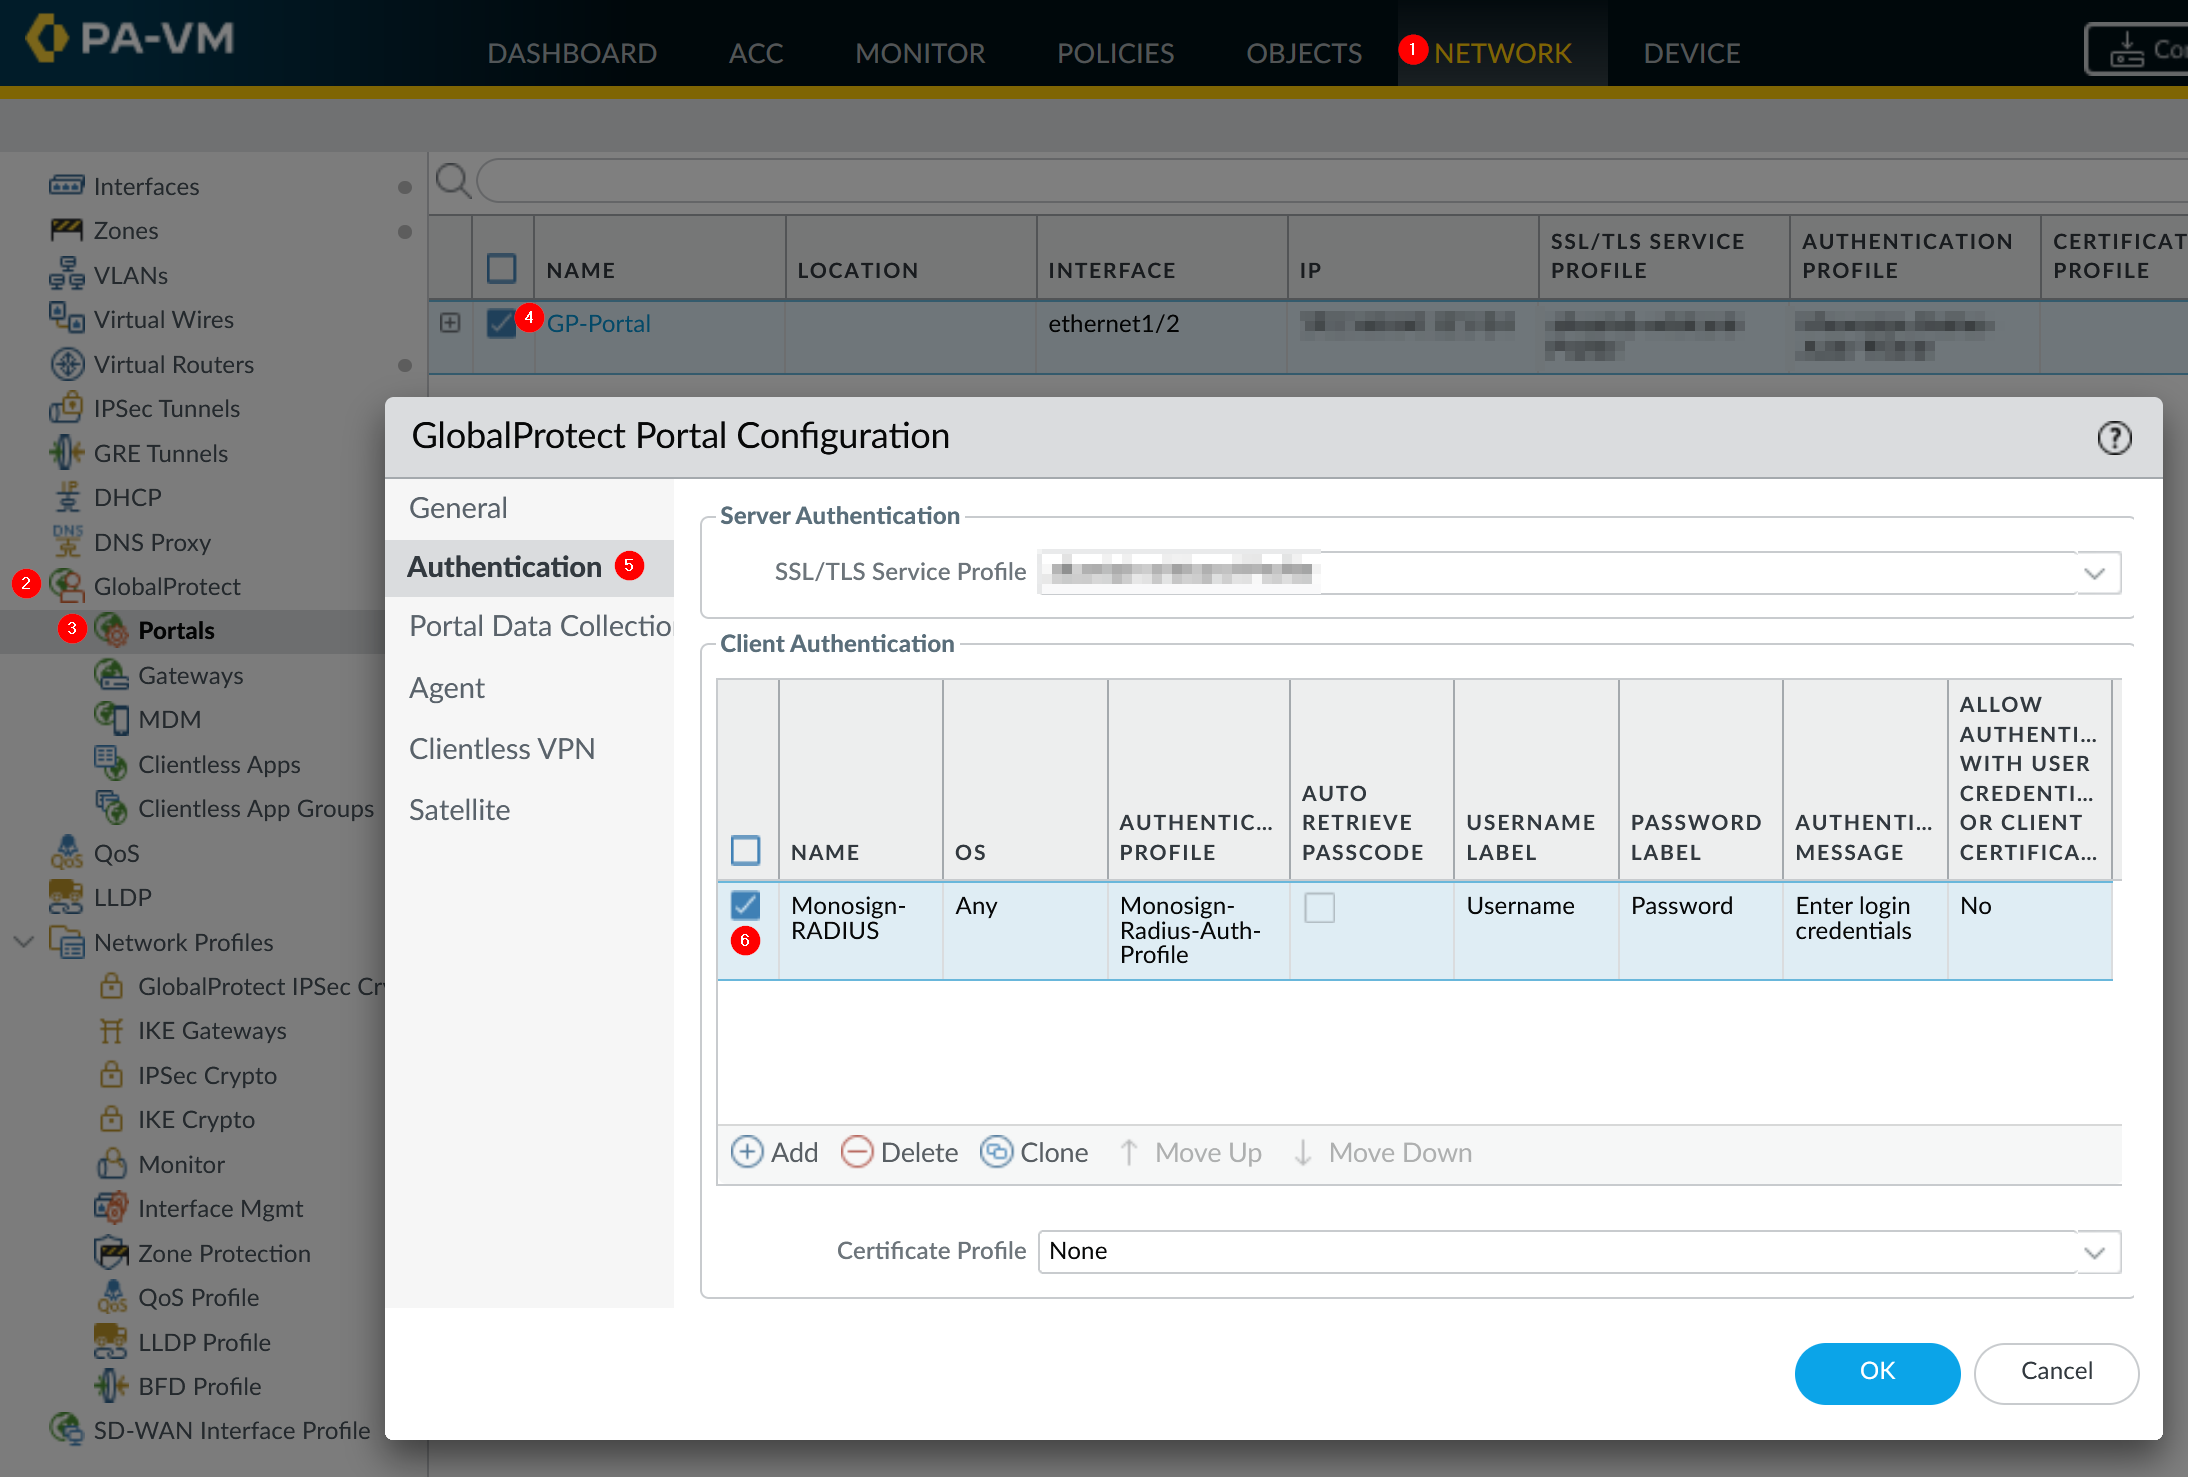
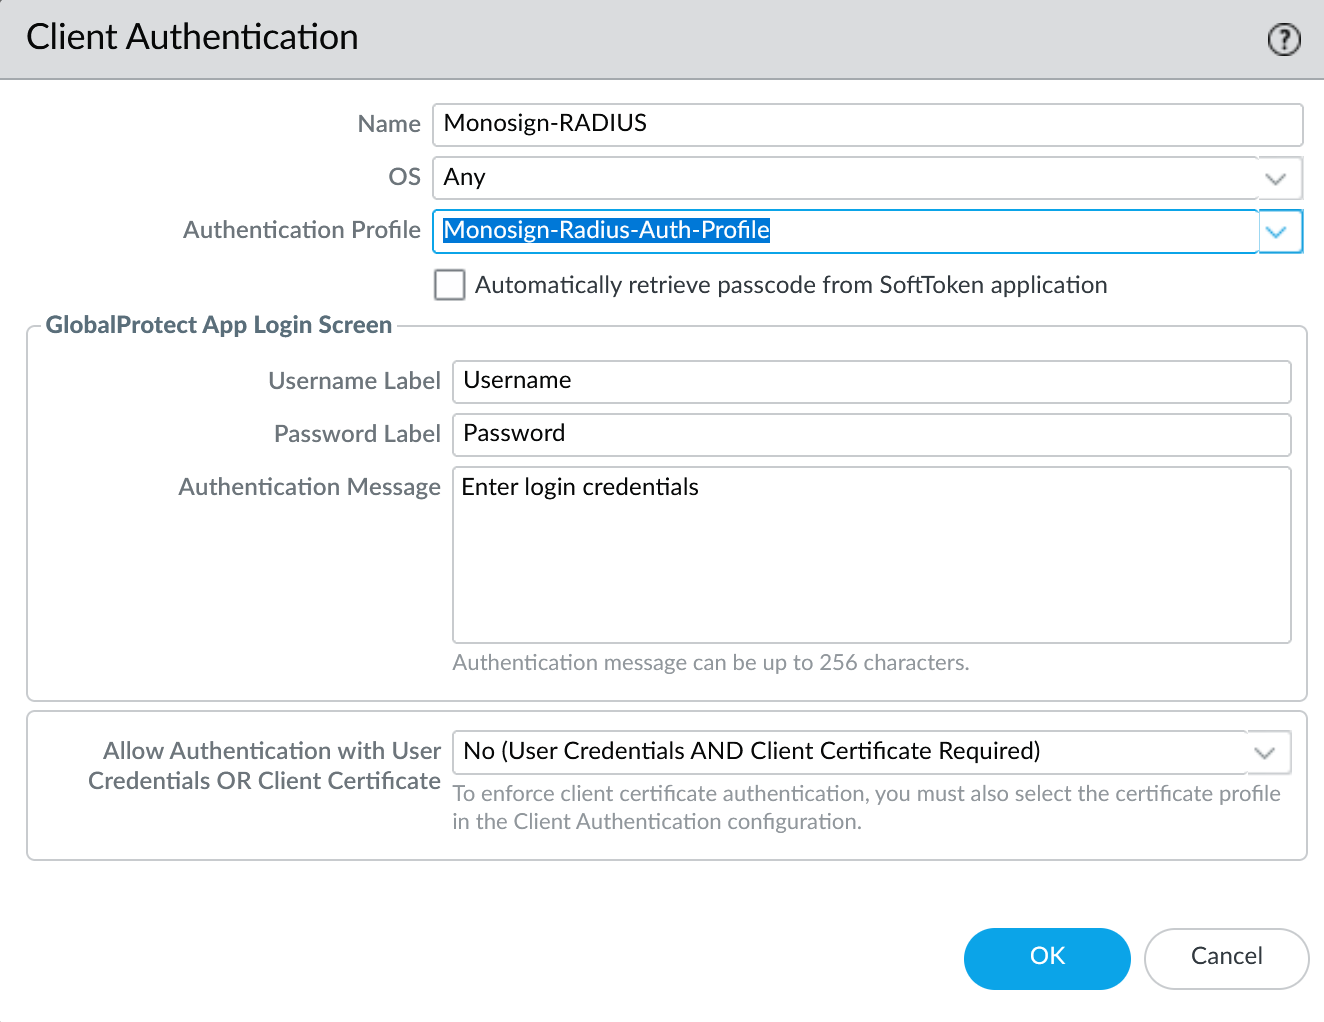
Click Ok
Go to Network → GlobalProtect → Gateways Open existing gateway configuration and edit Authentication on the Palo Alto Network devices management UI.
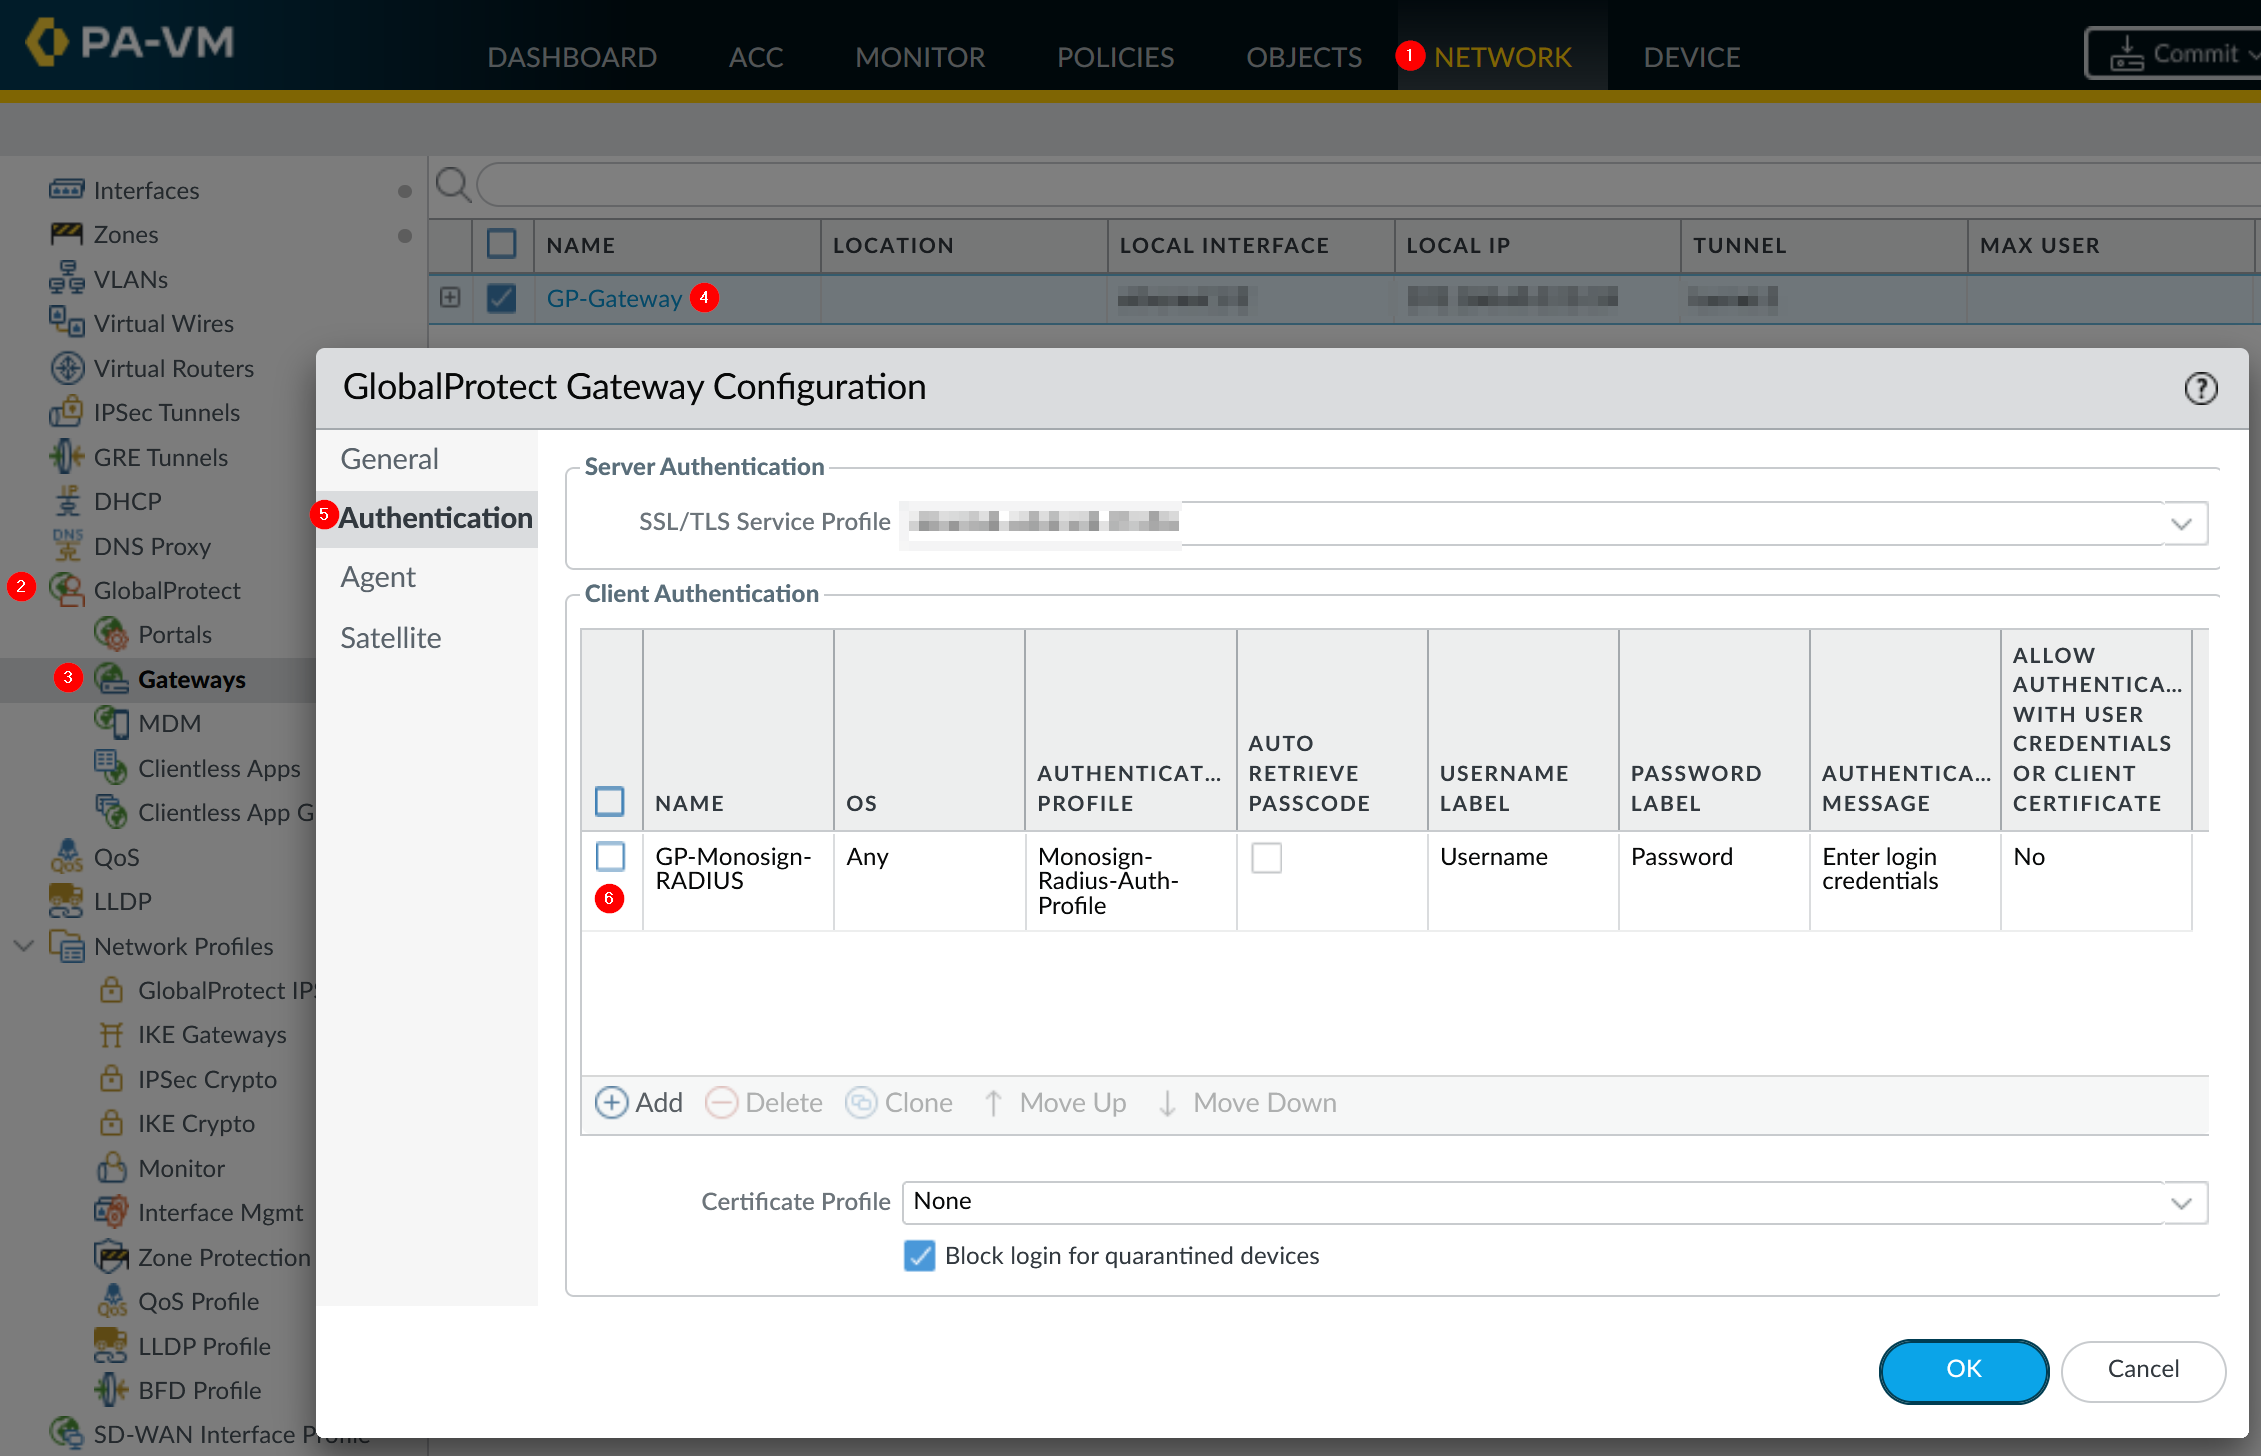
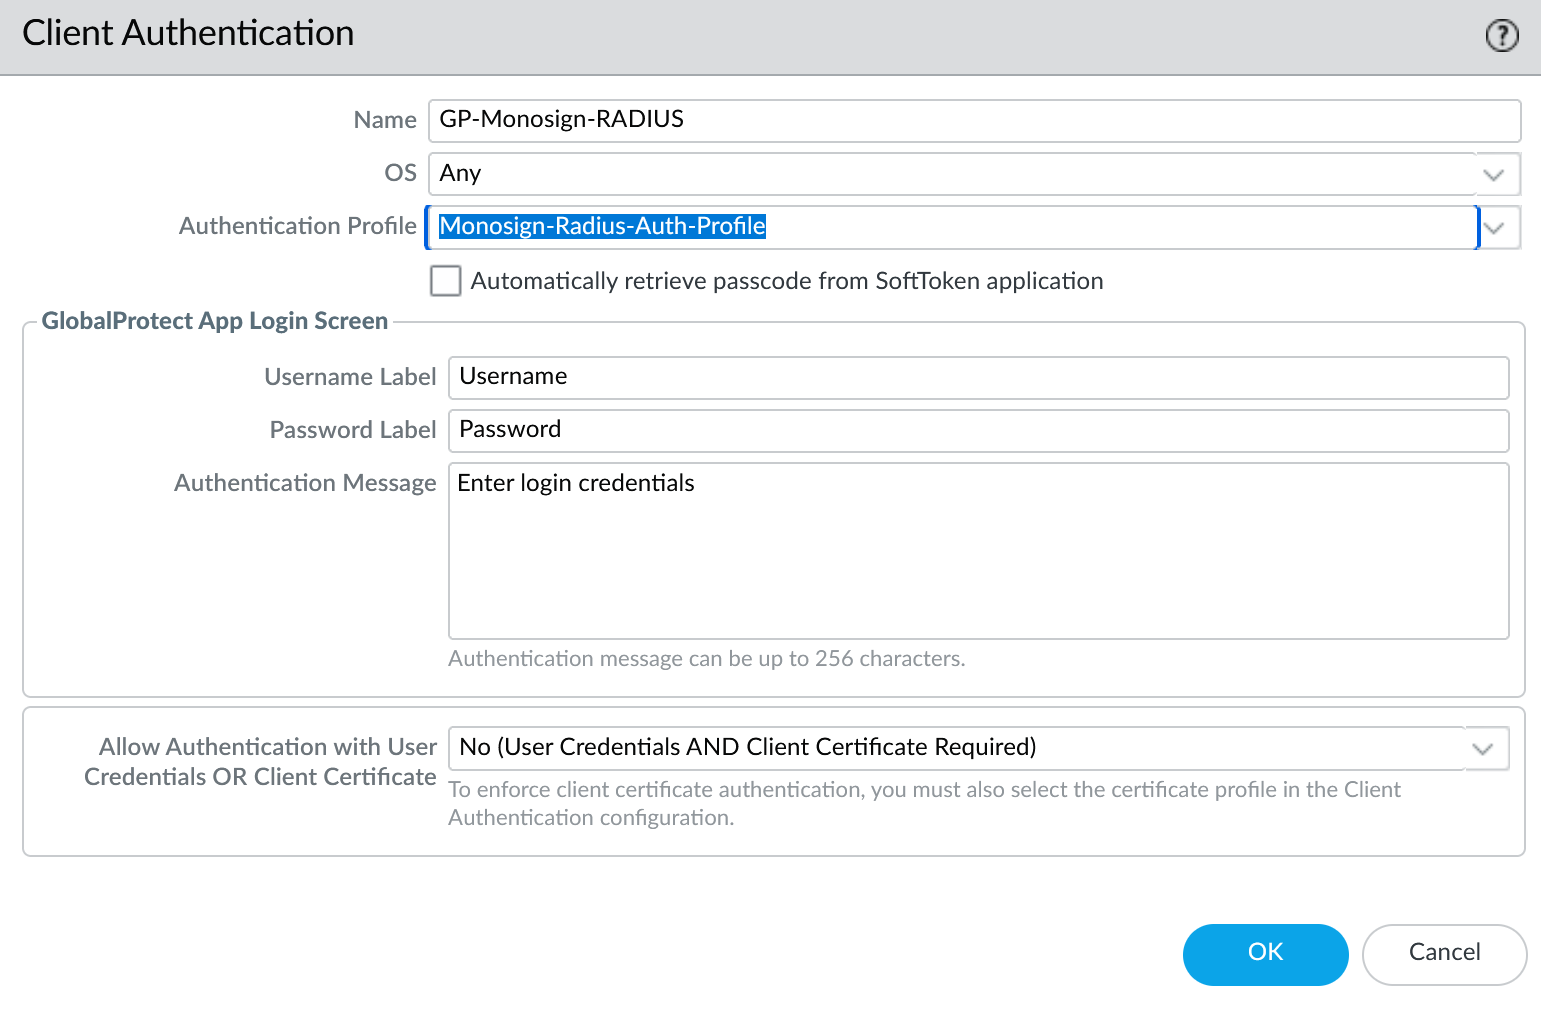
d. Global Protect Authentication Timing Configuration
Global Protect timeout defaults to 30 seconds. If global-protect timeout lower than RADIUS server profile timeout, the lower value will be used to timeout the authentication. To resolve this issue;
Increase the global-protect-timeout value
configure
set deviceconfig setting global-protect timeout 120
commit
Increase the “TCP received timeout” On the (GUI: Network > GlobalProtect > Portals > (name) > Agent > (agent name) > App )
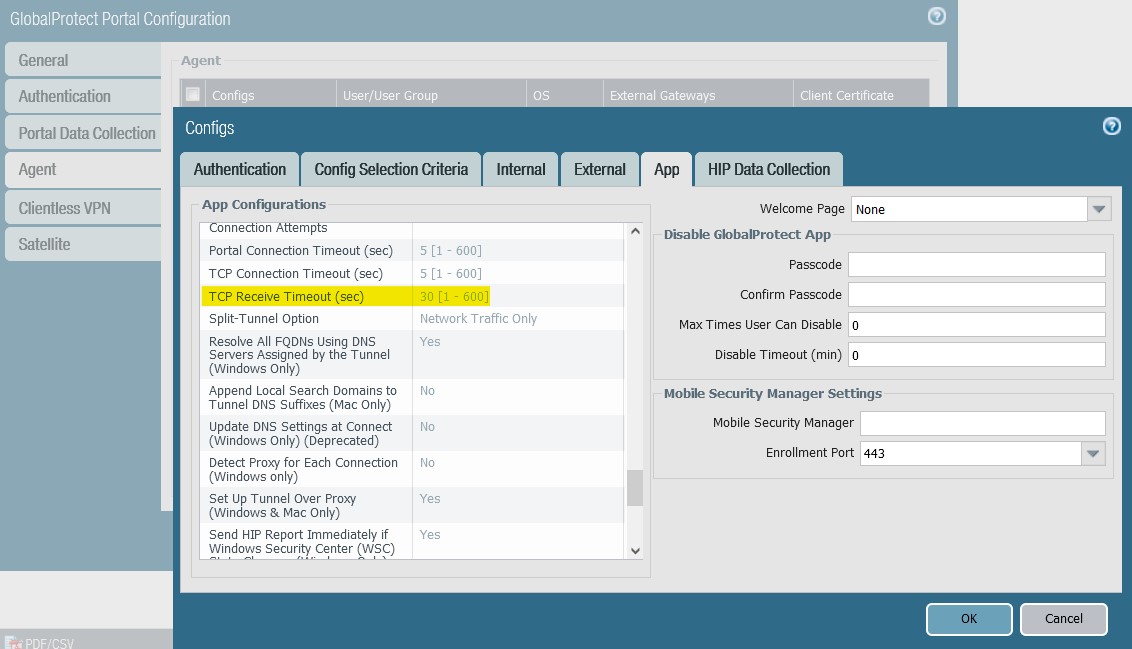
NOTE: If GlobalProtect timeout is changed without changing “TCP received timeout” the GP App gets disconnected after about 30 seconds due to the “TCP received timeout” value which defaults to 30 seconds. Source
Click Commit on Palo Alto Network devices management UI to apply all changes.
Now, go back to Monosign and give access to your users and try login.
3- Assign a user to the Palo Alto application
Please follow below instructions on how to assign a user to the Palo Alto application. In this example john.smith will assign to the application access.


4- Sign In Test
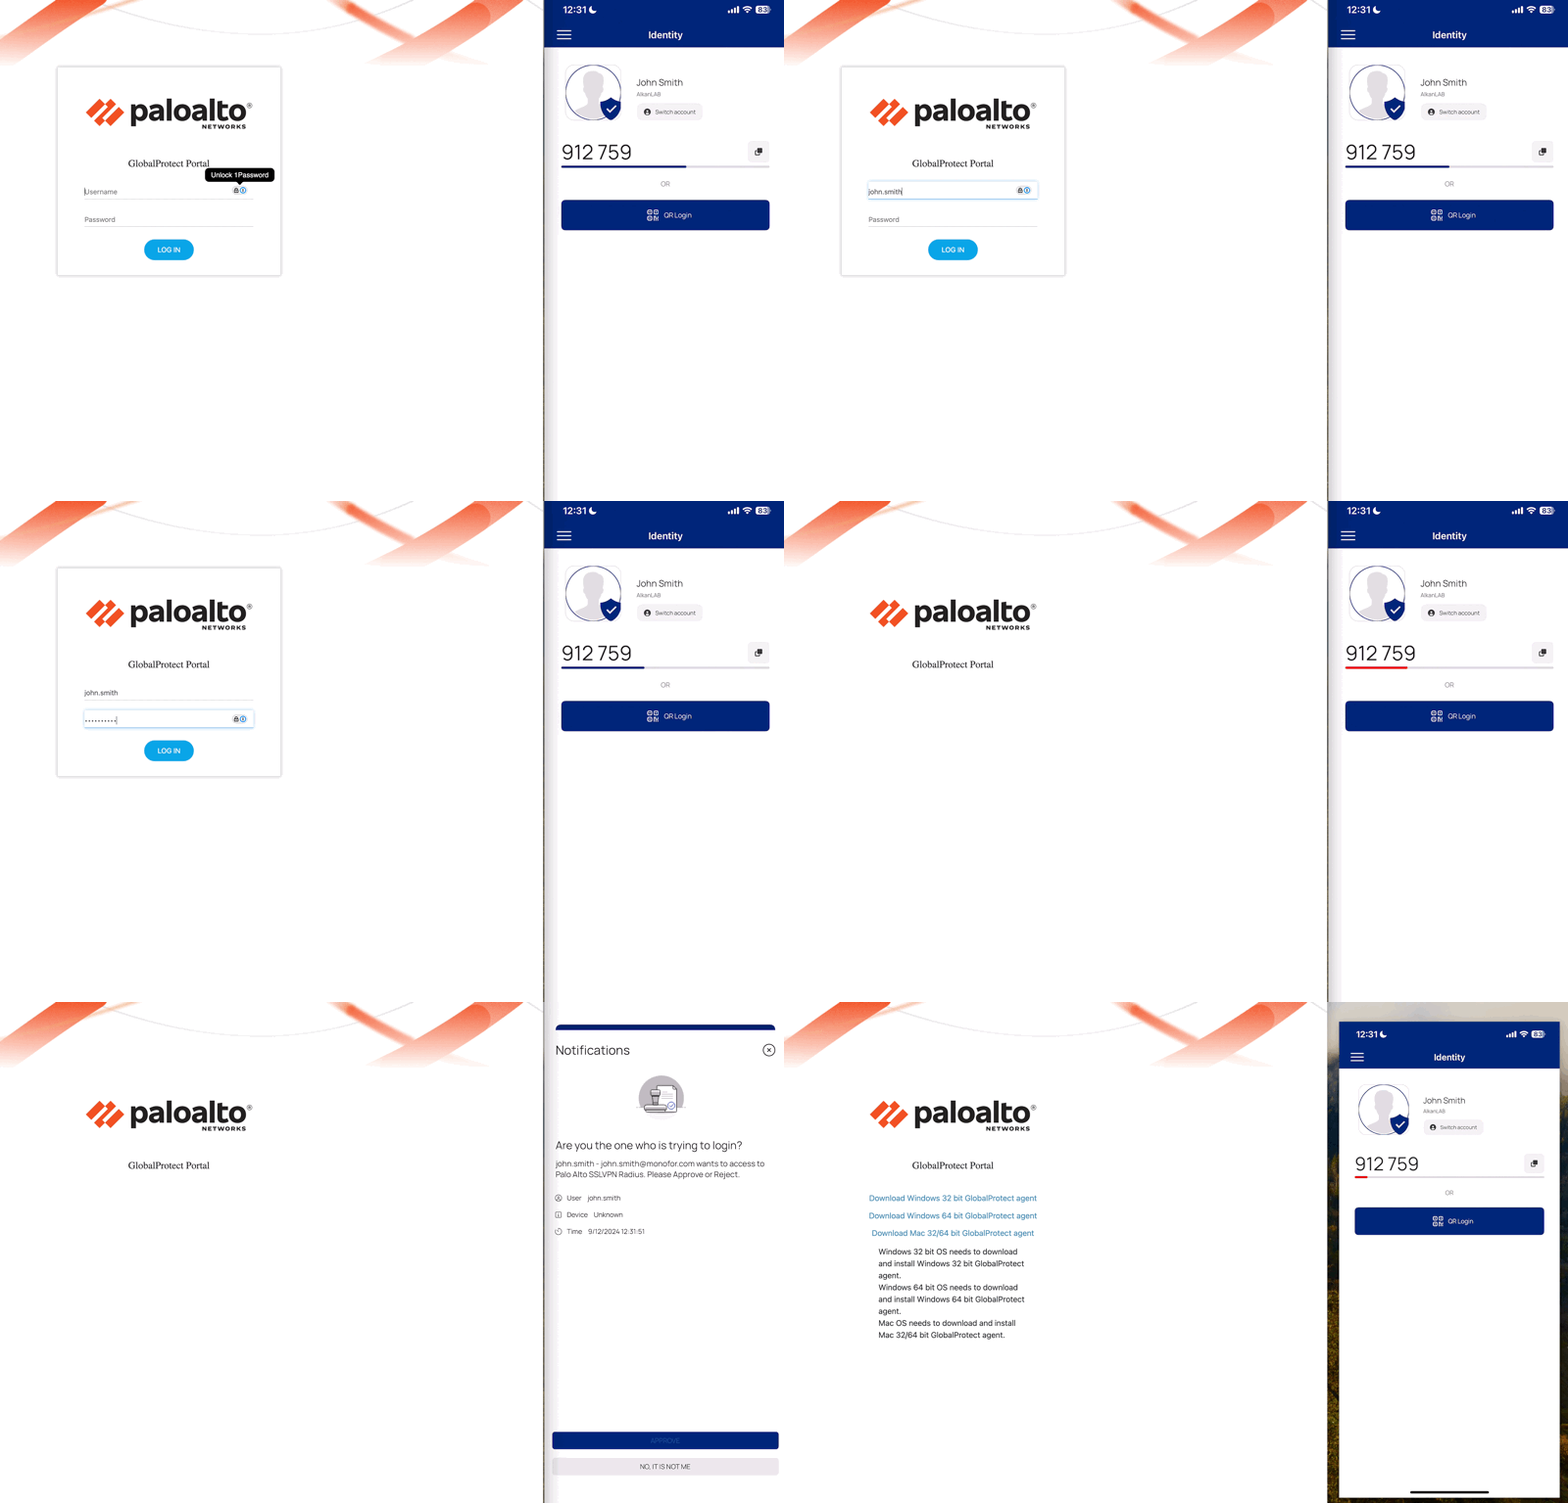
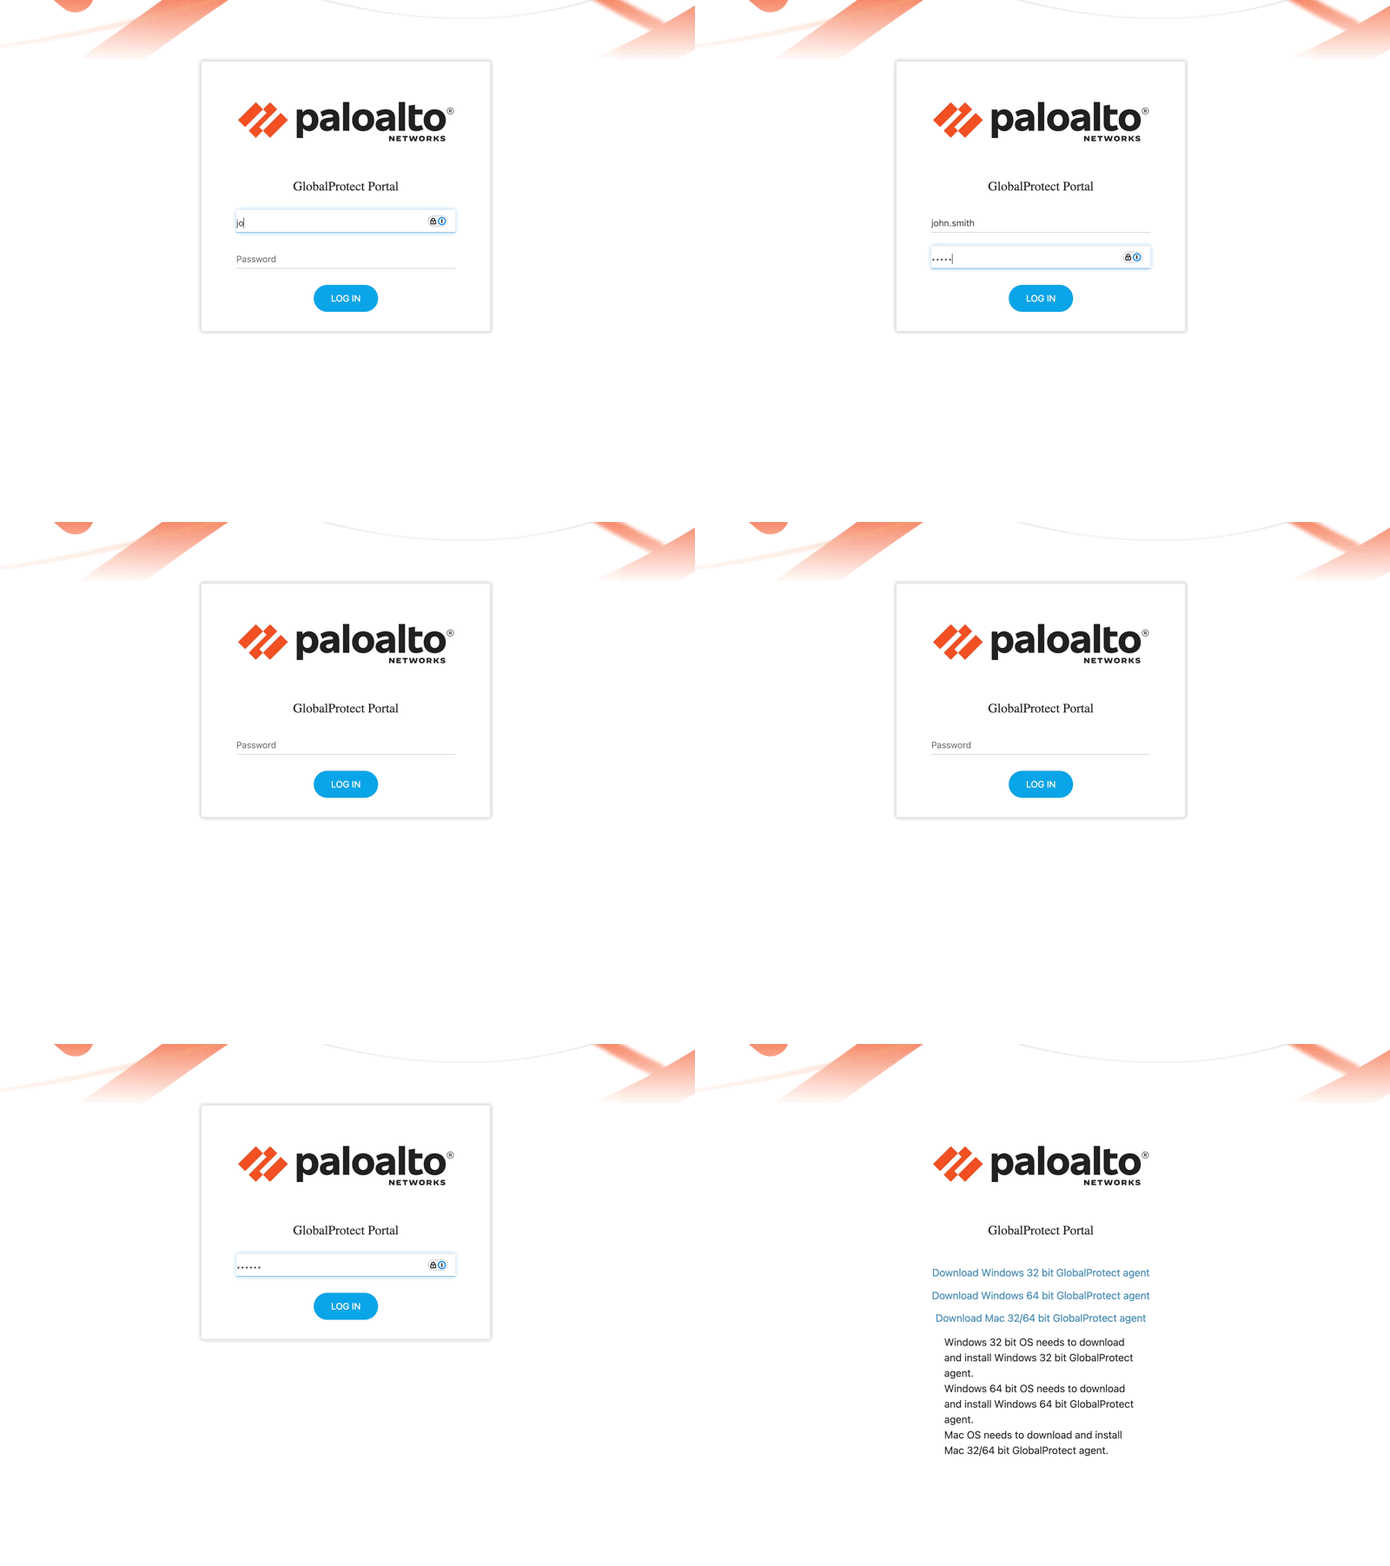
Now try login. Navigate to the Palo Alto Global Protect Portal. Type Username and Password then click login.
a. Palo Alto GlobalProtect Portal
Monofor Identity
If everything is well configured user will get Push notification on mobile device then approve notification will successfully login to Palo Alto GlobalProtect Portal.
Google Authenticator
If everything is well configured user will get secondary password prompt after username password input. Then user will successfully login to Palo Alto GlobalProtect Portal.
b. Palo Alto GlobalProtect Client
Monofor Identity
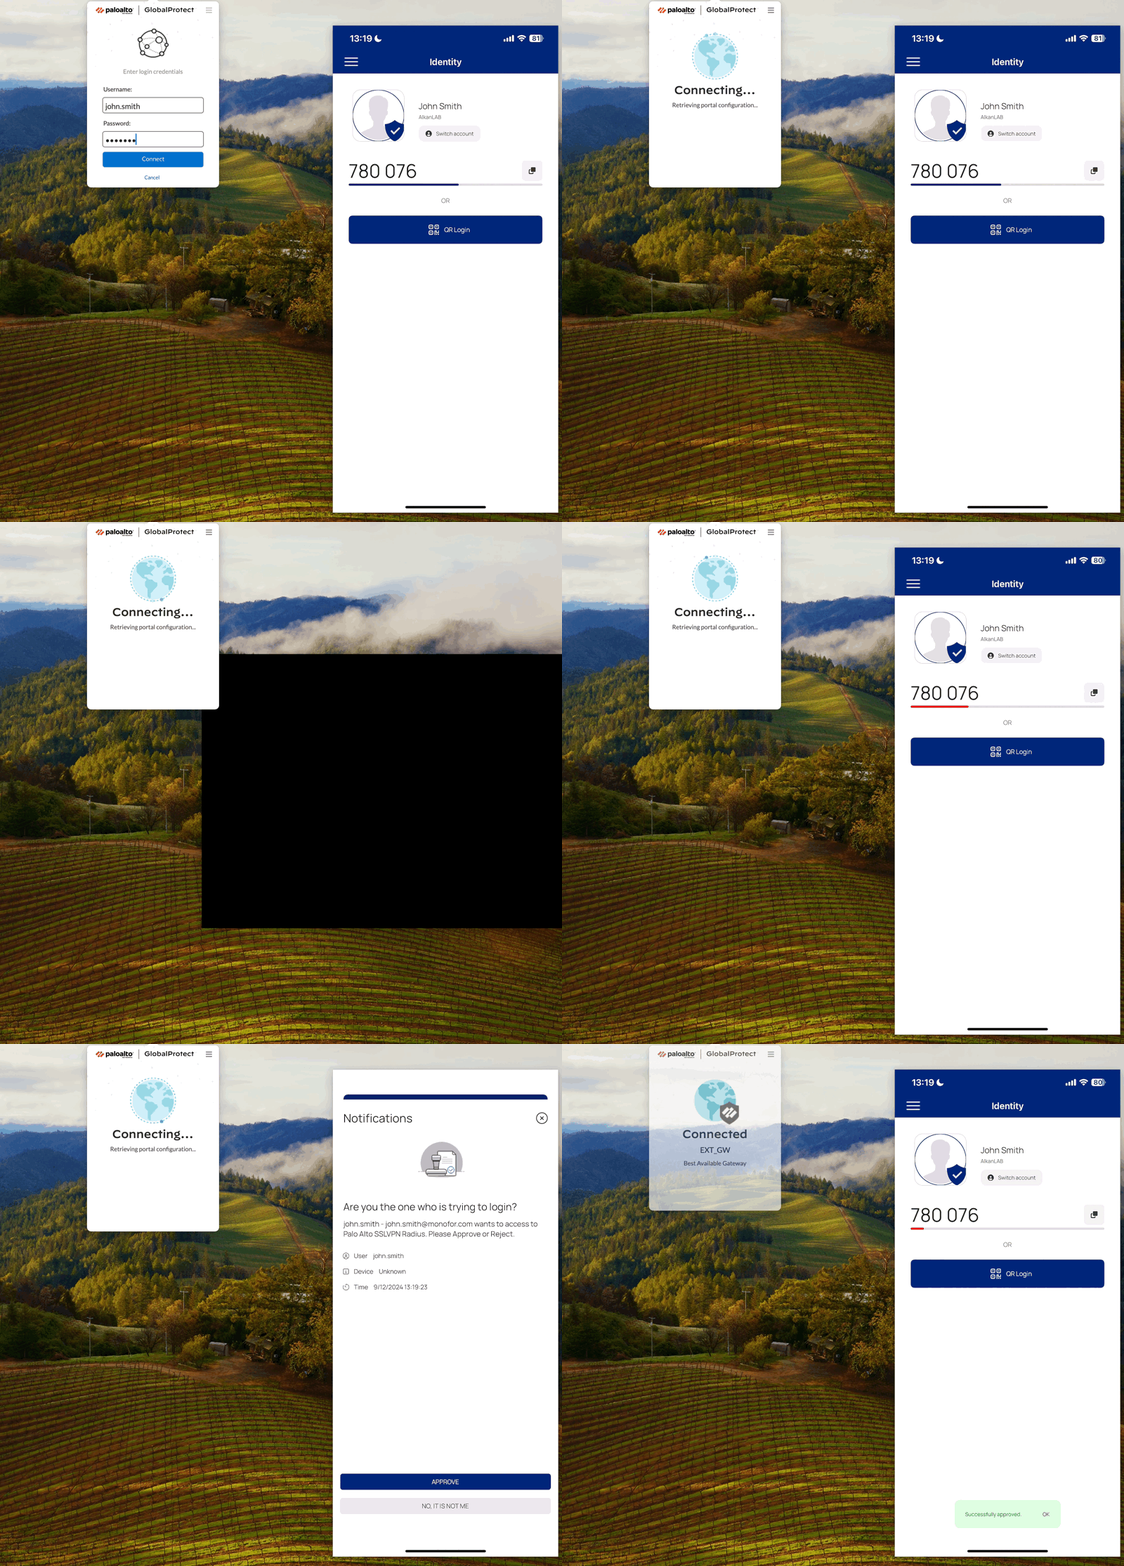
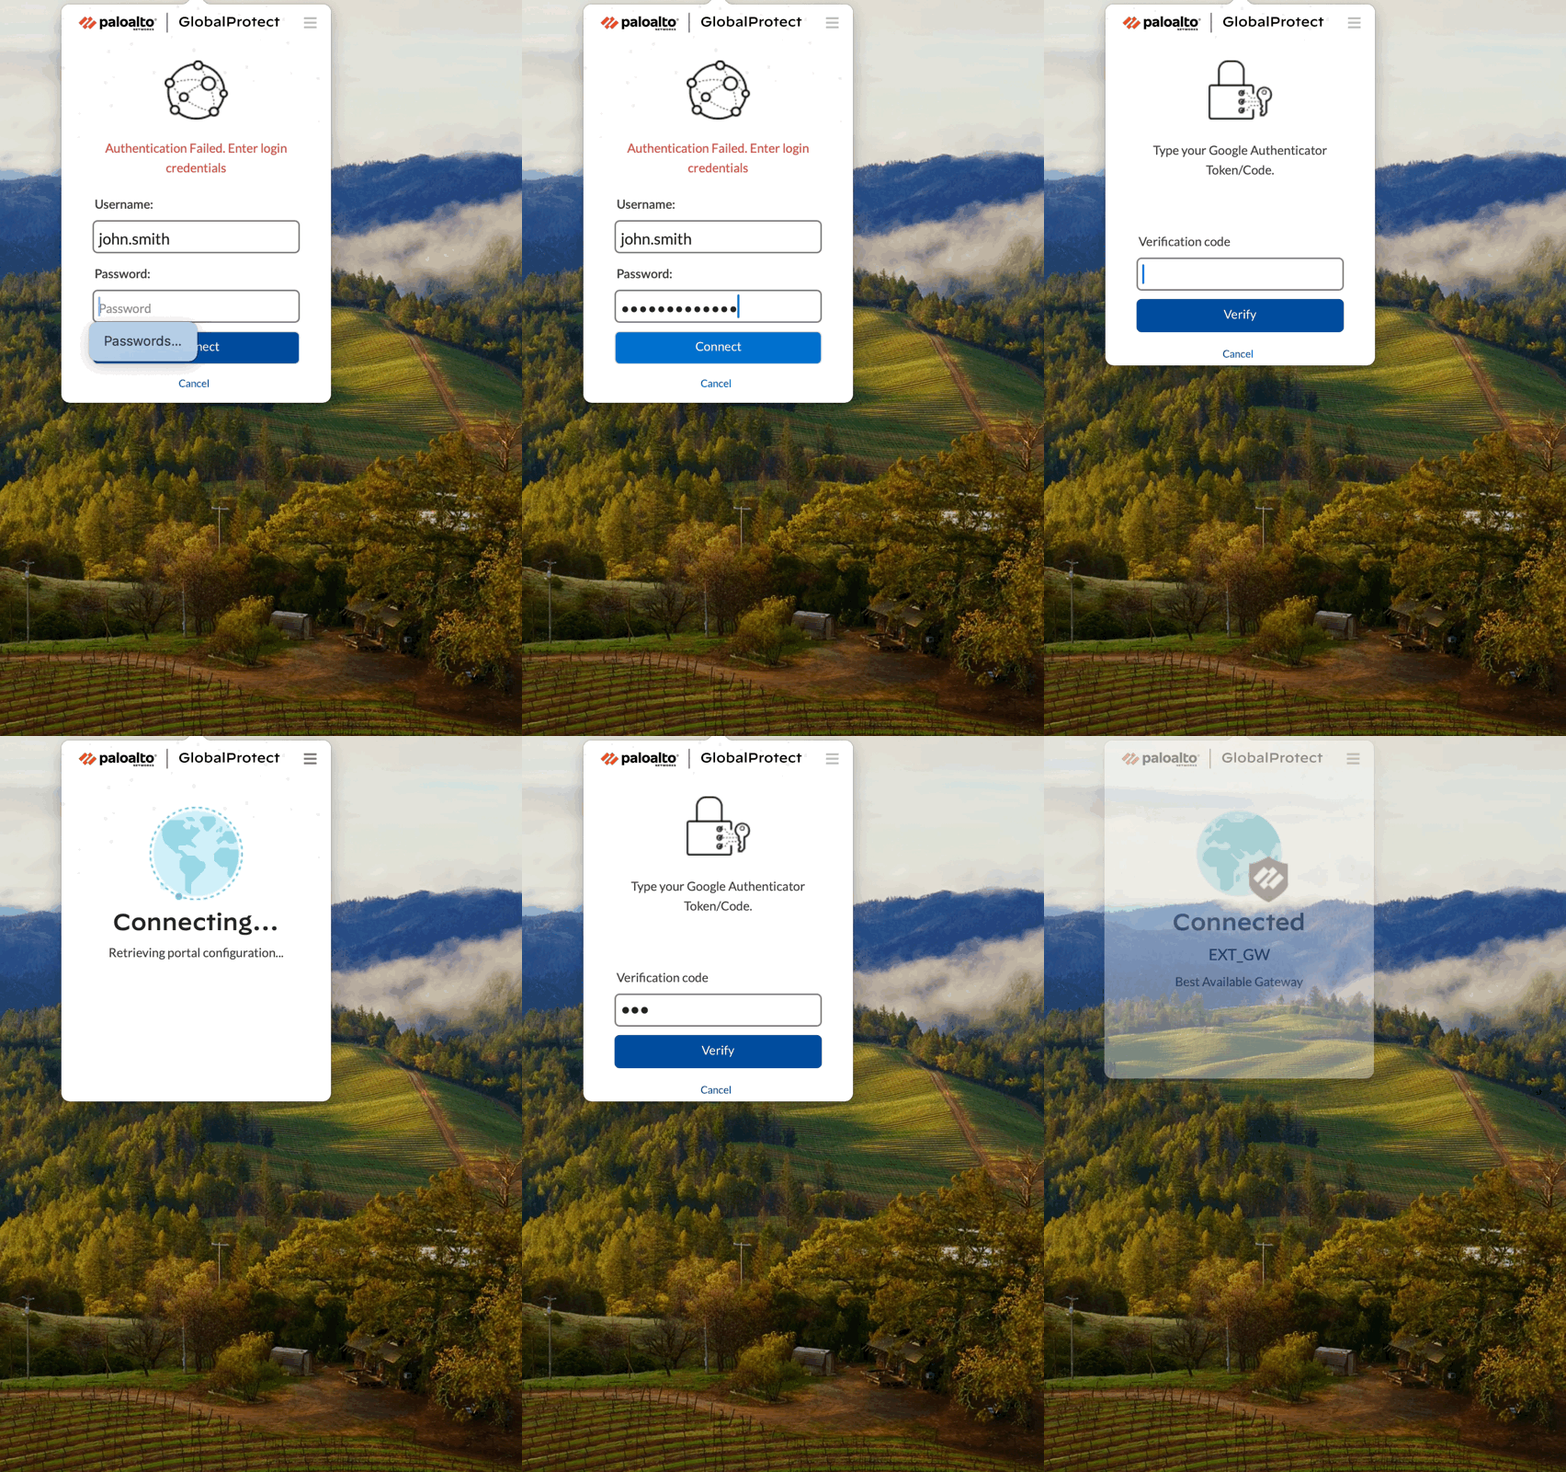
If everything is well configured user will get two(2) Push notification on mobile device then approve notifications will successfully login to Palo Alto GlobalProtect Client.
Google Authenticator
If everything is well configured user will get secondary password prompt two(2) times after username password input. Then user will successfully login to Palo Alto GlobalProtect Client.
5- Additional Configuration
Palo Alto GlobalProtect Client connections authenticate user twice. This is normal behavior and this behavior is commonly hidden to the end user when using simple user/password authentication. But If RADIUS enabled after user entered username/password MFA option will prompted twice.
By default, the GP client caches the credentials entered by the user. When the user is prompted to authenticate to the Portal, the client stores these credentials and uses them when authentication to the Gateway is required. In cases where the Gateway employs the same authentication method (which is common), the user will be connected to the Gateway without being prompted for credentials again. However, in the background, a second authentication process does indeed occur. For more details please follow this link.
Palo Alto giving a solution for this behavior. GlobalProctect provide option about Authentication Override for this kind of situation.
GlobalProtect offers the option to generate an authentication cookie once the user has successfully authenticated. This cookie is stored on the user's computer and has a configurable lifespan. The purpose of this cookie is to authenticate the user using the cookie itself, rather than the authentication method configured for GlobalProtect. The process should follow these steps:
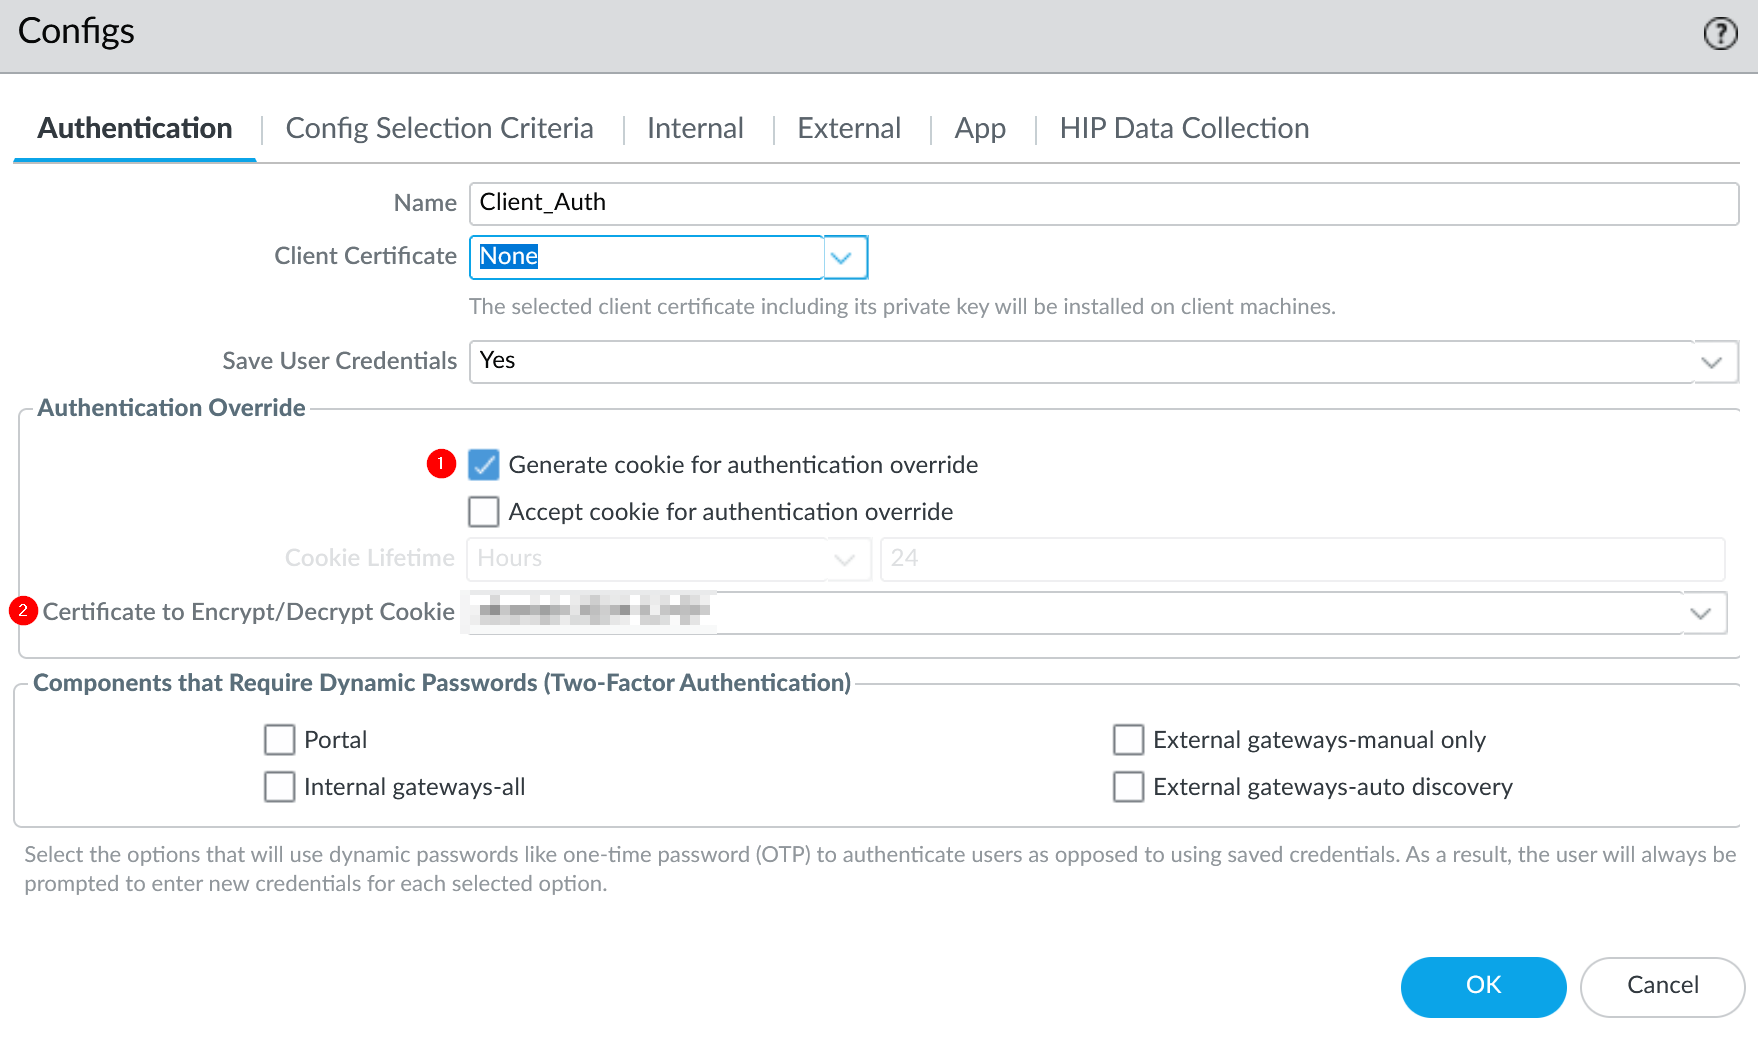
Configure the GP Portal to generate an authentication cookie with a lifespan of 1 minute. (Ensure that only the generation of the cookie is enabled, without enabling the acceptance of the authentication cookie.)
Configure the GP Gateway to accept the authentication cookie, without enabling its generation.
Below steps must be done by Palo Alto Experts.
a. Configure GP Portal
Go to Network → GlobalProtect → Portals → Portal Config → Agent → Agent Config → Authentication
Select Generate cookie for authentication override and Certificate to Encrypt/Decrypt Cookie
b. Configure GP Gateway
Go to Network → GlobalProtect → Gateways → Gateway Config → Agent → Client Settings → Client Settings Config → Authentication Override
Select Accept cookie for authentication override, Cookie Lifetime 1 Min and Certificate to Encrypt/Decrypt Cookie

Commit changes to apply on Palo Alto Devices.
Now MFA prompt will work only once.
