Monofor PoC installation can be done with the steps below.
Version : v2026.02
Before Start Installation
Monofor products are designed to work on container architecture. Therefore, in order to download the images, it is necessary to download them from Monofor's Official Repositories. If you do not have access to the Official Repositories, the installation cannot be performed. To overcome this, you can contact Monofor Sales Engineers or authorized partners to receive support.
These installation steps are performed under the supervision of Monofor Sales Engineers or authorized partners sales engineers.
Downloading the Installation Package
Monofor installation package can be downloaded with below link;
cURL
curl -SL https://download.monofor.com/install/latest/monofor.sh -o /tmp/monofor.sh && chmod +x /tmp/monofor.sh && cd /tmp
wget
curl -SL https://download.monofor.com/install/latest/monofor.sh -o /tmp/monofor.sh && chmod +x /tmp/monofor.sh && cd /tmp
Installation steps
After Monofor package downloads you can follow below steps to install.
Please make sure to get Monofor Repository credentials from your local Sales Engineer. If you didn’t obtain the correct credentials you will not able to install Monofor Products. If you don’t know your local Sales Engineer please contact se@monofor.com
Installation Start
First of all, we need to verify if Monosign package was successfully downloaded.
cd /tmp
bash monofor.sh -install
Example of commands output;
  __  __                    __
 |  \/  | ___  _ __   ___  / _| ___  _ __
 | |\/| |/ _ \| '_ \ / _ \| |_ / _ \| '__|
 | |  | | (_) | | | | (_) |  _| (_) | |
 |_|  |_|\___/|_| |_|\___/|_|  \___/|_|

Monofor Identity Access Management
Monofor Privileged Account & Access Management
Copyright 2017-2026, Monofor, Inc.
https://monofor.com
Version: v2026.02 (Build: 202602072315)
======================================================================

Usage: monofor.sh [OPTIONS]

OPTIONS:
  -install              Download and install Monofor scripts
  -check                Run pre-installation checks
  -tools                Download and install Monofor tools
  -v, --version VERSION Install specific version (default: latest)
  -h, --help            Show this help message

EXAMPLES:
  monofor.sh -install
  monofor.sh -check
  monofor.sh -tools
  monofor.sh -v v2025.04
  monofor.sh -h

For more information, visit: https://monofor.com
If you run the script without argument it will failed. It must be run with -install for the PoC installation.
Example output of bash monofor.sh -install command
  __  __                    __
 |  \/  | ___  _ __   ___  / _| ___  _ __
 | |\/| |/ _ \| '_ \ / _ \| |_ / _ \| '__|
 | |  | | (_) | | | | (_) |  _| (_) | |
 |_|  |_|\___/|_| |_|\___/|_|  \___/|_|

Monofor Identity Access Management
Monofor Privileged Account & Access Management
Copyright 2017-2026, Monofor, Inc.
https://monofor.com
Version: v2026.02 (Build: 202602072315)
======================================================================

======================================================================
  Docker Service Check
======================================================================

▶ [1/4] Checking Docker service (progress: 25%)

======================================================================
  Docker Service Check
======================================================================
✓ Docker service is installed and running

======================================================================
  Repository Connectivity Check
======================================================================

▶ [2/4] Verifying repository access (progress: 50%)

======================================================================
  Monofor Repository Access Check
======================================================================
✓ Monofor Repository is reachable (https://cr.monofor.com)

======================================================================
  Installing Monofor Scripts
======================================================================

▶ [3/4] Installing scripts (progress: 75%)
✓ Installation scripts installed

======================================================================
  Installing Monofor Tools
======================================================================

▶ [4/4] Installing tools (progress: 100%)
✓ Monofor tools installed

======================================================================
  Installation Complete
======================================================================
✓ Monofor installation scripts and tools are ready

Next steps:
  1. Run: monofor-build
  2. Run: monosign
Pre-Requirement Installation
Monofor Install scripts need to be run with the root privilege. Before beginning the installation, you need to elevate Linux user to the root privilege. It can be done with below commands;
sudo su -
sudo -i
Or you can run all commands with sudo
We will continue with sudo prefix.
Monofor products need docker environment on your infrastructure. Monofor pre-requirements script checks missing packages but not install. you need to install them manually.
Type below command to configure pre-requirements on your Linux host;
sudo monofor-build
Please choose deployment type(For PoC Select 1);
  __  __                    __
 |  \/  | ___  _ __   ___  / _| ___  _ __
 | |\/| |/ _ \| '_ \ / _ \| |_ / _ \| '__|
 | |  | | (_) | | | | (_) |  _| (_) | |
 |_|  |_|\___/|_| |_|\___/|_|  \___/|_|

Monofor Identity Access Management
Monofor Privileged Account & Access Management
Copyright 2017-2026, Monofor, Inc.
https://monofor.com
Monofor Build Configuration Script
Version: v2026.02 (Build: 202602072335)
======================================================================

======================================================================
  Monofor Configuration
======================================================================

======================================================================
  Deployment Type Selection
======================================================================
Available deployment types:
  1. PoC (Proof of Concept)
  2. Production

Select deployment type (1 or 2): 1
Select Installation path if you want to use default path pr Enter
======================================================================
  Installation Path Configuration
======================================================================
Default path: /opt
Press Enter to confirm to use default path.

Enter Monofor installation path:
✓ Directory structure created at: /opt
Type domain name Example: monofor.com
======================================================================
  DNS Configuration
======================================================================
Enter main domain name (e.g., monofor.com): monofor.com
Choose correct network interface for docker service installation.
======================================================================
  Network Interface Selection
======================================================================
Available network interfaces:
  1. lo 127.0.0.1
  2. eth0 192.168.53.20
Select interface number: 2
Selected interface: eth0 (192.168.53.20)
✓ Interface selected: eth0 (192.168.53.20)
Docker has own network configuration. Sometimes Docker networks is overlapping with the actual networks configuration. For detail information please check this link.
If network customization not necessary please type no.
======================================================================
  Docker Network Configuration
======================================================================
Configure custom Docker networks? (yes/no): no
✓ Using default Docker networks
Type yes if domain name for account different than the local domain name. Then type yes if the domain configuration is correct.
Use different domain for Account service? (yes/no): no

================================
Main Domain: monofor.com
================================

Is this configuration correct? (yes/no): yes
Script will generate configuration and self-signed certificate
======================================================================
  Generating Environment IDs
======================================================================
✓ Environment IDs generated

======================================================================
  Copying Base Files
======================================================================
✓ Base files copied successfully

======================================================================
  Certificate Generation
======================================================================
[2026-02-08 00:07:44.548] [INFO] - Monofor Self-Signed Certificate creation started.
...+....+...+...+..+...+..................+....+...............+..+......
.............+...............+...++++++++++++++++++++++++++++++++++++++++
-----
[2026-02-08 00:07:48.844] [INFO] - Monofor Self-Signed Certificate creation finished.
[2026-02-08 00:07:49.580] [INFO] - Certificate detail can be found: /opt/monofor/cert/2026-02-08/monofor.com.info
[2026-02-08 00:07:49.679] [INFO] - Initial installation detected. Skipping loadbalancer update.
##############################################################
  Certificate Name          : monofor.com.crt
  Certificate Location      : /opt/monofor/cert/2026-02-08
  Certificate Validity      : 3650 Days
  Certificate Thumbprint    : C8E2B14B55FF4C3AD6F0A4FAA4675E1F1B3736CB
  Subject CommonName        : *.monofor.com
  Subject Country           : US
  Subject State             :
  Subject Locality          :
  Subject Organization Unit :
  Subject Organization      : Monofor, Inc.
  Subject Alternate Names   : DNS:*.monofor.com,DNS:*.monofor.monofor.com,DNS:monofor.com
##############################################################
✓ Certificate generated successfully
Please type Monosign repository credentials;
======================================================================
  Repository Login Configuration
======================================================================
Enter repository username: mfc_poc
Enter repository password:
✓ Successfully logged in to Monofor Repository
Above credentials are examples. Do not use these credentials. You can contact with your local Monofor SE team to get correct credentials for your environment.
Following that Monofor-Pre-Requirement installation will be completed.
======================================================================
  Docker Service Initialization
======================================================================
✓ Docker service restarted
✓ Docker Swarm initialized with default networks

======================================================================
  Creating Monofor Docker Network
======================================================================
6j9tsdjlla0q5ol3rvyplbm3x
✓ Network 'monofornet' created
✓ Configuration finalized

======================================================================
  Configuration Complete
======================================================================
✓ Monofor pre-installation configuration completed successfully

Log file: /var/log/monofor-build-2026-02-07.log
DNS records are very important for Monofor services. Therefore, if there are missing DNS records, they need to be completed before proceeding to the next steps. You can check this page.
Monosign Installation
Please make sure to complete the Monofor Pre-Requirement installation first.
If Pre-Requirement installation is not completed correctly, please do not continue to next steps.
Now you can continue with Monosign services installation.
Type below command to install Monosign on your Linux host;
sudo monosign
OR
monosign
First Monosign installation require hostname of the monosign products. If you want to continue default please leave it blank.
Example of the command output;
root@monofor:/tmp# monosign
   __  __                       _
  |  \/  | ___  _ __   ___  __ (_) __ _ _ __
  | |\/| |/ _ \| '_ \ / _ \/ _|| |/ _` | '_ \
  | |  | | (_) | | | | (_) \__ | | (_| | | | |
  |_|  |_|\___/|_| |_|\___/|__/|_|\__, |_| |_|
                                  |___/

   Monosign Installation Script

Monofor Identity and Access Management Platform
Copyright 2017-2026, Monofor, Inc.
https://monofor.com
Version: v2026.02 (Build: 202602072357)
======================================================================

======================================================================
  Validating Prerequisites
======================================================================

✓ Prerequisites validated successfully

======================================================================
  Monosign Installation Started
======================================================================


======================================================================
  Running Installation Steps
======================================================================

✓ Files copied to /opt/monofor

======================================================================
  Configuring Monosign Hostnames
======================================================================

⚠ If you want to use default hostnames please leave it blank and press Enter to continue...
Type Monosign Account Hostname (Default: id):
Type Monosign API Hostname (Default: iam-api):
Type Monosign Management Hostname (Default: iam):
✓ Monosign Account Hostname configured: Host=id -> FQDN=id.monofor.com
✓ Monosign API Hostname configured: Host=iam-api -> FQDN=iam-api.monofor.com
✓ Monosign Management Hostname configured: Host=iam -> FQDN=iam.monofor.com

DNS Name           | DNS Query Result   | FQDN
-------------------|--------------------|-------------------
id                 | Resolvable         | id.monofor.com
iam-api            | Resolvable         | iam-api.monofor.com
iam                | Resolvable         | iam.monofor.com

✓ All required DNS Names are resolved by your DNS server.

======================================================================
  Configuring Monosign Database
======================================================================

✓ PoC database configuration completed
Monosign Installation is always install latest version. If you want to install specific version please type it.
======================================================================
  Configuring Monosign Version
======================================================================

Default version: v2025.10-hf01
Please set Monosign version (press Enter for default):
✓ Version configured: Monosign v2025.10-hf01
Please check Installation summary and something is wrong start monosign scripts again.
======================================================================
  Installation Summary
======================================================================

##############################################################
  DNS Name                : monofor.com
  Account Hostname        : id
  API Hostname            : iam-api
  Management Hostname     : iam
  Account URL             : id.monofor.com
  API URL                 : iam-api.monofor.com
  Management URL          : iam.monofor.com
  Monosign Version        : v2025.10-hf01
  Certificate Thumbprint  : C8E2B14B55FF4C3AD6F0A4FAA4675E1F1B3736CB
  Database Type           : PostgreSql
  Database Server/Port    : monofor-db:5432
  Database Name           : monosign
  Database User           : monofor
  Database Password       : 38cb30b4-c2a9-43b3-93ac-e0ba6b02551a
##############################################################

Are these information correct? Do you want to continue? (yes/no): yes
Installation will continue to download Monofor docker images.
======================================================================
  Monosign installation continuing...
======================================================================

Variables change started.
Variables change finished.

======================================================================
  Monosign Images Download Started
======================================================================

v2025.10: Pulling from monofor/db
v2025.10-hf01: Pulling from monofor/cache
v2025.10-hf01: Pulling from monofor/mq
v2025.10-hf01: Pulling from monosign/seed
v2025.10-hf01: Pulling from monosign/api
v2025.10-hf01: Pulling from monosign/management
v2025.10-hf01: Pulling from monosign/account
v2025.10-hf01: Pulling from monosign/service
v2025.10-hf01: Pulling from monosign/radius-server
v2025.10-hf01: Pulling from monosign/access-gateway
v2025.10-hf01: Pulling from monosign/ldap-gateway
v2025.10-hf01: Pulling from monofor/loadbalancer

======================================================================
  Monosign Images Download Finished
======================================================================
After images downloaded please type yes to install Monofor services.
Do you want to deploy monofor projects? (yes/no): yes
monofor project deploy starting...
Creating service monofor_gear
Creating service monofor_db
Creating service monofor_loadbalancer
Progress: [mmmmmmmmmmmmmmmmmmmmmmmmmmmmmmmmmmmmmmmmmmmmmmmmmm] 100%
monosign project deploy starting...
Creating service monosign_ldap-gateway
Creating service monosign_mq
Creating service monosign_seed
Creating service monosign_access-gateway
Creating service monosign_cache
Creating service monosign_management
Creating service monosign_api
Creating service monosign_account
Creating service monosign_service
Progress: [mmmmmmmmmmmmmmmmmmmmmmmmmmmmmmmmmmmmmmmmmmmmmmmmmm] 100%
monosign-radius-server project deploy starting...
[+] up 1/1
 ✔ Container monosign_radius-server Created                                                                                              0.1s
Progress: [mmmmmmmmmmmmmmmmmmmmmmmmmmmmmmmmmmmmmmmmmmmmmmmmmm] 100%
License information created. Please check: /opt/monofor/log/license-2026-02-08.info
monosign stack deployed.
monofor stack deployed.
Progress: [mmmmmmmmmmmmmmmmmmmmmmmmmmmmmmmmmmmmmmmmmmmmmmmmmm] 100%
Monosign service check started
Monosign HealthCheck Status: true
monosign_radius-server deployed.

ID             NAME                      MODE         REPLICAS   IMAGE                                                  PORTS
gnwyawwe5z1x   monofor_db                replicated   1/1        cr.monofor.com/monofor/db:v2025.10                     *:5432->5432/tcp
9yuyqs2iih6k   monofor_gear              replicated   0/1        cr.monofor.com/monofor/gear:v2025.05
kzhshgyd9vpd   monofor_loadbalancer      global       1/1        cr.monofor.com/monofor/loadbalancer:v2025.10-hf01      *:80->80/tcp, *:443->443/tcp
t4taytw9xq3j   monosign_access-gateway   replicated   1/1        cr.monofor.com/monosign/access-gateway:v2025.10-hf01
ngf5aur84elf   monosign_account          replicated   1/1        cr.monofor.com/monosign/account:v2025.10-hf01
3efjppotzygt   monosign_api              replicated   1/1        cr.monofor.com/monosign/api:v2025.10-hf01
9futdcuhycmh   monosign_cache            replicated   1/1        cr.monofor.com/monofor/cache:v2025.10-hf01
tw67rq3fj4e0   monosign_ldap-gateway     replicated   1/1        cr.monofor.com/monosign/ldap-gateway:v2025.10-hf01     *:3389->3389/tcp, *:6636->6636/tcp
bmbvw950vtux   monosign_management       replicated   1/1        cr.monofor.com/monosign/management:v2025.10-hf01
rpi7hi68qpal   monosign_mq               replicated   1/1        cr.monofor.com/monofor/mq:v2025.10-hf01
y4p0bj606pry   monosign_seed             replicated   1/1        cr.monofor.com/monosign/seed:v2025.10-hf01
ge828u6iup61   monosign_service          replicated   1/1        cr.monofor.com/monosign/service:v2025.10-hf01
NAME                STATUS              CONFIG FILES
monofor             running(1)          /opt/monofor/radius-server.yml


======================================================================
  Monosign Installation Finished. Please open your browser and type
======================================================================

✓ id.monofor.com

======================================================================
  Root User Credentials
======================================================================

UserName : root
Password : vTk8LVAV8q4wbHxM

Credentials saved to: /opt/monofor/log/rootTmpPass-2026-02-08.info

======================================================================
  Installation Summary
======================================================================

✓ Monosign installation completed successfully

Log file: /opt/monofor/log/install-20260208.log
Now Monosign has been successfully installed on your Linux host. You can open browser on your client machine and type the below address;
https://id.domainname
Replace domainname in your URL with the domain name that you provided in the Pre-Requirement installation. In our example we used monofor.com
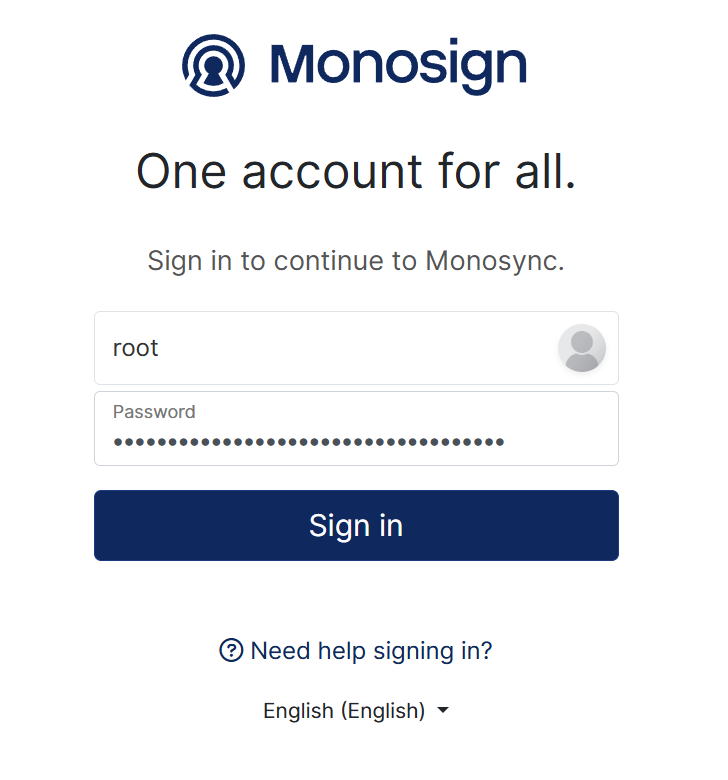
After typing id.monofor.com on your browser, you will get the Privacy Error because Monosign being installed with Self-Signed SSL certificate.
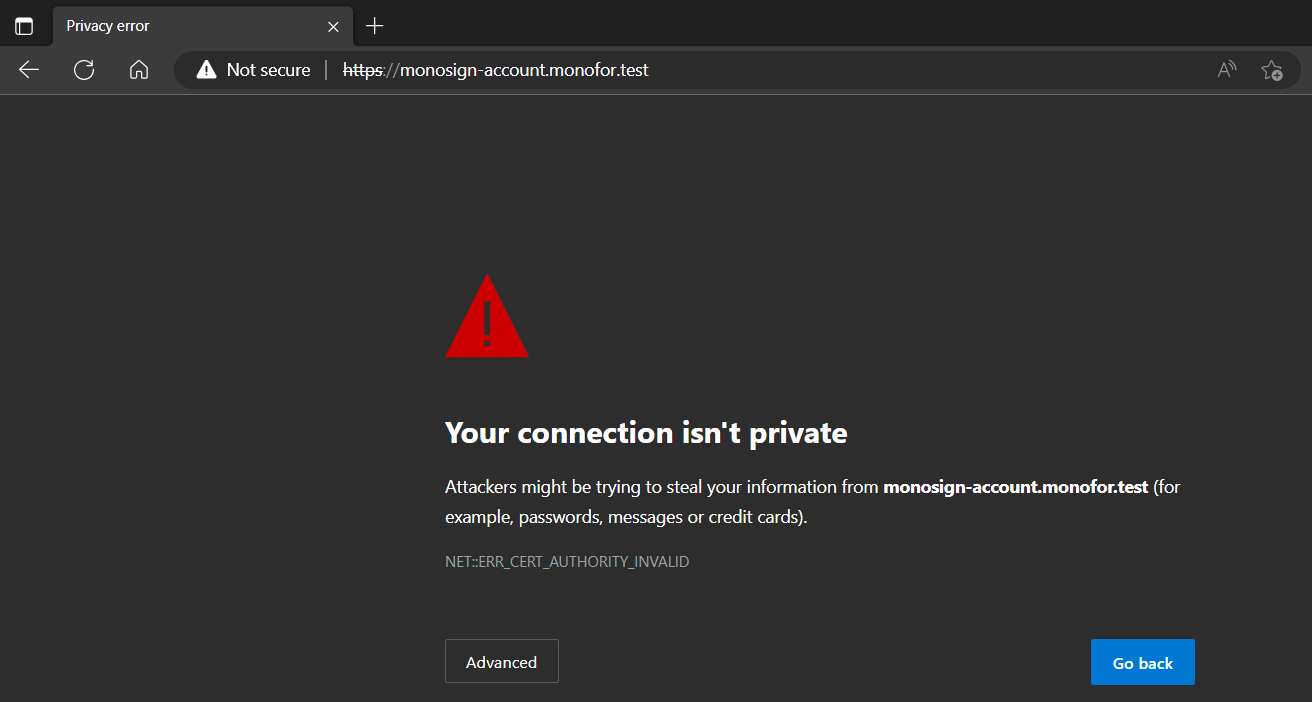
You can click Advanced → Continue to id.monofor.com
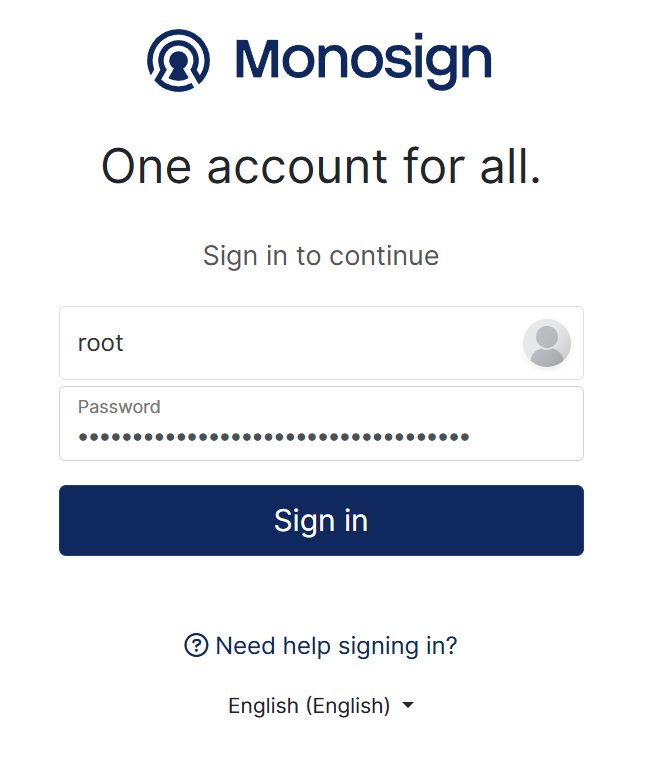
Monosign Account login page will appear after skipping the certificate error.
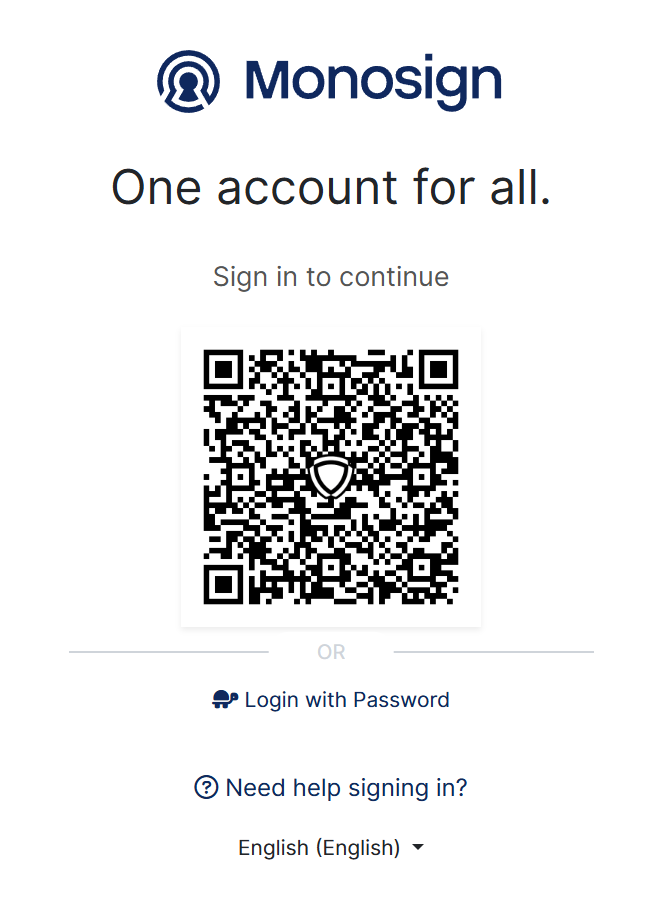
Please click “Login with Password” and type your username and password.
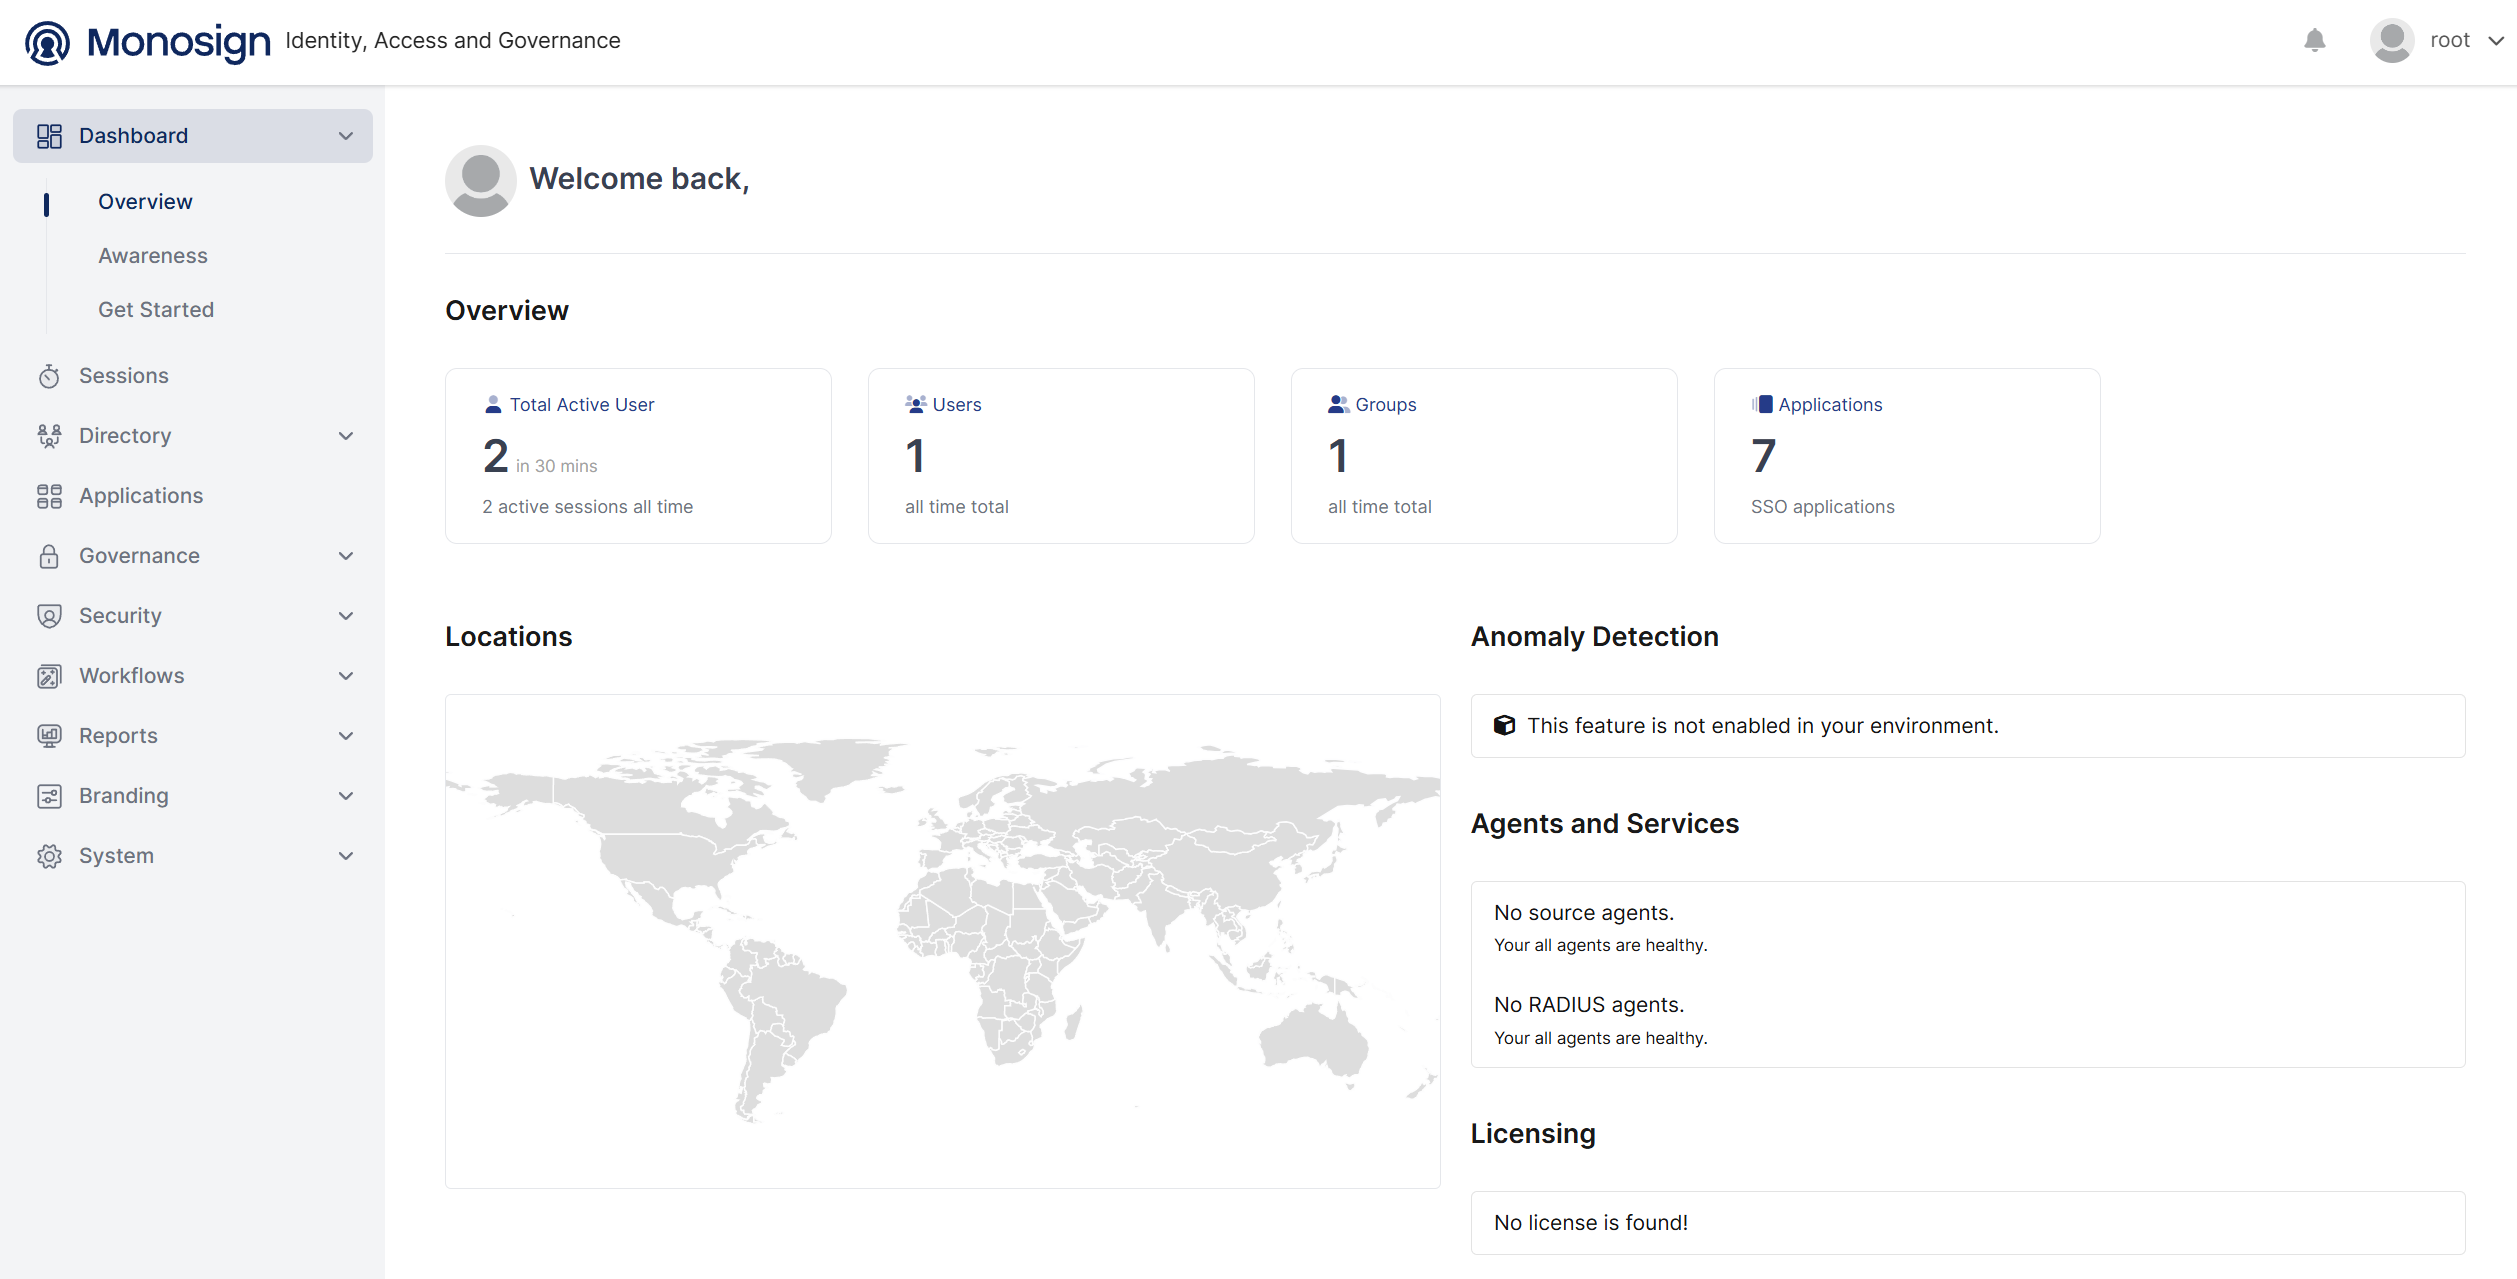
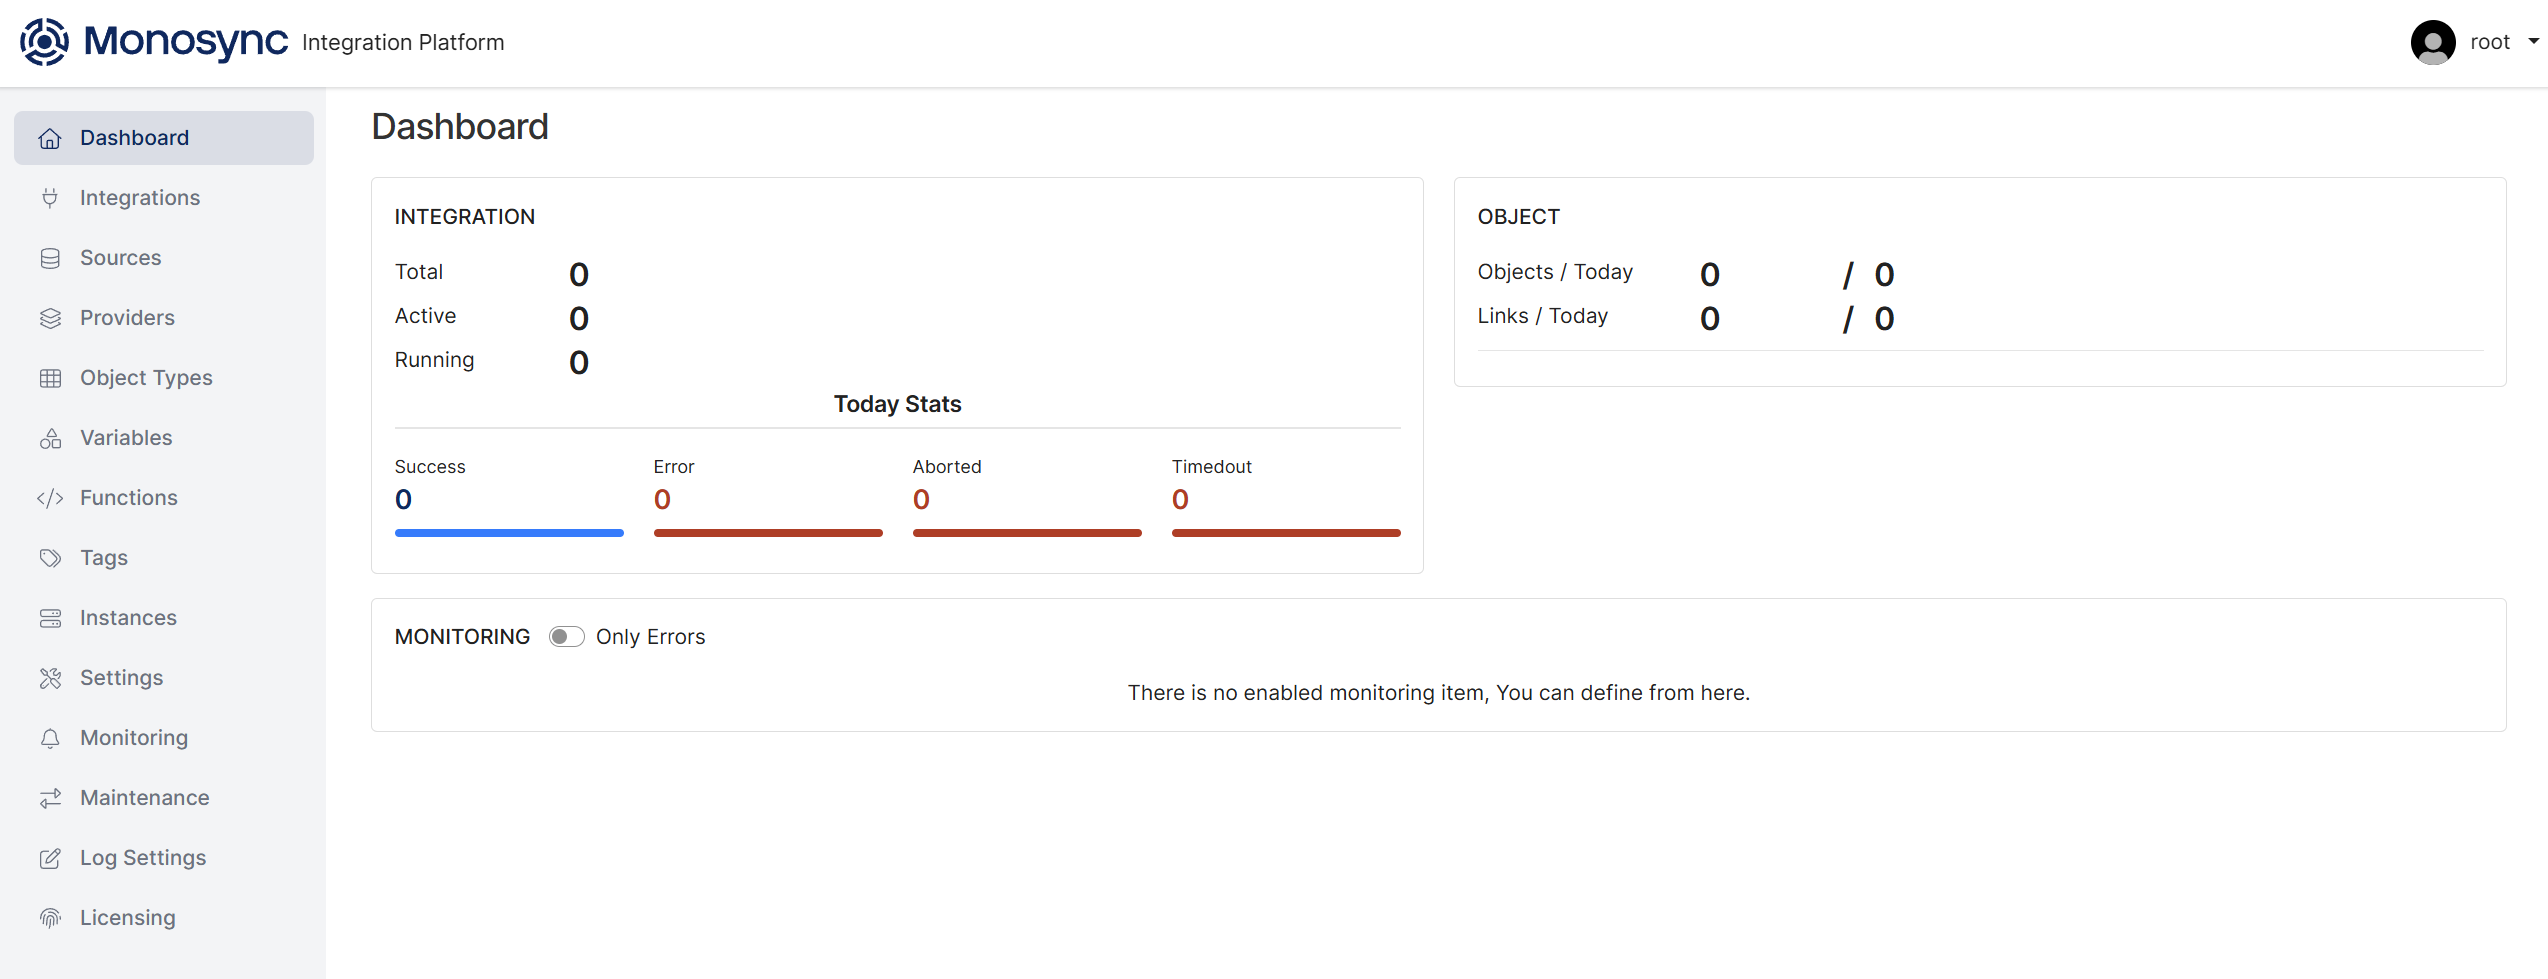
After successful first login, Monosign will redirect you to “My Apps“
Now you will able see “Monosign Management“ application.

You can click it and “Monosign Management“ console will be open.
Monosync Installation
Please make sure to complete Monosign Installation first. For Monosync Installation, Monosign product must be installed on your Linux host.
If Monosign installation has not finished correctly, please do not continue to the next steps.
You can continue with the Monosync installation on your Linux host. Type below command to install Monosync;
sudo monosync
OR
monosync
Example of the command output;
root@monofor:/tmp# monosync
   __  __
  |  \/  | ___  _ __   ___  ___ _   _ _ __   ___
  | |\/| |/ _ \| '_ \ / _ \/ __| | | | '_ \ / __|
  | |  | | (_) | | | | (_) \__ \ |_| | | | | (__
  |_|  |_|\___/|_| |_|\___/|___/\__, |_| |_|\___|
                                |___/

   Monosync Installation Script

Monofor Identity Synchronization Platform
Copyright 2017-2026, Monofor, Inc.
https://monofor.com
Version: v2026.02 (Build: 202602080016)
======================================================================

======================================================================
  Validating Prerequisites
======================================================================

✓ Prerequisites validated successfully

======================================================================
  Monosync Installation Started
======================================================================


======================================================================
  Running Installation Steps
======================================================================


======================================================================
  Configuring Monosync Hostname
======================================================================

If you want to use default hostnames please leave it blank and press Enter to continue...
Type Monosync Hostname (Default: sync):
✓ Hostname configured: Host=sync -> FQDN=sync.monofor.com

DNS Name           | DNS Query Result   | FQDN
-------------------|--------------------|-------------------
sync               | Resolvable         | sync.monofor.com

✓ All required DNS Names are resolved by your DNS server.

======================================================================
  Configuring Monosync Database
======================================================================

✓ PoC database configuration completed for Monosync

======================================================================
  Configuring Monosync Version
======================================================================

Default version: v2026.01
Please set Monosync version (press Enter for default):
✓ Version configured: Monosync v2026.01
Please check Installation summary and something is wrong start monosign scripts again.
======================================================================
  Installation Summary
======================================================================

##############################################################
  DNS Name              : monofor.com
  Monosync Hostname     : sync
  Monosync URL          : sync.monofor.com
  Monosync Version      : v2026.01
  Database Type         : PostgreSql
  Database Server/Port  : monofor-db:5432
  Database Name         : monosync
  Database User         : monofor
  Database Password     : 38cb30b4-c2a9-43b3-93ac-e0ba6b02551a
##############################################################

Are these information correct? Do you want to continue? (yes/no): yes
Installation will continue to download Monofor docker images.
======================================================================
  Monosync installation continuing...
======================================================================


======================================================================
  Running Deployment Steps
======================================================================


======================================================================
  Monosync Images Download Started
======================================================================

v2026.01: Pulling from monosync/app

======================================================================
  Monosync Images Download Finished
======================================================================
After images downloaded please type yes to install Monofor services.
======================================================================
  Updating Monosync Application URL in Monosign Management
======================================================================
✓ Monosync Application URL updated in Monosign!

======================================================================
  Modifying configuration files
======================================================================
Variables change started.
Variables change finished.
Do you want to deploy monosync projects? (yes/no): yes
monosync project deploy started
Creating service monosync_ui
Creating service monosync_service
Creating service monosync_cache
monofor_loadbalancer
overall progress: 1 out of 1 tasks
qmkfimuev1ba: running   [==================================================>]
verify: Service monofor_loadbalancer converged
Progress: [mmmmmmmmmmmmmmmmmmmmmmmmmmmmmmmmmmmmmmmmmmmmmmmmmm] 100%
monosync stack deployed and monofor_loadbalancer updated.
Monosync HealthCheck Status: true

======================================================================
  Finalizing Installation
======================================================================


======================================================================
  Monosync Installation Finished. Please open your browser and type
======================================================================

✓ sync.monofor.com


======================================================================
  Monosync Installation Completed Successfully
======================================================================


======================================================================
  Installation Summary
======================================================================

✓ Monosync installation completed successfully

Log file: /opt/monofor/log/install-20260208.log
Monosync has been successfully installed on your Linux host. You can open a web browser on your client machine and type the below address;
https://sync.domainname
Replace domainname in your url with domain name when you provided in the Pre-Requirement installation. In our example we used monofor.com.
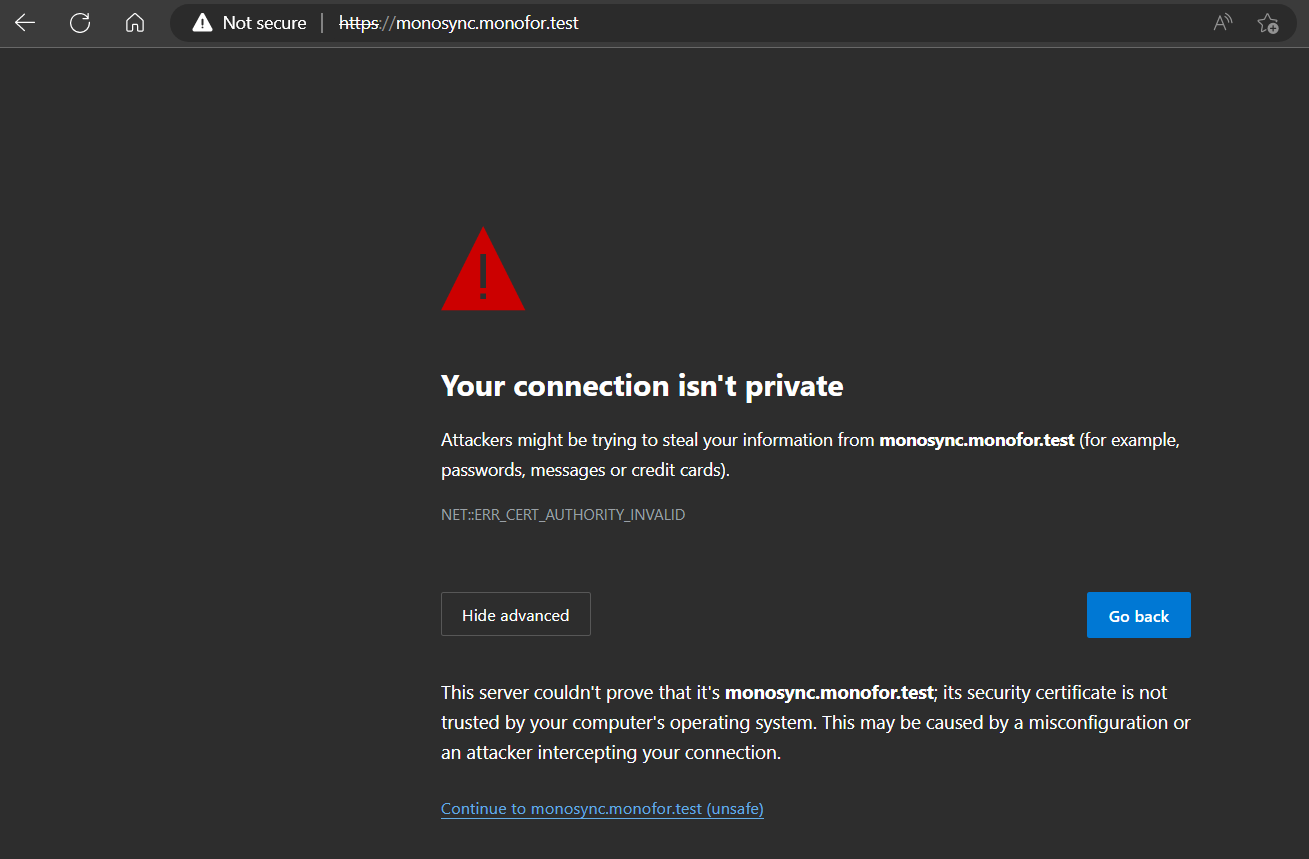
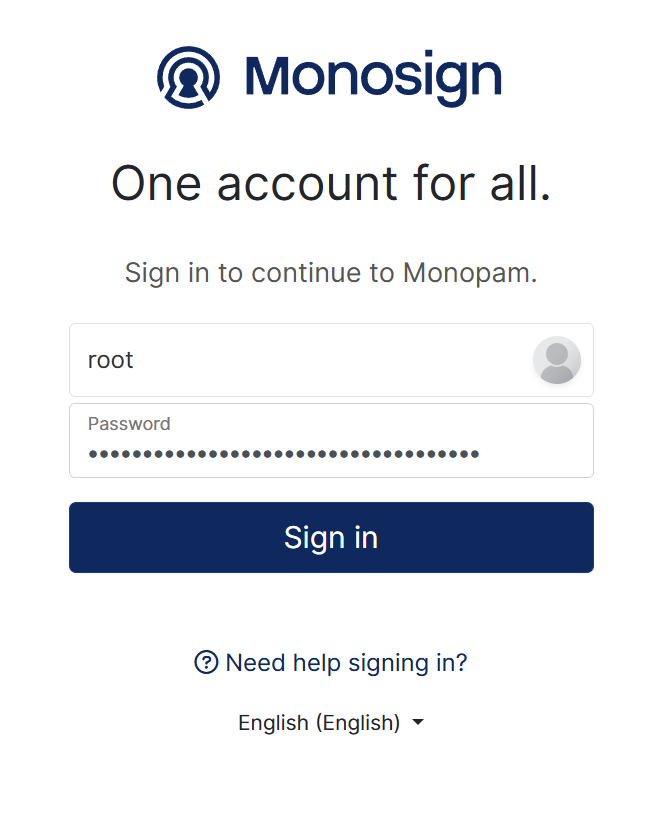
When typing sync.monofor.com on your browser you will get the Privacy Error because Monosync being installed with Self-Signed SSL certificate.
You can click Advanced → Continue to sync.monofor.com
The page will be redirected to id.monofor.com. Because all Monofor products use Monosign for authentication, authorization and access. So Monosync has no login page. Monosync is integrated with Monosign with the SSO architecture.
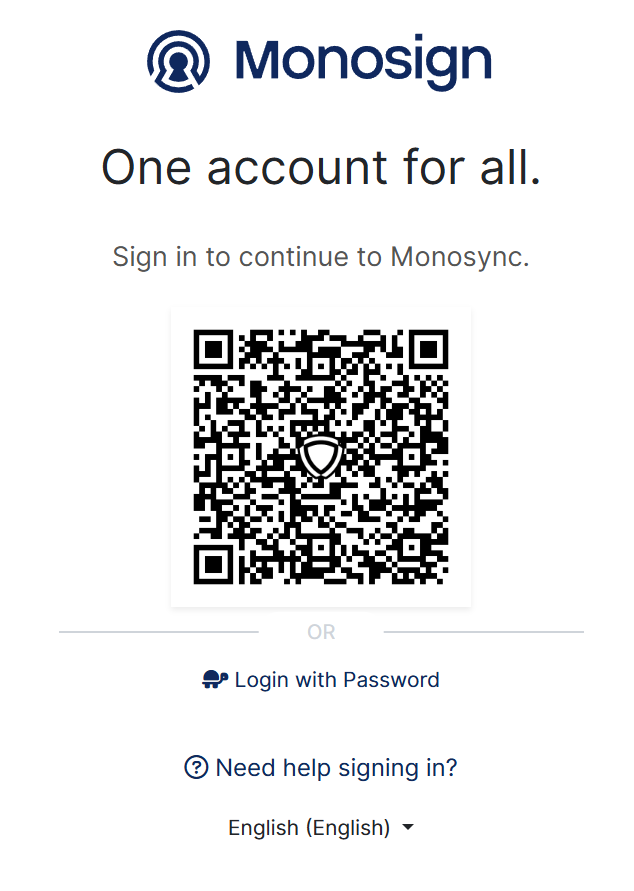
Please click “Login with Password” and type username and password.
Now you have successfully logged in to Monosync;
Monopam Installation
Please make sure to complete Monosign Installation first. For Monopam Installation, Monosign product must be installed on your Linux host.
If Monosign installation is not finished correctly, please do not continue with the next steps.
Now you can continue with the Monopam installation on your Linux host. Type below command to install pam.
sudo monopam
Example of the command output :
root@monofor:/tmp# monopam
   __  __
  |  \/  | ___  _ __   ___  _ __   __ _ _ __ ___
  | |\/| |/ _ \| '_ \ / _ \| '_ \ / _` | '_ ` _ \
  | |  | | (_) | | | | (_) | |_) | (_| | | | | | |
  |_|  |_|\___/|_| |_|\___/| .__/ \__,_|_| |_| |_|
                           |_|

   Monopam Installation Script

Monofor Privileged Access Management Platform
Copyright 2017-2026, Monofor, Inc.
https://monofor.com
Version: v2026.02 (Build: 202602080016)
======================================================================

======================================================================
  Monopam Installation Started.
======================================================================


======================================================================
  Configuring Monopam Hostname
======================================================================

⚠ If you want to use default hostnames please leave it blank and press Enter to continue...
Type Monopam Hostname (Default: pam):
✓ Hostname configured: Host=pam -> FQDN=pam.monofor.com

| DNS Name    | DNS Query Result | FQDN                    |
| ----------- | ---------------- | ----------------------- |
| pam         | Resolvable       | pam.monofor.com         |
| pam-cdn     | Resolvable       | pam-cdn.monofor.com     |
| pam-cdn-con | Resolvable       | pam-cdn-con.monofor.com |

✓ All required DNS Names are resolved by your DNS server.

======================================================================
  Configuring Monopam Database
======================================================================

✓ PoC database configuration completed for Monopam

======================================================================
  Configuring Monosync Version
======================================================================

Default version: v2024.10
Please Set Monopam Version(Latest Stable Version: v2024.10):
Version defined. Monopam: v2024.10
Please check Installation summary and something is wrong start monosign scripts again.
======================================================================
  Installation Summary
======================================================================

##############################################################
  DNS Name                : monofor.com
  Monopam Hostname        : pam
  Monopam URL             : pam.monofor.com
  Monopam Cdn Hostname    : pam-cdn
  Monopam Cdn URL         : pam-cdn.monofor.com
  Monopam CdnCon Hostname : pam-cdn-con
  Monopam CdnCon URL      : pam-cdn-con.monofor.com
  Monopam Version         : v2024.10
  Database Type           : PostgreSql
  Database Server/Port    : monofor-db:5432
  Database Name           : monopam
  Database User           : monofor
  Database Password       : 38cb30b4-c2a9-43b3-93ac-e0ba6b02551a
##############################################################

Are these information correct? Do you want to continue? (yes/no): yes
Installation will continue to download Monofor docker images.
======================================================================
  Monopam installation continue...
======================================================================


======================================================================
  Monopam Images Download Started.
======================================================================

v2024.10: Pulling from monopam/app
latest: Pulling from monopam/cdn

======================================================================
  Monosync Images Download Finished
======================================================================
After images downloaded please type yes to install Monofor services.
======================================================================
  Updating Monopam Application URL in Monosign Management
======================================================================
✓ Monopam Application URL updated in Monosign!

======================================================================
  Modifying configuration files
======================================================================
Variables change started.
Variables change finished.
Do you want to deploy Monopam projects? (yes/no): yes
Monopam project deploy started
Creating service monopam_app
Creating service monopam_cdn
Creating service monopam_cache
monofor_loadbalancer
overall progress: 1 out of 1 tasks
qmkfimuev1ba: running   [==================================================>]
Progress: [mmmmmmmmmmmmmmmmmmmmmmmmmmmmmmmmmmmmmmmmmmmmmmmmmm] 100%
monopam stack deployed and monofor_loadbalancer updated.
Progress: [mmmmmmmmmmmmmmmmmmmmmmmmmmmmmmmmmmmmmmmmmmmmmmmmmm] 100%

======================================================================
  Configuring Monopam First Setup
======================================================================

✓ Monopam Tenant settings successfully updated. Message: No message
monopam_app
overall progress: 1 out of 1 tasks
1/1: running   [==================================================>]
verify: Service monopam_app converged
monofor_loadbalancer
overall progress: 1 out of 1 tasks
qmkfimuev1ba: running   [==================================================>]
verify: Service monofor_loadbalancer converged
Monopam service check started
Monopam HealthCheck Status: true

======================================================================
  Monopam Installation Finished. Please open your browser and type
======================================================================

✓ https://pam.monofor.com

======================================================================
  Monopam installation completed successfully
======================================================================


Log file: /opt/monofor/log/install-20260208.log
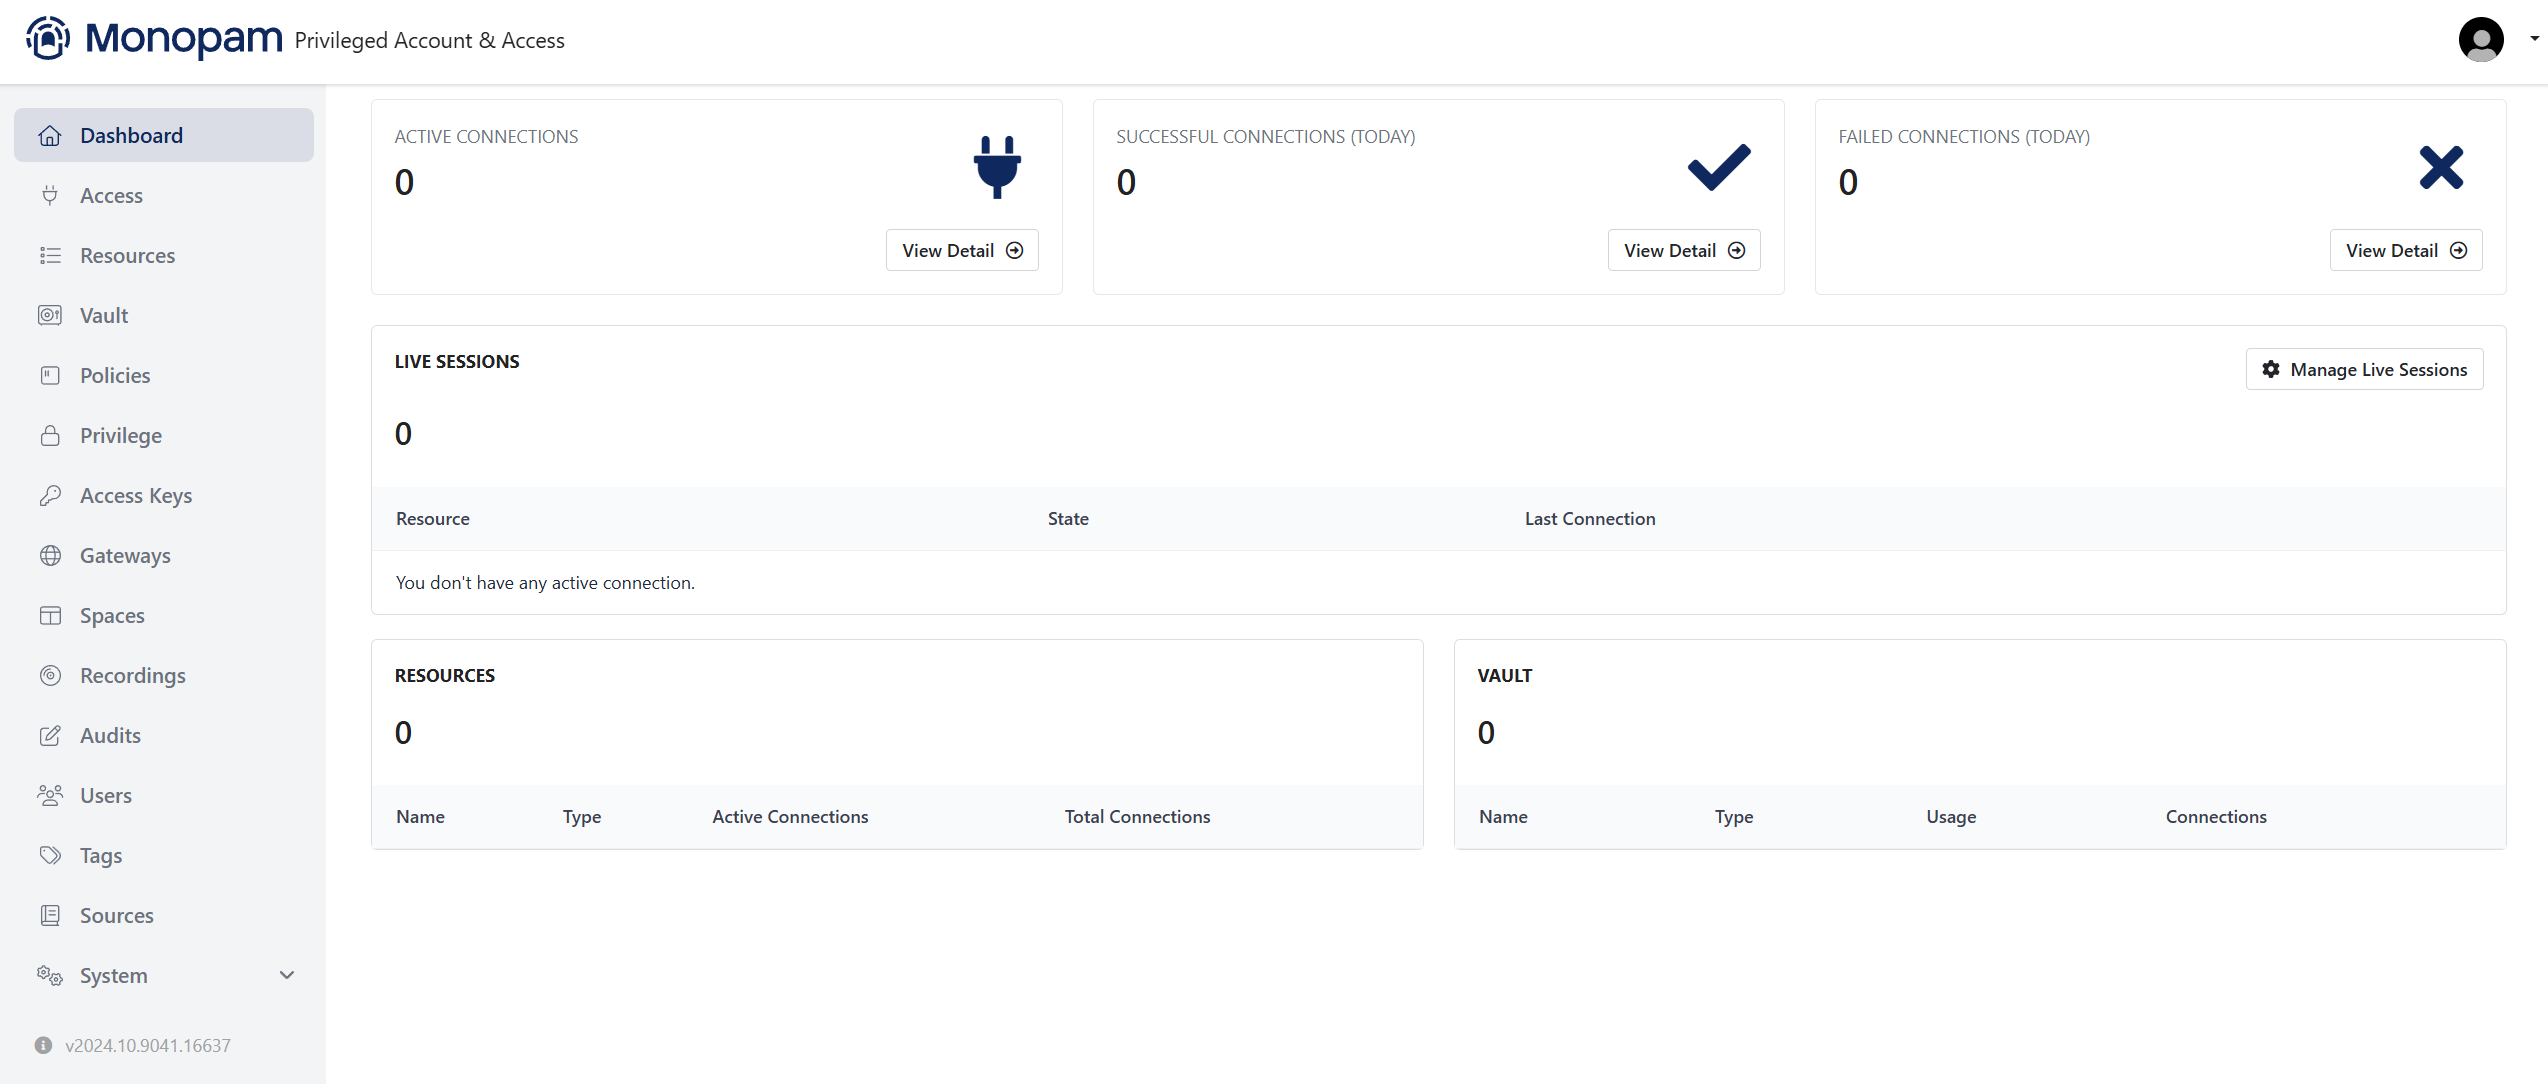
Monopam has been successfully installed on your Linux host. You can open browser on your client machine and type the below address;
https://pam.domainname
Replace domainname in your URL with domain name when you provided in the Pre-Requirement installation. In our example we used monofor.com.
When typing pam.monofor.com on your browser you will get the Privacy Error because of Monopam being installed with Self-Signed SSL certificate.
You can click Advanced → Continue to pam.monofor.com

The page will be redirected to id.monofor.com. Because all Monofor products has using Monosign for authentication, authorization and access. So Monopam has no login page. Monopam is integrated with Monosign via SSO architecture.

Please click “Login with Password” and type username and password.
Now, you have successfully logged in to Monopam;