This document explains how to implement Monosign with FortiGate SSLVPN. It covers Single Sign-On. Before you continue, it is better to start with FortiGate’s Single Sign-On this page.
This configuration done with FortiOS 7.4.4. If your FortiGate firewall version is different please check Fortinet documentation.
Monofor has no responsibility to do FortiGate configurations. If you need support please contact Fortinet Support Services.
📑 Instructions
This documentation contains 4 main steps for integration.
-
Creating an Application on Monosign
-
Configuration Single Sign-On for FortiGate
-
Assign a user to the FortiGate application
-
Sign In Test
1- Creating an Application on Monosign
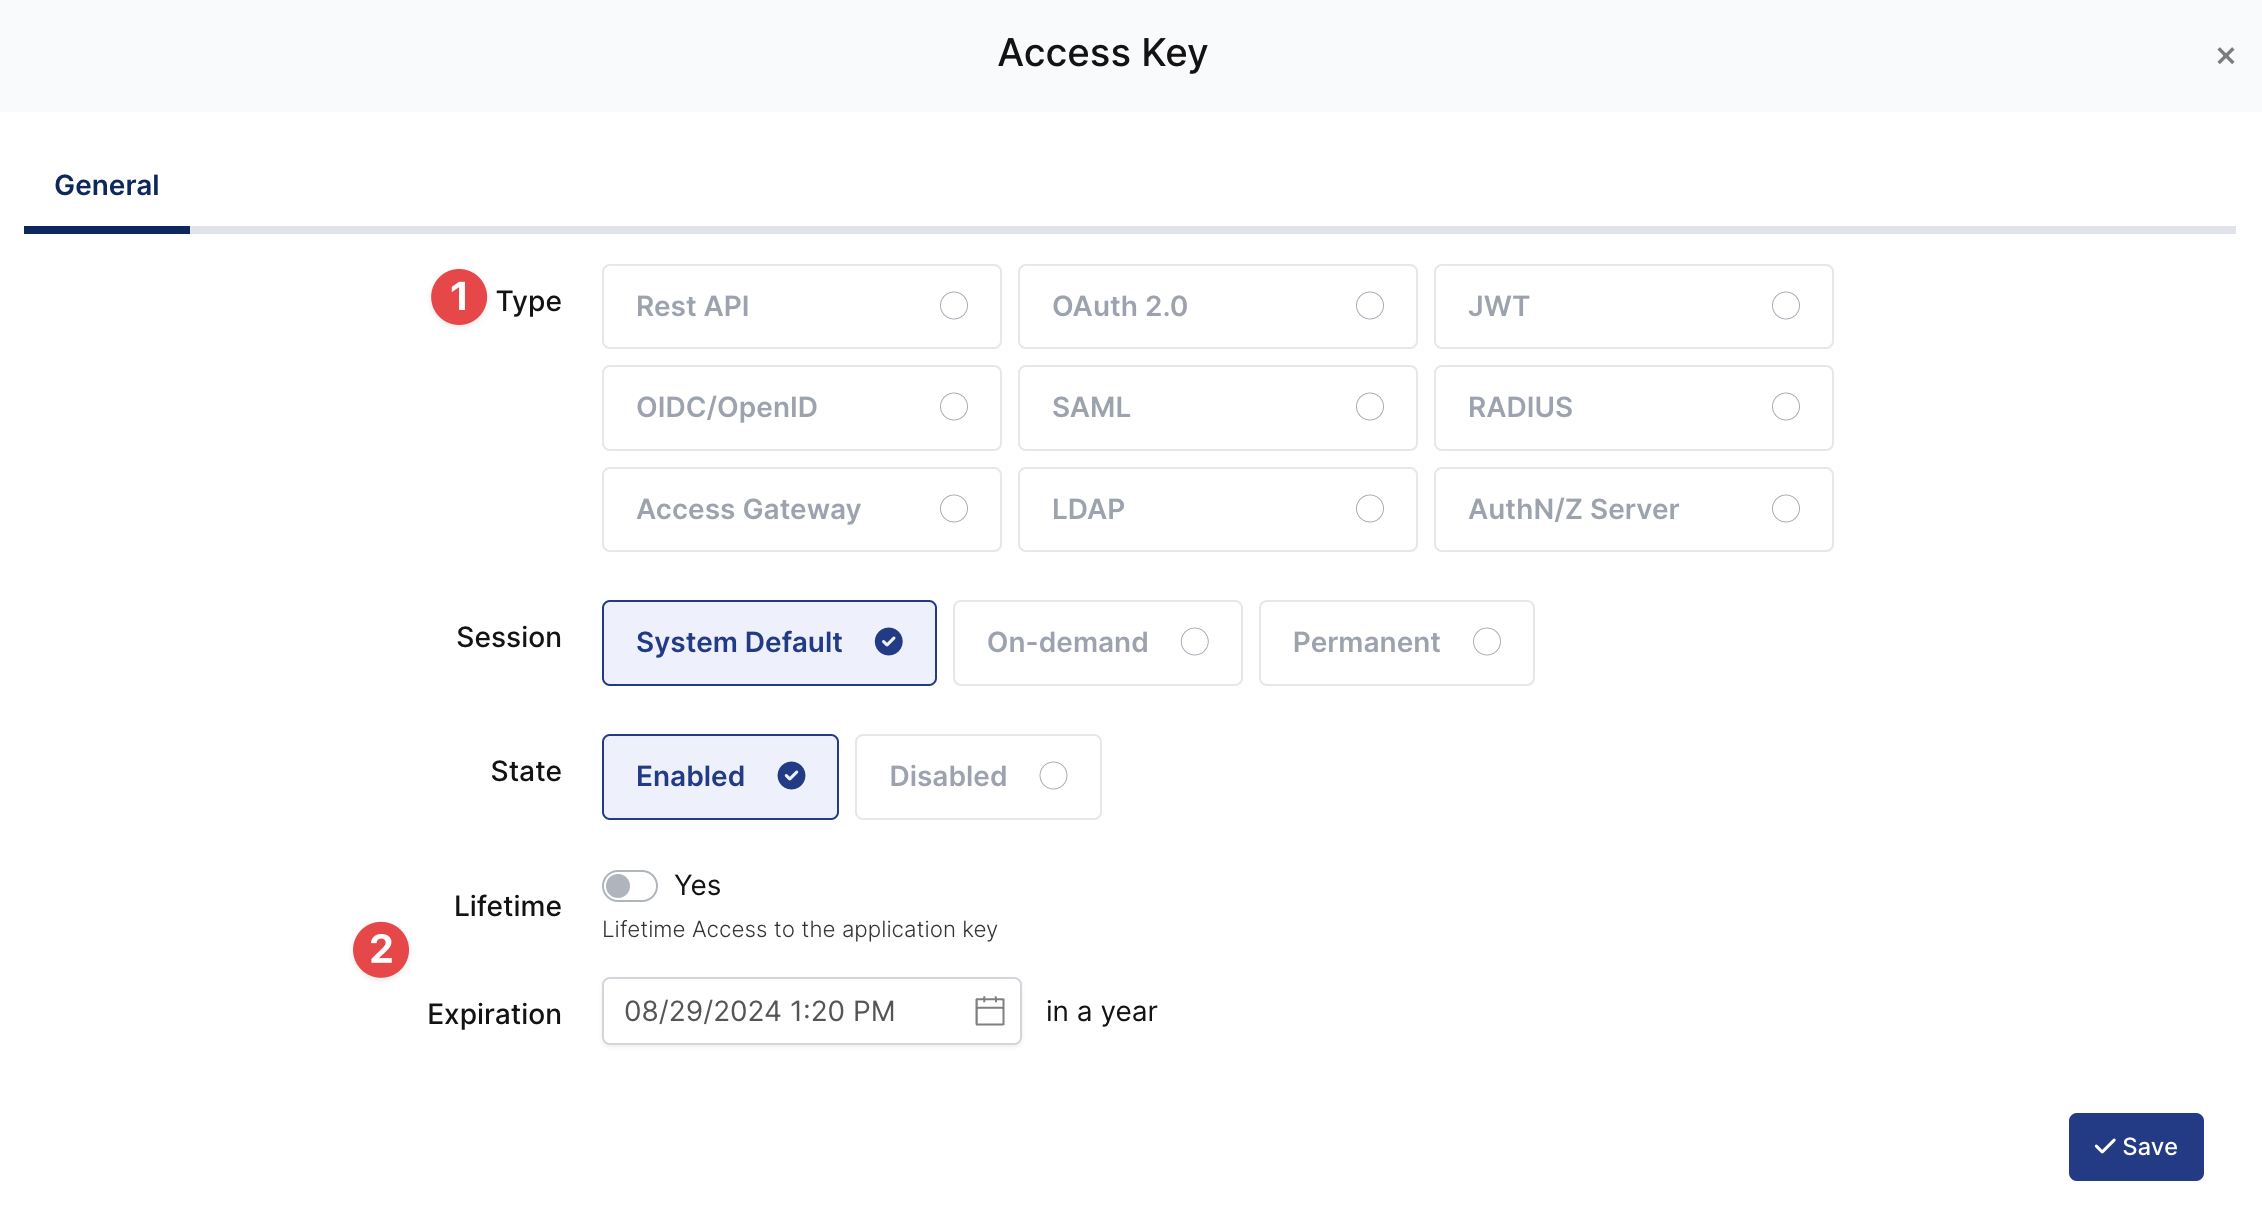
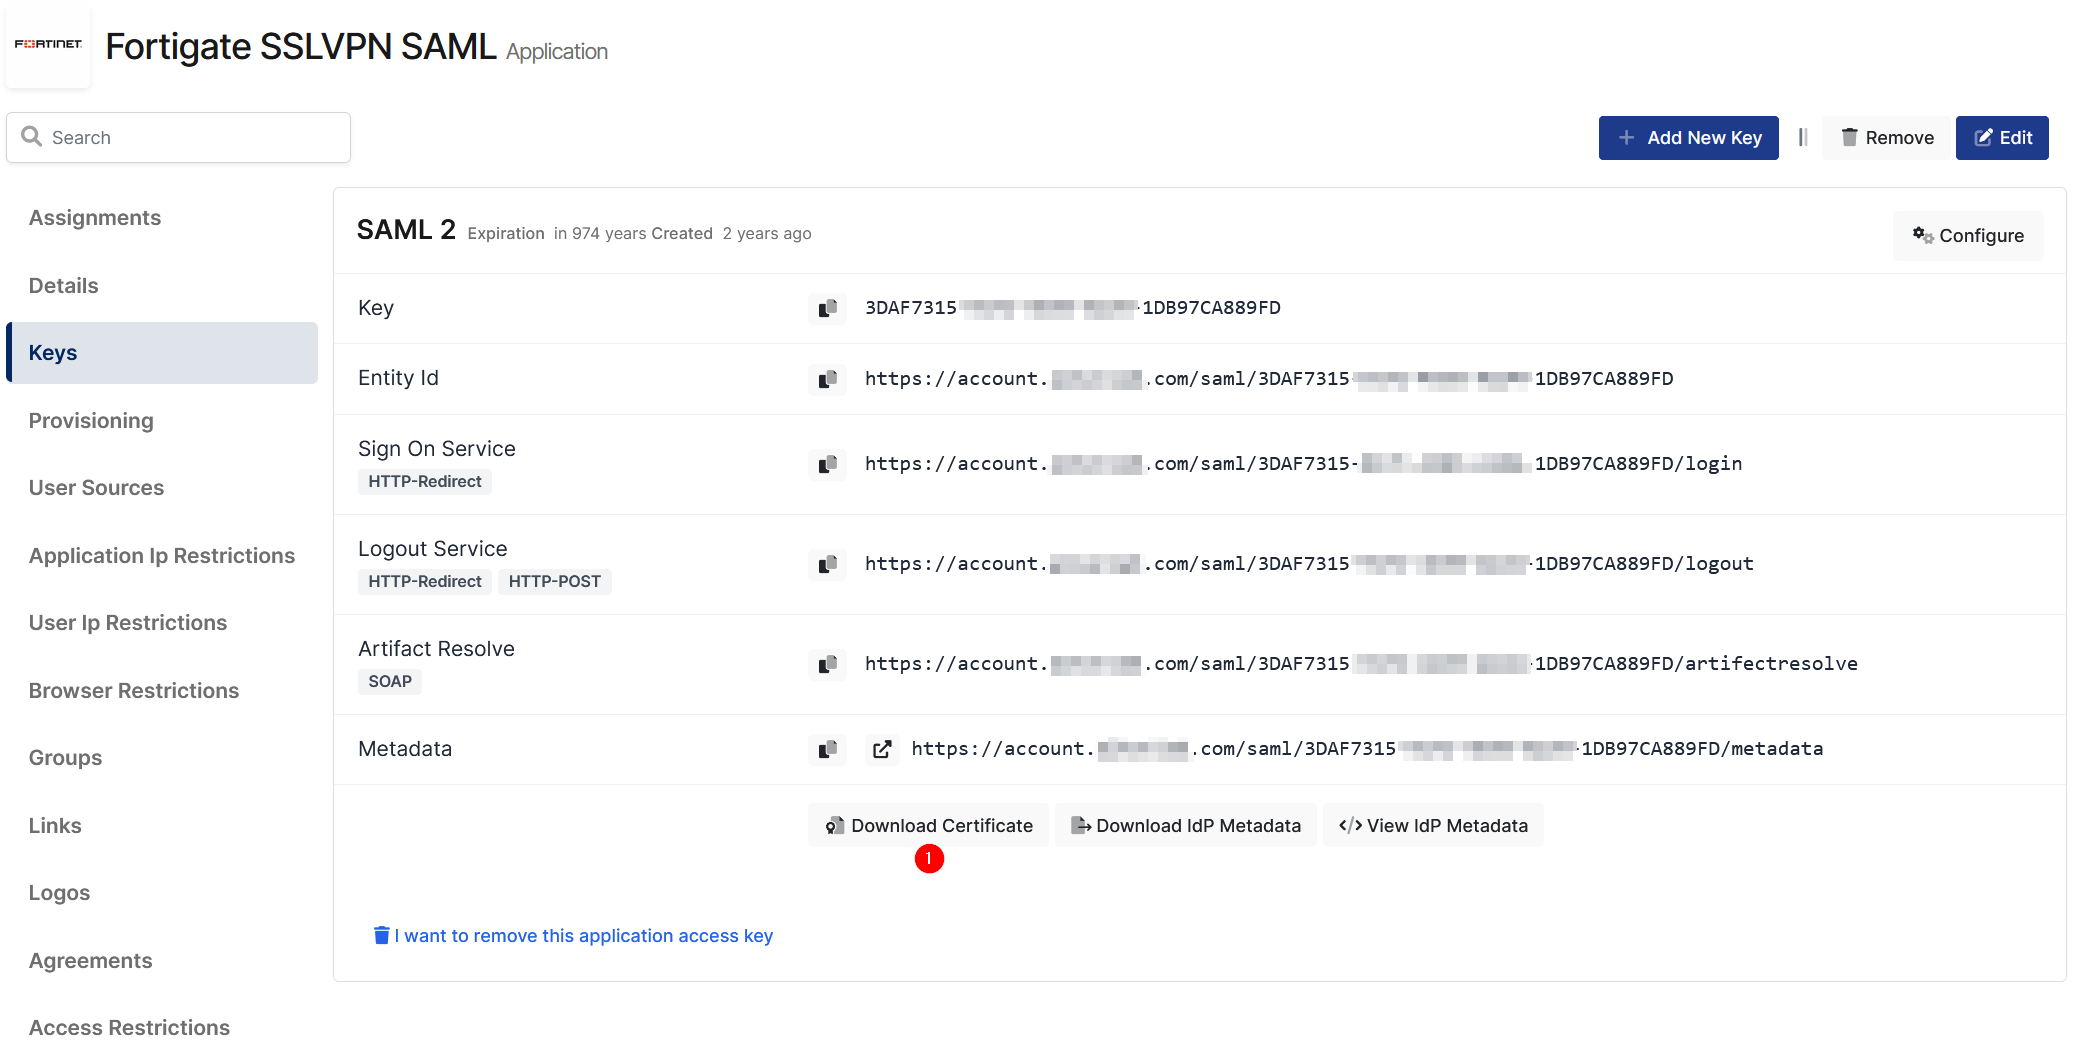
Create application on Monosign and configure your access policy. Once you create, click “Keys” and add a new Access Key for SAML Key for access.
This information will be necessary during the configuration of the application.

|
Property |
Value |
Options |
|---|---|---|
|
Key Type |
SAML |
Rest API, OAuth 2.0, JWT, OIDC/OpenID, SAML, RADIUS, Access Gateway, LDAP, AuthN/Z Server |
|
Expiration |
Lifetime |
Lifetime or Specific Date/Time - By Default Lifetime is Enabled. |
Configuration details for the FortiGate application are provided as follows:
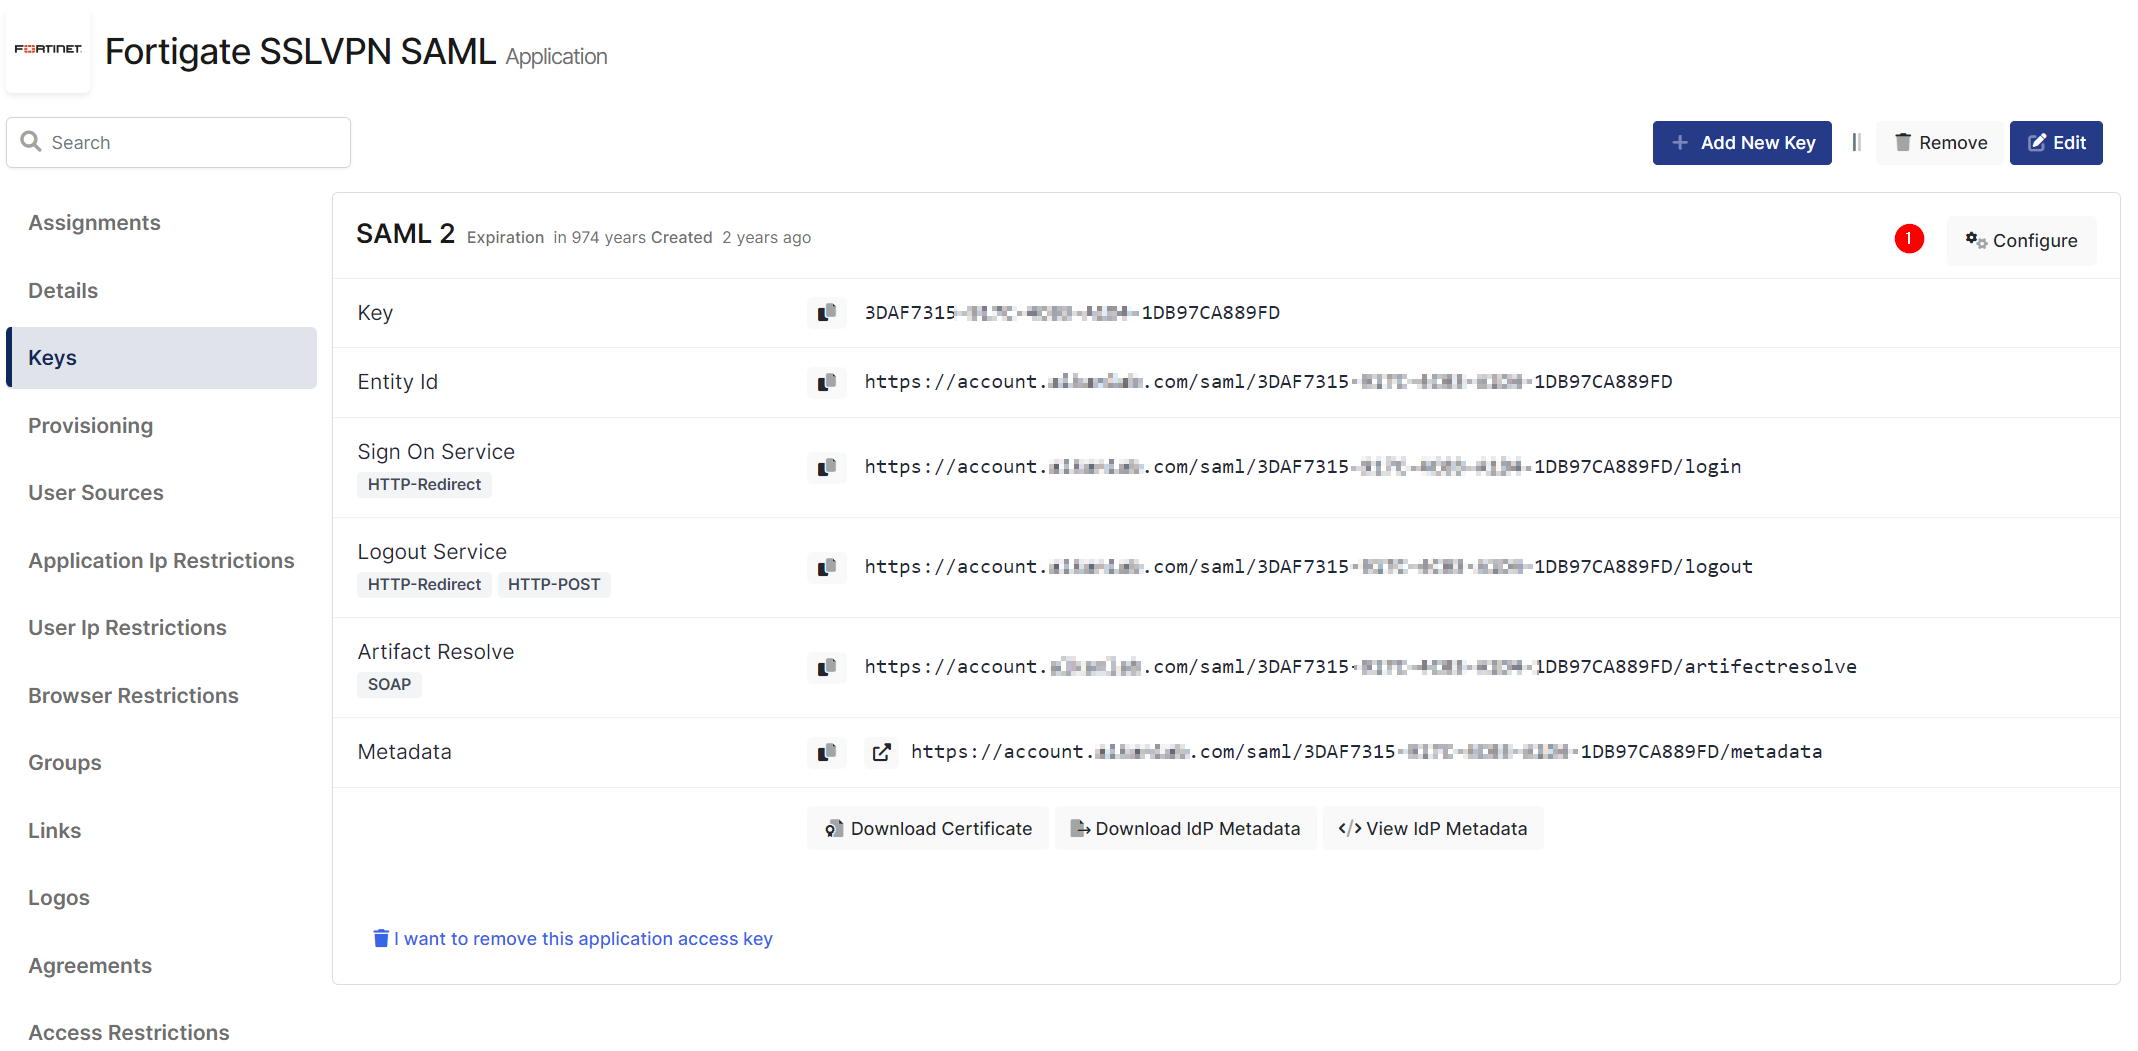
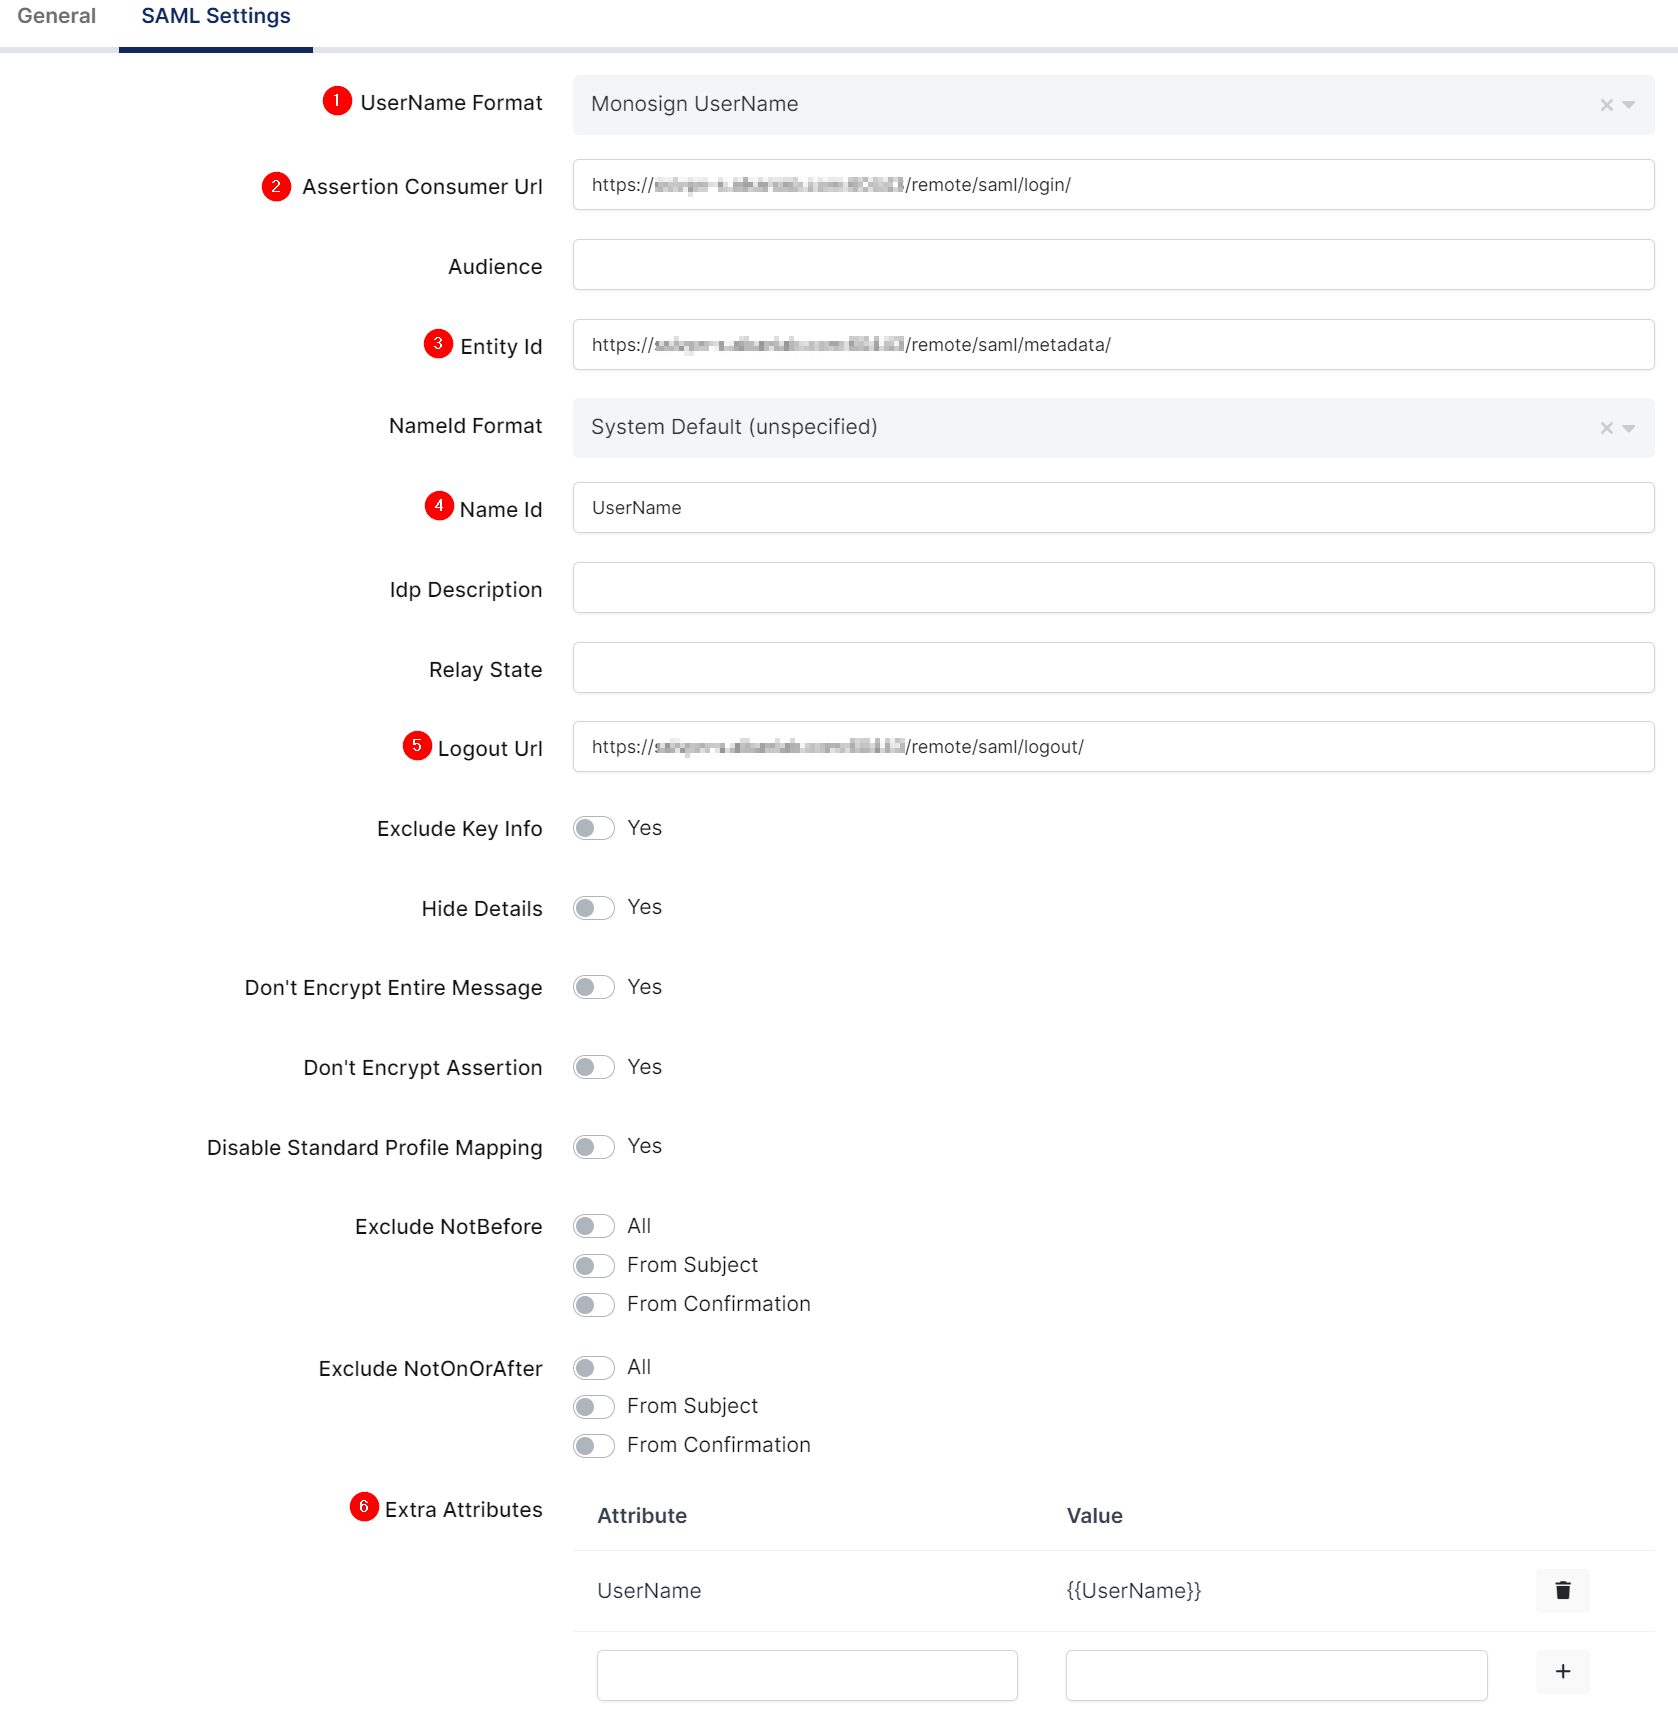
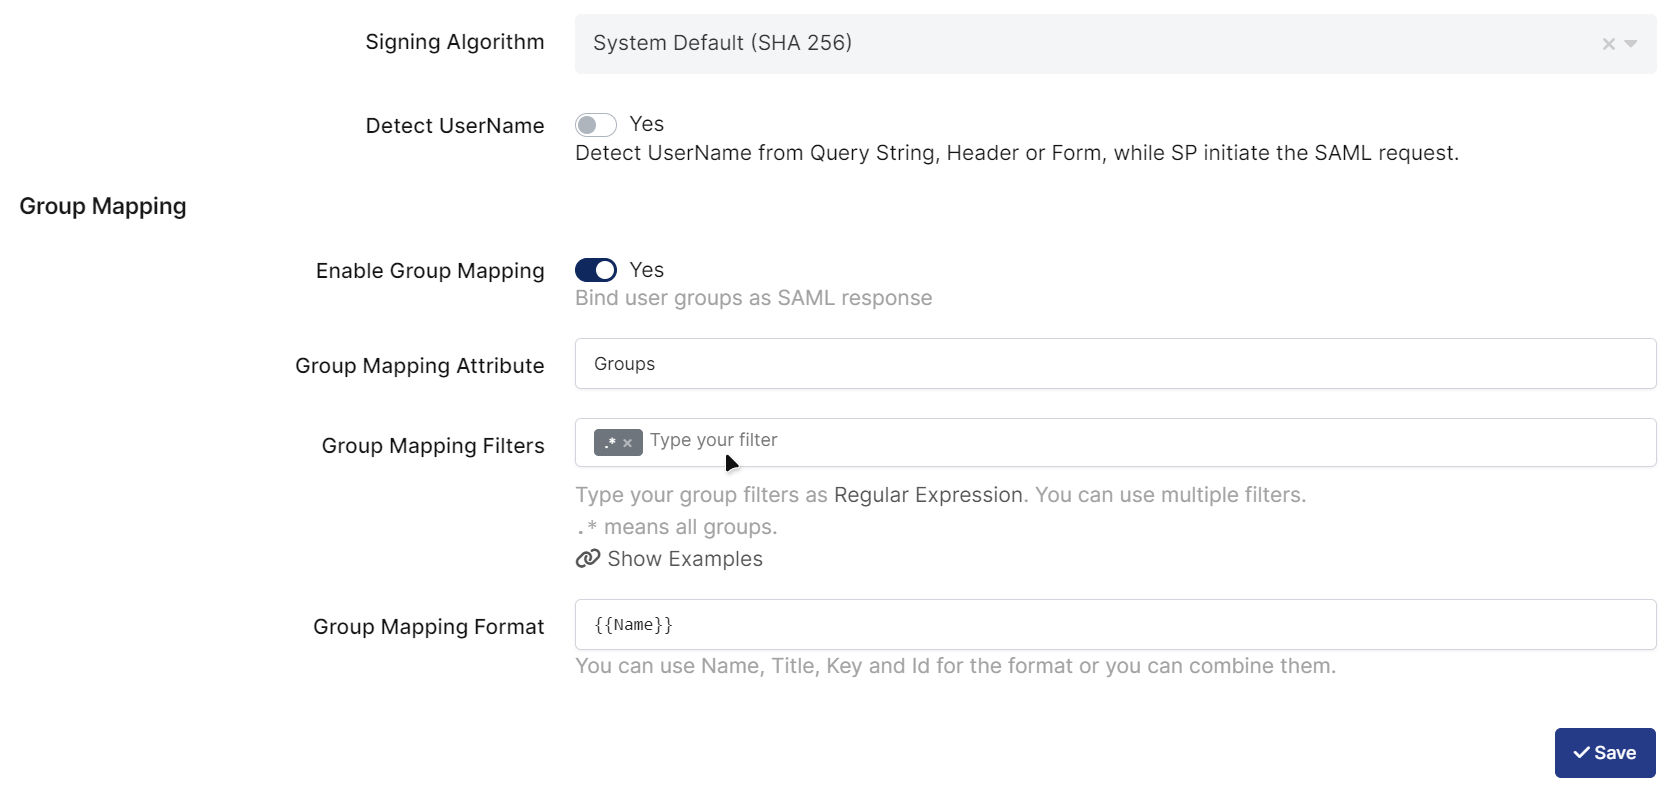
Change UserName Format, ACS(Assertion Consumer Url), Entity Id, Name Id, Logout URL and Extra Attributes.
|
Property |
Value |
|---|---|
|
UserName Format |
|
|
Assertion Consumer Url |
|
|
Entity Id |
|
|
Name Id |
|
|
Logout URL |
|
|
Extra Attribute |
|
|
Signing Algorithm |
|
|
Enable Group Mapping |
|
|
Group Mapping Attribute |
|
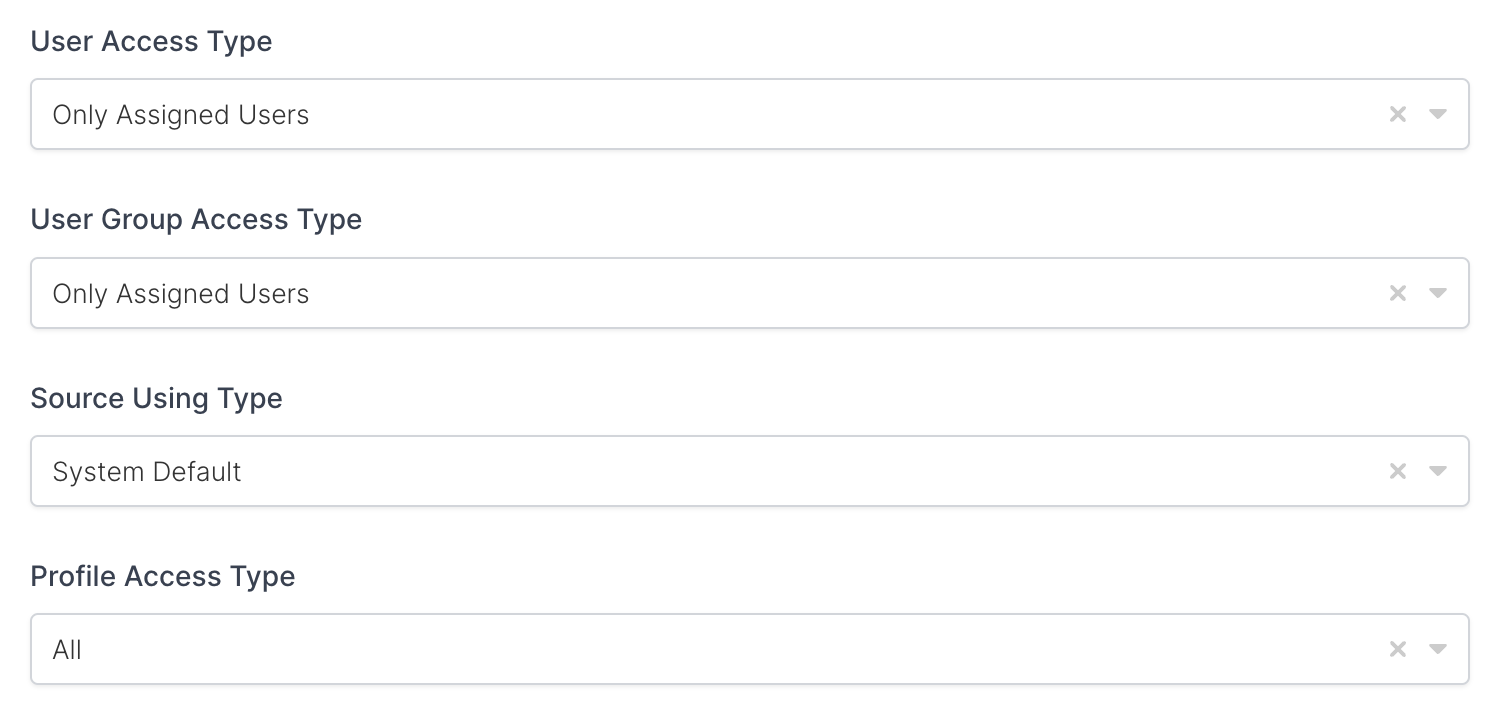
To ensure that the application has access to user groups, follow these steps:
-
If the application hasn't been configured yet, click the “Edit” option for the application.
-
In the application settings, navigate to the “Source, Provider, and Profile” tab.
-
Configure the “User Access Type“ and “User Group Access Type” as “Only Assigned Users.”
Configuring this setting will allow the application to access by user groups when users sign in.
|
Property |
Description |
Options |
|---|---|---|
|
User Access Type |
Defines which Users will access to this application. |
Only Assigned Users
|
|
User Group Access Type |
Defines application’s user group access |
Only Assigned Users
|
|
Profile Access Type |
Defines Application’s user’s profile access |
Restricted - Only restricted user profile attributes
|
2- Configuration Single Sign-On for FortiGate
As it highlighted at the beginning of document, please check out the FortiGate’s SSO configuration page first.
Monofor is suggest to configure SAML on FortiGate with different ssl-vpn realm. This way, necessary tests can be conducted without affecting the active VPN configurations, and subsequently, the active VPN configuration can be modified.
FortiGate configuration contains below steps:
-
Create SSLVPN Realm
-
Upload Monosign IdP Certificate
-
Create SSO Server
-
Create Group
-
Configure SSL-VPN Settings
-
Configure Firewall Policy
a. Create SSLVPN Realm
From GUI
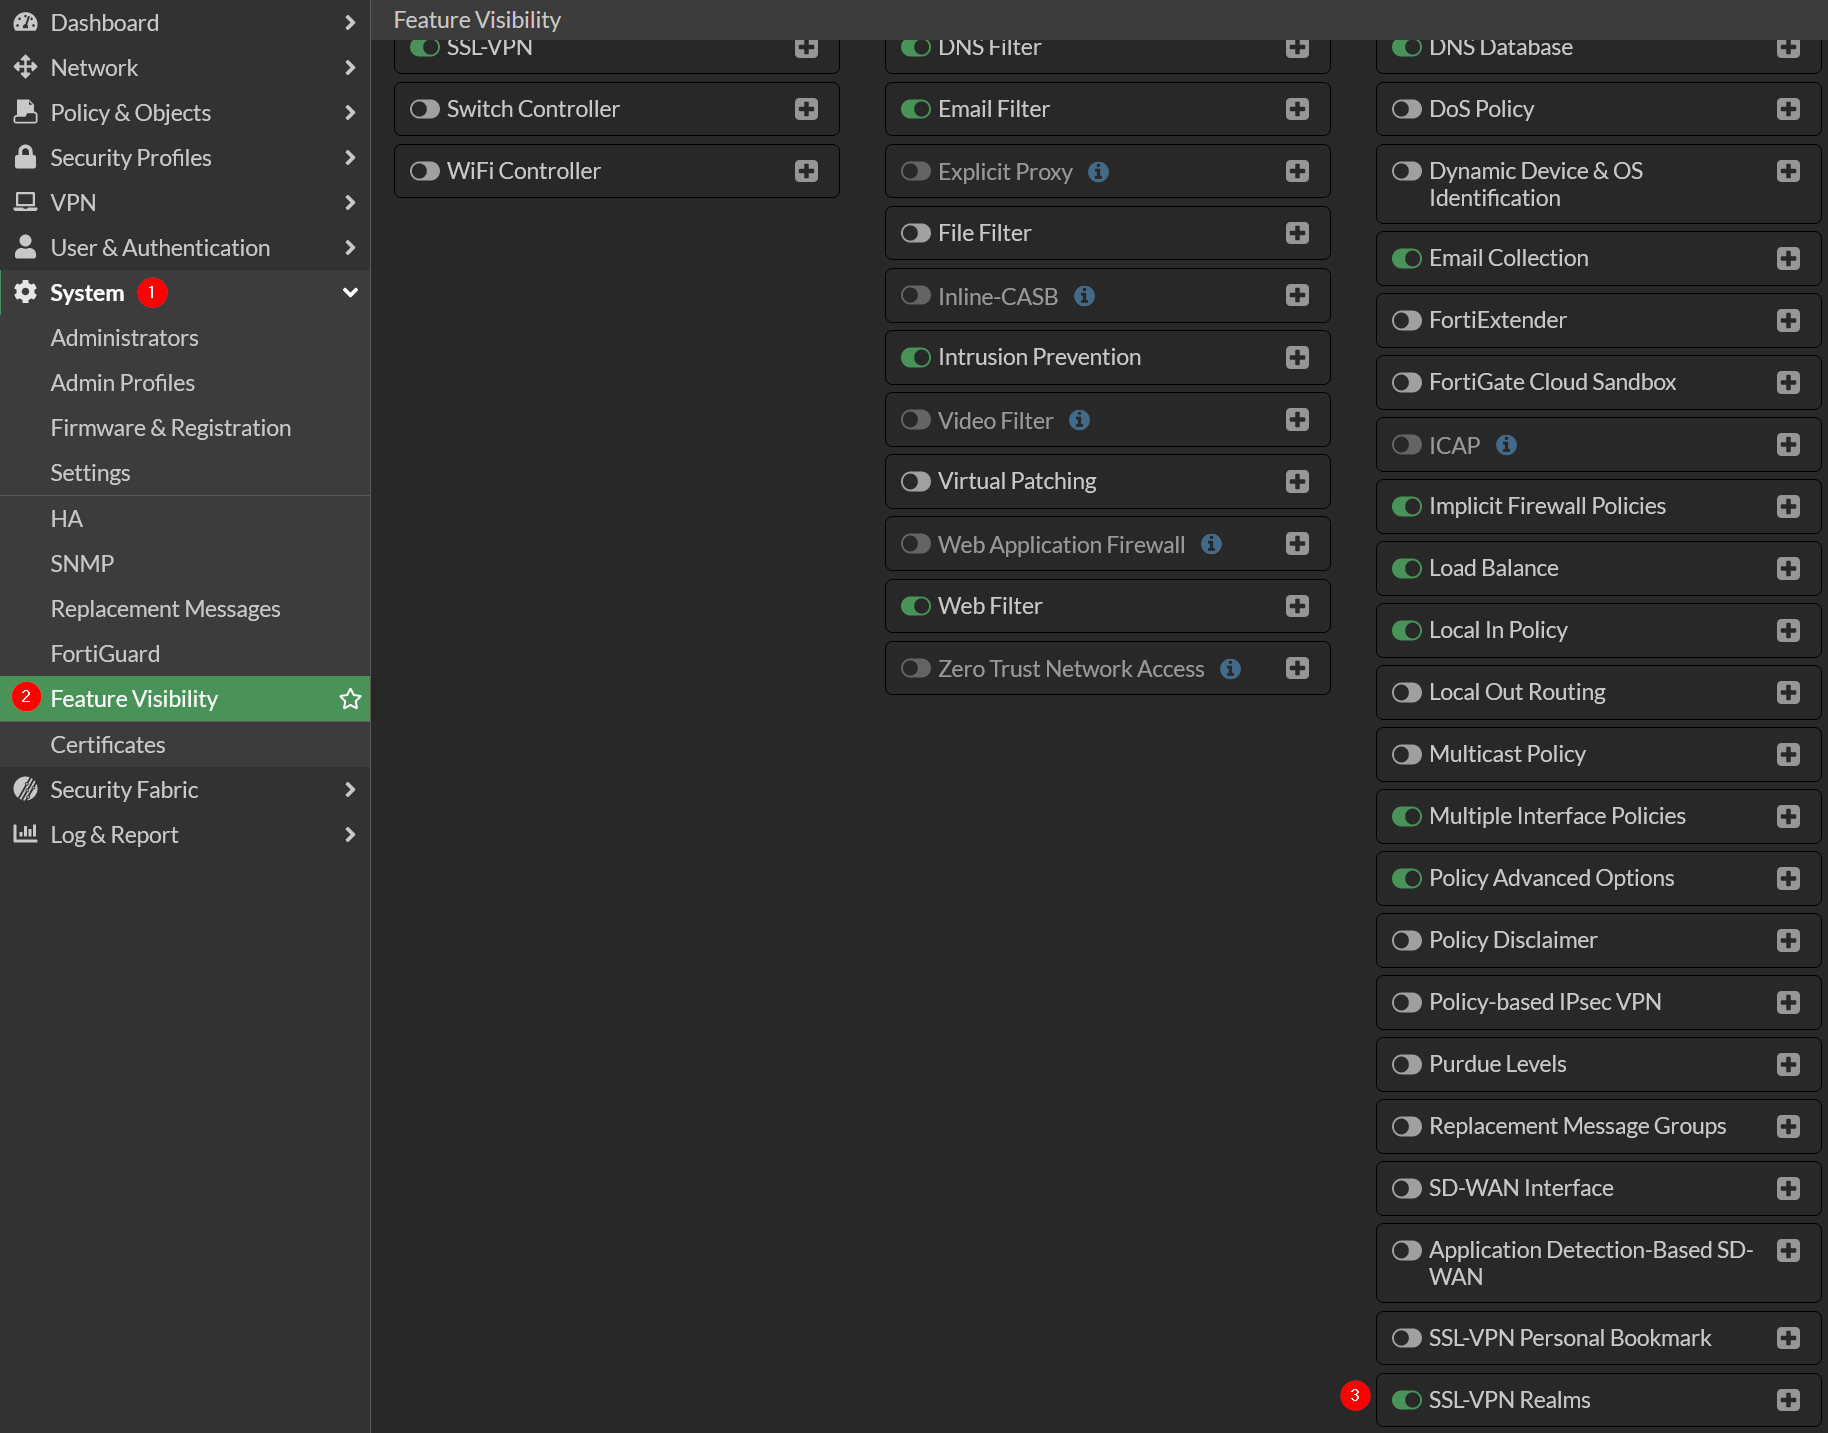
First you need to enable SSL-VPN Realms on FortiGate Firewall
Go to System → Feature Visibility and enable SSL-VPN Realms
Now go to VPN → SSL-VPN Realms and Create New
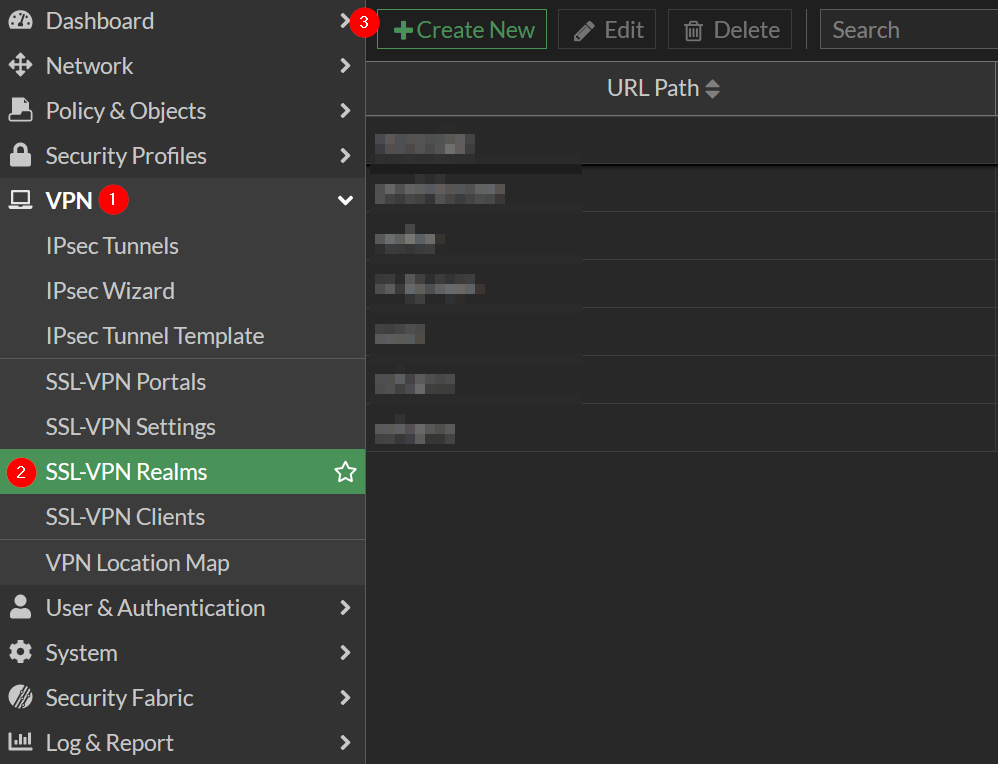
Type url path whatever you want. In this example monofor is used for url path
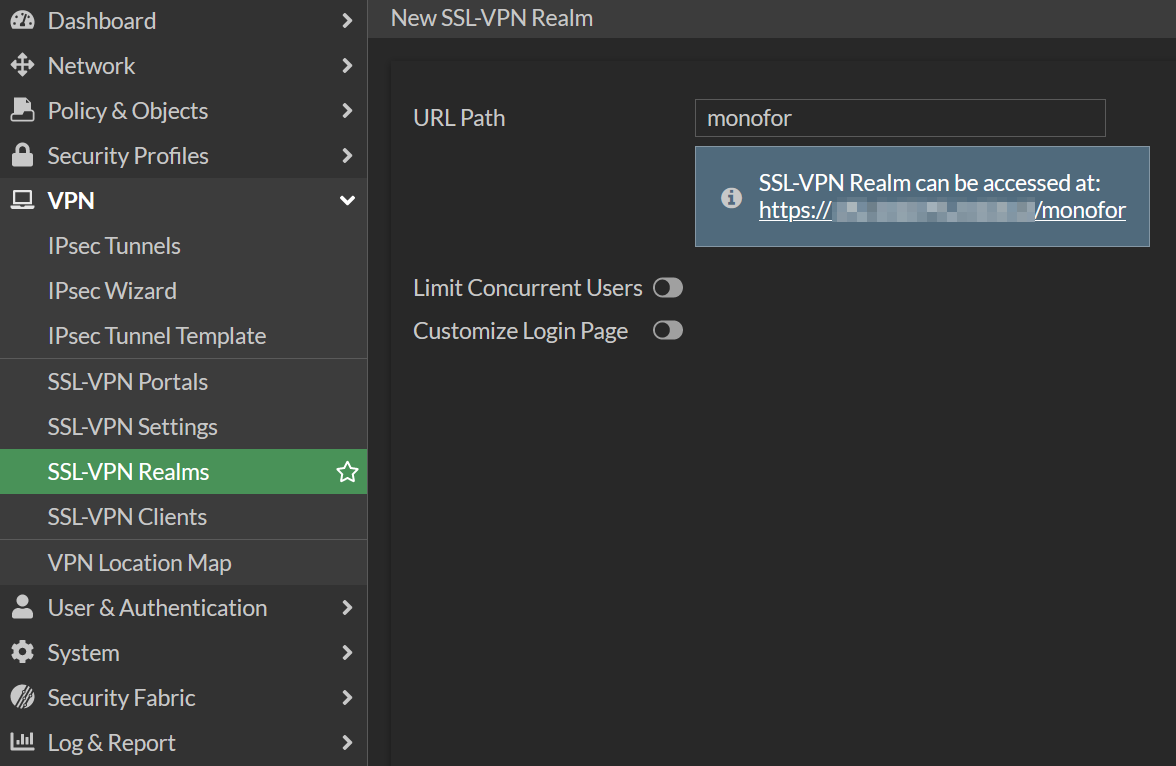
As shown in the picture new url path is accessible with your firewall SSL-VPN interface IP
https://<SSLVPN_IP_FQDN:PORT>/monofor
If you want to use a virtual host, the changes can be made as follows:
Login your firewall CLI with admin rights then run below commands
config vpn ssl web realm
  edit monofor
    set virtual-host saml.monofor.com
  next
end
From CLI
SSL-VPN realm can be configured via CLI.
Login your firewall CLI with admin rights then run below commands
Without virtual-host
config vpn ssl web realm
  edit monofor
  next
end
With virtual-host(optional)
config vpn ssl web realm
  edit monofor
    set virtual-host saml.monofor.com
  next
end
Please make sure create a DNS record if virtual-host configured. In this guide saml.monofor.com is used for virtual-host. saml.monofor.com DNS records must be created in your public DNS provider to point FortiGate SSL-VPN interface.
b. Upload Monosign IdP Certificate
Download Monosign IdP certificate from Monosign application keys.
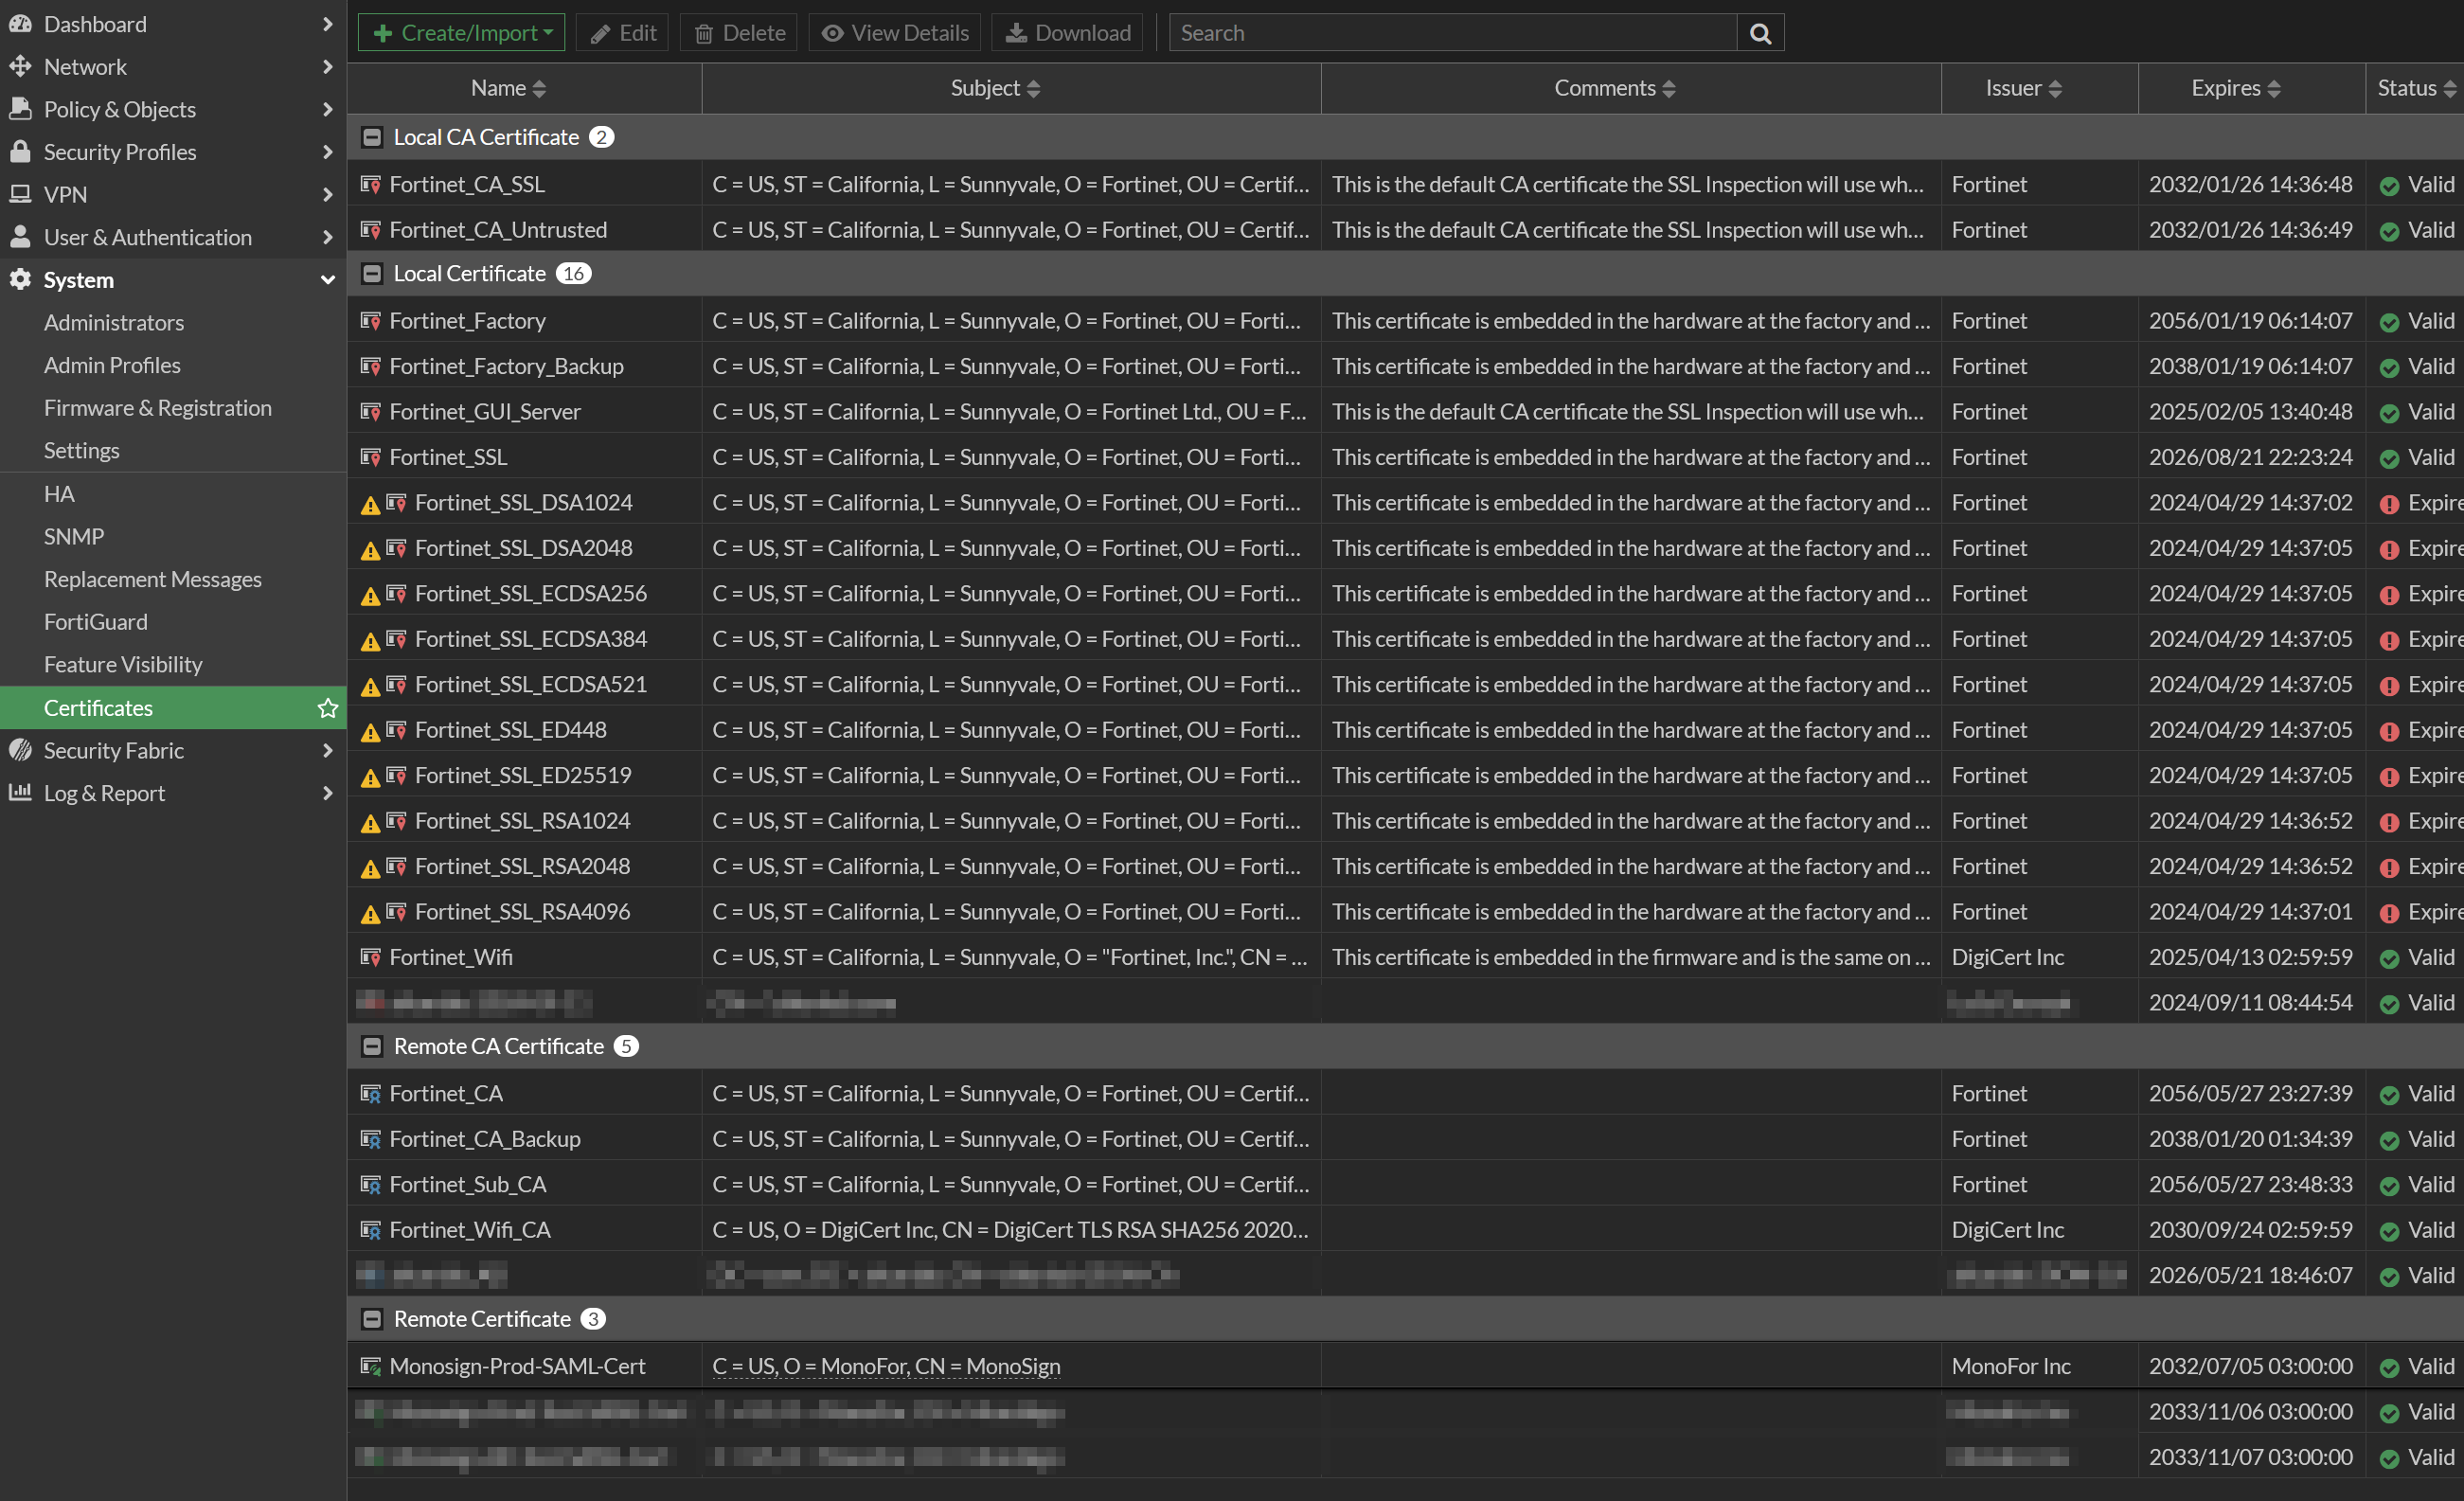
Go to System → Certificates → Create/Import → Remote Certificate than import Monosign IdP Certificate
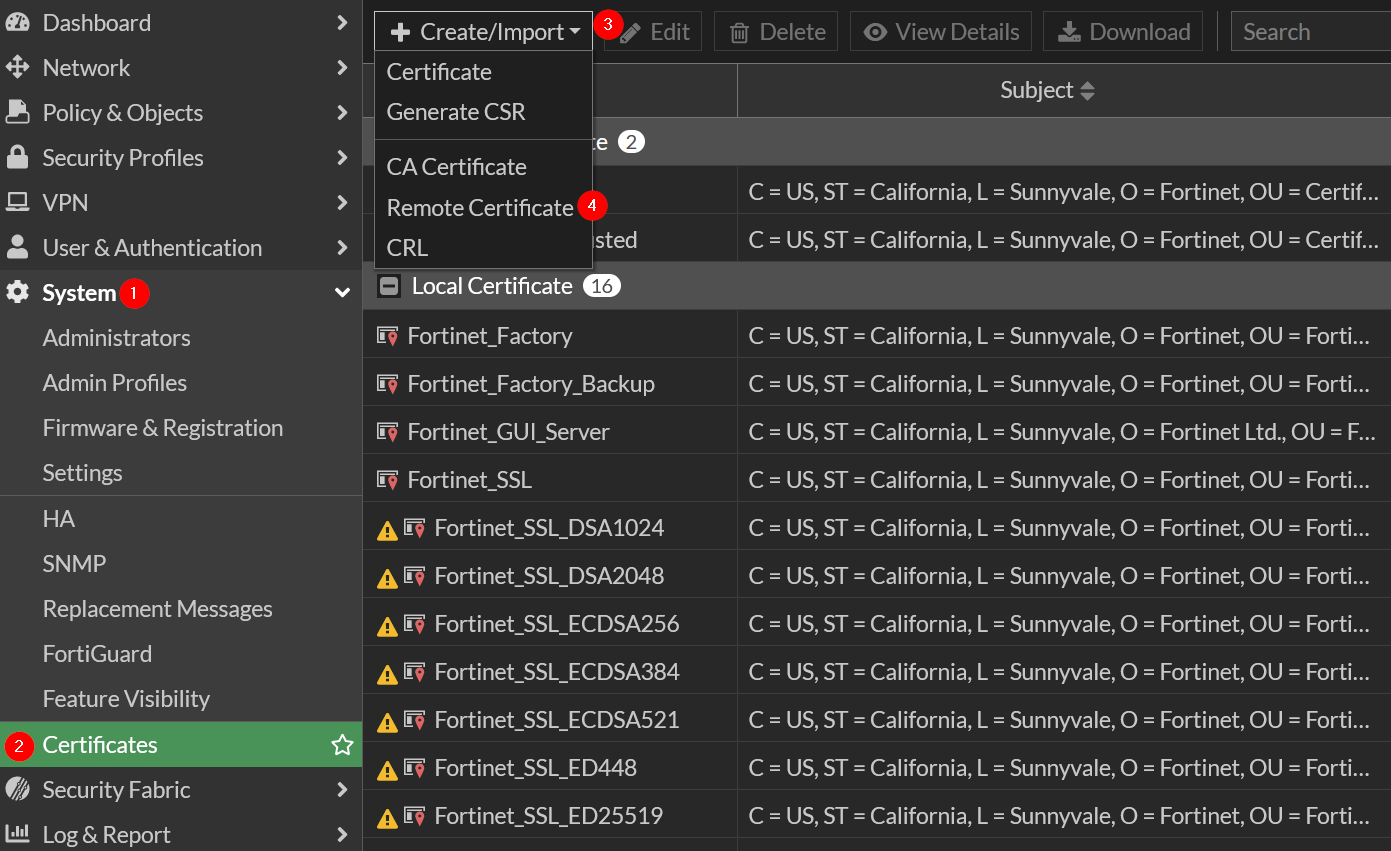
Click upload and choose certificate which is already downloaded in you pc then click OK.

Please verify Monosign IdP certificate uploaded correctly and listed in FortiGate Certificates. Uploaded certificate name is automatically generated by FortiGate. Name format is REMOTE_Cert_x
If you want to change certificate name use below cli command
config vpn certificate remote
  rename REMOTE_Cert_1 to Monosign-SAML-Cert
  next
end
Now it can be verified Monosign IdP certificate renamed and uploaded correctly under System → Certificates.
Subject : C = US, O = MonoFor, CN = MonoSign
Issuer : MonoFor, Inc
c. Create SSO Server
GUI
Go to User & Authentication → Single Sign-On then Create new
Provide below information
|
Property |
Value |
|---|---|
|
Name |
|
|
Address |
|
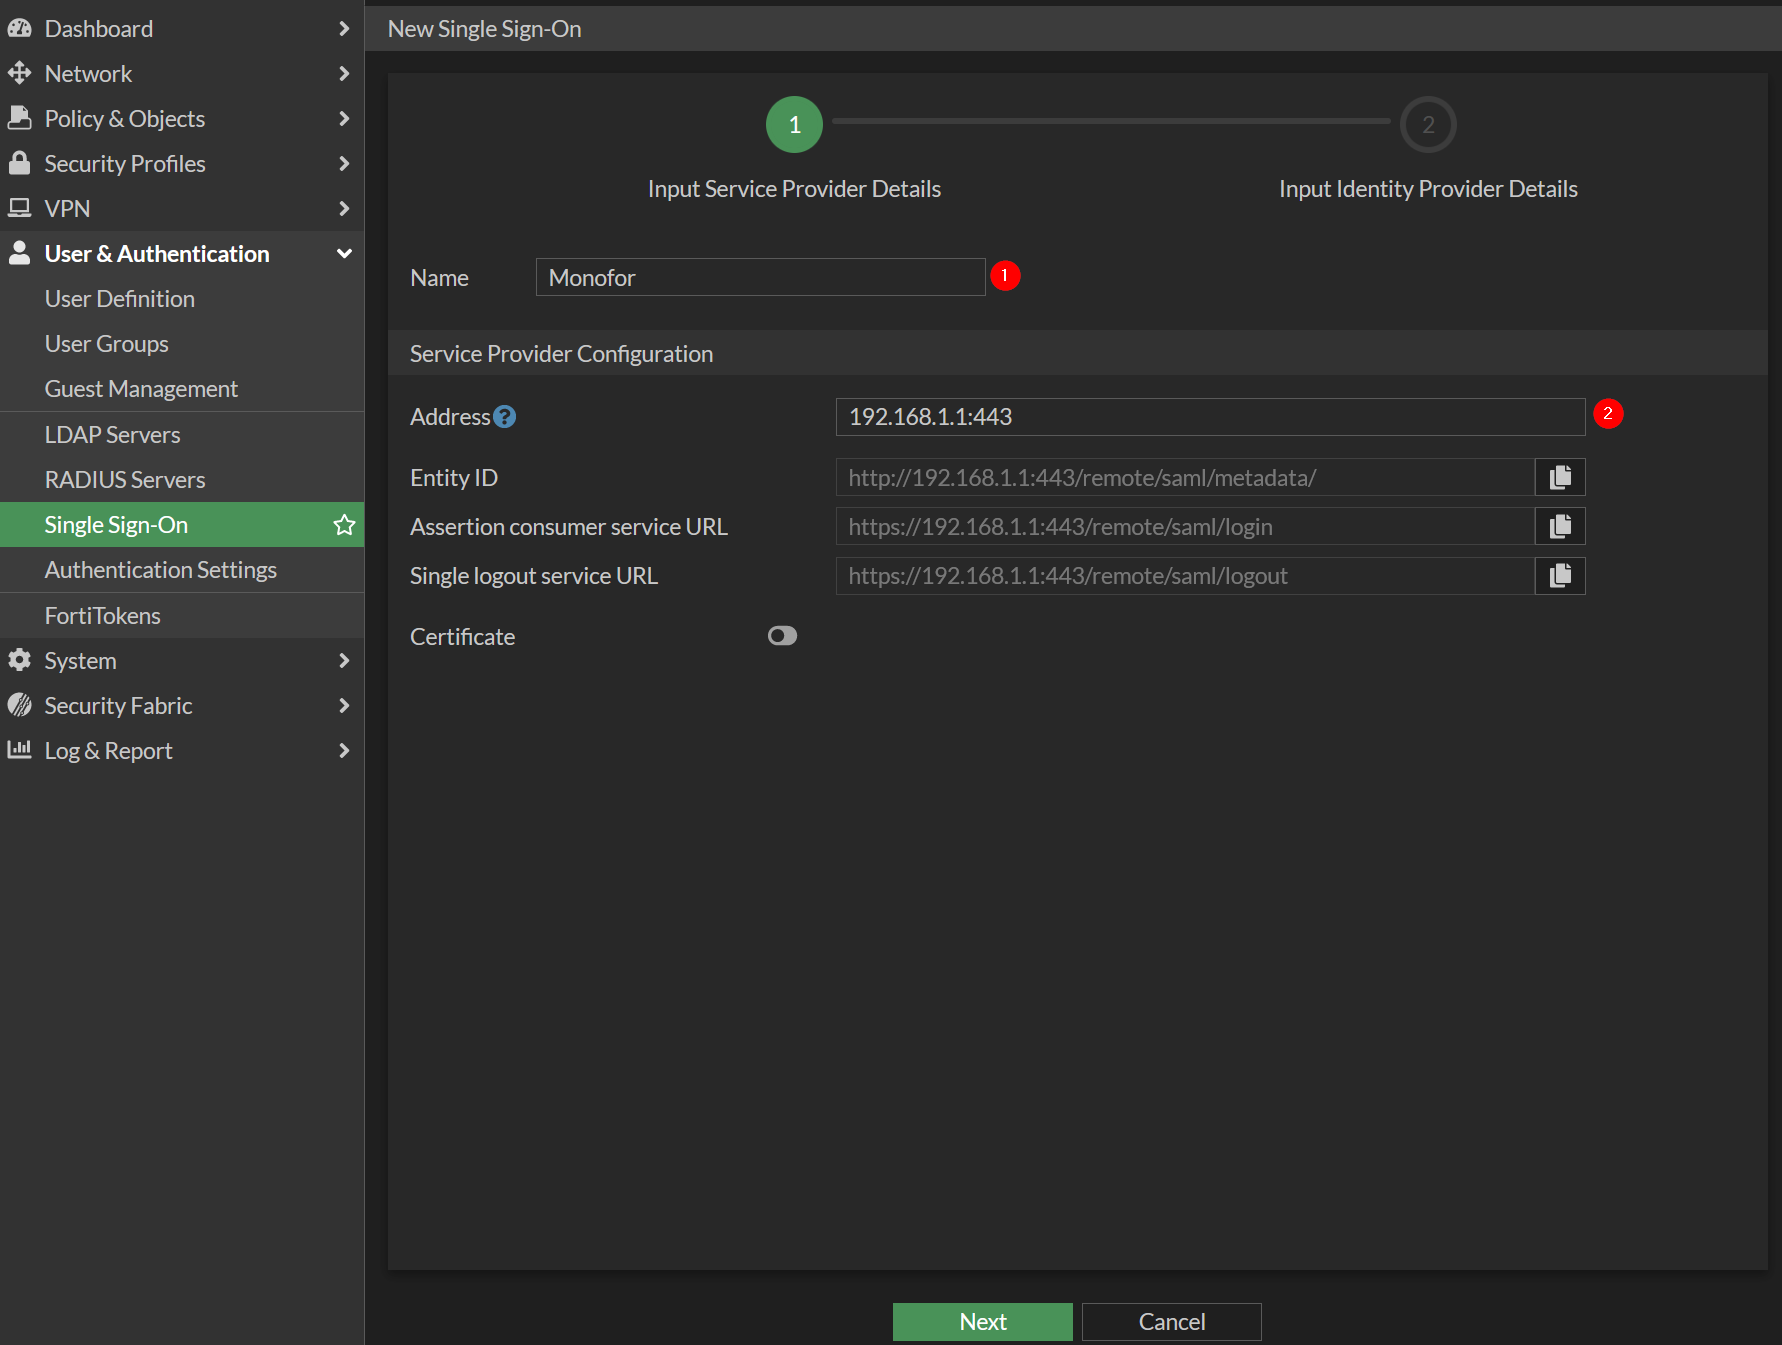
If virtual-host configured in the SSL-VPN Realms please type virtual-host in Address Field with port information
Example:
|
Property |
Value |
|---|---|
|
Address |
|
Click Next
Provide below information. Entity ID, Assertion consumer service URL and Single logout service URL can be get from FortiGate Application Keys on Monosign. This is explained in this step.
|
Property |
Value |
|---|---|
|
Type |
|
|
Entity ID |
|
|
Assertion consumer service URL |
|
|
Single logout service URL |
|
|
Certificate |
|
|
Attribute used to identify users |
|
|
Attribute used to identify groups |
|
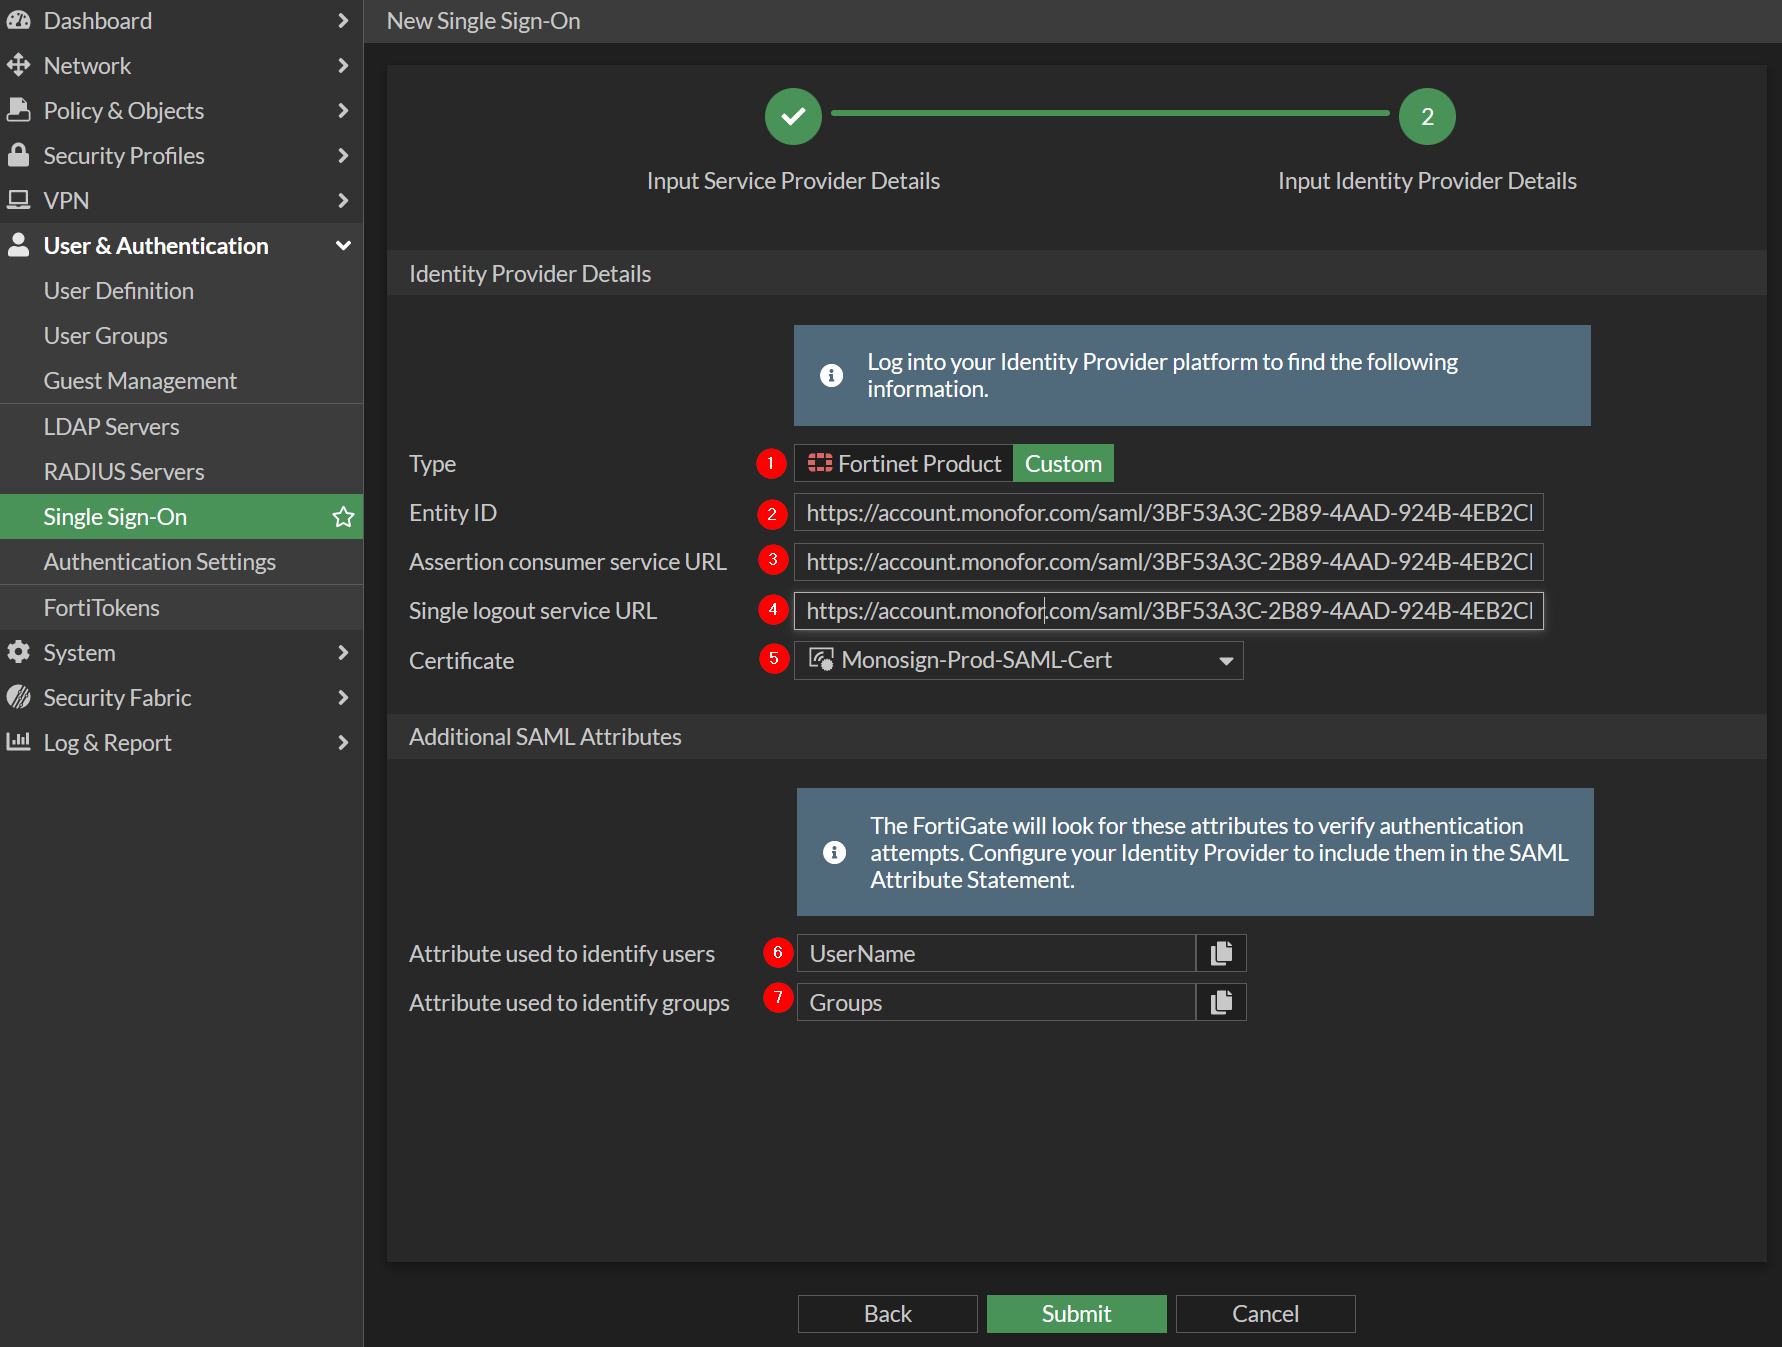
Click Submit to save Single Sign-On.
After configuration verified connect FortiGate Firewall CLI to change digest-method. When SSO configured via GUI FortiGate Firewall set digest-method to SHA1. It needs to be changed to SHA256.
config user saml
  edit Monofor
    set digest-method sha256
  next
end
CLI
Single Sign-On configuration can be done via CLI commands.
config user saml
  edit Monofor
    set entity-id http://saml.monofor.com/remote/saml/metadata/
    set single-sign-on-url https://saml.monofor.com/remote/saml/login/
    set single-logout-url https://saml.monofor.com/remote/saml/logout/
    set idp-entity-id https://account.monofor.com/saml/3daf7315-917c-4c03-a1d4-1db97ca889fd
    set idp-single-sign-on-url https://account.monofor.com/saml/3daf7315-917c-4c03-a1d4-1db97ca889fd/Login
    set idp-single-logout-url https://account.monofor.com/saml/3daf7315-917c-4c03-a1d4-1db97ca889fd/Logout
    set idp-cert Monosign-SAML-Cert
    set user-name UserName
    set group-name Groups
    set digest-method sha256
  next
end
d. Create Group
Go to User & Authentication → User Groups then Create New
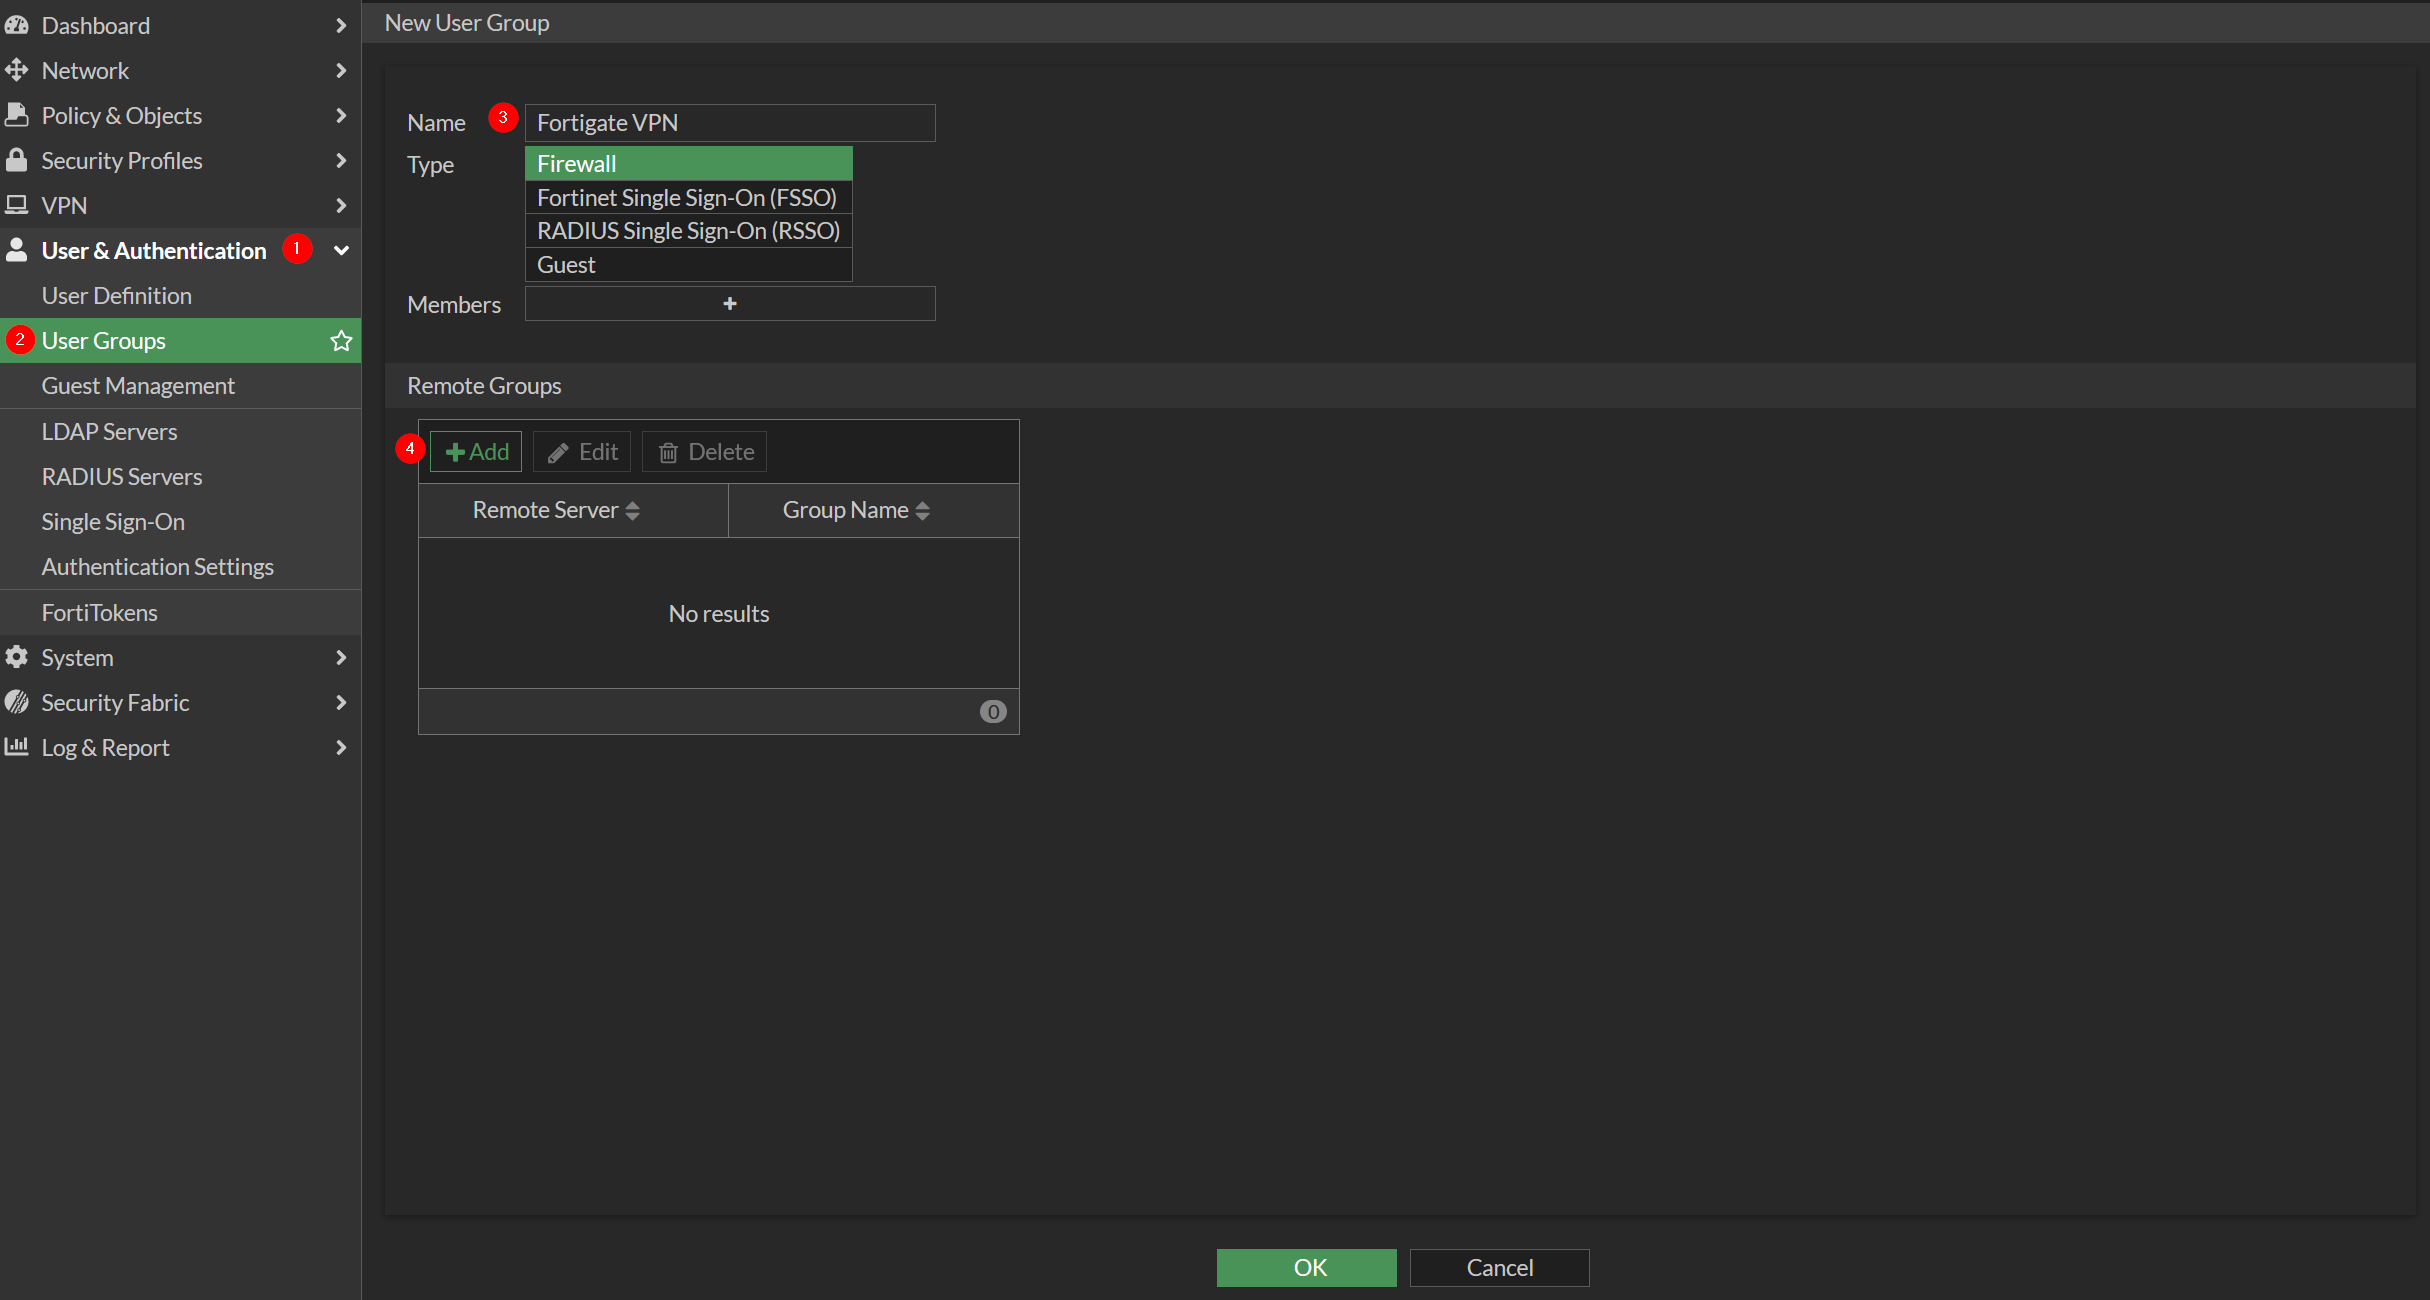
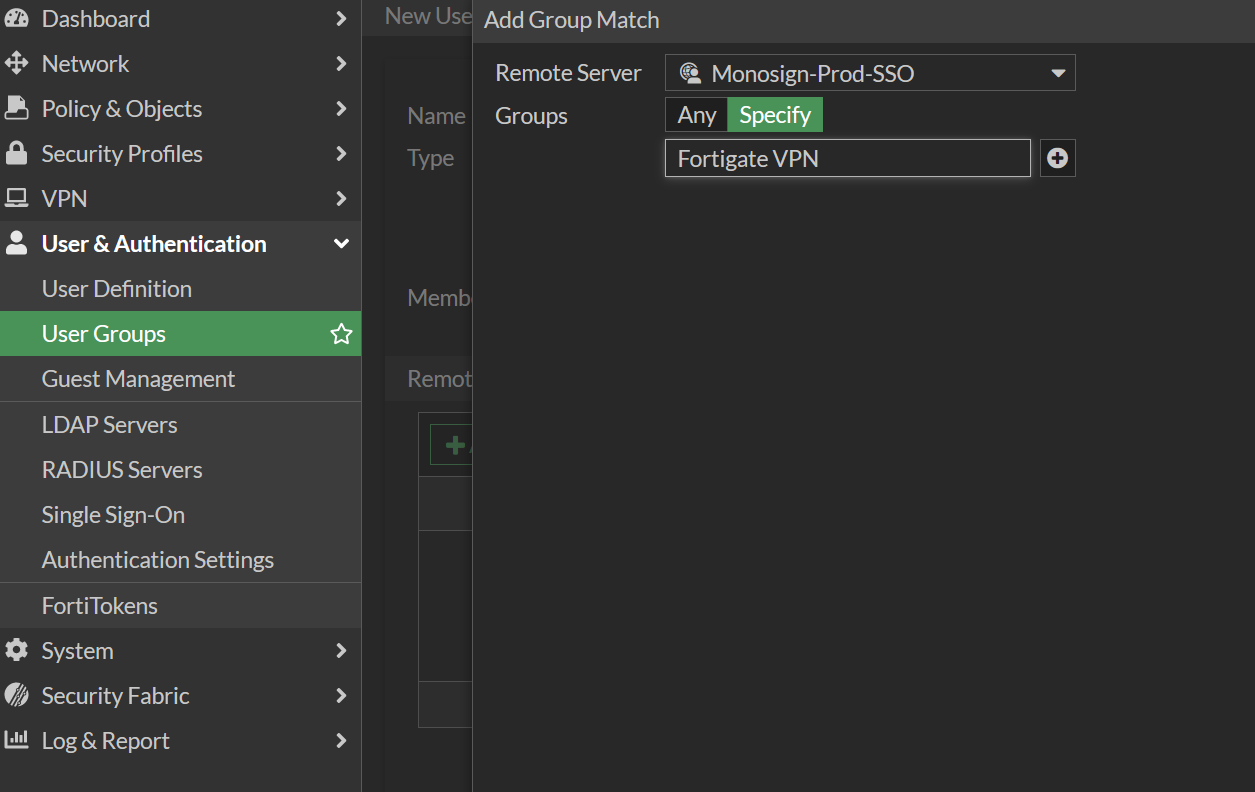
Give name of the group and Click Add in Remote Groups
Choose Remote Server which is already added in the Single Sign-On. Choose groups type Specify and type name of the user group in Monosign.
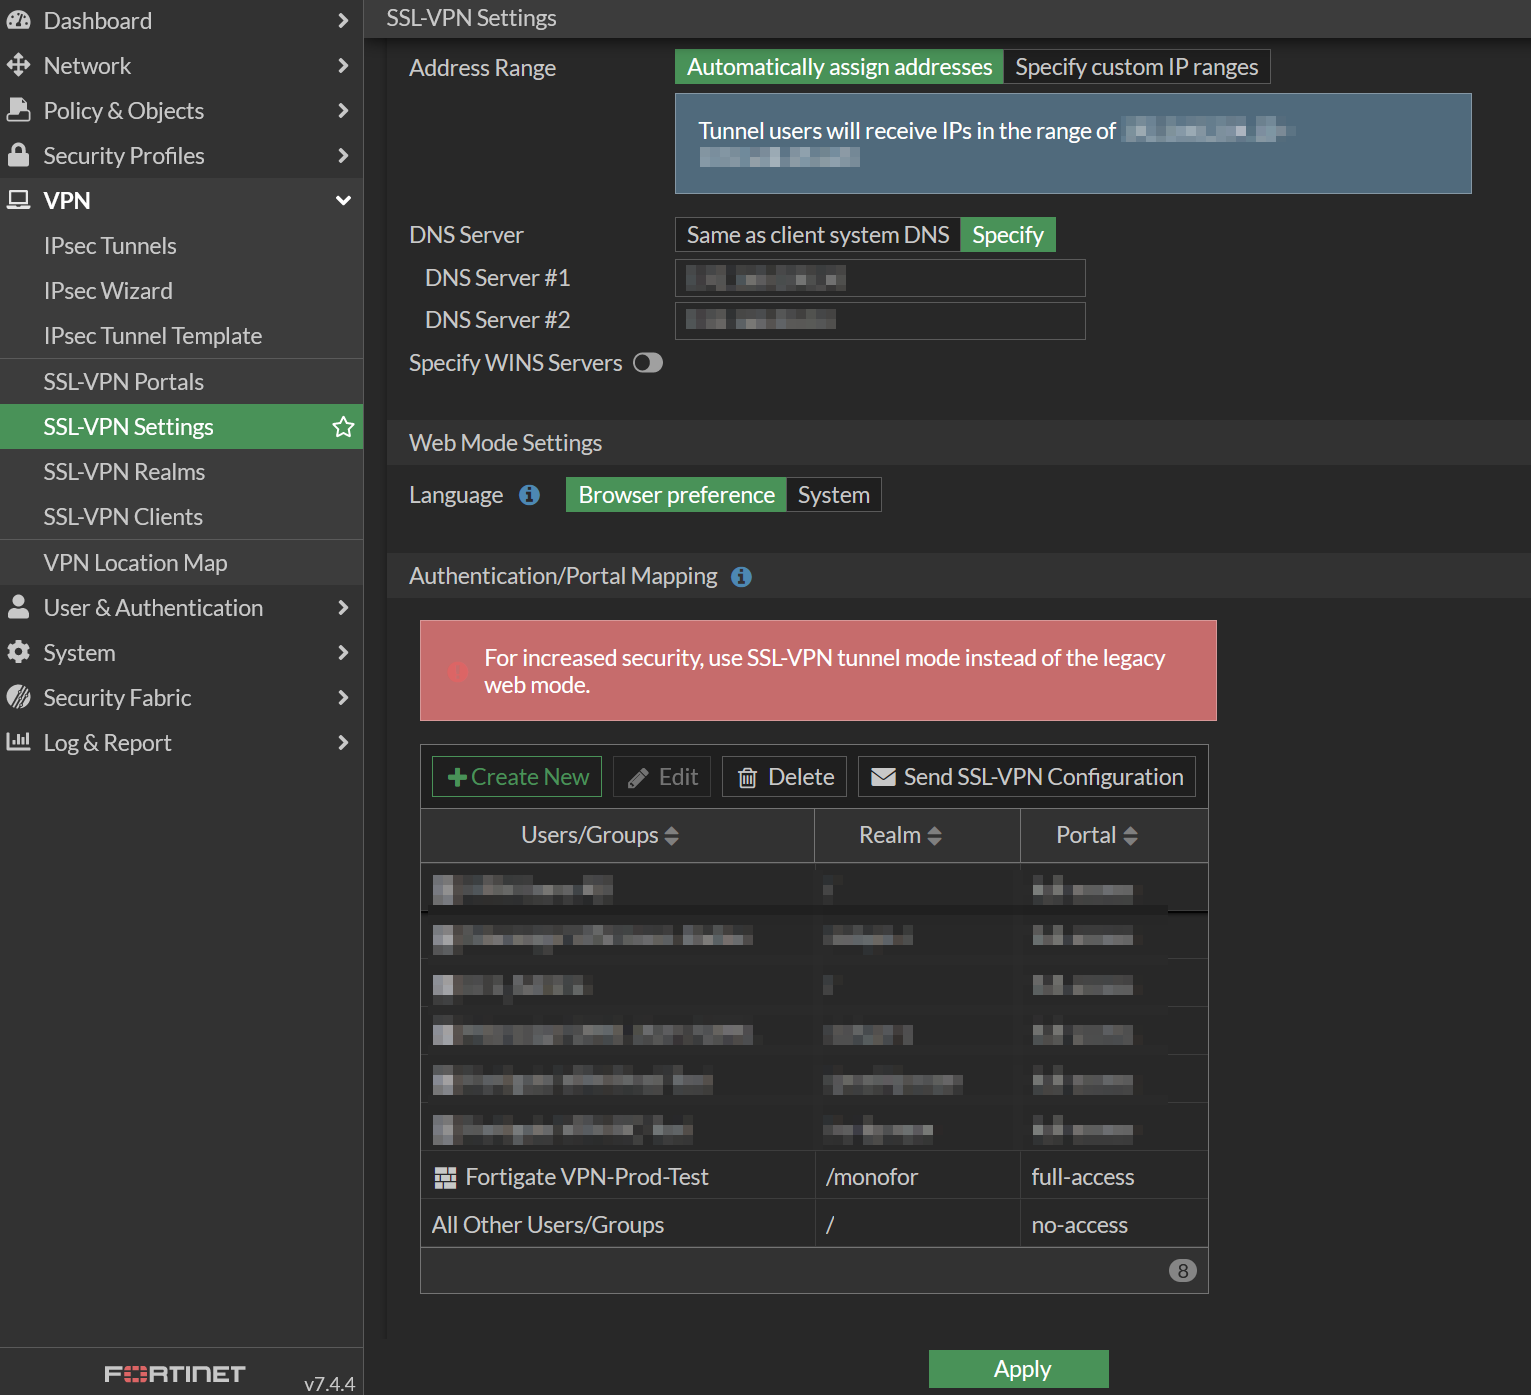
e. Configure SSL-VPN
Go to VPN → SSL-VPN Settings then click Create new under the Authentication/Portal Mapping
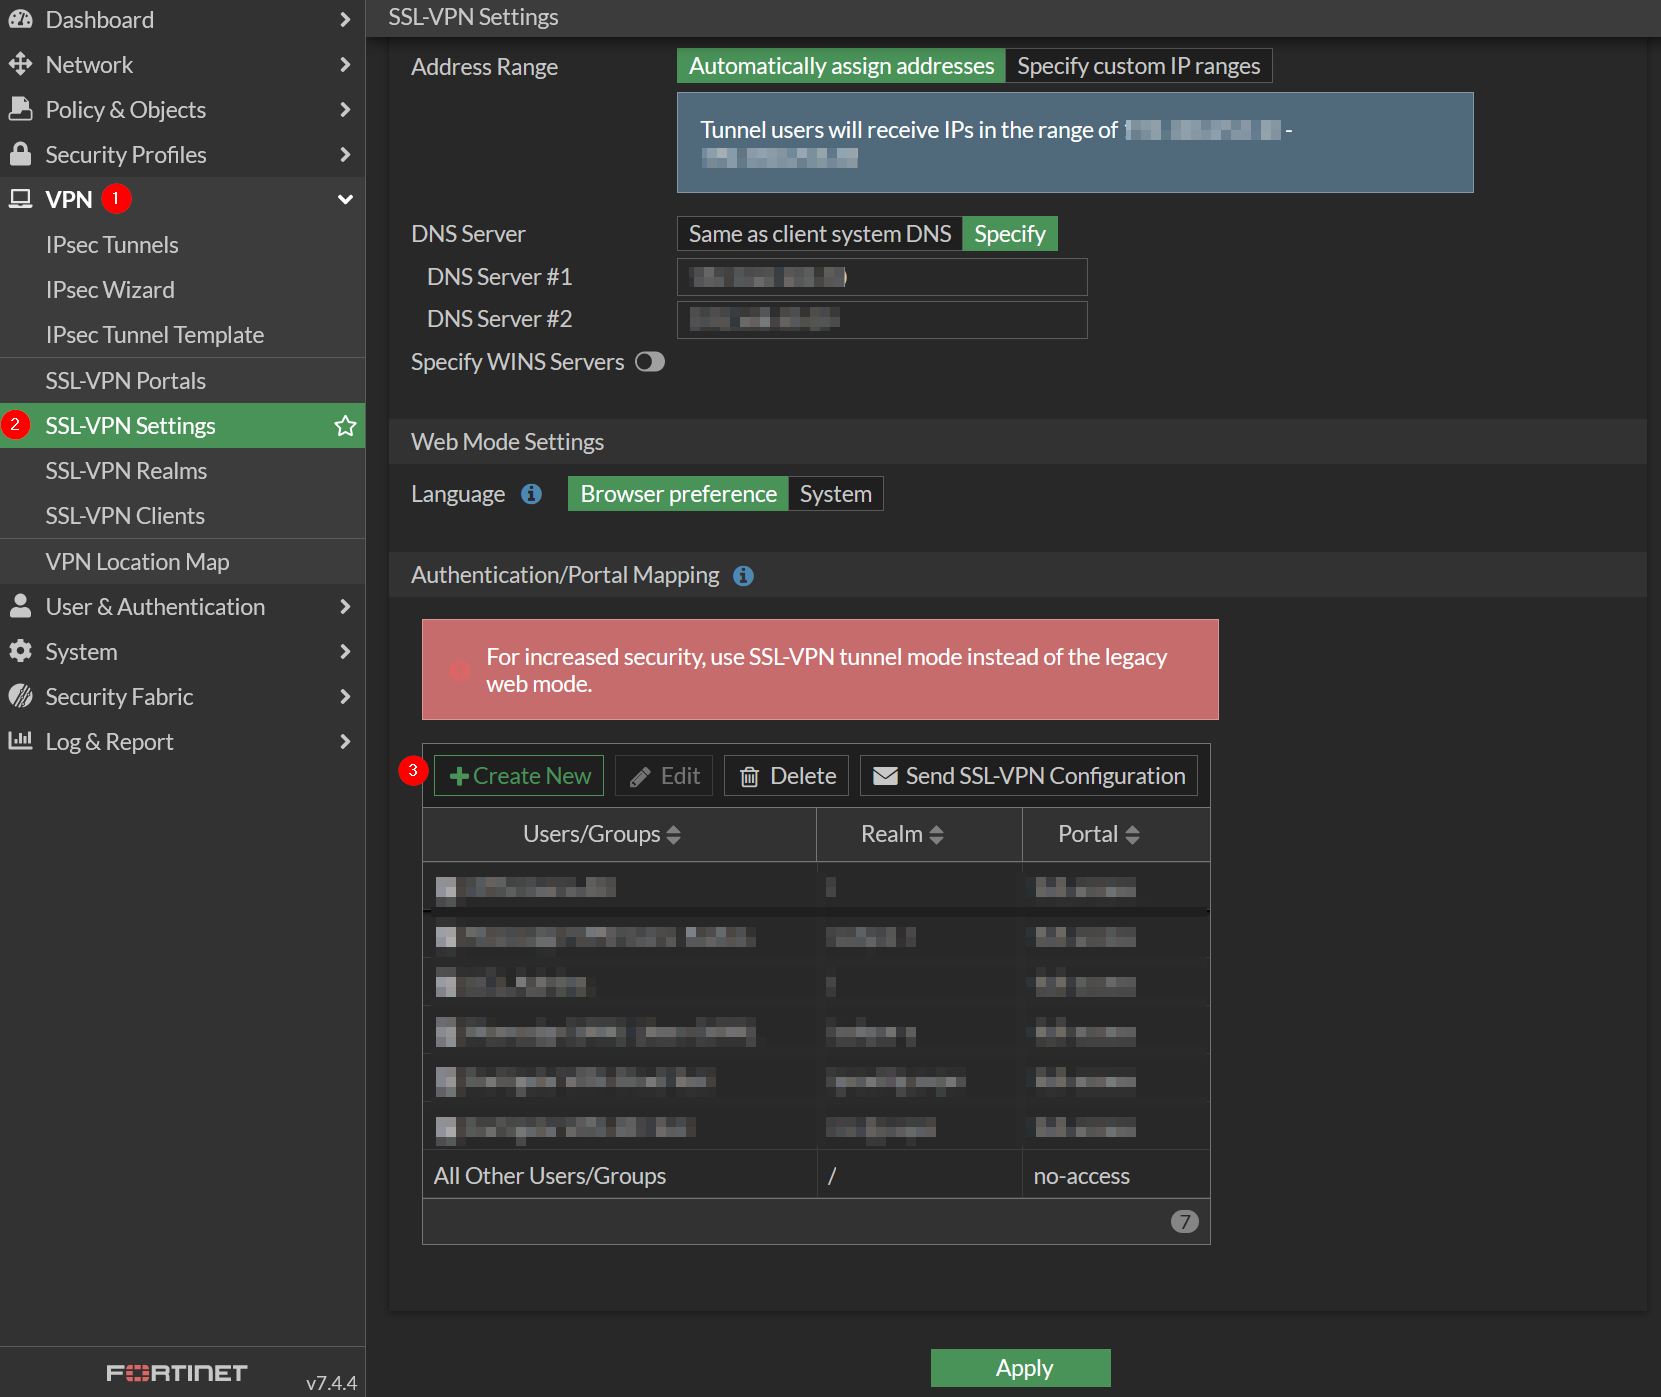
Provide User/Groups, Realm and Portal information
|
Property |
Value |
|---|---|
|
User/Groups |
Choose group which is created previous step |
|
Realm |
Choose Specify and select created realm in previous step |
|
Portal |
Choose portal access type |
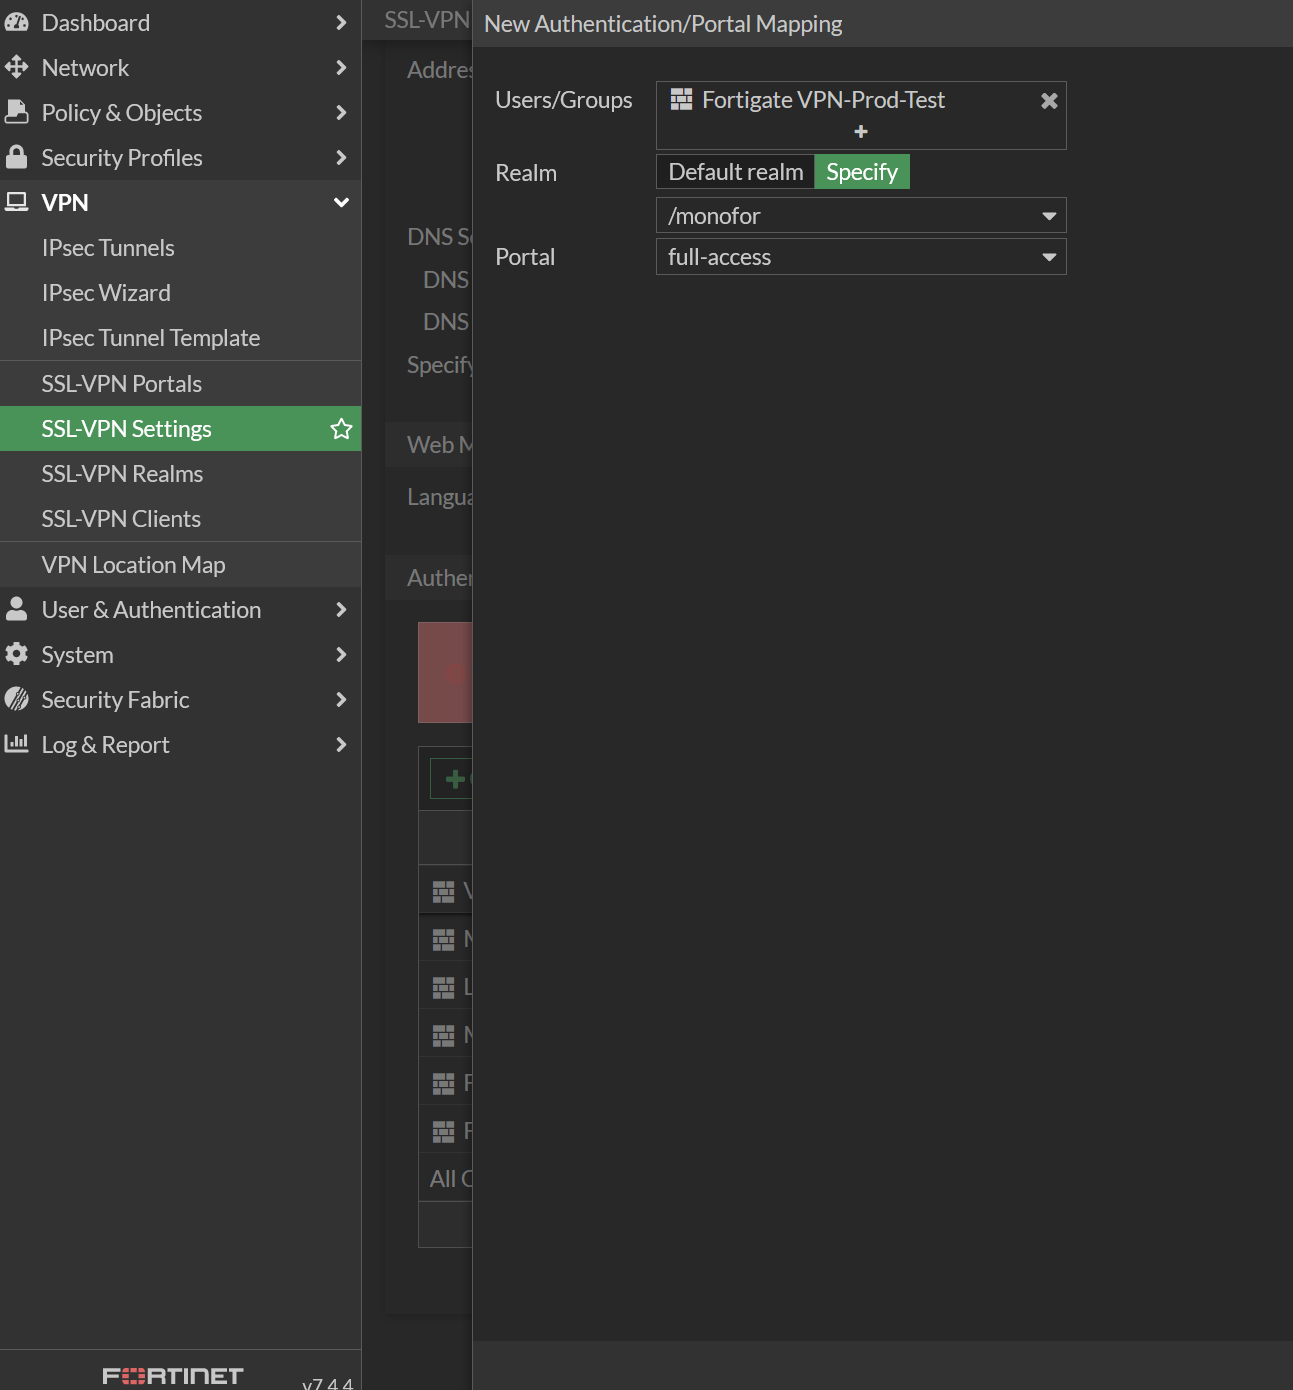
Now you will able to see newly added Authentication/Portal Mapping configuration then click Apply
f. Configure Firewall Policy
Go to Policy & Objects → Firewall Policy
Select existing SSL-VPN policy or create new one(optional) and add new group to the source in the policy which is created here.
Now, go back to Monosign and give access to your users and try login.
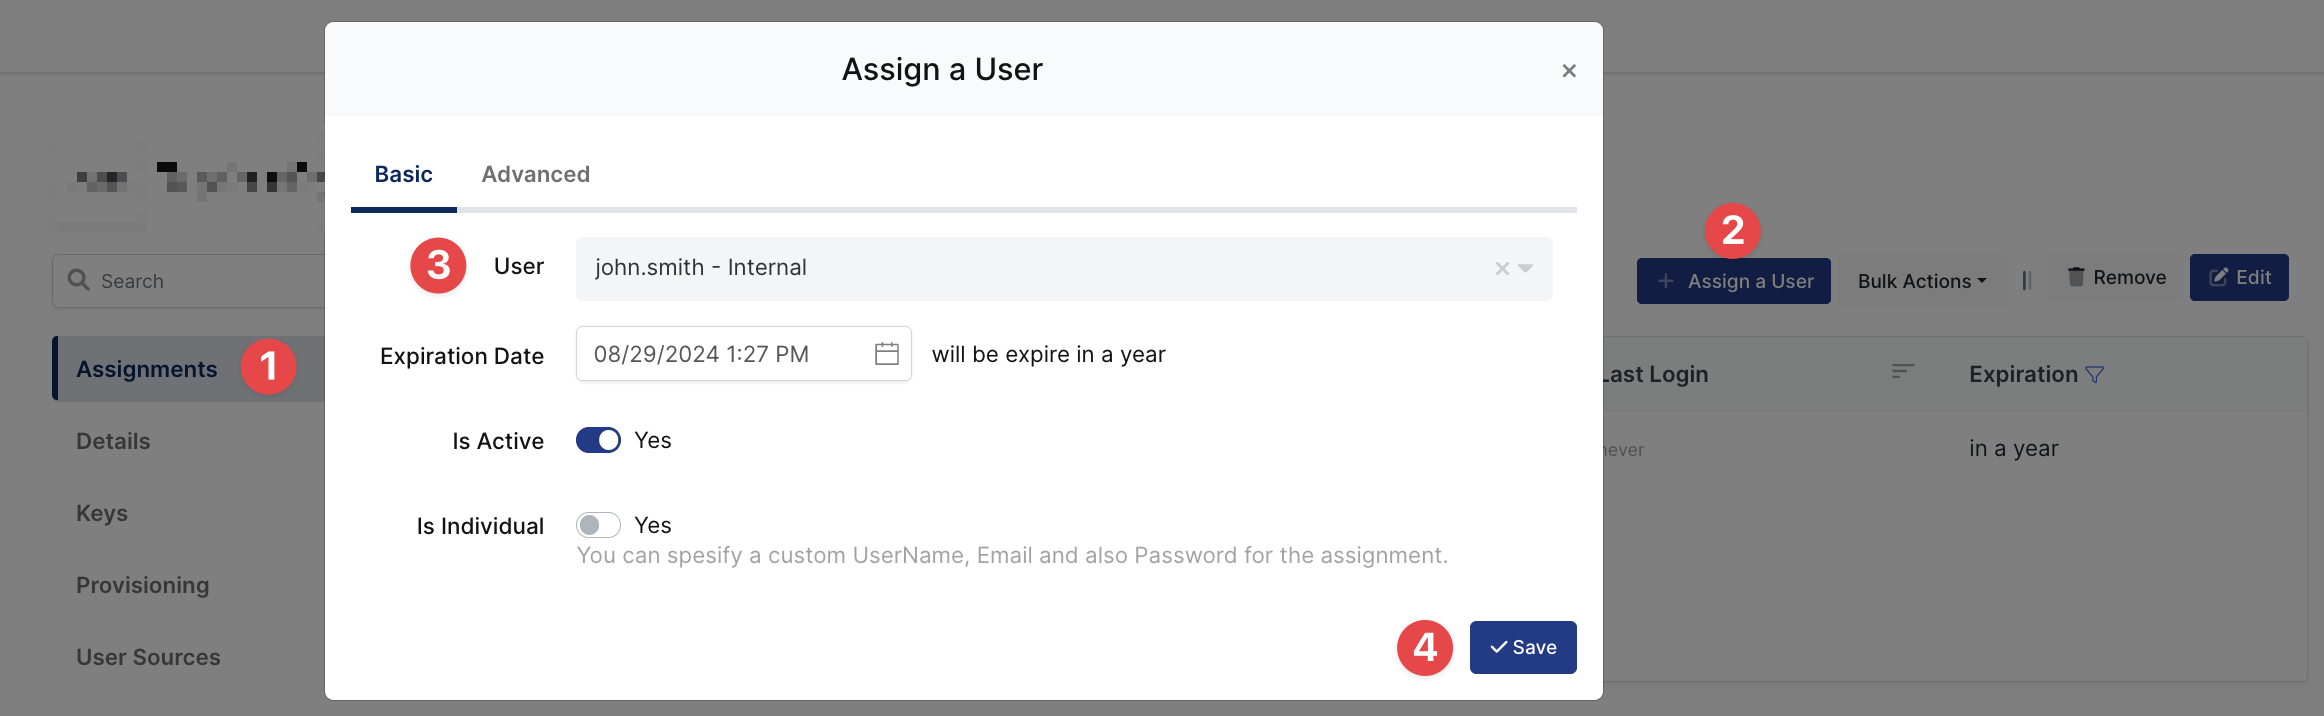
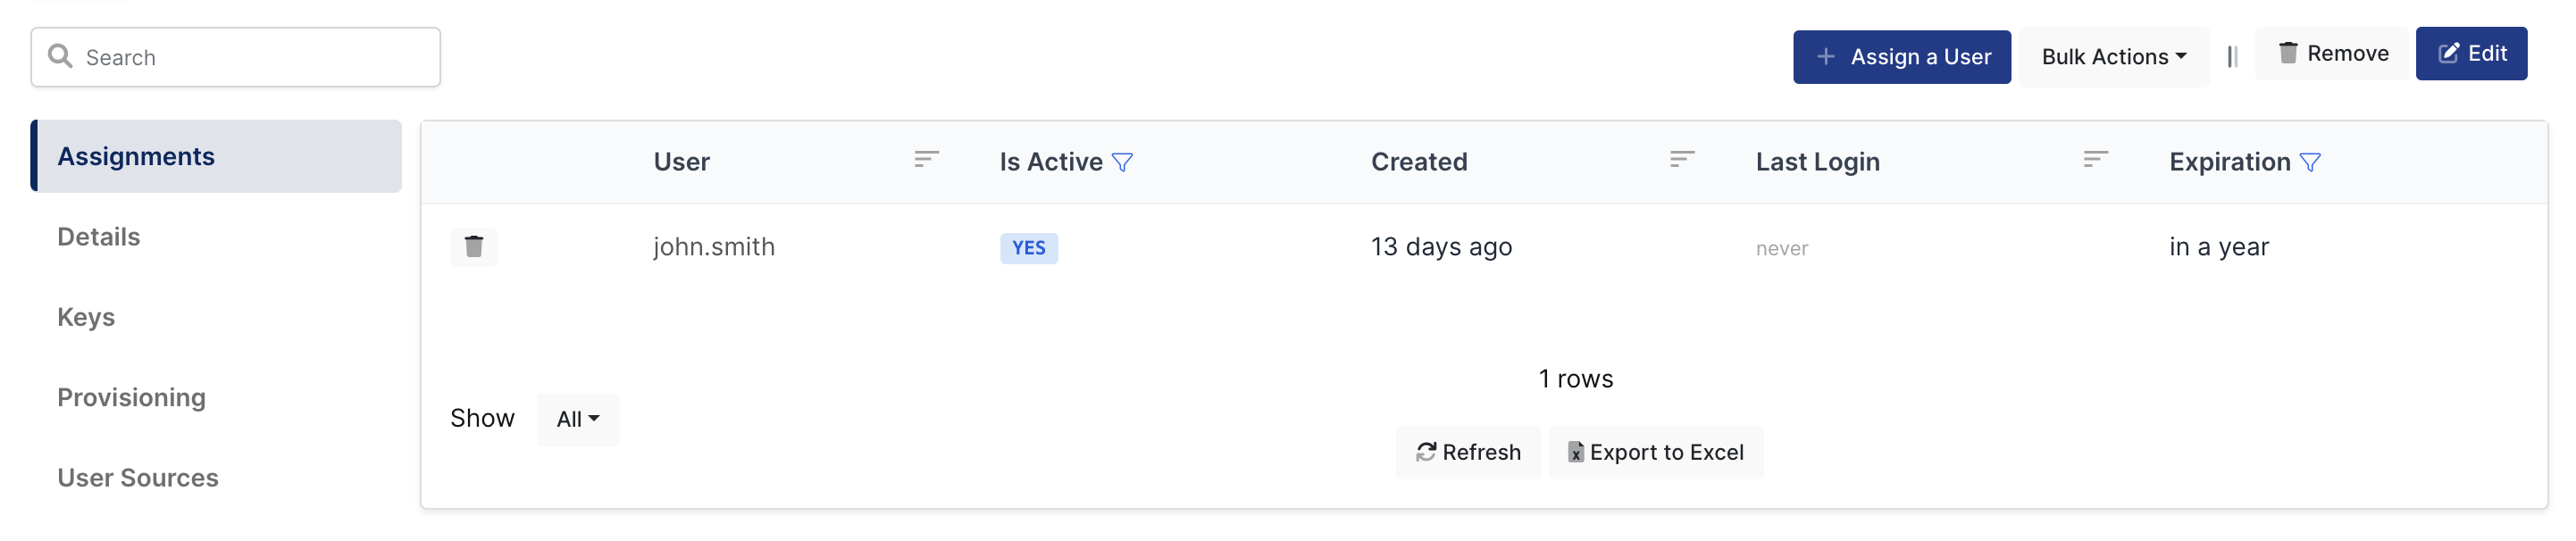
3- Assign a user to the FortiGate SSL-VPN application
Please follow below instructions on how to assign a user to the FortiGate application. In this example john.smith will assign to the application access.
4- Sign In Test
Now try login.
a. Browser
Open new browser or tab type SSL-VPN portal address
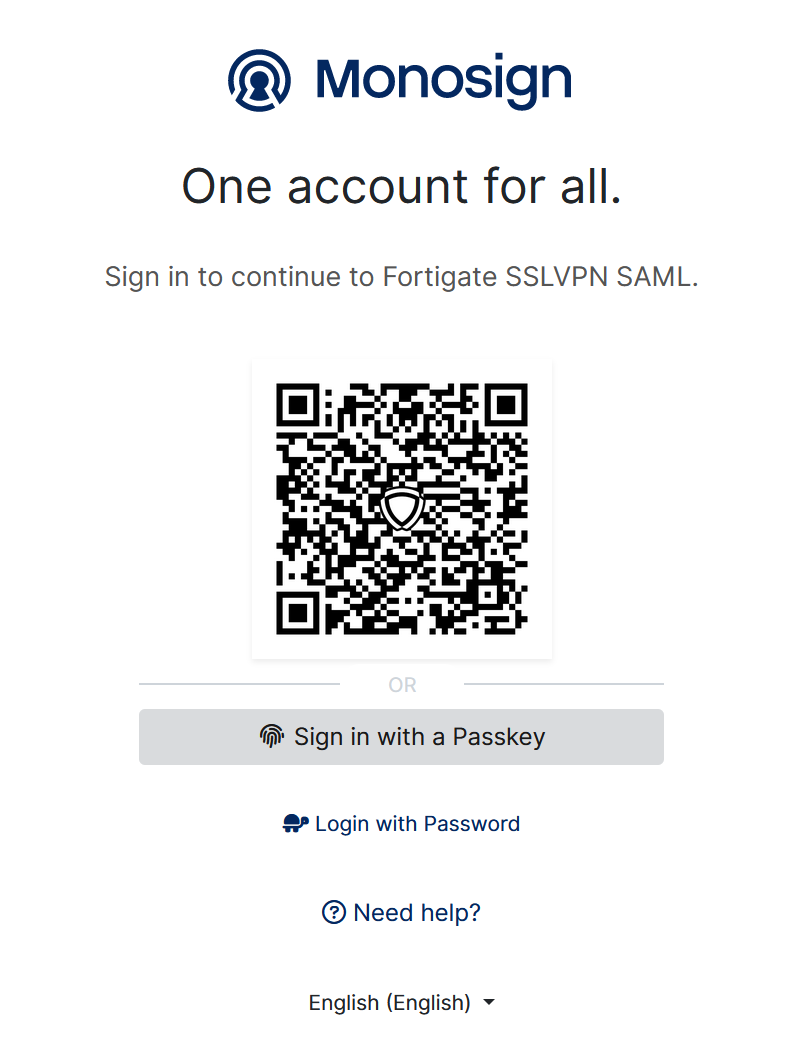
It can be login with Passwordless login(Monofor Identity), Passkey or Username and Password(Login with Password)
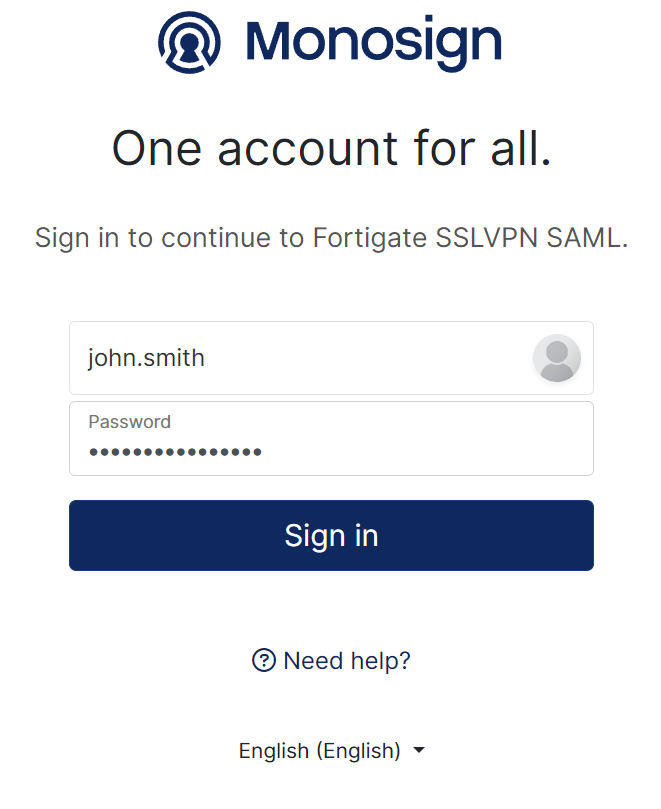
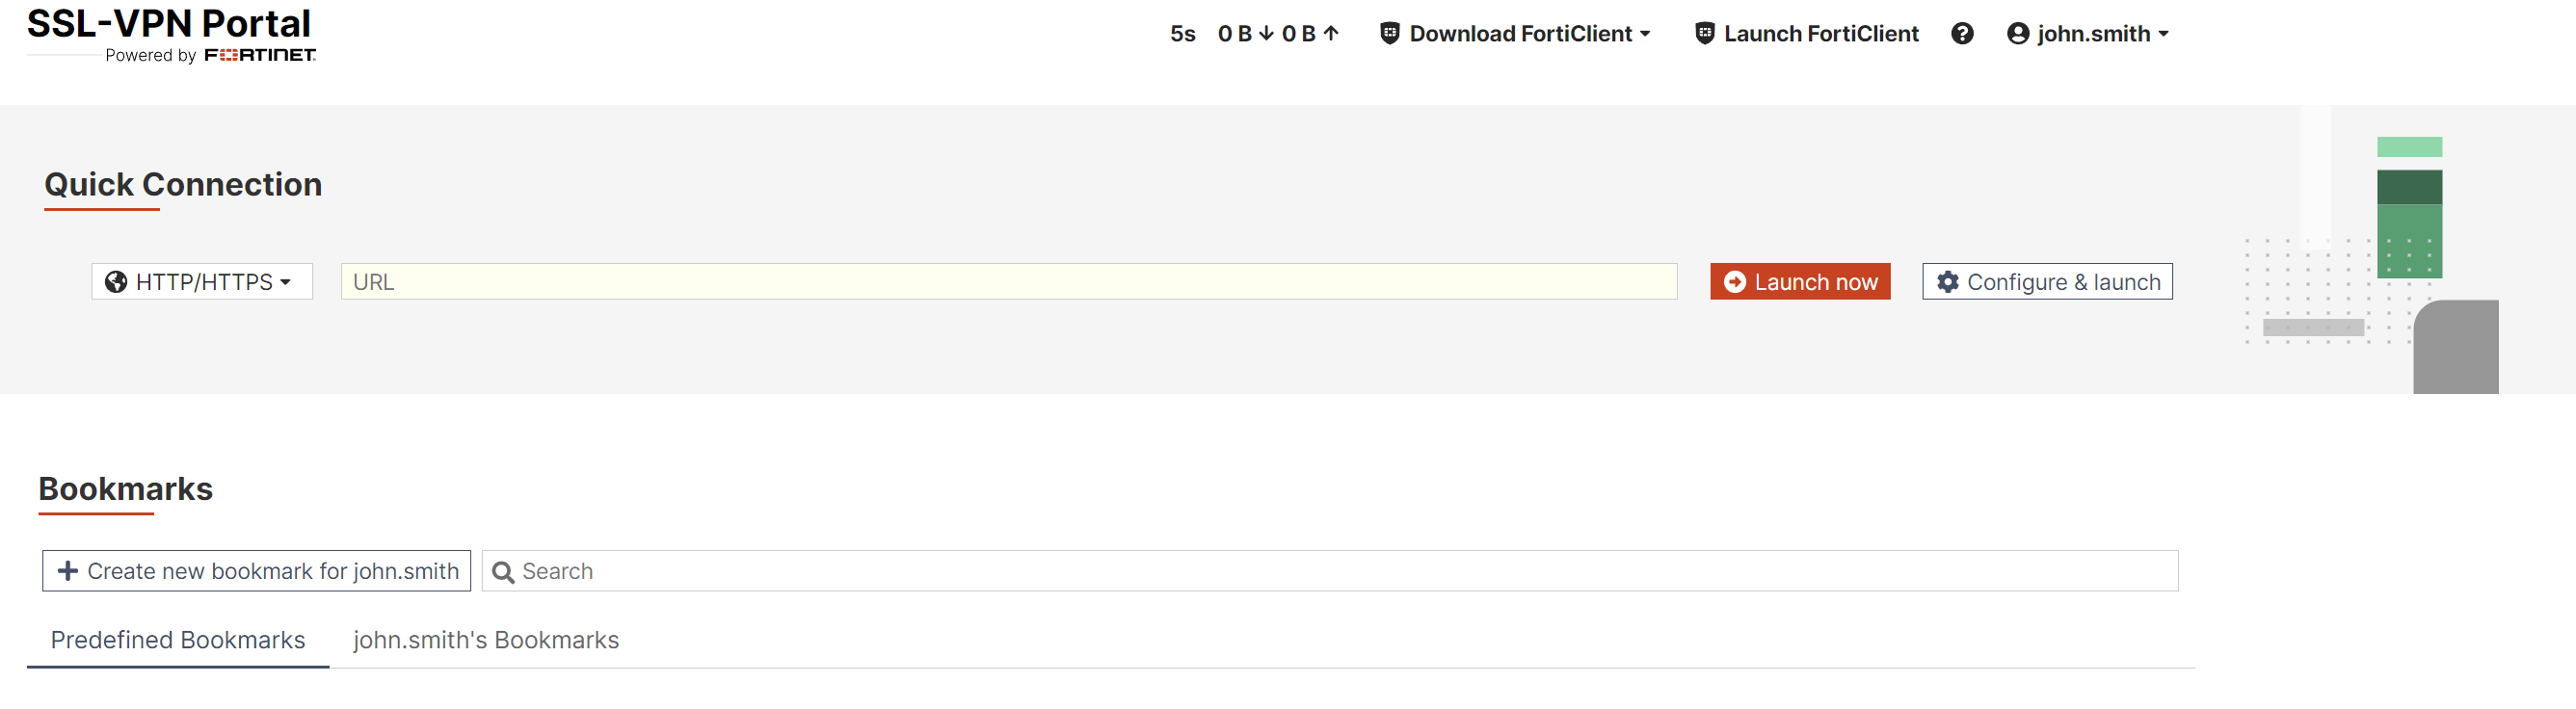
After click Sign in user will able to login FortiGate SSL-VPN Portal
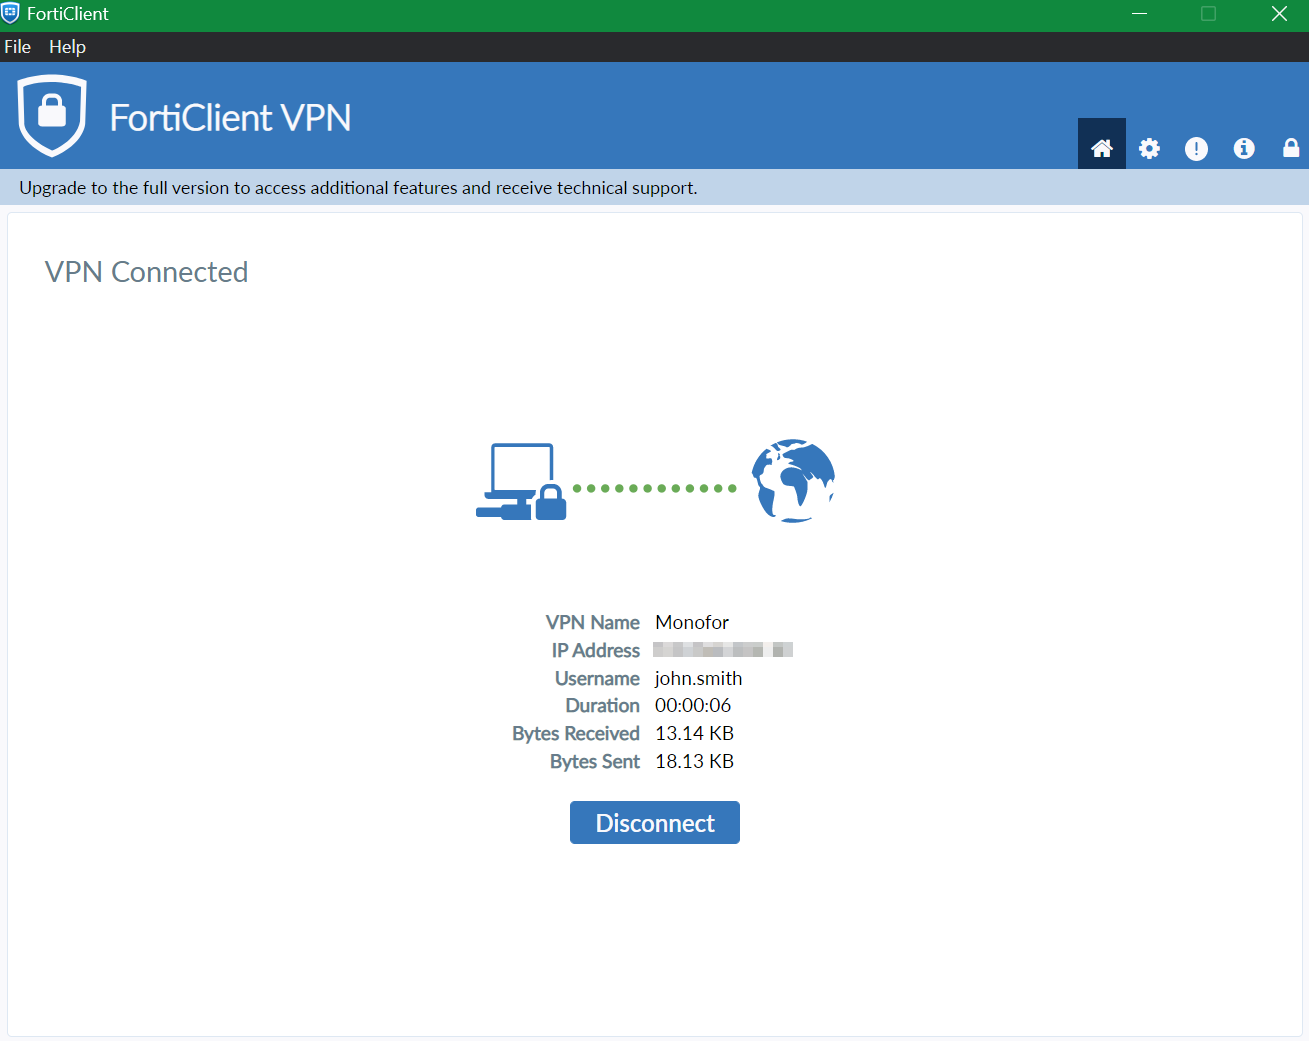
b. FortiGate Client
Open FortiGate VPN Client click 3-line
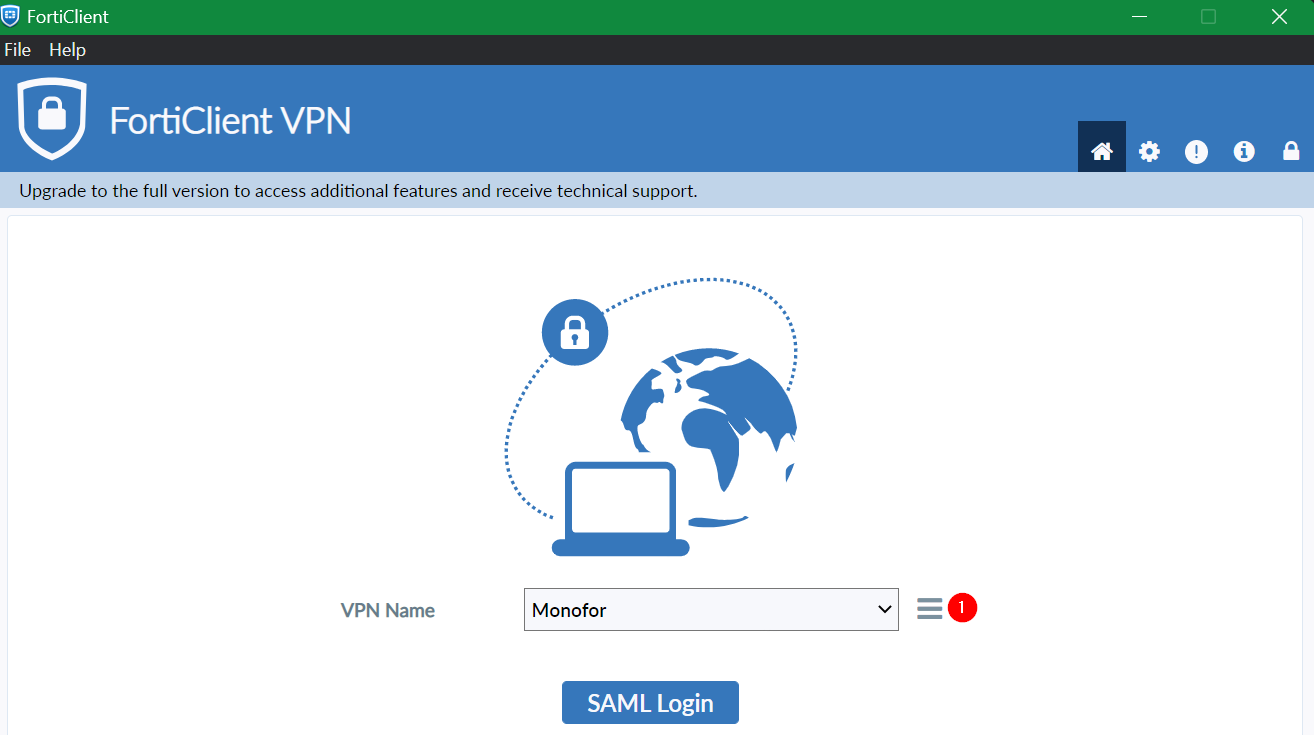
Provide below information in the FortiGate VPN Client than click Save.
|
Property |
Value |
|---|---|
|
Connection Name |
Name of the Connection |
|
Remote Gateway |
Virtual-host or SSL-VPN address with realm Portal Address : 192.168.1.1:443/monofor OR Virtual-Host : |
|
Customize Port(Optional) |
If configured different port then 443 |
|
Enable Single Sign On (SSO) for VPN Tunnel |
Required |
|
Use external browser as user-agent for saml user authentication(Optional) |
This is optional. |
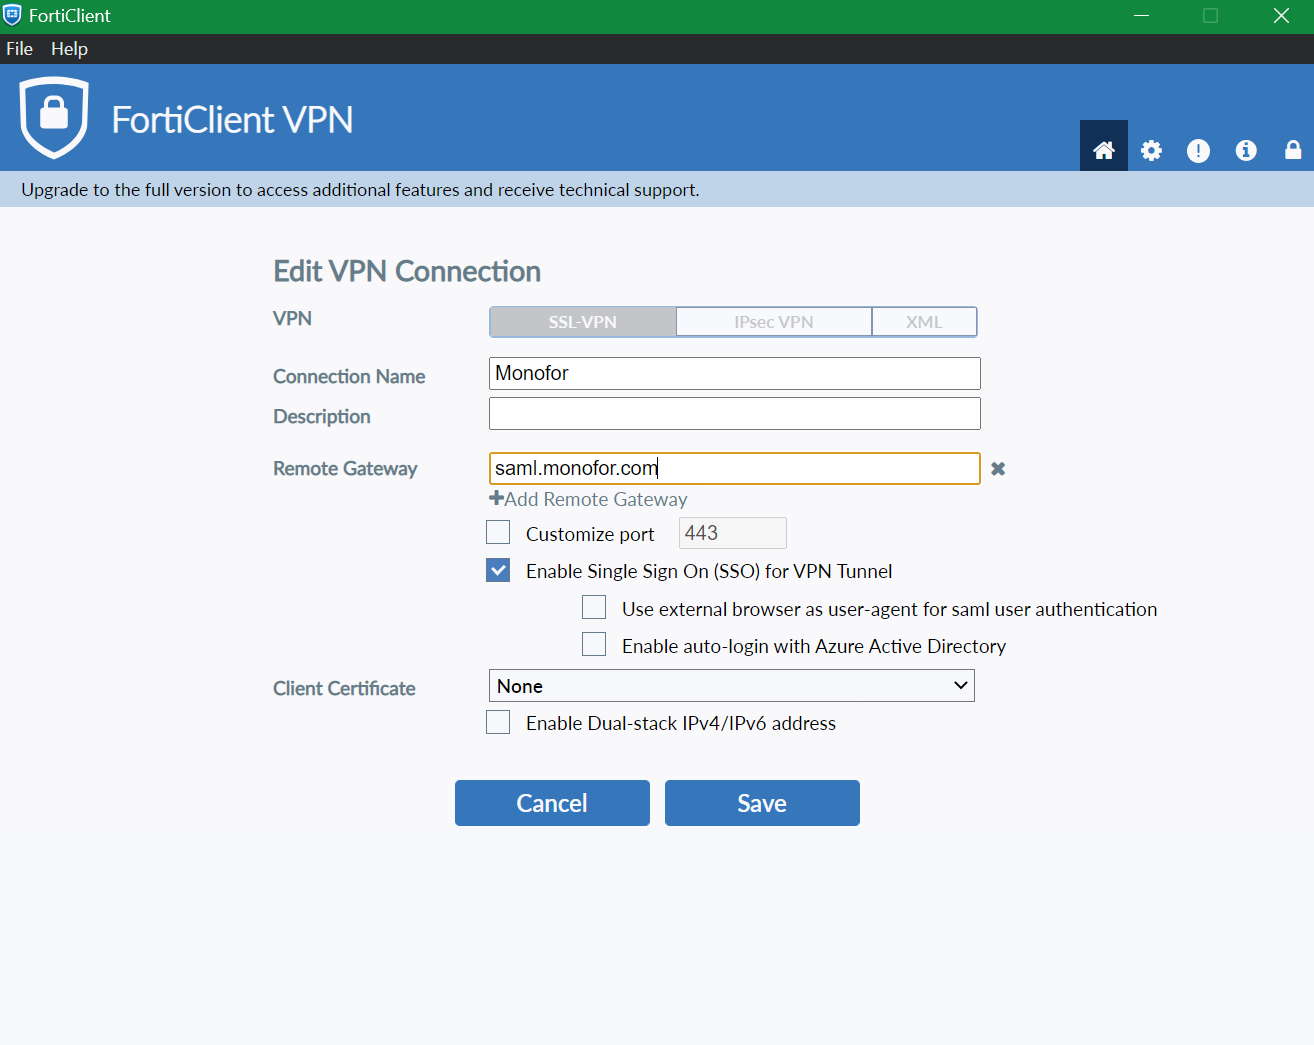
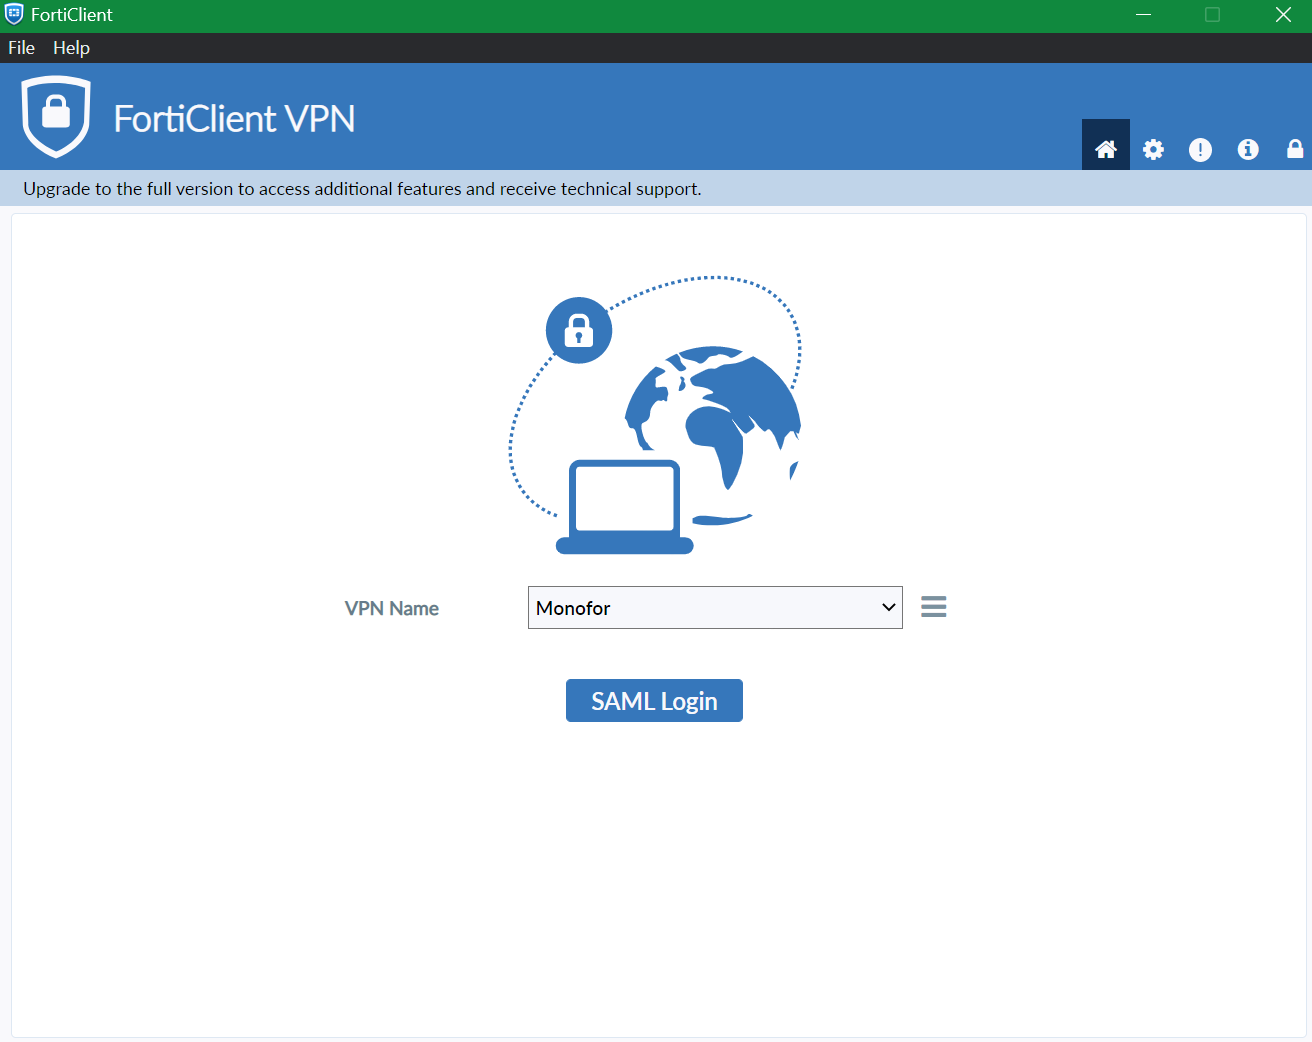
Now it can be try by clicking SAML Login on FortiGate VPN Client.
It will open in-place browse to login on Monosign
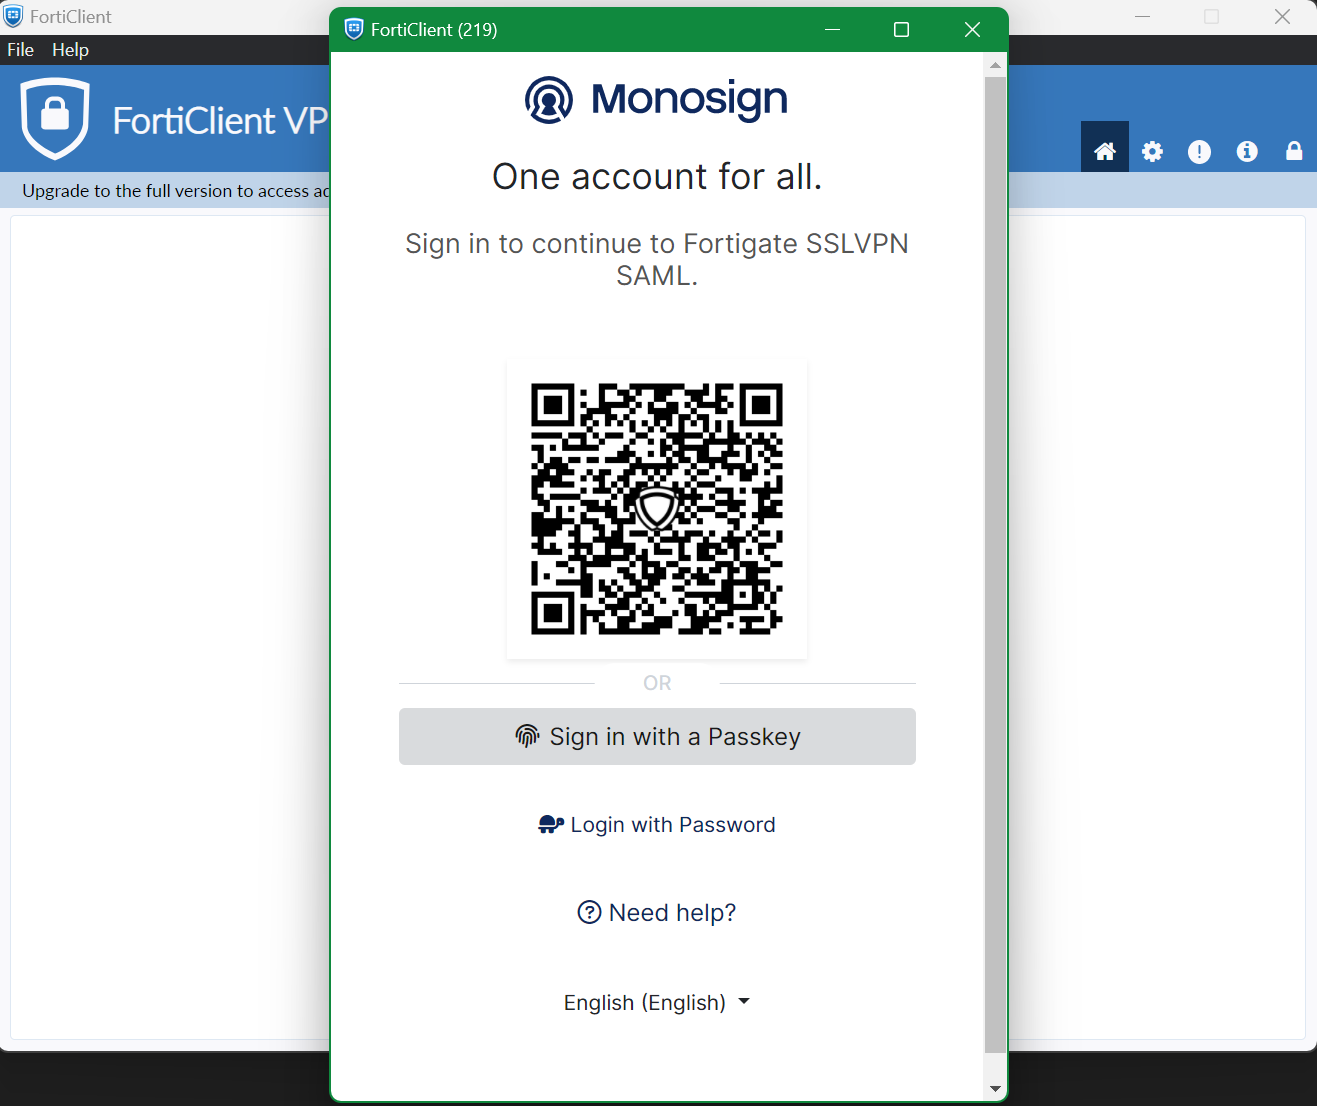
It can be login with Passwordless login(Monofor Identity), Passkey or Username and Password(Login with Password)
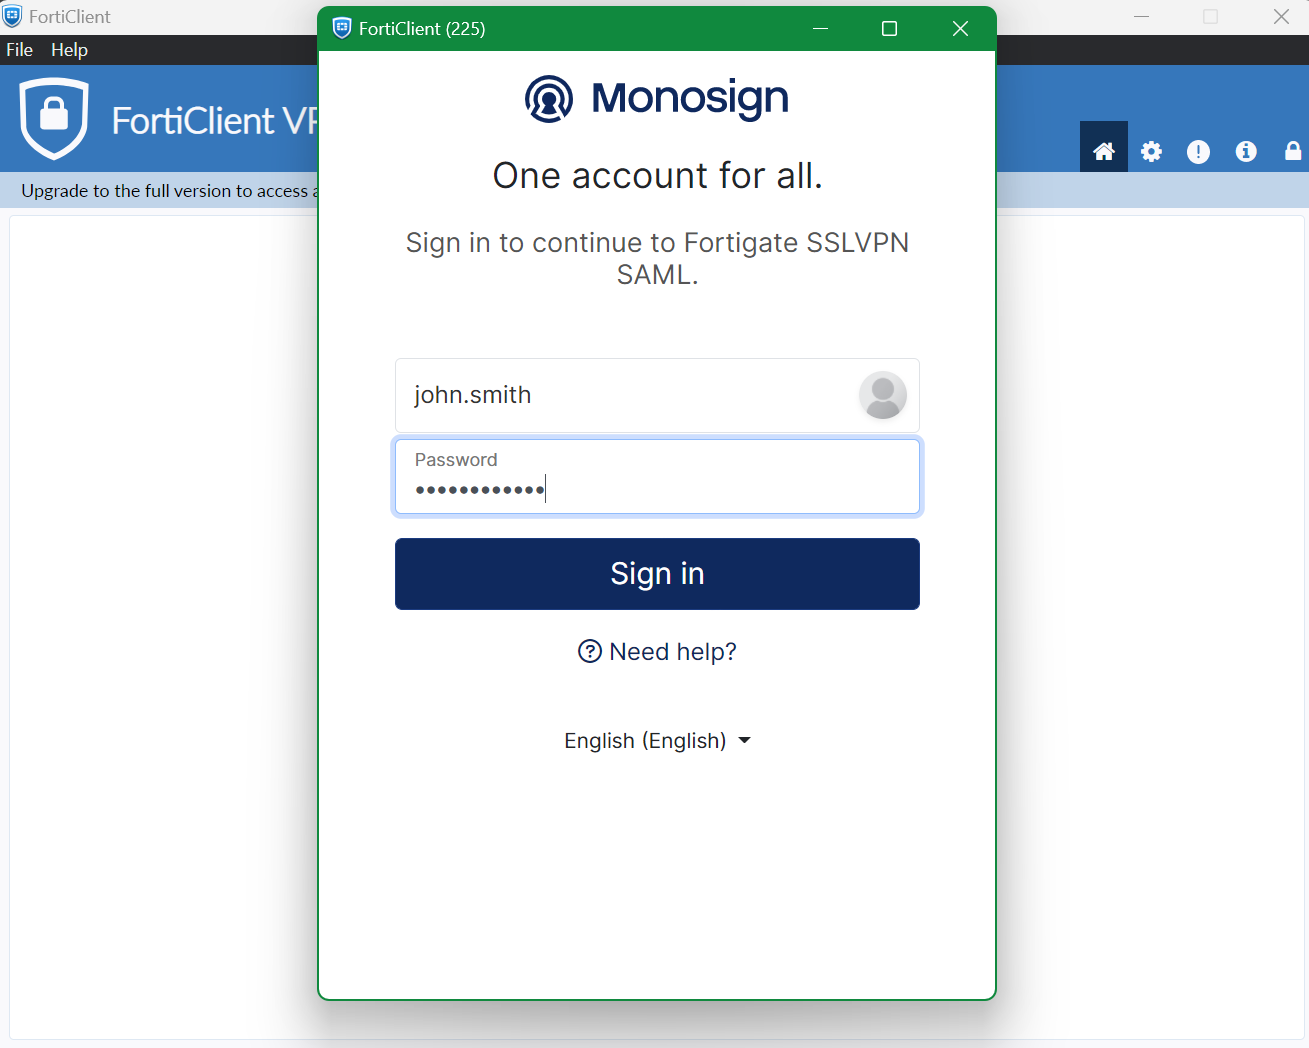
Click sign in and FortiGate VPN client will connect your device to SSL-VPN