
The Tenants page lists every tenant of the installation and creates new ones. For each tenant you choose where its data lives, which addresses open it and whether it has its own sign-in.
|
Applies to |
Who can do this |
|---|---|
|
Monopam v2026.10 |
Super administrators of the default tenant, on an installation started with |
Before you begin
-
For a tenant with a new database: the installation's database login must be allowed to create databases (PostgreSQL
CREATEDBor superuser; SQL ServerCREATE ANY DATABASE). Otherwise create an empty database beforehand and use Custom connection string. -
A DNS name for the tenant that reaches the installation, with a certificate on your reverse proxy or load balancer. The proxy must pass the original
Hostheader andX-Forwarded-Proto: https.
The tenant list
Open System → Tenants. New Tenant (1) creates a tenant on this installation, New Remote Tenant (2) registers a customer-hosted installation. The Database column (3) shows where each tenant's data lives: Shared, Dedicated with host:port/database, or Remote (its own installation).
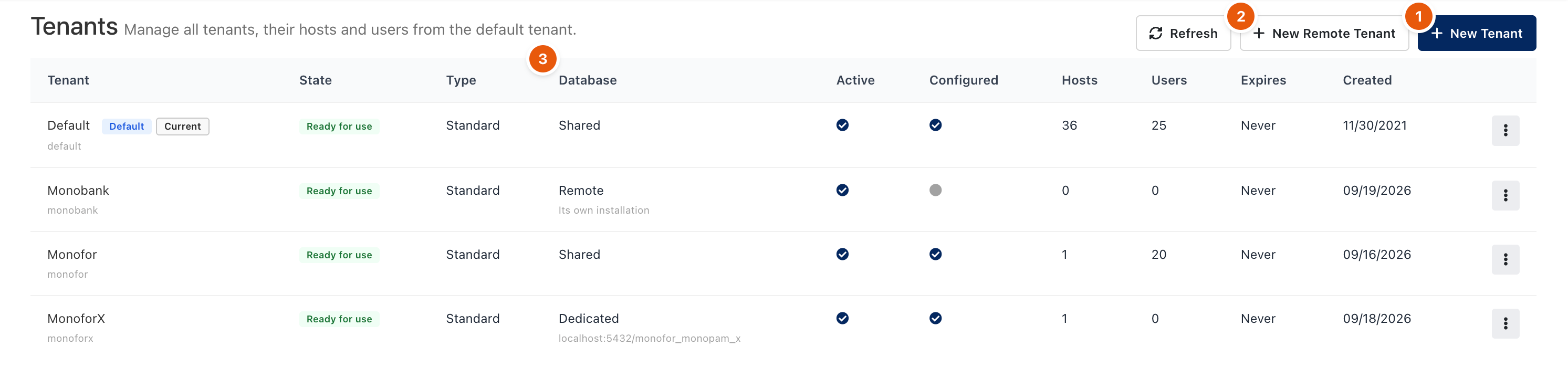
Figure 1. System → Tenants.
Create a tenant
-
Click New Tenant. Enter the Title; the Name is derived from it and cannot be changed later. Choose Type (Standard or Trial) and an expiry, or keep Never expires.
-
Under Host, enter the bare host name (no
https://, port or path), the port and the scheme. More addresses can be added later on the tenant's Hosts tab. -
Under Database (1), choose where the tenant's data lives:
-
Shared: the installation database: the tenant's data sits with the other tenants.
-
New database on the installation's server: Monopam creates the database with the installation's login and applies every migration before the tenant is saved. Names are 1 to 63 letters, digits, underscores or dashes.
-
Custom connection string: a database you created beforehand, of the same type as the installation. The connection string is stored encrypted with the installation's vault key and is never shown again.
Test Connection (2) checks that the server answers, whether the database exists and whether the login may create it.
-
-
Under Settings, keep Copy authentication, MonoSign API and storage settings from the default tenant to use the same identity provider as the main tenant, or turn it off to enter the tenant's own Monosign connection.
-
Choose the Sign-in Policy (3). Automatic becomes Delegated only when the settings are copied and Local and delegated otherwise. Delegated only means nobody signs in on the tenant's address except provider staff with a grant; Local and delegated keeps the tenant's own sign-in as well.
-
Keep Run the seed right after creation (4) on and click Create. Creating a tenant with a new database takes as long as its migrations, usually tens of seconds.
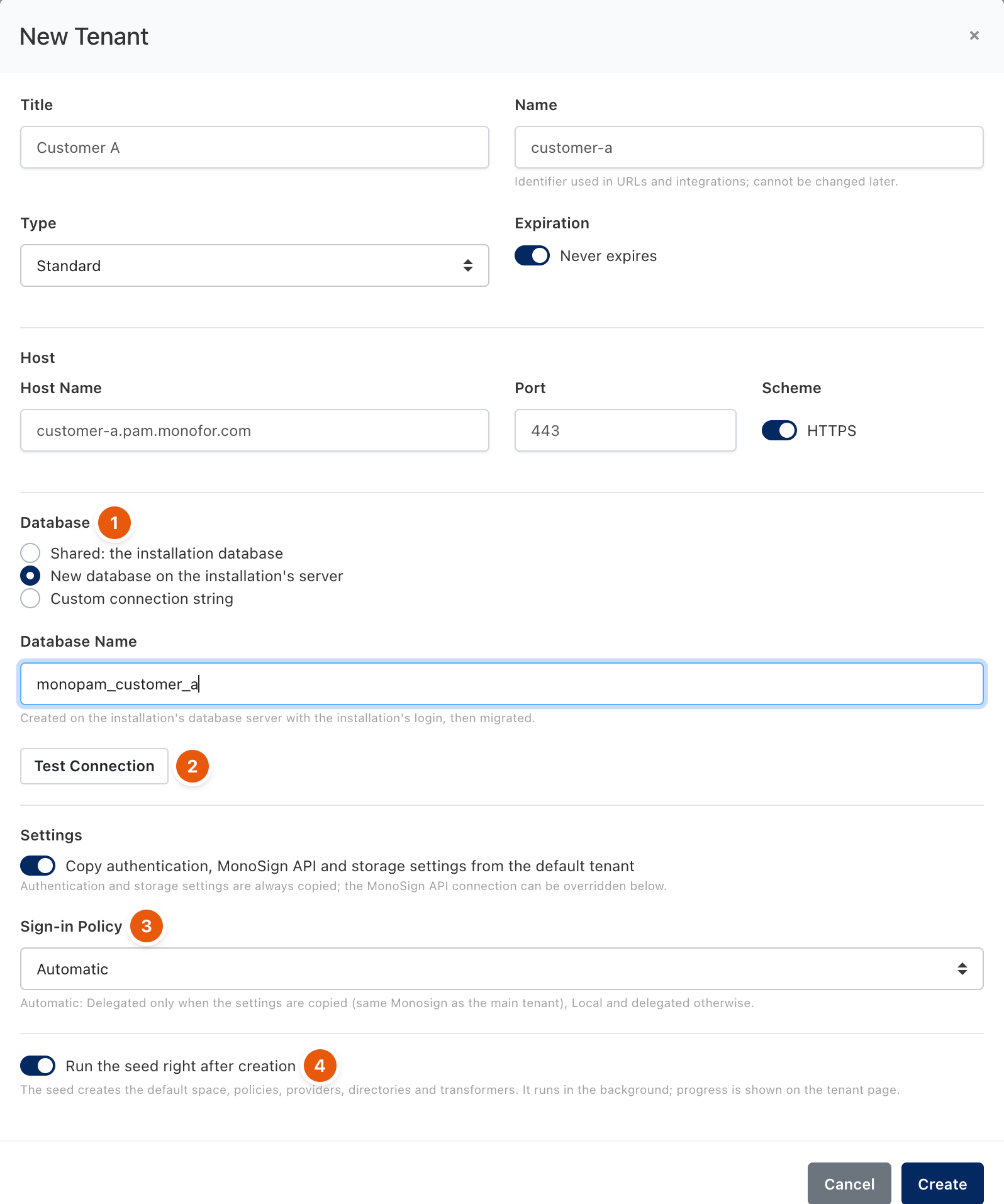
Figure 2. A tenant with its own database.
Follow the setup (seed)
The tenant page's Overview shows the seed in nine steps: default settings and resource types, the default space and space access policy, policy schema upgrades, directories and cloud providers, the default password policy, directories and transformers. When all nine are Completed the state is Ready for use. A failed step shows its error; Run Seed runs the steps again and keeps existing data.
Hosts, users and sign-in
-
Hosts: add, edit or remove the addresses that open the tenant. A host (name and port) belongs to exactly one tenant.
-
Users: search the tenant's users, activate or deactivate them. Deactivating a user ends the user's live connections.
-
Edit: change the title, type, expiry and sign-in policy. Switching an existing tenant to Delegated only stops every local sign-in on it at once.
-
The main tenant's own addresses can also be given at start-up:
MONOPAM_TENANT_HOSTS=https://pam.example.com,https://pam2.example.comadds them as hosts of the default tenant. A new installation knows onlylocalhost:4070andlocalhost:4470.
Operating dedicated databases
-
Back up every dedicated database separately; the installation database holds only the tenant record and its hosts.
-
A dedicated database that does not answer shows Unreachable. Only that tenant is affected; its scheduled work is retried on the next run.
-
Rotating the vault key: run the re-encryption before removing the old key, or the tenant's connection string becomes unreadable.
-
A tenant cannot be moved between the installation database and a dedicated database, and its connection string cannot be changed after creation.
-
Before going back to a release earlier than v2026.09, make sure every tenant is Shared: earlier releases ignore dedicated databases.
Troubleshooting
|
What you see |
Why |
What to do |
|---|---|---|
|
Every page answers Page not found on the new address. |
The address is not a host of any tenant, or the proxy does not pass the original Host header. |
Add the host on the tenant's Hosts tab (or |
|
The tenant database could not be prepared |
The login cannot create databases, or the server is unreachable. |
Use Test Connection; create the database beforehand and choose Custom connection string. |
|
The tenant stays in Waiting for Seed. |
It was created without the seed, or a step failed. |
Open Overview and click Run Seed. |
|
The new tenant's address shows that only delegated access is allowed. |
The sign-in policy is Delegated only. |
Grant provider access, or change the policy with Edit. |
|
Host name must be a bare host name without scheme, port or path. |
A scheme, port or path was typed into Host Name. |
Enter only the name; put the port in Port. |
Related
-
Service Provider Guide
-
Remote tenants
-
Provider access
-
Multi-server deployment and tenant isolation